Page is loading ...


i
Reference Manual
00809-0200-4101, Rev BA
Title Page
October 2014
Title Page
Rosemount 2051 Pressure
Transmitter
Read this manual before working with the product. For personal and system safety, and for
optimum product performance, make sure you thoroughly understand the contents
before installing, using, or maintaining this product.
For technical assistance, contacts are listed below:
Customer Central
Technical support, quoting, and order-related questions.
United States - 1-800-999-9307 (7:00 am to 7:00 pm CST)
Asia Pacific- 65 777 8211
Europe/ Middle East/ Africa - 49 (8153) 9390
North American Response Center
Equipment service needs.
1-800-654-7768 (24 hours—includes Canada)
Outside of these areas, contact your local Emerson Process Management representative.
The products described in this document are NOT designed for nuclear-qualified
applications. Using non-nuclear qualified products in applications that require
nuclear-qualified hardware or products may cause inaccurate readings.
For information on Rosemount nuclear-qualified products, contact your local Emerson
Process Management Sales Representative.


iii
Reference Manual
00809-0200-4101, Rev BA
Table of Contents
October 2014
Table of Contents
1Section 1: Introduction
1.1 Overview . . . . . . . . . . . . . . . . . . . . . . . . . . . . . . . . . . . . . . . . . . . . . . . . . . . . . . . . . . . . . .1
1.2 Using this manual. . . . . . . . . . . . . . . . . . . . . . . . . . . . . . . . . . . . . . . . . . . . . . . . . . . . . . .1
1.3 Models covered . . . . . . . . . . . . . . . . . . . . . . . . . . . . . . . . . . . . . . . . . . . . . . . . . . . . . . . .1
1.4 Foundation fieldbus installation flowchart . . . . . . . . . . . . . . . . . . . . . . . . . . . . . . . . .2
1.5 Transmitter overview . . . . . . . . . . . . . . . . . . . . . . . . . . . . . . . . . . . . . . . . . . . . . . . . . . .2
1.6 Service support. . . . . . . . . . . . . . . . . . . . . . . . . . . . . . . . . . . . . . . . . . . . . . . . . . . . . . . . .3
1.7 Host files . . . . . . . . . . . . . . . . . . . . . . . . . . . . . . . . . . . . . . . . . . . . . . . . . . . . . . . . . . . . . .4
1.8 Product recycling/disposal . . . . . . . . . . . . . . . . . . . . . . . . . . . . . . . . . . . . . . . . . . . . . . .4
2Section 2: Configuration
2.1 Configuration overview. . . . . . . . . . . . . . . . . . . . . . . . . . . . . . . . . . . . . . . . . . . . . . . . . .5
2.1.1 DD and DTM™ based interfaces. . . . . . . . . . . . . . . . . . . . . . . . . . . . . . . . . . . . .5
2.1.2 The device menu tree . . . . . . . . . . . . . . . . . . . . . . . . . . . . . . . . . . . . . . . . . . . . .5
2.1.3 Basic organization. . . . . . . . . . . . . . . . . . . . . . . . . . . . . . . . . . . . . . . . . . . . . . . . .5
2.1.4 The Home Screen . . . . . . . . . . . . . . . . . . . . . . . . . . . . . . . . . . . . . . . . . . . . . . . . .6
2.1.5 Overview . . . . . . . . . . . . . . . . . . . . . . . . . . . . . . . . . . . . . . . . . . . . . . . . . . . . . . . .7
2.1.6 Configure . . . . . . . . . . . . . . . . . . . . . . . . . . . . . . . . . . . . . . . . . . . . . . . . . . . . . . . .7
2.1.7 Service Tools . . . . . . . . . . . . . . . . . . . . . . . . . . . . . . . . . . . . . . . . . . . . . . . . . . . . .9
2.1.8 Navigation . . . . . . . . . . . . . . . . . . . . . . . . . . . . . . . . . . . . . . . . . . . . . . . . . . . . . .11
2.1.9 Classic View . . . . . . . . . . . . . . . . . . . . . . . . . . . . . . . . . . . . . . . . . . . . . . . . . . . . .12
2.2 Safety messages. . . . . . . . . . . . . . . . . . . . . . . . . . . . . . . . . . . . . . . . . . . . . . . . . . . . . . .13
2.2.1 Confirm correct device driver. . . . . . . . . . . . . . . . . . . . . . . . . . . . . . . . . . . . . .13
2.3 Device capabilities . . . . . . . . . . . . . . . . . . . . . . . . . . . . . . . . . . . . . . . . . . . . . . . . . . . . .14
2.3.1 Link active scheduler . . . . . . . . . . . . . . . . . . . . . . . . . . . . . . . . . . . . . . . . . . . . .14
2.3.2 Capabilities. . . . . . . . . . . . . . . . . . . . . . . . . . . . . . . . . . . . . . . . . . . . . . . . . . . . . .14
2.4 Node address . . . . . . . . . . . . . . . . . . . . . . . . . . . . . . . . . . . . . . . . . . . . . . . . . . . . . . . . .15
2.5 General block information . . . . . . . . . . . . . . . . . . . . . . . . . . . . . . . . . . . . . . . . . . . . . .15
2.5.1 Foundation fieldbus function blocks. . . . . . . . . . . . . . . . . . . . . . . . . . . . . . . .15
2.5.2 Modes . . . . . . . . . . . . . . . . . . . . . . . . . . . . . . . . . . . . . . . . . . . . . . . . . . . . . . . . . .17
2.5.3 Block instantiation . . . . . . . . . . . . . . . . . . . . . . . . . . . . . . . . . . . . . . . . . . . . . . .18
2.5.4 Simulation . . . . . . . . . . . . . . . . . . . . . . . . . . . . . . . . . . . . . . . . . . . . . . . . . . . . . .18
2.6 Resource block . . . . . . . . . . . . . . . . . . . . . . . . . . . . . . . . . . . . . . . . . . . . . . . . . . . . . . . .19
2.6.1 FEATURES and FEATURES_SEL . . . . . . . . . . . . . . . . . . . . . . . . . . . . . . . . . . . . .19
2.6.2 MAX_NOTIFY. . . . . . . . . . . . . . . . . . . . . . . . . . . . . . . . . . . . . . . . . . . . . . . . . . . .20
2.6.3 Alerts/alarms . . . . . . . . . . . . . . . . . . . . . . . . . . . . . . . . . . . . . . . . . . . . . . . . . . . .20
2.6.4 PlantWeb alerts overview . . . . . . . . . . . . . . . . . . . . . . . . . . . . . . . . . . . . . . . . .24

iv
Reference Manual
00809-0200-4101, Rev BA
Table of Contents
October 2014
Table of Contents
2.7 Basic device setup . . . . . . . . . . . . . . . . . . . . . . . . . . . . . . . . . . . . . . . . . . . . . . . . . . . . .25
2.7.1 Configure . . . . . . . . . . . . . . . . . . . . . . . . . . . . . . . . . . . . . . . . . . . . . . . . . . . . . . .26
2.8 Analog Input (AI) function block . . . . . . . . . . . . . . . . . . . . . . . . . . . . . . . . . . . . . . . . .30
2.8.1 Configure the AI block . . . . . . . . . . . . . . . . . . . . . . . . . . . . . . . . . . . . . . . . . . . .30
2.9 Advanced device setup . . . . . . . . . . . . . . . . . . . . . . . . . . . . . . . . . . . . . . . . . . . . . . . . .37
2.9.1 Overall configuration . . . . . . . . . . . . . . . . . . . . . . . . . . . . . . . . . . . . . . . . . . . . .37
2.9.2 Damping. . . . . . . . . . . . . . . . . . . . . . . . . . . . . . . . . . . . . . . . . . . . . . . . . . . . . . . .38
2.9.3 Gauge scaling . . . . . . . . . . . . . . . . . . . . . . . . . . . . . . . . . . . . . . . . . . . . . . . . . . .39
2.9.4 Local display (LCD display) . . . . . . . . . . . . . . . . . . . . . . . . . . . . . . . . . . . . . . . .39
2.9.5 Mode . . . . . . . . . . . . . . . . . . . . . . . . . . . . . . . . . . . . . . . . . . . . . . . . . . . . . . . . . . .41
2.9.6 Alert configuration NE107 and PlantWeb . . . . . . . . . . . . . . . . . . . . . . . . . . .42
2.9.7 Alert simulation. . . . . . . . . . . . . . . . . . . . . . . . . . . . . . . . . . . . . . . . . . . . . . . . . .44
2.9.8 Write lock . . . . . . . . . . . . . . . . . . . . . . . . . . . . . . . . . . . . . . . . . . . . . . . . . . . . . . .45
3Section 3: Hardware Installation
3.1 Overview . . . . . . . . . . . . . . . . . . . . . . . . . . . . . . . . . . . . . . . . . . . . . . . . . . . . . . . . . . . . .47
3.2 Safety messages. . . . . . . . . . . . . . . . . . . . . . . . . . . . . . . . . . . . . . . . . . . . . . . . . . . . . . .47
3.2.1 Warnings . . . . . . . . . . . . . . . . . . . . . . . . . . . . . . . . . . . . . . . . . . . . . . . . . . . . . . .48
3.3 Considerations . . . . . . . . . . . . . . . . . . . . . . . . . . . . . . . . . . . . . . . . . . . . . . . . . . . . . . . .48
3.4 Mechanical considerations. . . . . . . . . . . . . . . . . . . . . . . . . . . . . . . . . . . . . . . . . . . . . .49
3.5 Environmental considerations . . . . . . . . . . . . . . . . . . . . . . . . . . . . . . . . . . . . . . . . . . .49
3.6 Tagging . . . . . . . . . . . . . . . . . . . . . . . . . . . . . . . . . . . . . . . . . . . . . . . . . . . . . . . . . . . . . .49
3.6.1 Commissioning tag . . . . . . . . . . . . . . . . . . . . . . . . . . . . . . . . . . . . . . . . . . . . . .49
3.6.2 Transmitter tag . . . . . . . . . . . . . . . . . . . . . . . . . . . . . . . . . . . . . . . . . . . . . . . . . .50
3.7 Installation procedures . . . . . . . . . . . . . . . . . . . . . . . . . . . . . . . . . . . . . . . . . . . . . . . . .50
3.7.1 Mount the transmitter . . . . . . . . . . . . . . . . . . . . . . . . . . . . . . . . . . . . . . . . . . . .50
3.7.2 Impulse piping. . . . . . . . . . . . . . . . . . . . . . . . . . . . . . . . . . . . . . . . . . . . . . . . . . .55
3.7.3 Process connections. . . . . . . . . . . . . . . . . . . . . . . . . . . . . . . . . . . . . . . . . . . . . .56
3.7.4 Housing rotation. . . . . . . . . . . . . . . . . . . . . . . . . . . . . . . . . . . . . . . . . . . . . . . . .58
3.8 Hazardous locations certifications . . . . . . . . . . . . . . . . . . . . . . . . . . . . . . . . . . . . . . .58
3.9 Rosemount 305, 306, and 304 Manifolds . . . . . . . . . . . . . . . . . . . . . . . . . . . . . . . . .59
3.9.1 Rosemount 305 Integral Manifold installation procedure . . . . . . . . . . . . .60
3.9.2 Rosemount 306 Integral Manifold installation procedure . . . . . . . . . . . . .60
3.9.3 Rosemount 304 Conventional Manifold installation procedure . . . . . . . .60
3.9.4 Integral manifold operation . . . . . . . . . . . . . . . . . . . . . . . . . . . . . . . . . . . . . . .61
3.10 Liquid level measurement. . . . . . . . . . . . . . . . . . . . . . . . . . . . . . . . . . . . . . . . . . . . . .63
3.10.1 Open vessels. . . . . . . . . . . . . . . . . . . . . . . . . . . . . . . . . . . . . . . . . . . . . . . . . . . .63
3.10.2 Closed vessels. . . . . . . . . . . . . . . . . . . . . . . . . . . . . . . . . . . . . . . . . . . . . . . . . . .63

v
Reference Manual
00809-0200-4101, Rev BA
Table of Contents
October 2014
Table of Contents
4Section 4: Electrical Installation
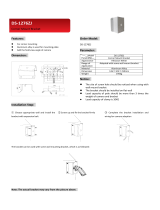
4.1 Overview . . . . . . . . . . . . . . . . . . . . . . . . . . . . . . . . . . . . . . . . . . . . . . . . . . . . . . . . . . . . .67
4.2 Safety messages. . . . . . . . . . . . . . . . . . . . . . . . . . . . . . . . . . . . . . . . . . . . . . . . . . . . . . .67
4.3 LCD display . . . . . . . . . . . . . . . . . . . . . . . . . . . . . . . . . . . . . . . . . . . . . . . . . . . . . . . . . . .68
4.3.1 Rotating LCD display . . . . . . . . . . . . . . . . . . . . . . . . . . . . . . . . . . . . . . . . . . . . .68
4.4 Configuring transmitter security and simulation . . . . . . . . . . . . . . . . . . . . . . . . . . .69
4.4.1 Setting security switch. . . . . . . . . . . . . . . . . . . . . . . . . . . . . . . . . . . . . . . . . . . .69
4.4.2 Setting simulate switch . . . . . . . . . . . . . . . . . . . . . . . . . . . . . . . . . . . . . . . . . . .70
4.5 Electrical considerations . . . . . . . . . . . . . . . . . . . . . . . . . . . . . . . . . . . . . . . . . . . . . . . .70
4.5.1 Conduit installation . . . . . . . . . . . . . . . . . . . . . . . . . . . . . . . . . . . . . . . . . . . . . .70
4.5.2 Power supply for Foundation fieldbus. . . . . . . . . . . . . . . . . . . . . . . . . . . . . . .71
4.6 Wiring. . . . . . . . . . . . . . . . . . . . . . . . . . . . . . . . . . . . . . . . . . . . . . . . . . . . . . . . . . . . . . . .71
4.6.1 Transmitter wiring . . . . . . . . . . . . . . . . . . . . . . . . . . . . . . . . . . . . . . . . . . . . . . .71
4.6.2 Grounding the transmitter . . . . . . . . . . . . . . . . . . . . . . . . . . . . . . . . . . . . . . . .72
5Section 5: Operation and Maintenance
5.1 Overview . . . . . . . . . . . . . . . . . . . . . . . . . . . . . . . . . . . . . . . . . . . . . . . . . . . . . . . . . . . . .75
5.1.1 Methods and manual operation. . . . . . . . . . . . . . . . . . . . . . . . . . . . . . . . . . . .75
5.2 Safety messages. . . . . . . . . . . . . . . . . . . . . . . . . . . . . . . . . . . . . . . . . . . . . . . . . . . . . . .75
5.2.1 Warnings . . . . . . . . . . . . . . . . . . . . . . . . . . . . . . . . . . . . . . . . . . . . . . . . . . . . . . .76
5.3 Calibration overview . . . . . . . . . . . . . . . . . . . . . . . . . . . . . . . . . . . . . . . . . . . . . . . . . . .76
5.3.1 Determining necessary sensor trims. . . . . . . . . . . . . . . . . . . . . . . . . . . . . . . .77
5.3.2 Determining calibration frequency . . . . . . . . . . . . . . . . . . . . . . . . . . . . . . . . .77
5.3.3 Compensating for span line pressure effects
(range 4 and range 5). . . . . . . . . . . . . . . . . . . . . . . . . . . . . . . . . . . . . . . . . . . . .78
5.4 Trim the pressure signal . . . . . . . . . . . . . . . . . . . . . . . . . . . . . . . . . . . . . . . . . . . . . . . .80
5.4.1 Sensor trim overview . . . . . . . . . . . . . . . . . . . . . . . . . . . . . . . . . . . . . . . . . . . . .80
5.4.2 Perform a calibration or sensor trim . . . . . . . . . . . . . . . . . . . . . . . . . . . . . . . .81
5.5 Status . . . . . . . . . . . . . . . . . . . . . . . . . . . . . . . . . . . . . . . . . . . . . . . . . . . . . . . . . . . . . . . .82
5.6 Master reset method. . . . . . . . . . . . . . . . . . . . . . . . . . . . . . . . . . . . . . . . . . . . . . . . . . .83
5.6.1 Resource block . . . . . . . . . . . . . . . . . . . . . . . . . . . . . . . . . . . . . . . . . . . . . . . . . .83
5.7 Simulation . . . . . . . . . . . . . . . . . . . . . . . . . . . . . . . . . . . . . . . . . . . . . . . . . . . . . . . . . . . .84
5.7.1 Manual mode. . . . . . . . . . . . . . . . . . . . . . . . . . . . . . . . . . . . . . . . . . . . . . . . . . . .84
5.7.2 Simulate . . . . . . . . . . . . . . . . . . . . . . . . . . . . . . . . . . . . . . . . . . . . . . . . . . . . . . . .84

vi
Reference Manual
00809-0200-4101, Rev BA
Table of Contents
October 2014
Table of Contents
6Section 6: Troubleshooting
6.1 Overview . . . . . . . . . . . . . . . . . . . . . . . . . . . . . . . . . . . . . . . . . . . . . . . . . . . . . . . . . . . . .85
6.2 Safety messages. . . . . . . . . . . . . . . . . . . . . . . . . . . . . . . . . . . . . . . . . . . . . . . . . . . . . . .85
6.2.1 Warnings . . . . . . . . . . . . . . . . . . . . . . . . . . . . . . . . . . . . . . . . . . . . . . . . . . . . . . .86
6.3 Disassembly procedures. . . . . . . . . . . . . . . . . . . . . . . . . . . . . . . . . . . . . . . . . . . . . . . .86
6.3.1 Removing from service . . . . . . . . . . . . . . . . . . . . . . . . . . . . . . . . . . . . . . . . . . .86
6.3.2 Removing terminal block . . . . . . . . . . . . . . . . . . . . . . . . . . . . . . . . . . . . . . . . .87
6.3.3 Removing electronics board. . . . . . . . . . . . . . . . . . . . . . . . . . . . . . . . . . . . . . .87
6.3.4 Removing sensor module from the electronics housing. . . . . . . . . . . . . . .88
6.4 Reassembly procedures . . . . . . . . . . . . . . . . . . . . . . . . . . . . . . . . . . . . . . . . . . . . . . . .88
6.4.1 Attaching electronics board . . . . . . . . . . . . . . . . . . . . . . . . . . . . . . . . . . . . . . .89
6.4.2 Installing terminal block . . . . . . . . . . . . . . . . . . . . . . . . . . . . . . . . . . . . . . . . . .89
6.4.3 Reassembling the 2051C process flange . . . . . . . . . . . . . . . . . . . . . . . . . . . .89
6.4.4 Installing drain/vent valve . . . . . . . . . . . . . . . . . . . . . . . . . . . . . . . . . . . . . . . . .90
6.5 Troubleshooting guides . . . . . . . . . . . . . . . . . . . . . . . . . . . . . . . . . . . . . . . . . . . . . . . .91
6.6 Troubleshooting and diagnostic messages. . . . . . . . . . . . . . . . . . . . . . . . . . . . . . . .93
6.7 Analog Input (AI) function block . . . . . . . . . . . . . . . . . . . . . . . . . . . . . . . . . . . . . . . . .94
AAppendix A: Specifications and Reference Data
A.1 Resource block . . . . . . . . . . . . . . . . . . . . . . . . . . . . . . . . . . . . . . . . . . . . . . . . . . . . . . . .97
A.1.1 Definition . . . . . . . . . . . . . . . . . . . . . . . . . . . . . . . . . . . . . . . . . . . . . . . . . . . . . . .97
A.2 Sensor transducer block . . . . . . . . . . . . . . . . . . . . . . . . . . . . . . . . . . . . . . . . . . . . . . 106
A.3 Analog input (AI) function block . . . . . . . . . . . . . . . . . . . . . . . . . . . . . . . . . . . . . . . 111
A.3.1 AI parameter table . . . . . . . . . . . . . . . . . . . . . . . . . . . . . . . . . . . . . . . . . . . . . 111
A.4 LCD display transducer block. . . . . . . . . . . . . . . . . . . . . . . . . . . . . . . . . . . . . . . . . . 115
A.5 Performance specifications . . . . . . . . . . . . . . . . . . . . . . . . . . . . . . . . . . . . . . . . . . . 120
A.5.1 Conformance to specification (±3s [Sigma]). . . . . . . . . . . . . . . . . . . . . . . 120
A.5.2 Reference accuracy . . . . . . . . . . . . . . . . . . . . . . . . . . . . . . . . . . . . . . . . . . . . 120
A.6 Functional specifications . . . . . . . . . . . . . . . . . . . . . . . . . . . . . . . . . . . . . . . . . . . . . 123
A.6.1 Range and sensor limits. . . . . . . . . . . . . . . . . . . . . . . . . . . . . . . . . . . . . . . . . 123
A.6.2 Service. . . . . . . . . . . . . . . . . . . . . . . . . . . . . . . . . . . . . . . . . . . . . . . . . . . . . . . . 124
A.6.3 Protocols . . . . . . . . . . . . . . . . . . . . . . . . . . . . . . . . . . . . . . . . . . . . . . . . . . . . . 124
A.6.4 Foundation fieldbus (Output code F) . . . . . . . . . . . . . . . . . . . . . . . . . . . . . 125
A.6.5 Backup Link Active Scheduler (LAS). . . . . . . . . . . . . . . . . . . . . . . . . . . . . . . 126
A.6.6 Standard function blocks. . . . . . . . . . . . . . . . . . . . . . . . . . . . . . . . . . . . . . . . 126
A.6.7 PROFIBUS PA (Output Code W) . . . . . . . . . . . . . . . . . . . . . . . . . . . . . . . . . . 127
A.6.8 Wireless (Output Code X) . . . . . . . . . . . . . . . . . . . . . . . . . . . . . . . . . . . . . . . 128
A.6.9 HART 1-5 Vdc Low Power (Output Code M). . . . . . . . . . . . . . . . . . . . . . . . 129

vii
Reference Manual
00809-0200-4101, Rev BA
Table of Contents
October 2014
Table of Contents
A.6.10 Overpressure limits. . . . . . . . . . . . . . . . . . . . . . . . . . . . . . . . . . . . . . . . . . . . 130
A.6.11 Static pressure limit . . . . . . . . . . . . . . . . . . . . . . . . . . . . . . . . . . . . . . . . . . . 131
A.6.12 Burst pressure limits . . . . . . . . . . . . . . . . . . . . . . . . . . . . . . . . . . . . . . . . . . . 131
A.6.13 Temperature limits . . . . . . . . . . . . . . . . . . . . . . . . . . . . . . . . . . . . . . . . . . . . 131
A.6.14 Humidity limits . . . . . . . . . . . . . . . . . . . . . . . . . . . . . . . . . . . . . . . . . . . . . . . 132
A.6.15 Turn-on time . . . . . . . . . . . . . . . . . . . . . . . . . . . . . . . . . . . . . . . . . . . . . . . . . 132
A.6.16 Volumetric displacement . . . . . . . . . . . . . . . . . . . . . . . . . . . . . . . . . . . . . . 132
A.6.17 Damping . . . . . . . . . . . . . . . . . . . . . . . . . . . . . . . . . . . . . . . . . . . . . . . . . . . . . 132
A.6.18 Failure mode alarm . . . . . . . . . . . . . . . . . . . . . . . . . . . . . . . . . . . . . . . . . . . . 133
A.7 Physical specifications. . . . . . . . . . . . . . . . . . . . . . . . . . . . . . . . . . . . . . . . . . . . . . . . 133
A.7.1 Material selection . . . . . . . . . . . . . . . . . . . . . . . . . . . . . . . . . . . . . . . . . . . . . . 133
A.7.2 Electrical connections . . . . . . . . . . . . . . . . . . . . . . . . . . . . . . . . . . . . . . . . . . 133
A.7.3 Process connections. . . . . . . . . . . . . . . . . . . . . . . . . . . . . . . . . . . . . . . . . . . . 134
A.7.4 Shipping weights . . . . . . . . . . . . . . . . . . . . . . . . . . . . . . . . . . . . . . . . . . . . . . 136
A.8 Dimensional drawings. . . . . . . . . . . . . . . . . . . . . . . . . . . . . . . . . . . . . . . . . . . . . . . . 138
A.9 Ordering information . . . . . . . . . . . . . . . . . . . . . . . . . . . . . . . . . . . . . . . . . . . . . . . . 152
A.9.1 Rosemount 2051C Coplanar Pressure Transmitter . . . . . . . . . . . . . . . . . 152
A.9.2 Rosemount 2051T In-Line Pressure Transmitter. . . . . . . . . . . . . . . . . . . . 159
A.9.3 Rosemount 2051CF Flowmeters . . . . . . . . . . . . . . . . . . . . . . . . . . . . . . . . . 165
A.10Rosemount 2051L Liquid Level Transmitter. . . . . . . . . . . . . . . . . . . . . . . . . . . . . 181
A.11Options . . . . . . . . . . . . . . . . . . . . . . . . . . . . . . . . . . . . . . . . . . . . . . . . . . . . . . . . . . . . 188
A.11.1 Standard configuration . . . . . . . . . . . . . . . . . . . . . . . . . . . . . . . . . . . . . . . . 188
A.11.2 Custom configuration . . . . . . . . . . . . . . . . . . . . . . . . . . . . . . . . . . . . . . . . . 188
A.11.3 Commissioning tag. . . . . . . . . . . . . . . . . . . . . . . . . . . . . . . . . . . . . . . . . . . . 189
A.11.4 Optional Rosemount 304, 305, or 306 Integral Manifolds . . . . . . . . . . 189
A.11.5 Other seals . . . . . . . . . . . . . . . . . . . . . . . . . . . . . . . . . . . . . . . . . . . . . . . . . . . 189
A.11.6 Output information . . . . . . . . . . . . . . . . . . . . . . . . . . . . . . . . . . . . . . . . . . . 190
A.11.7 Display and Interface Options. . . . . . . . . . . . . . . . . . . . . . . . . . . . . . . . . . . 190
A.11.8 Configuration buttons . . . . . . . . . . . . . . . . . . . . . . . . . . . . . . . . . . . . . . . . . 190
A.11.9 Transient protection. . . . . . . . . . . . . . . . . . . . . . . . . . . . . . . . . . . . . . . . . . . 191
A.11.10 Bolts for flanges and adapters . . . . . . . . . . . . . . . . . . . . . . . . . . . . . . . . . 191
A.11.11 Conduit plug . . . . . . . . . . . . . . . . . . . . . . . . . . . . . . . . . . . . . . . . . . . . . . . . 191
A.11.12 Rosemount 2051C Coplanar Flange and 2051T bracket option . . . . 191
A.11.13 Rosemount 2051C traditional flange bracket options. . . . . . . . . . . . . 191
A.12 Spare parts. . . . . . . . . . . . . . . . . . . . . . . . . . . . . . . . . . . . . . . . . . . . . . . . . . . . . . . . . 193

viii
Reference Manual
00809-0200-4101, Rev BA
Table of Contents
October 2014
Table of Contents
BAppendix B: Product Certifications
B.1 Overview . . . . . . . . . . . . . . . . . . . . . . . . . . . . . . . . . . . . . . . . . . . . . . . . . . . . . . . . . . . 199
B.2 Safety messages. . . . . . . . . . . . . . . . . . . . . . . . . . . . . . . . . . . . . . . . . . . . . . . . . . . . . 199
B.2.1 Warnings . . . . . . . . . . . . . . . . . . . . . . . . . . . . . . . . . . . . . . . . . . . . . . . . . . . . . 199
B.3 Product certifications . . . . . . . . . . . . . . . . . . . . . . . . . . . . . . . . . . . . . . . . . . . . . . . . 200
B.3.1 European Directive Information. . . . . . . . . . . . . . . . . . . . . . . . . . . . . . . . . . 200
B.3.2 Ordinary Location Certification . . . . . . . . . . . . . . . . . . . . . . . . . . . . . . . . . . 200
B.3.3 North America. . . . . . . . . . . . . . . . . . . . . . . . . . . . . . . . . . . . . . . . . . . . . . . . . 200
B.3.4 Europe. . . . . . . . . . . . . . . . . . . . . . . . . . . . . . . . . . . . . . . . . . . . . . . . . . . . . . . . 201
B.3.5 International . . . . . . . . . . . . . . . . . . . . . . . . . . . . . . . . . . . . . . . . . . . . . . . . . . 203
B.3.6 Brazil . . . . . . . . . . . . . . . . . . . . . . . . . . . . . . . . . . . . . . . . . . . . . . . . . . . . . . . . . 205
B.3.7 China . . . . . . . . . . . . . . . . . . . . . . . . . . . . . . . . . . . . . . . . . . . . . . . . . . . . . . . . . 206
B.3.8 Japan . . . . . . . . . . . . . . . . . . . . . . . . . . . . . . . . . . . . . . . . . . . . . . . . . . . . . . . . . 208
B.3.9 Combinations . . . . . . . . . . . . . . . . . . . . . . . . . . . . . . . . . . . . . . . . . . . . . . . . . 208
B.4 Additional Certifications . . . . . . . . . . . . . . . . . . . . . . . . . . . . . . . . . . . . . . . . . . . . . . 208
B.5 Approval drawings . . . . . . . . . . . . . . . . . . . . . . . . . . . . . . . . . . . . . . . . . . . . . . . . . . . 210
B.5.1 Factory mutual 02051-1009. . . . . . . . . . . . . . . . . . . . . . . . . . . . . . . . . . . . . 210
B.5.2 Canadian Standards Association (CSA) 02051-1008 . . . . . . . . . . . . . . . . 223

Reference Manual
00809-0200-4101, Rev BA
Section 1: Introduction
October 2014
1
Introduction
Section 1 Introduction
1.1 Overview
This manual is for the Rosemount
2051 Pressure Transmitter with FOUNDATION
™
fieldbus
communications.
This manual only describes the topics required for installation, operation, configuration, and
troubleshooting the F
OUNDATION fieldbus transmitter.
1.2 Using this manual
The sections in this manual provide information on configuring, installing, operating and
maintaining, troubleshooting, and calibrating 2051 Transmitters specifically for F
OUNDATION
fieldbus protocol.
Section 2: Configuration provides instruction on commissioning and operating 2051
Transmitters. Information on software functions, configuration parameters, and Online
variables is also included.
Section 3: Hardware Installation contains mechanical installation instructions, and field
upgrade options.
Section 4: Electrical Installation contains electrical installation instructions, and field upgrade
options.
Section 5: Operation and Maintenance provides detailed information on calibrating the
transmitter
Section 6: Troubleshooting provides troubleshooting techniques for the most common
operating problems.
Appendix A: Specifications and Reference Data supplies reference and specification data, as well
as ordering information.
Appendix B: Product Certifications contains intrinsic safety approval information, European
ATEX directive information, and approval drawings.
1.3 Models covered
The following 2051 Transmitters are covered by this manual:
Rosemount 2051C Coplanar
™
Pressure Transmitter
– Measures differential and gage pressure up to 2000 psi (137,9 bar).
– Measures absolute pressure up to 4000 psia (275,8 bar).
Rosemount 2051T In-Line Pressure Transmitter
– Measures gage/absolute pressure up to 10000 psi (689,5 bar).
Rosemount 2051L Level Transmitter
– Measures level and specific gravity up to 300 psi (20,7 bar).
Rosemount 2051CF Series Flowmeter
– Measures flow in line sizes from
1
/2-in. (15mm) to 96-in. (2400 mm).

2
Reference Manual
00809-0200-4101, Rev BA
Section 1: Introduction
October 2014
Introduction
1.4 FOUNDATION fieldbus installation flowchart
Figure 1-1. FOUNDATION fieldbus Installation Flowchart
1.5 Transmitter overview
The Rosemount 2051C Coplanar design is offered for Differential Pressure (DP), Gage Pressure
(GP) and Absolute Pressure (AP) measurements. The Rosemount 2051C utilizes capacitance
sensor technology for DP and GP measurements. The Rosemount 2051T and 2051CA utilize
piezoresistive sensor technology for AP and GP measurements.
The major components of the Rosemount 2051 are the sensor module and the electronics
housing. The sensor module contains the oil filled sensor system (isolating diaphragms, oil fill
system, and sensor) and the sensor electronics. The sensor electronics are installed within the
sensor module and include a temperature sensor and a memory module. The electrical signals
from the sensor module are transmitted to the output electronics in the electronics housing.
The electronics housing contains the output electronics board and the terminal block. The basic
block diagram of the Rosemount 2051CD is illustrated in Figure 1-3 on page 3.
For the Rosemount 2051, pressure is applied to the isolating diaphragm(s). The oil deflects the
sensor which then changes its capacitance or voltage signal. This signal is then changed to a
digital signal by the Signal Processing. The microprocessor then takes the signals from the
Signal Processing and calculates the correct output of the transmitter.
An optional 2-line LCD display can be ordered that connects directly to the interface board
which maintains direct access to the signal terminals. The display indicates output and
abbreviated diagnostic messages. A glass display cover is provided. The first line of eight
characters displays the actual measured value, the second line of six characters displays the
engineering units. The LCD display can also display diagnostic messages.
Start
1. Transmitter
installation
2.
Commissioning
tag
Done
Locate device
7. Zero trim the
transmitter
(Section 5.4)
3. Housing
rotation
5. Grounding,
6. Configuration
(Section 2.1)
wiring and
power up
(Section 4.6)
4. Set switches
and software
write lock
(Section 4.4)
(Section 3.7.4)
(Section 3.6)
(Section 3.7)

3
Reference Manual
00809-0200-4101, Rev BA
Section 1: Introduction
October 2014
Introduction
Figure 1-2. LCD Display
Figure 1-3. Block Diagram of Operation
A. Sensor Module
B. Electronics Board
C. F
OUNDATION fieldbus Signal to Control System
D. Field Communicator
1.6 Service support
Within the United States, call the Emerson Process Management Instrument and Valve
Response Center using the 1-800-654-RSMT (7768) toll-free number. This center, available 24
hours a day, will assist you with any needed information or materials.
The center will ask for product model and serial numbers, and will provide a Return Material
Authorization (RMA) number. The center will also ask for the process material to which the
product was last exposed.
ABC
D
Signal Processing
Temp.
Sensor
Sensor Module
Memory
Microprocessor
*Sensor linearization
*Damping
*Diagnostics
*Engineering units
*Control function
blocks
*Communication
Memory
*Configuration
Digital
Communication

4
Reference Manual
00809-0200-4101, Rev BA
Section 1: Introduction
October 2014
Introduction
For inquiries outside of the United States, contact the nearest Emerson Process Management
representative for RMA instructions.
To expedite the return process outside of the United States, contact the nearest Emerson
Process Management representative.
Emerson Process Management Instrument and Valve Response Center representatives will
explain the additional information and procedures necessary to return goods exposed to
hazardous substances.
1.7 Host files
Before configuring the device, ensure the host has the appropriate Device Description (DD) or
Device Type Manager (DTM
™
) file revision for this device. The device descriptor can be found on
www.fieldbus.org. The DTM can be found at www.emersonprocess.com. The current release of
the Rosemount 2051 with F
OUNDATION fieldbus protocol is device revision 2. This manual is for
revision 2.
1.8 Product recycling/disposal
Recycling of equipment and packaging should be taken into consideration and disposed of in
accordance with local and national legislation/regulations.
Individuals who handle products exposed to a hazardous substance can avoid injury if they
are informed of and understand the hazard. The product being returned will require a copy
of the required Material Safety Data Sheet (MSDS) for each substance must be included
with the returned goods.

Reference Manual
00809-0200-4101, Rev BA
Section 2: Configure
October 2014
5
Configuration
Section 2 Configuration
Configuration overview . . . . . . . . . . . . . . . . . . . . . . . . . . . . . . . . . . . . . . . . . . . . . . . . . . . . . . page 5
Safety messages . . . . . . . . . . . . . . . . . . . . . . . . . . . . . . . . . . . . . . . . . . . . . . . . . . . . . . . . . . . . page 13
Device capabilities . . . . . . . . . . . . . . . . . . . . . . . . . . . . . . . . . . . . . . . . . . . . . . . . . . . . . . . . . . page 14
Node address . . . . . . . . . . . . . . . . . . . . . . . . . . . . . . . . . . . . . . . . . . . . . . . . . . . . . . . . . . . . . . page 15
General block information . . . . . . . . . . . . . . . . . . . . . . . . . . . . . . . . . . . . . . . . . . . . . . . . . . . page 15
Resource block . . . . . . . . . . . . . . . . . . . . . . . . . . . . . . . . . . . . . . . . . . . . . . . . . . . . . . . . . . . . . page 19
Basic device setup . . . . . . . . . . . . . . . . . . . . . . . . . . . . . . . . . . . . . . . . . . . . . . . . . . . . . . . . . . . page 25
Analog Input (AI) function block . . . . . . . . . . . . . . . . . . . . . . . . . . . . . . . . . . . . . . . . . . . . . . page 30
Advanced device setup . . . . . . . . . . . . . . . . . . . . . . . . . . . . . . . . . . . . . . . . . . . . . . . . . . . . . . page 37
2.1 Configuration overview
This section contains information on commissioning and tasks that should be performed on the
bench prior to installation, as well as tasks performed after installation.
2.1.1 DD and DTM
™
based interfaces
The 2051 Pressure Transmitter Rev 2 has both DD based and DTM based user interfaces
available. All device configuration and maintenance tasks can be performed using either
technology.
The DD capabilities supported will vary based on host supplier and host revision. Check with
your host supplier to determine and obtain the appropriate DD for your situation. The type of
DD your host supports may influence navigation between different functions, and the exact
steps used to perform different tasks. The device menu tree has multiple ways to navigate
between and perform tasks. Not all ways will be usable on all hosts, but at least one way will be
usable on every host.
2.1.2 The device menu tree
Device information and device tasks are organized in a menu tree structure. The complete menu
tree is shown in Figure 2-10. A partial menu tree covering the most common device tasks is
shown in Figure 2-11.
2.1.3 Basic organization
Device information and tasks are organized into three different menu tree branches. They are
Overview, Configure, and Service Tools. Information and tasks may be resident in more than a
single branch of the menu tree.
The device menu tree is the landing screen for the Handheld user interface. The device menu
tree is also permanently displayed on PC based user interfaces. On PC based user interfaces the
menu tree can be expanded or collapsed as needed to facilitate navigation.
The same device menu tree applies for both handheld and PC based user interfaces. On the
handheld, each menu tree entry has a dedicated screen (see Figure 2-3). On PC based user

6
Reference Manual
00809-0200-4101, Rev BA
Section 2: Configure
October 2014
Configuration
interfaces, several menu tree entries may be displayed on a single screen with each menu tree
entry used as the heading for a section of that screen (see Figure 2-2). The net result is the menu
tree can be used to navigate all DD’s and DTM’s, however the user may need to perform actions
on one screen, or several screens to perform the same task.
Figure 2-1. Configure Device Alerts-Multiple Screens
On devices with smaller screens the information and parameters necessary to complete a task
may be divided into several screens. In this figure each category of alert to be configured has a
dedicated screen shown. There are four total screens used for alert configuration.
Figure 2-2. Configure Device Alerts-Single Screen
On this PC based configuration screen, alert configuration for all four alert categories is
performed on a single screen.
2.1.4 The Home Screen
The home screen provides access to the three main branches of the menu tree. These branches
are “Overview”, “Configure”, and “Service Tools”. From this screen select any of the three main
branches to access detailed device functionality.

7
Reference Manual
00809-0200-4101, Rev BA
Section 2: Configure
October 2014
Configuration
Figure 2-3. Home Screen Menu Tree Main Navigation Branches
2.1.5 Overview
The overview branch of the menu tree provides device information and single keystroke
shortcuts to view variables and device status, access device diagnostics, and perform basic
calibration functions. The overview screen is the landing screen for PC based user interfaces.
Figure 2-4. Overview Section of the Menu Tree
2.1.6 Configure
Figure 2-5. Guided Setup Branch of the Menu Tree
The Configure branch of the menu tree provides both guided setup and manual setup. Guided
setup provides automated step by step methods for performing device configuration. Manual
setup provides user editable screens where the user can perform a configuration task by
selecting or entering the necessary parameters without step by step guidance.
Figure 2-6. Manual Setup Branch of the Menu Tree
Overview
Configure
Service Tools
(Overview)
Pressure
Calibration
Device Information
Locate Device
Scale Gauges
(Calibration)
Primary Value
Sensor Trim
Sensor Limits
Restore Factory Calibration
Last Calibration Points
Calibration Details
(Device Information)
Identification
Revisions
Materials of Construction
Security & Simulation
(Materials of Construction)
Sensor
Sensor Range
Flange
Remote Seal
(Security & Simulation)
Write Lock Setup
(Primary Value)
Change Damping
(Sensor Trim)
Upper
Lower
Zero
Restore
(Revisions)
Device Driver
Black Text – Navigation selections available
(Text) – Name of selection used on parent menu
screen to access this screen
Green Text – Automated methods
Red Text – Configuration task numbers from
configuration flow chart
(Configure)
Guided Setup
Manual Setup
Alert Setup
(Guided Setup)
Zero Trim
Change Damping
Local Display Setup
Configure Analog Input Blocks
Black Text – Navigation selections available
(Text) – Name of selection used on parent menu
screen to access this screen
Green Text – Automated methods
Red Text – Configuration task numbers from
configuration flow chart
(Manual Setup)
Process Variable
Materials of Construction
Analog Input Blocks Configuration
Display
Classic View
(Materials of Construction)
Sensor
Sensor Range
Flange
Remote Seal
(Display)
Display Options
Advanced Configuration
(Advanced Configuration)
Display Parameter 1
Display Parameter 2
Display Parameter 3
Display Parameter 4
(Process Variable)
Pressure
Pressure Damping
Sensor Temperature
Configure Analog Input Blocks
Change Damping
Black Text – Navigation selections available
(Text) – Name of selection used on parent menu
screen to access this screen
Green Text – Automated methods
Red Text – Configuration task numbers from
configuration flow chart

8
Reference Manual
00809-0200-4101, Rev BA
Section 2: Configure
October 2014
Configuration
Manual Setup can take less time than guided setup if the user is familiar with the task to be
performed. Manual Setup also allows users to edit specific parameters without needing to step
through all the setup steps. If the user is not familiar with a specific task, Guided Setup is
recommended so task steps are done in the correct order and all needed steps are performed.
Figure 2-7. Classic View of the Menu Tree
The Manual Setup branch also provides a view called ‘classic view’ which lists block parameters
in a single scroll-down menu. Expert users may prefer this view for configuration as multiple
configuration tasks can be performed without leaving the single menu screen.
Figure 2-8. Alert Setup Branch of the Menu Tree
The final Configure branch supports alert setup of NE107 alerts (The factory default Device
Alerts), or PlantWeb
®
Alerts. Note that the diagnostics performed and the recommended
actions for NE107 Alerts and PlantWeb Alerts are identical. The only difference is that NE107
alerts and PlantWeb Alerts annunciate the alerts using different categories.
NE107 requires device manufacturers to provide a way for users to enable, suppress, and
re-categorize alerts. The Rosemount 2051 organizes alerts as “Device Alerts”, “Process Alerts”,
or “Diagnostic Alerts”. NE107 alerts can be defined as any of four categories. They are “Failure
Alerts”, Out of Specification Alerts”, Maintenance Required Alerts”, and “Function Check
Alerts”. To minimize configuration tasks and time, the Rosemount 2051 ships from the factory
with alerts enabled and pre-categorized. The use of factory default categories is recommended
if the defaults meet plant standards, and there is no identified benefit to changing categories.
Note
The NE107 specification allows a single alert to be included in multiple categories. As a general
practice this is not recommended as alarm management can become needlessly complex.
(Classic View)
View All Parameters
Mode Summary
Master Reset
(View All Parameters)
Resource Block
Sensor Transducer Block
LCD Block
(Mode Summary)
Return All to Service
Put All Out of Service
Resource Block – Mode Change
Sensor Transducer Block – Mode Change
LCD Block Mode Change
Black Text – Navigation selections available
(Text) – Name of selection used on parent menu
screen to access this screen
Green Text – Automated methods
Red Text – Configuration task numbers from
configuration flow chart
(Alert Setup)
Device Alerts
Process Alerts
Diagnostic Alerts
(Device Alerts)
Enable Failure Alerts
Enable Out of Specification Alerts
Enable Maintenance Required Alerts
Enable Function Check Alerts
Suppressed Device Alerts
(Suppressed Device Alerts)
Failure Alerts
Out of Specification Alerts
Maintenance Required Alerts
Function Check Alerts
(Process Alerts)
Enable Failure Alerts
Enable Out of Specification Alerts
Enable Maintenance Required Alerts
Enable Function Check Alerts
Suppressed Process Alerts
(Diagnostic Alerts)
Enable Failure Alerts
Enable Out of Specification Alerts
Enable Maintenance Required Alerts
Enable Function Check Alerts
Suppressed Device Alerts
(Suppressed Process Alerts)
Failure Alerts
Out of Specification Alerts
Maintenance Required Alerts
Function Check Alerts
(Suppressed Diagnostic Alerts)
Failure Alerts
Out of Specification Alerts
Maintenance Required Alerts
Function Check Alerts
Black Text – Navigation selections available
(Text) – Name of selection used on parent menu
screen to access this screen
Green Text – Automated methods
Red Text – Configuration task numbers from
configuration flow chart

9
Reference Manual
00809-0200-4101, Rev BA
Section 2: Configure
October 2014
Configuration
NE107 alerts can be suppressed. If an alert is configured to reside in multiple categories, it can
be suppressed in some categories, but not others. To completely suppress an alert it must be
suppressed in every category where it is configured.
2.1.7 Service Tools
Figure 2-9. Service Tools
The Service Tools branch of the menu tree allows users to perform typical device maintenance
tasks, simulate alerts and parameters, and perform some configuration resets to return devices
to as-manufactured settings.
(Service Tools)
Alerts
Variables
Trends
Maintenance
Simulate
(Variables)
Pressure
Sensor Temperature
(Trends)
Pressure
Sensor Temperature
(Simulate)
Simulate Alerts
Enable / Disable Alert Simulations
(Maintenance)
Calibrate
Reset / Restore
(Calibrate)
Primary Value
Pressure Unit Conversion
Change Damping
Sensor Trim
Upper / Lower / Zero
Restore
Sensor Limits
Last Calibration Point
Calibration Details
(Reset / Restore)
Master Reset
Restore Factory Cal
Black Text – Navigation selections available
(Text) – Name of selection used on parent menu
screen to access this screen
Green Text – Automated methods
Red Text – Configuration task numbers from
configuration flow chart

10
Reference Manual
00809-0200-4101, Rev BA
Section 2: Configure
October 2014
Configuration
Figure 2-10. Complete Menu Tree
Overview
Configure
Service Tools
(Overview)
Pressure
Calibration
Device Information
Locate Device
Scale Gauges
(Calibration)
Primary Value
Sensor Trim
Sensor Limits
Restore Factory Calibration
Last Calibration Points
Calibration Details
(Device Information)
Identification
Revisions
Materials of Construction
Security & Simulation
(Materials of Construction)
Sensor
Sensor Range
Flange
Remote Seal
(Configure)
Guided Setup
Manual Setup
Alert Setup
(Manual Setup)
Process Variable
Materials of Construction
Display
Classic View
(Materials of Construction)
Sensor
Sensor Range
Flange
Remote Seal
(Display)
Display Options
Advanced Configuration
(Advanced Configuration)
Display Parameter 1
Display Parameter 2
Display Parameter 3
Display Parameter 4
(Classic View)
View All Parameters
Mode Summary
Master Reset
(View All Parameters)
Resource Block
Sensor Transducer Block
LCD Block
(Alert Setup)
Device Alerts
Process Alerts
Diagnostic Alerts
PlantWeb Alerts
(Device Alerts)
Enable Failure Alerts
Enable Out of Specification Alerts
Enable Maintenance Required Alerts
Enable Function Check Alerts
Suppressed Device Alerts
(Suppressed Device Alerts)
Failure Alerts
Out of Specification Alerts
Maintenance Required Alerts
Function Check Alerts
(Process Alerts)
Enable Failure Alerts
Enable Out of Specification Alerts
Enable Maintenance Required Alerts
Enable Function Check Alerts
Suppressed Process Alerts
(Diagnostic Alerts)
Enable Failure Alerts
Enable Out of Specification Alerts
Enable Maintenance Required Alerts
Enable Function Check Alerts
Suppressed Device Alerts
(Suppressed Process Alerts)
Failure Alerts
Out of Specification Alerts
Maintenance Required Alerts
Function Check Alerts
(Suppressed Diagnostic Alerts)
Failure Alerts
Out of Specification Alerts
Maintenance Required Alerts
Function Check Alerts
(Service Tools)
Alerts
Variables
Trends
Maintenance
Simulate
(Variables)
Pressure
Sensor Temperature
(Trends)
Pressure
Sensor Temperature
(Simulate)
Simulate Alerts
Enable / Disable Alert Simulations
(Maintenance)
Calibrate
Reset / Restore
(Process Variable)
Pressure
Pressure Damping
Sensor Temperature
Configure Analog Input Blocks
Change Damping
(Security & Simulation)
Write Lock Setup
(Guided Setup)
Zero Trim
Change Damping
Local Display Setup
Configure Analog Input Blocks
(Primary Value)
Pressure Unit Conversion
Change Damping
(Sensor Trim)
Upper
Lower
Zero
Restore
(Revisions)
Device Driver
(Mode Summary)
Return All to Service
Put All Out of Service
Resource Block – Mode Change
Sensor Transducer Block – Mode Change
LCD Block Mode Change
(Calibrate)
Primary Value
Pressure Unit Conversion
Change Damping
Sensor Trim
Upper / Lower / Zero
Restore
Sensor Limits
Last Calibration Point
Calibration Details
(Reset / Restore)
Master Reset
Restore Factory Cal
(PlantWeb Alert Setup)
Failed Suppression
Maintenance Suppression
Advisory Suppression
Black Text – Navigation selections available
(Text) – Name of selection used on parent menu
screen to access this screen
Green Text – Automated methods
Red Text – Configuration task numbers from
configuration flow chart
/