Page is loading ...

Read this manual before use of product
IWAKI
Chemical Gear Pump
GM-V
Instruction Manual
T348-1 '03/05
U.S.A.
Australia
Singapore
Indonesia
Malaysia
Taiwan
Thailand
Hong Kong
China
China
China
China
Philippines
Korea
TEL : (1)508 429 1440
TEL : (61)2 9899 2411
TEL : (65)6763 2744
TEL : (62)21 690 6606
TEL : (60)3 7803 8807
TEL : (886)2 8227 6900
TEL : (66)2 322 2471
TEL : (852)2 607 1168
TEL : (86)750 380 9018
TEL : (86)20 8435 0603
TEL : (86)10 6442 7713
TEL : (86)21 6272 7502
TEL : (63)2 888 0245
TEL : (82)2 3474 0523
Germany
Italy
Denmark
Sweden
Finland
Norway
France
U.K.
Switzerland
Austria
Holland
Spain
Belgium
TEL : (49)2154 9254 0
TEL : (39)02 990 3931
TEL : (45)48 24 2345
TEL : (46)8 511 72900
TEL : (358)9 2742714
TEL : (47)66 81 16 60
TEL : (33)1 69 63 33 70
TEL : (44)1743 231363
TEL : (41)26 674 9300
TEL : (43)2236 33469
TEL : (31)297 241121
TEL : (34)943 630030
TEL : (32)1367 0200
: IWAKI WALCHEM Corporation
: IWAKI Pumps Australia Pty. Ltd.
: IWAKI Singapore Pte. Ltd.
: IWAKI Singapore (Indonesia Branch)
: IWAKIm Sdn. Bhd.
: IWAKI Pumps Taiwan Co., Ltd.
: IWAKI (Thailand) Co.,Ltd.
: IWAKI Pumps Co., Ltd.
: IWAKI Pumps (Guandong) Co., Ltd.
: GFTZ IWAKI Engineering & Trading (Guangzhou)
: IWAKI Pumps Co., Ltd. (Beijing)
: IWAKI Pumps (Shanghai) Co., Ltd.
: IWAKI Chemical Pumps Philippines, Inc.
: IWAKI Korea Co.,Ltd.
FAX : 508 429 1386
FAX : 2 9899 2421
FAX : 6763 2372
FAX : 21 690 6612
FAX : 3 7803 4800
FAX : 2 8227 6818
FAX : 2 322 2477
FAX : 2 607 1000
FAX : 750 380 9078
FAX : 20 8435 9181
FAX : 10 6442 7712
FAX : 21 6272 6929
FAX : 2 843 3096
FAX : 2 3474 0221
( )Country codes
IWAKI CO.,LTD. 6-6 Kanda-Sudacho 2-chome Chiyoda-ku Tokyo 101-8558 Japan
TEL:(81)3 3254 2935 FAX:3 3252 8892(http://www.iwakipumps.jp)
: IWAKI EUROPE GmbH
: IWAKI Italia S.R.L.
: IWAKI Pumper A/S
: IWAKI Sverige AB
: IWAKI Suomi Oy
: IWAKI Norge AS
: IWAKI France S.A.
: IWAKI PUMPS (UK) LTD.
: IWAKI (Schweiz) AG
: IWAKI (Austria) GmbH
: IWAKI Holland B.V.
: IWAKI Iberica Pumps, S.A.
: IWAKI Belgium n.v.
FAX : 2154 1028
FAX : 02 990 42888
FAX : 48 24 2346
FAX : 8 511 72922
FAX : 9 2742715
FAX : 66 81 16 61
FAX : 1 64 49 92 73
FAX : 1743 366507
FAX : 26 674 9302
FAX : 2236 33469
FAX : 297 273902
FAX : 943 628799
FAX : 1367 2030

Thank you for having selected the Iwaki Chemical Gear Pump GM-V Type.
This manual deals with the correct handling and operation procedures and
troubleshooting methods for the pump. To make maximum use of the pump and
to ensure safe, long operation, please read this manual carefully prior to
operating the pump. Pay special attention to the "Warning" and "Caution"
sections as they relate to matters of safety and proper usage of the pump.
Contents
Chapter Page
IMPORTANT INSTRUCTION ······················································· 1
1. SAFETY INSTRUCTION ······················································ 2~3
(Safety Instructions to Prevent Personal Injuries)
2. OUTLINE OF PRODUCT ·················································· 4~12
2-1. Before Using Pump ·································· 5
2-2. Operating Principle ··································· 5
2-3. Identification Codes ·································· 6
2-4. Specifications ············································7
2-5. Outer Dimensions ···································· 8
2-6. Description of Parts and
Exploded View ··································· 9
2-7. Names of Parts ······································ 10
3. PUMP OPERATION ························································· 13~20
3-1. Handling Instructions ······························ 13
3-2. Installation ·············································· 15
3-3. Piping ····················································· 17
3-4. Wiring ····················································· 20
3-5. Operation Step ······································· 20
4. MAINTENANCE ································································ 24~33
4-1. Causes of Trouble
and Troubleshooting ························ 25
4-2. Consumable Parts ·································· 26
4-3. Disassembly and Assembly ··················· 27
This instruction manual should be kept on hand by the end user for quick reference.
Please contact the Iwaki sales office or Iwaki dealer for any inquiries or questions
regarding this product.

- 1 -
Types of Symbols
Indicates that “Warning” or “Caution” must be exercised. Inside this
triangle, a concrete and practical image provided as a warning or caution
message is depicted.
Indicates a prohibited action or procedure. Inside or near this circle, a
concrete and practical image of the activity to be avoided is depicted.
Indicates an important action or procedure which must be performed or
carried out without fail. Failure to follow the instructions herein can
lead to malfunction or damage to the pump.
Nonobservance or misapplication of the contents
of the “Caution” section could lead to serious
physical injury to the user or serious damage to
the product.
Warning Nonobservance or misapplication of the contents
of the “Warning” section could lead to a serious
accident, including death or injury.
Caution
IMPORTANT INSTRUCTION
For the Safe and
Correct Handling of the Pump
•Read the “Safety Instructions” sections carefully to prevent accidents
involving your customers or other personnel and to avoid damage or loss
of other assets. Always follow the instructions and advice found in these
sections.
•Observe and abide by the instructions described in this manual. These
instructions are very important for protecting pump users from
dangerous conditions and situations related with the use of the pump
system.
•The symbols relate to the following meanings described below:

- 2 -
1. SAFETY INSTRUCTION
●Turn off the power supply.
Working without disconnecting the power supply may cause an electrical shock. Before
engaging upon any working procedures involving the pump, make sure to turn the power
supply switch off and to stop the pump and other related devices.
●Terminate operation!
When you detect or become aware of a dangerous sign or abnormal condition during
operation, terminate the operation immediately and start it from the beginning again.
●For specified application only.
The use of a pump in an application other than those clearly specified may result in injury or
damage to the pump. Use the pump strictly in accordance with the pump specifications and
application range.
●No modify!
Never modify a pump. Otherwise, a serious accident may result. Iwaki will not be
responsible for any accident or damage of any kind which is caused by the user modifying
the pump without first obtaining permission or instructions from Iwaki.
●Wear protectors.
If you touch or come in contact with any type of hazardous chemical liquid, including but
not limited to chemicals, you may experience a serious injury. Wear protective gear
(protective mask, gloves, etc.) during the pump operation.
Electrical Shock
Prohibited
No modifying
Wear protective
gear
●Qualified operators only!
The pump operator and pump operation supervisor must not allow any operators who have
little or no knowledge of the pump to run or operate the pump. Pump operators must have a
sound knowledge of the pump and its operation.
●Specified power only.
Do not operate the pump on voltage which is not specified on the nameplate. Failure to do
so may result in damage or fire. Only the specified power level is to be applied.
●Do not wet or dampen!
If the motor or wiring cable becomes wet or dampened with the operating liquid by mistake,
this may result in a fire or cause an electrical shock. Install the motor and wiring cable in
positions which are not likely to become wet or dampened with any liquid.
●Ventilate!
Poisoning may result during an operation which involves toxic or odorous liquid. Ventilate
the operating site sufficiently.
●Spill-out accident!
Protective measures should be taken against any accidental spill-out or leakage of the
operating liquid as a result of unexpected damage on the pump or the related piping.
Prohibited
Caution
Caution
Prohibited
Prohibited
Warning
Caution

- 3 -
●Damaged pump
Never operate a damaged pump. A damaged pump may cause leakage or electrical
shock.
●Operating site must be free of water and humidity
The pump is not designed to be water-proof or dust-proof. The use of the pump in
places where water splashes or humidity is high may result in an electrical shock or
short circuit.
●Do not run the pump dry.
Do not run the pump dry (without liquid inside the pump). Heat generated as a
result of abrasion between elements inside the pump during operation without liquid
may damage the inside of the pump.
●Do not damage or change power cable!
Do not scratch, damage, process, or pull the power cable forcibly. An extra load onto
the cable, such as heating the cable or placing something heavy on the cable, may
damage the cable and finally cause a fire or an electrical shock.
●Do not cover the motor!
Running a covered motor may accumulate heat inside the motor and cause a fire or a
mechanical failure. Ventilate the motor sufficiently.
●Arrange grounding!
Do not operate the pump without connecting the grounding wire. Otherwise, an
electrical shock may result. Make sure the grounding wire is connected with the
grounding terminal.
●Install an earth leakage breaker (option)!
The operation of a pump without using an earth leakage breaker may cause an
electrical shock. Please purchase an optional leakage breaker and install in the
system.
●Follow the instruction manual
Replace the consumable parts by following the descriptions in the instruction
manual. Do not disassemble any part of the pump if the disassembling procedure for
the part in question is not included in the instruction manual.
●Limited operating site and storage
Do not install or store the pump in the following places:
* Places where a flammable gas or material is used or stored.
* Places where the ambient temperature is extremely high (40°C or higher) or
extremely low (0°C or lower).
●Do not drain the liquid in the site.
The liquid discharged out of the pump, including a hazardous chemical liquid, must
be drained into a special container. Never drain such liquid directly onto the floor in
or near the operation site.
●Disposal of used pump
Disposal of used or damaged pumps must be done in accordance with the relevant
local laws and regulations. (Consult a licensed industrial waste products disposing
company.)
Caution
Prohibited
Prohibited
Prohibited
Prohibited
Prohibited
Caution
Grounding
Electrical Shock

2. OUTLINE OF PRODUCT
2-1. Before Using Pump .......................... 5
2-2. Operating Principle .......................... 5
2-3. Identification Codes ......................... 6
2-4. Specifications ................................... 7
2-5. Outer Dimensions ............................ 8
2-6. Description of Parts and
Exploded View ............................... 10
2-7. Names of Parts .............................. 11
- 4 -

2-1. Before Using Pump
After unpacking, check the following points to confirm
that the delivered product and its accompanying parts
and elements are exactly what you ordered.
When lifting the pump please follow the procedure
mentioned "2. Installation" of "Pump operation".
[1] Do the model and frequency indicated on the
nameplate conform to your order?
[2] Has the pump unit or any part of it been damaged or
bolts and nuts been loosened during delivery?
[3] The fourth numeral of the MFG. No. shows the year
the product was manufactured.
(e.g.) ××6×××
"6" shows the product was manufactured in the year
1996.
If you find anything wrong, please refer to the dealer
you placed your order with.
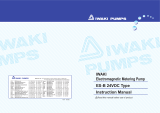
2-2. Operating Principle
[1] Pumping is carried out by a change in the capacity of
the meshed part between the pinion (drive-side gear)
supported by two bearings and the internal gear
(driven-side gear) whose periphery is supported by a
bearing. (A)
[2] In the suction process, they are out of mesh and the
space defined by the two gears and the casing
expands. The negative pressure caused by this
process works to suck liquid into this space. (B)
[3] In the discharge process, the teeth of the gears begin
to mesh and the space defined by the two gears and
the casing shrinks to force out the liquid. (C)
- 5 -

- 6 -
2-3. Identification Codes
Example:
GM-15VKCV-04MC-N
q werty uio !0
qPump type
M : Magnetic drive
wSize (Discharge per revolution)
15 : 3.3 ml/rev. 25 : 12.8ml/rev.
eMaterial of body
V : PVC
rMaterial of gears
K : SiC
tMaterial of bearings
C : Carbon K : SiC
ySealing material of O ring
V : FKM-A E : EPDM
uMotor output
02 : 0.2kW 04 : 0.4kW 07 : 0.75kW
iType of motor
M : 4P motor F : Inverter motor R : Special 4P motor
oMotor specifications
A : Increased safety, outdoor type
B : Explosion proof, outdoor type
C : Totally enclosed fan cooled, outdoor type
!0 Special specifications
No symbol :
N : NEMA motor specification (NPT connection is employed for piping.)
I : IEC motor specification (PT connection is employed for piping.)
S : Special specification

2-4. Specifications
■Specifications
- 7 -
Model Discharge
per
Revolution
mR/rev
Maximum
Speed
min-1
Maximum
Discharge
Pressure *1
Mpa {kgf/cm2}
Temperature
Range
°C
Viscosity
Range *2
mPa•S {cP}
Maximum
Suction
Pressure
MPa {kgf/cm2}
Connection
GM-15V
GM-25V
3.3 1800 JIS 10K 15A
JIS 10K 20A
0.5 {5} 0~50
12.8 0.3 {3}
*1 The values listed in the table are maximum values.
It depends on the motor rpm and viscosity. For further detail, please refer the following table.
*2 Viscosity Range is applied to nynton-fluid.
Model Viscosity
Range
mPa•s {cP}
Maximum
Discharge
Pressure
MPa {kgf/cm2}
Maximum Capacity
R/min
GM-15V
GM-25V
0.24 {2.4}
0.33 {3.3} 4.7 5.6
18.0
0.5 {5.0} 21.8
50Hz 60Hz
1. The values are for 20°C clear water and motor speed 1410 rpm (50Hz).
(1700 rpm (60Hz))
■Specifications by viscosity

2-5. Outer Dimensions
■GM-25VK MM-07M-I
- 8 -
■GM-15VK MM-04M-I

2-6. Description of Parts and Exploded View
- 9 -
Suction port
Pump unit (Liquid feeding section)
Self-priming pump: Supply priming water
through the suction port before operating
the pump.
Motor specifications nameplate
Apply the power source voltage
indicated on this nameplate only.
(Observe the local regulations when
the pump is operated out of Japan.)
"Arrow" indicator label
The arrow indicates the
rotating direction of the
motor.
Always make sure that the
motor runs in the direction the
arrow indicates.
(Refer to "Preparation for
start-up [7]" in the "Pump
Operation" chapter.)
Motor (Driving section)
This motor provides power to
the pump unit.
Discharge port
Base
Setting should be fixed.
"Do not run pump dry" label
Operation of the pump without liquid
may damage the inside of the pump.
Be careful not to run the pump dry.
Pump specifications nameplate
Operate the pump only within the
pump specifications. Do not allow the
discharge pressure to exceed the with
standable pressure limit.
CAUTION
Do not wipe the nameplate, label, or pump body with a solvent-soaked cloth when cleaning the pump unit.

2-7. Names of Parts
■GM-25VK MM-07M
- 10 -
No. Parts Name Q'ty Material Remarks
1
2
3
4
5
6
7
8
9
10
11
12
13
14
15
16
17
18
19
20
21
22
23
24
25
1
1
2
1
1
1
1
1
1
1
1
1
1
1
1
1
1
1
1
1
1
6
8
14
6
STNLS STL
PVC
HIGH DENSITY CARBON or SILICON CARBIDE
PVC
HIGH DENSITY CARBON or SILICON CARBIDE
ALUMINA CERAMIC 99.5%
FKM or EPDM
FKM or EPDM JIS B 2401 G 95
JIS B 2401 G 105
JIS B 2401 G 160
SILICON NITRIDE
VINYL ESTER+CF
SILICON CARBIDE
SILICON CARBIDE
FC200
PVC
FERRITE+CFRETFE
PVC
FKM or EPDM
CFRETFE+ALMINA CERAMICS 99.5%
FERRITE+ALUMINUM ALLOY, STEEL
FC200
STEEL
STNLS STL
STNLS STL
STNLS STL
STNLS STL
M 10
M 8 ◊ 90
M 8 ◊ 40
M 8
M 5 ◊ 35
FRONT PLATE
PORT HOUSING
BEARING
GEAR HOUSING
BEARING
PIN
O-RING
O-RING
SHAFT
KEY
PINION
INTERNAL GEAR
SUB-BRACKET
SEAL RING
MAGNET CAPSULE ASS'Y
DRIVE BOSS
O-RING
REAR CASING
DRIVE MAGNET ASS'Y
FOOT SUPPORT
EYE BOLT
HEX. SOCKET HEAD BOLT
HEX. SOCKET HEAD BOLT
SW
HEX. SOCKET HEAD BOLT

■GM-15VK MM-04M
- 11 -
No. Parts Name Q'ty Material Remarks
1
2
3
4
5
6
7
8
9
10
11
12
13
14
15
16
17
19
20
21
22
23
24
25
1
1
2
1
1
1
1
1
1
1
1
1
1
1
1
1
1
1
1
1
1
6
8
14
STNLS STL
PVC
HIGH DENSITY CARBON or SILICON CARBIDE
S45C
PVC
HIGH DENSITY CARBON or SILICON CARBIDE
ALUMINA CERAMIC 99.5%
FKM or EPDM JIS B 2401 G 65
AN6230-22
VINYL ESTER+CF
PTFE+GF
SILICON CARBIDE
SILICON CARBIDE
FKM or EPDM
STNLS STL
CFRETFE+SILICON CARBIDE
FERRITE+PVC, VINYL ESTER+CF,Si3N4
FERRITE+ALUMINUM ALLOY, STEEL
STNLS STL
STNLS STL
STNLS STL
FC200
STEEL
STNLS STL
STNLS STL
M 6
M 6 ◊ 45
M 8
M 8
M 8 ◊ 35
FRONT PLATE
PORT HOUSING
BEARING
SUB BRACKET
GEAR HOUSING
BEARING
PIN
O-RING
KEY
SPACER
PINION
INTERNAL GEAR
O-RING
REINFORCING RING
REAR CASING
MAGNET CAPSULE ASS'Y
DRIVE MAGNET ASS'Y
HEX. SOCKET HEAD BOLT
SW
HEX. SOCKET HEAD BOLT
FOOT SUPPORT
EYE BOLT
HEX. SOCKET HEAD BOLT
SW
26 MOTOR ADAPTOR 1 SS400
M 6 ◊ 35

3. PUMP OPERATION
3-1. Handling Instructions ..................... 13
3-2. Installation ...................................... 15
3-3. Piping ............................................. 17
3-4. Wiring ............................................ 20
3-5. Operation Step ............................... 20
- 12 -

Warning
●Do not operate the pump for the circulation of hazardous mediums (such as
explosive, combustible, flammable, or toxic substances, as well as corrosive or
irritating substances considered harmful to human health).
Caution
●Read the following information prior to installing the pump.
●Protective wear:
When operating the pump or working near it, with the pump system loaded with chemical
liquid, always wear protective clothing, face guard, goggles, and gloves. Further
precautionary measures must be taken depending upon the type of liquid used.
●Operating the pump dry (without supplying liquid to it) may cause seizure or wear
of the inside of the pump section.
●Pump repair beyond the range specified in this instruction manual:
Do not try to disassemble or repair the pumps by yourself.
(Observe all the following instructions
to prevent injuries and accidents.)
- 13 -
[1] Handle the pump carefully.
Strong impacts caused by dropping the pump on the floor or striking it may result in damage or faulty
performance.
[2] Priming water
Be sure to fill the pump unit with feeding liquid as priming water before pump operation.
[3] Do not operate the pump in the following places.
• Places where the temperature falls below 0°C.
• Places where corrosive gas or explosive gas is generated.
• Places exposed to splashing water.
• Places where the ambient temperature is 40°C or above.
• Places where the humidity is excessively high. (Permissible humidity: 35~85%RT)
• Places filled with or likely to be filled with explosive or corrosive atmosphere.
• Danger due to dust, fire, earthquake and/or any externally imposed shock.
[4] Keep the pump away from fire.
To prevent fire and explosions, do not place dangerous or inflammable substances near the pump.
[5] If pump is damaged
Do not operate a damaged pump, otherwise there may be electricity leakage or electric shocks.
[6] No madify
Never try to madify the pump. This may cause a serious accident or damage.
3-1. Handling Instructions

- 14 -
[8] No disassembly or repair
Users are allowed to disassemble and repair the pump to the degree of the given description in "Disassembly
and Assembly" in this manual.
* The pump must be repaired by trained and qualified operators only. When it needs to be disassembled and
repaired, stop operation and contact the supplier for advice.
[9] No dry running operation
Dry operation of the pump (pump operation without liquid inside) may cause damage to the pump internally.
Never operate the pump dry. If the pump is operated dry or with the suction-side valve closed, damage may
result.
* Countermeasures to be taken in case of dry operation
1. Turn off the power switch of the pump immediately and leave the pump as it is for more than 1 hour.
2. Prime the pump and fill the pump with liquid.
(Note that the pump should be supplied with liquid after leaving the pump empty for more than 1 hour. A
sudden supply of liquid may cause cracks in a part due to quenching effects.)
[10] Points to be noted when starting and stopping pump
Pay close attention to the following points to avoid damage when starting and stopping pump operation.
(1) When starting the pump, first prime it. Then, open the discharge valve completely and turn on the power
switch. After starting up the pump, close the discharge valve gradually and set it to the desired operation
level within the limits of 0.5MPa.
(2) When stopping the pump, first open the discharge valve slowly. Turn off the power switch only after
completely opening the discharge valve.
Caution
•In this procedure, never try to stop the pump quickly using a solenoid valve, etc. Quick closure
may cause water hammer action, and the excessive pressure will destroy the pump.
[11] Allowable pressure limit
The allowable pressure (the suction pressure) limit of all models is 0.3MPa. The discharge pressure limit of all
models is 0.5MPa.
[12] Use of slurry liquid
Slurry liquid pumping is absolutely not possible.
[13] Influence of viscosity of liquid on pump performance
If the viscosity of the liquid is different than that of pure water, the discharge volume, and pump head may vary.
The delivered pump has been prepared to meet the specifications ordered by the user. To change the operating
conditions after delivery, be sure to contact the supplier.

- 15 -
[14] Temperature humidity fluctuation
The liquid may change in terms of its viscosity, pressure, or corrosion resistance. Pay special attention to
changes in liquid characteristics as a result of temperature fluctuation.
[15] Disengagement of magnet coupling
Though the motor is running, the liquid is not circulated. (The pressure gauge on the discharge side points to "0"
point approximately.)
When the magnet coupling disconnects, stop the pump within 1 minute. If operation is continued with the
coupling in the disconnected mode, the power of the coupling will decrease considerably.
3-2. Installation
[1] Installation position
• Install the pump as close to the suction tank as possible and in the lowest position available (for flooded
suction).
* The lift head depends upon the liquid properties, temperature, and length of the suction piping. For details
of the setup, consult Iwaki or your dealer.
[2] Indoor and outdoor use
The pump can be operated either indoors or outdoors. However, safety measures should be taken so as not to
expose the motor and power distribution unit to flooding or other natural hazards.
[3] Installation site
Select an installation site that is flat and free of vibrations caused by nearby machines. Space sufficient for
maintenance work should be provided.
Liquid temperature range : 0~50°C (pure water)
Ambient temperature range : 0~40°C
Humidity range : 35~85% RH

- 16 -
■Lifting
When lifting the pump, please pay attention to the following points.
· Pump must be lifted horizontally using two bolts located at pump and motor.
· In the case that there is no lifting bolt at the motor, rope or such kind materials should be securely fastened to the
motor to lift the pump horizontally.
· Please use lifting chain or rope which has enough strength similar to handle pump weight.
· To prevent any bodily harm caused by the pump falling, keep clear of the lifted pump.
■Foundation preparation (before pump installation)
[1] The area for anchoring the pump must be greater than the area of the base. If the anchoring area is not enough,
the base may be destroyed due to a concentrated load on it.
[2] If pump operation is to be subject to vibration (resonation with the piping, for example), provide an expansion
joint between the pump and the piping. Otherwise, the piping, gauge, etc., may be damaged.
[3] Installation advice
• Use anchor bolts to fasten the pump base firmly.
• Install the pump horizontally.
• Sufficient space is required to allow cool air from the motor fan to circulate.
• Allow ample space around the pump for easy and efficient maintenance work.

3-3. Piping
- 17 -
The piping for PT and NPT screw connection types should be made in a manner that no excessive force is applied to
the screw sections.
The piping for the flange connection type is easily damaged if excessive force is applied. Arrange supports for the
piping in a position which is closest to the connected flange as possible and try not to load the flange with excessive
force.
Example of piping
(1) Discharge pipe (Support the pump to keep the (12) Pipe support
pump free of piping load.) (13) Relief valve
(2) Valve (14) Expansion joint or flexible joint
(3) Check valve (15) Piping for flushing (Discharge side)
(4) Pressure gauge (16) Piping for flushing (Suction side)
(5) Strainer
(6) Pump
(7) Priming/air vent pipe
(8) Drain pipe
(9) Drain trough
(10) Vacuum gauge
(11) Suction pipe (pipe diameter : D)
(The horizontal section should be as short as
possible and there should be an ascending
gradient of 1/100 toward the pump.)

- 18 -
■Suction piping
[1] The suction pipe should employ the flooded suction method if possible. The shortest pipe possible, with the
minimum number of bends, should be used. Arrange a proper support under the suction pipe such as an
expansion joint or the like so that the weight and thermal stress of the pipe are not applied to the pump.
[2] The suction port on the pump is made of PVC. In order not to apply stress to the port and to protect the port, use
an expansion joint or a flexible joint to connect with the piping. Arrange a pipe support in the closest position to
the pump as possible.
[3] Attach the coupling on the suction pipe carefully so as not to allow air inside the line. Air in the suction pipe
may damage the system.
[4] If suction is not good (e.g., the suction tank is a vacuum, the suction head is large, or the suction pipe is long),
the condition NPSHa > NPSHr + 0.5 m should be established. For the NPSHr level, refer the following.
NPSHr GM-15V : 2m
GM-25V : 3m
[5] Do not allow any projection where air may be trapped along the suction pipe. The suction pipe should have an
ascending gradient of 1/100 toward the pump.
[6] If the diameters of the pump suction port and the suction pipe are different, use an eccentric reducer pipe.
Connect the eccentric reducer pipe so that the upper surface is level. In any case, never use a suction pipe with a
diameter smaller than that of the suction port.
The diameter of the suction pipe must be larger than that of the pump suction port.
[7] It is also recommended, in the case of flooded suction, that a gate valve be installed on the suction pipe for
easier overhaul inspection of the pump. Keep the gate valve fully open during ordinary pump operation; it is
required to be closed only during an overhaul inspection.
[8] When circulating a dangerous liquid, arrange the flushing pipes so that internal cleaning is possible when
disassembling the pump.
[9] The end of the suction pipe should be located 500 mm or more below the surface of the liquid.
[10] A screen should be provided at the inlet in the suction tank to prevent the entry of foreign matter into the suction
pipe. The end of the suction pipe should be 1~1.5 D (D: diameter of suction pipe) or more away from the
bottom of the suction tank. Note that the entry of foreign matter may cause the pump to malfunction.
[11] In the case of the suction lift method, install a foot valve on the suction pipe.
Note: The items [9], [10], and [11] above are applied to the suction lift method.
/