Page is loading ...

Sherpa Door Pockets
for the
’11-’18 JK Wrangler
Installation Instructions
www.overland-outfitters.com outfittersover[email protected]
The Sherpa Door Pockets can be secured to the door panel in two ways – with self-adhesive
Velcro, or with screws. If you plan to carry heavier loads on the Molle panel/in the door
pockets or you don’t want to apply sticky Velcro to the door panel, we recommend using
screws. If you’d rather not drill 3 small holes in the door panel, you can first use the Velcro
method and if your loads increase to the point where the Velcro isn’t sufficient, you can always
install the screws later. Whichever method is used to secure the pockets to the door panel,
installation is basically the same.
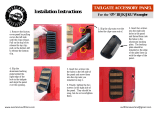
1. Remove the two screws
securing the bottom of the door
panel to the door.
2. Pry off the trim in the center
of the door panel. This can be
done with a plastic trim tool, or
with a small screwdriver. The
plastic can be protected from
scratching by a layer of masking
tape on the screwdriver as
shown. Pry gently to allow
finger access to the underside
of the trim and pull the trim off
the door. Once the trim is
removed, remove the lower of
the two screws under the trim.
Tools required:
- Phillips screwdriver
- T-25 Torx driver
- Trim pry tool

3. Starting at the bottom where
you removed the screws from
the panel, pull the panel gently
away from the door. The goal is
to pull the lower half of the
panel out far enough to release
the pins that secure the panel
to the door.
4. Slip the door pocket around
the bottom of the door panel,
making sure the door pins go
through the holes in the back of
the door pocket. You will need
to reach behind the panel to
guide the fabric over the pins so
the pins go into the holes in the
fabric. Once all the pins are
through the holes, pull the
panel up tight and push the
door panel back in place, being
careful that the pins go back in
the appropriate holes.
5a. If you plan to use the self-
stick Velcro to secure the
pockets, put the self-stick
Velcro hook patches on the
Velcro loop patches on the back
of the pockets, pull the
adhesive off the Velcro one
patch at a time, pull the door
pocket up tightly and press the
self-stick Velcro onto the door
panel.
5a. If you plan to use screws to secure the pockets, pull the door pocket up tightly and using
a 1/16" drill bit make a hole through one grommet at a time. Insert a screw through that
grommet and tighten it into the hole you just drilled. Put screws in the other two grommets
the same way.
6. Replace the screws that you removed from behind the trim panel and replace the trim
panel. Replace the screws you removed from the bottom corner of the door panel.

Your new Sherpa Door Pocket is made
from heavy cotton duck canvas fabric
and is designed to give years of service
on the road and trail. Canvas is very
easy to clean and handle - a soft and
dry bristled brush can be used to
remove any loose dust or dirt.
If the canvas needs further cleaning, mix
clean water and a small amount of mild
detergent and use a damp towel or
bristled brush dipped in the solution and
scrub or rub the dirty areas gently.
Lightly spray the canvas area with water
to remove the soap residue and dry with
a towel.
To keep the Door Pockets looking new
longer, we recommend treating the
fabric with Scotchgard Auto Fabric &
Carpet Protector. Scotchgard provides
excellent resistance to water, oil and
stains and it doesn't change the look
and feel of the fabric, so the fabric stays
soft and colors stay true. Scotchgard
comes in an easy-to-use spray bottle.
Note: Do not Dry-Clean, bleach or put in
the dryer as these may potentially
discolor the canvas.
www.overland-outfitters.com o[email protected]
Sherpa Door Pockets
Care Instructions
/


