
POWER LIFT
™
BASKETBALL SYSTEM
Icon Legend................................2
Notices....................................3
Pole Assembly.............................4
Pole to Base Assembly.................9
Backboard to Rim Assembly.......13
Backboard to Pole Assembly.......18
Parts Identifi er..........................i-iv
Handle Assembly.......................22
Final Assembly..........................27
Maintenance Instructions..........31
Warning Sticker........................33
Registration........................34
Warranty................................35
(2)
(2)
(1)
(1)
(1)
(1)
(1)
(1)
(1)
(1)
3/8”, 1/2”, 9/16”, 3/4”
1/2”
3/16”
(2)
(375 lb)
TOOLS REQUIRED TABLE OF CONTENTS
• Before you start, decide how you would like to fi ll
your base (sand is recommended, see page 29).
• Assembly should take 2 people about 2-3
hours to complete.
ASSEMBLY INSTRUCTIONS
MODEL #60091
MODEL 90682
Save this instruction in the event that the manufacturer has
to be contacted for replacement parts.
BEFORE ASSEMBLY:
CONTACT LIFETIME CUSTOMER SERVICE:
Call: 1-800-225-3865
7:00 am–5:00 pm (Monday–Friday) MST
and 9:00 am–1:00 pm Saturday MST
QUESTIONS?
MODEL# AND PRODUCT ID
(you will need both when contacting us)
Model Number: 90682
Product ID:
For Customer Service in Mainland
Europe and the United Kingdom,
E-mail: [email protected]
Live Chat: www.lifetime.com
(click on “Ask An Expert” tab)
Video Instructions:
www.youtube.com/lifetimeproducts
1/4”
(1)
COPY

2
• Indicates the parts to be used for a section.
• Indicates special heed should be taken when reading.
• Indicates the hardware to be used for a section.
• Indicates the tools to be used for a section.
• Indicates no hardware required for a specifi c page.
• Indicates no parts required for a specifi c section.
• Indicates to use/not to use an electric drill for a specifi c step.
ICON LEGEND
• Indicates the use of a Centerlock Nut. A Nut with this marking will require some effort to tighten.
This hardware was designed with this feature in order to prevent loosening later.
• Save this instruction in the event that the manufacturer has to be contacted for replacement parts.
CONTACT US
www.lifetime.com/instructions
Call: 1-800-225-3865
7:00 am–5:00 pm (Monday–Friday) MST
and 9:00 am–1:00 pm Saturday MST
1182894
4/1/2017
COPY

3
WARNINGS & NOTICES / AVERTISSEMENTS ET AVIS / ADVERTENCIAS Y AVISOS
Most injuries are caused by misuse and/or not following instructions. Use caution when using this product.
To ensure safety, do not attempt to assemble this product without following the instructions carefully. Check entire box and inside all packing
material for parts and/or additional instruction material. Before beginning assembly, read the instructions and identify parts using the hardware
identifi er and parts list in this document. Proper and complete assembly, use and supervision are essential for proper operation and to reduce the
risk of accident or injury. A high probability of serious injury exists if this product is not installed, maintained, and operated properly.
FAILURE TO FOLLOW THESE WARNINGS MAY RESULT IN SERIOUS INJURY OR PROPERTY DAMAGE AND WILL VOID WARRANTY.
Owner must ensure that all players know and follow these rules for safe operation of the system.
• If using a ladder during assembly, use extreme caution.
• Two capable adults are recommended for this operation.
• Check base daily for leakage. Leaks will cause system to fall.
• Assemble the pole sections properly. Failure to do so could cause the pole sections to separate during play or transport.
• Minimum operational height is 6 ft 6 in (1.98m) to the bottom of the backboard.
SAFETY INSTRUCTIONS
COPY

4
SI NO SE OBEDECEN ESTAS ADVERTENCIAS PUEDEN PRODUCIRSE
GRAVES LESIONES Y/O DAÑOS A LA PROPIEDAD.
El propietario del sistema debe asegurarse de que todos
los jugadores conozcan y respeten estas reglas para que el
sistema se use en forma segura.
W
FAILURE TO FOLLOW THESE WARNINGS MAY RESULT IN SERIOUS INJU
AND/OR PROPERTY DAMAGE.
Owners must ensure that all players know and follow thes
e
rules for safe operation of the system.
• Only hang from the Rim briefly to regain balance or avoid
injuring others. Release the Rim as soon as safely possible.
• During play, especially when performing dunk type activit
i
keep player’s face away from the Backboard, Rim, and Net
Serious injury could occur if teeth/face come in contact wit
h
the Backboard, Rim, or Net. Player should wear a mouth
guard during play.
• Do not slide, climb, or play on Base or Pole.
• Completely fill Base according to manufacturer’s
instructions. Never leave the unit standing in an upright
position without first filling the Base with weight or the syst
e
will tip quickly causing serious personal injury.
• When adjusting height or moving system, keep hands an
d
fingers away from moving parts.
• Do not allow children to move or adjust system.
•
Do not wear jewelry (rings, watches, necklaces, etc.) duri
n
play. Objects may entangle in Net.
• Keep water and organic material away from Pole Base. Gr
a
litter, etc. could cause corrosion and/or deterioration.
• Never play on damaged equipment.
• Cuélguese del aro sólo en forma breve, para recuperar el equilibr
i
o evitar lesionar a otros jugadores. Suéltese del aro lo más pron
t
que pueda hacerlo con seguridad.
• Durante el juego, especialmente al embocar violentamente
d
alto, la cara de los jugadores debe mantenerse alejada del tabler
o
el aro y la red. Pueden producirse lesiones graves si los dientes o
l
cara entran en contacto con el tablero, el aro o la red. Los jugador
e
deben usar un protector bucal durante el juego.
• No se deslice, no trepe ni juegue sobre la base o el poste.
• Llene la base completamente siguiendo las instrucciones d
e
fabricante. Nunca deje la unidad en posición de uso sin hab
e
llenado previamente la base con material de contrapeso, pues
e
sistema podría tumbarse rápidamente y causar graves lesion
e
personales.
• Mantenga las manos y los dedos alejados de las piezas movibl
e
cuando regule la altura o desplace el sistema.
• No deje que los niños regulen ni desplacen el sistema.
• No use joyas (anillos, relojes, collares o gargantillas, etc.) durante
e
juego. Estos objetos pueden engancharse en la red.
• La superficie donde se coloque la base debe estar lisa y desprovis
t
de piedras, grava u otros objetos. Las perforaciones pueden origin
a
pérdidas, y éstas pueden hacer que el sistema se tumbe.
• Guarde aqua y materia orgánica. Césped, basura,etc., prodria
c
ausar corrosión et/o deterioros.
• Controle el poste y todas las piezas metálicas una vez al m
e
en busca de signos visibles de corrosión (oxidación, picadura
s
escamado). Elimine todo rastro de óxido y vuelva a pintar c
o
esmalte para exteriores. Si el óxido ha penetrado cualquier pieza
d
acero, reemplace esa pieza de inmediato.
• Inspeccione el sistema antes de cada uso para verificar que es
t
adecuadamente contrapesado, que los elementos de fijación
n
estén flojos, que no haya desgaste excesivo, inestabilidad ni sign
o
de corrosión. Si encuentra irregularidades, repárelas antes de us
a
el sistema.
Nunca juegue con un equipo dañado.
• No use el sistema en presencia de vientos fuertes o condicion
e
climáticas adversas, ya que puede tumbarse. Coloque la unidad
e
su posición de almacenamiento y/o en una zona a resguardo d
e
viento, lejos de propiedades personales que puedan dañarse si
e
sistema se cae, y de líneas de suministro de energía.
• No use el sistema para levantar ningún objeto. El mecanismo es
t
diseñado para elevar solamente el peso del tablero con el aro.
N
cuelgue nada de la agarradera, el aro, el tablero ni los brazos
d
elevación, ya que esto puede dañar el sistema y anular la garantía.
www.
l
ADVERTENCIA
Lifetime Products, Inc., Clearfield, UT 84016
1-800-225-3865
BCO
Metal Parts
Hardware Bag
TOOLS REQUIRED
PARTS REQUIRED
HARDWARE REQUIRED
POLE ASSEMBLY
1
Scrap Wood
Electric Drill
Warning Sticker
3/8"
(2)
ABB (x2)
AAF (x2)
ABE (x2)
CMV (x2)
ABR (x2)
ALH (x1)
ALF (x1)
ALE (x1)
ALL (x1)
Measuring Tape
Pencil
COPY

5
TOOLS AND HARDWARE REQUIRED
X SECTION 1 (CONTINUED)
• Use a pencil to mark a small line 4” from the top
of the Middle and Bottom Poles (ALF & ALE).
• Secure the Pole Bracket (ALL) to the Top Pole
(ALH)) with the hardware as shown.
1.1 1.2
AAF (x2)
3/8" (x2)
ABB (x2)
ABE (x2)
ABR (x2)
ALH
ALL
ABB
AAF
ABR
ABE
ALF
ALE
FAUTE DE NE PAS SUIVRE CES AVERTISS
E
DES BLESSURES GRAVES ET/OU DE
S
Le propriétaire doit s’assurer
q
naissent et appliquent les règl
e
l’équipement en t
o
E
NCIAS PUEDEN PRODUCIRSE
OS A LA PROPIEDAD.
asegurarse de que todos
e
n estas reglas para que el
f
orma segura.
G
S MAY RESULT IN SERIOUS INJURY
RTY DAMAGE.
layers know and follow these
t
ion of the system.
y
to regain balance or avoid
as soon as safely possible.
p
erforming dunk type activities,
e
Backboard, Rim, and Net.
t
h/face come in contact with
a
yer should wear a mouth
Base or Pole.
to manufacturer’s
it standing in an upright
a
se with weight or the system
ersonal injury.
i
ng system, keep hands and
or adjust system.
t
ches, necklaces, etc.) during
e
t.
a
l away from Pole Base. Grass,
a
nd/or deterioration.
ment.
• Surface beneath the Base mus
gravel or other objects. Puncture
s
cause system to tip over.
• Once a month check Pole and
corrosion (rust, pitting, chipping)
.
and repaint with exterior enamel.
steel part, replace that part imm
e
• Check system before each use
hardware, excessive wear, instab
i
and repair before use.
• Do not use system during wind
may tip over. Place system in an
a
wind or in an area away from pro
if the system falls, and from over
h
• Do not use the system to lift or
mechanism is designed to lift onl
y
Backboard and Rim. Do not han
g
Rim, Backboard, or Lifter Arms a
this will damage the system and
v
the warranty.
• Ne vous suspendez pas à l’ann
e
retrouver votre équilibre ou éviter
d
Relâchez l’anneau aussitôt que poss
i
• Lors d’un match, particulièreme
n
visage du joueur ne doit pas faire fac
e
filet. Le joueur risque de graves bles
s
entrent en contact avec le panneau,
l
doivent toujours porter un protège-d
e
• Ne glissez pas, ne grimpez pas, et
poteau.
• Remplissez complètement la b
a
fabricant. Ne laissez jamais l’unité d
d’abord rempli la base avec un p
o
basculer rapidement et causer de gr
a
• Lorsque vous ajustez la haute
u
l’équipement, gardez vos mains et d
o
• Ne permettez pas aux enfan
t
l’équipement.
• Ne portez pas de bijoux (bagues,
vous jouez. Ces objets pourraient s’a
c
• La surface sur laquelle est posée
gravier ou tout autre objet qui pourra
i
une fuite ce qui pourrait faire bascul
e
• Gardez de l’eau et de la matiére
gazon, les déchets, etc. pourraient
p
détérioration.
• Une fois par mois, vérifiez que le
métal ne montrent pas de signes
écaillage). Enlevez toute la rouille et
une peinture pour extérieur. Si la roui
acier, vous devrez remplacer imméd
i
• A chaque fois que vous allez utilise
l’équilibre, la possibilité de pièces d
e
de l’équipement et tout signe de cor
r
avant utilisation.
• Ne jouez jamais avec un équipem
e
• N’utilisez pas l’équipement lors
de mauvais temps. L’équipeme
n
l’équipement dans un endroit abrité
qu’il pourrait endommager s’il bascu
• N’utilisez pas l’équipement pour le
v
Son mécanisme a été conçu unique
panneau et de l’anneau. N’accroch
e
au panneau ni aux leviers sous pein
e
et d’annuler la garantie.
e
ve, para recuperar el equilibrio
S
uéltese del aro lo más pronto
al embocar violentamente de
m
antenerse alejada del tablero,
siones graves si los dientes o la
r
o, el aro o la red. Los jugadores
n
te el juego.
s
obre la base o el poste.
i
guiendo las instrucciones del
e
n posición de uso sin haber
m
aterial de contrapeso, pues el
e
nte y causar graves lesiones
a
lejados de las piezas movibles
e
l sistema.
e
splacen el sistema.
e
s o gargantillas, etc.) durante el
harse en la red.
a
se debe estar lisa y desprovista
s
perforaciones pueden originar
el sistema se tumbe.
Césped, basura,etc., prodrian
z
as metálicas una vez al mes
o
rrosión (oxidación, picaduras,
e
óxido y vuelva a pintar con
a penetrado cualquier pieza de
e
diato.
a
da uso para verificar que esté
e
los elementos de fijación no
e
xcesivo, inestabilidad ni signos
d
ades, repárelas antes de usar
o.
e
vientos fuertes o condiciones
u
mbarse. Coloque la unidad en
o
en una zona a resguardo del
ales que puedan dañarse si el
n
istro de energía.
n
gún objeto. El mecanismo está
p
eso del tablero con el aro. No
a
ro, el tablero ni los brazos de
e
l sistema y anular la garantía.
www.lifetime.com
N
CIA AVERTISS
E
4
016
Pencil
Measuring Tape

6
1.2
1.2
• Make sure the holes indicated are on the same side
of the Pole assembly. With the Pole Bracket on the
opposite side of the pole as the Warning Sticker, slide
the Top Pole (ALH) onto the Middle Pole (ALF) as shown.
• In order to seat the Poles, strike the end of the Pole very hard fi ve to six times on a piece of scrap wood. The Top Pole (ALH)
should come down until it covers the 4” pencil mark at the top of the Middle Pole (ALF) and no further. If the Top Pole does
not completely cover the mark at the top of the Middle Pole after seating, DO NOT COMPLETE ASSEMBLY. Call our Customer
Service Department.
TOOLS AND HARDWARE REQUIRED
1.3
1.4
X SECTION 1 (CONTINUED)
ALH
ALH
ALF
ALF
(1)
6x
ATTENTION: THIS STEP CANNOT BE REVERSED!
• Do not strike your feet with the
Pole sections, as serious injury
may occur.
!
WARNING
The Poles must be seated together! Even if the
Poles cover the slots before seating, they must be
struck on a hard surface five to six times! Failure
to seat the Poles correctly could allow the Poles to
separate during use, which could lead to serious
personal injuries or property damage.
!

7
1.5 1.6
TOOLS AND HARDWARE REQUIRED
X SECTION 1 (CONTINUED)
ALH
ALF
ALE
ALL
Crimped end
• Slide the Middle Pole (ALF) onto the
Bottom Pole(ALE) as shown. Make sure
the crimped side at the end of the
Bottom Pole (ALE) faces the opposite
direction as the Pole Bracket (ALL).
• In order to seat the Poles, strike each end of the Pole very hard
fi ve to six times on a piece of scrap wood or cardboard. This must
be done even if the Poles cover the 4” mark before seating has
occurred. If the Top and Middle Poles (ALH & ALF) do not completely
cover the marks on the Middle and Bottom Poles (ALF & ALE) after
seating, DO NOT COMPLETE ASSEMBLY. Call our Customer Service
Department.
(1)
6x
ATTENTION: THIS STEP CANNOT BE REVERSED!
WARNING
The Poles must be seated together! Even if the
Poles cover the slots before seating, they must be
struck on a hard surface five to six times! Failure
to seat the Poles correctly could allow the Poles to
separate during use, which could lead to serious
personal injuries or property damage.
!
• Do not strike your feet with the
Pole sections, as serious injury
may occur.
!

8
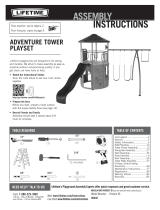
• After the Poles have been seated, insert two #10 x .62” Self-Tapping Screws (CMV) into the back of the Pole as shown.
1.7
CMV (x2)
• For ease of installation, chuck the
Self-Drilling Screws directly into the
drill if your drill (see Figure 1, not
available on all drills), or use a 3/8”
Hex Driver (see Figure 2, Hex Driver
not included).
!
TOOLS AND HARDWARE REQUIRED
X SECTION 1 (CONTINUED)
ALH
ALF
ALE
CMV
Figure 1
Figure 2

9
POLE TO BASE ASSEMBLY
2
BCQ
Metal Part
Hardware Bag
TOOLS REQUIRED
PARTS REQUIRED
HARDWARE REQUIRED
AMU (x2)
AJM (x1)
Plastic Parts
(2) (1)
1/2”
CCL-3/16”
(2)
21 3/4 ”
AJD (x1)
ALI (x2)
AJN (x1)
38”
CCL (x2)
AAE (x2)
ABD (x4)
AAO (x2)
DRZ (x1)
BTS (x1)

10
TOOLS AND HARDWARE REQUIRED
X SECTION 2 (CONTINUED)
2.1
• Make sure the Rubber Gasket
is inside the Base Cap.
AJM
AJN
AJN
Rubber Gasket
• Screw the Base Cap (AJN) onto the Base (AJM) as shown.
!
AJN
2.2
• Position the Pole assembly on the Base (AJM) as shown. Slide the 21 3/4” Axle (AJD) through one of the Wheels (AMU)
and into the Base (AJM). Have one adult position the Bottom Pole (ALE) within the Base as shown with the lip at the
bottom of the pole facing away from the base. Insert the Axle through the Bottom Pole and into the other side of the
Base and through the other Wheel.
• It may be necessary to use a
Rubber Mallet to tap the Axle
into place.
!
AJM
ALE
AMU AMU
AJD
ALE

11
TOOLS AND HARDWARE REQUIRED
X SECTION 2 (CONTINUED)
2.3
• Attach the fl attened end of the Pole Brace (ALI) to the Base (AJM) with the hardware shown. Only fi nger tighten the
hardware.
AAE (x2)
ABD (x4)
AAO (x2)
1/2" (x2)
2.4
• Repeat step 2.3 to install the remaining Pole Brace to the other side of the base. Make sure the unattached ends
of the Pole Braces line up as shown.
ALI
AAE
ABD
ABD
AAO

12
TOOLS AND HARDWARE REQUIRED
X SECTION 2 (CONTINUED)
• Tip the system forward and rest the Pole on the ground. Do not stand the system up until it is fi lled with either sand or water later in
the assembly. Tighten the hardware shown.
2.6
2.5
• Attach the Pole Braces (ALI) to the Bottom Pole (ALE) with the hardware shown.
3/16”
BTS (x1)
CCL (x2)
1/2" (x2)
DRZ (x1)
DRZ
BTS

13
BACKBOARD TO RIM ASSEMBLY
3
BCS
Metal Parts
Hardware Bag
PARTS REQUIRED
HARDWARE REQUIRED
AJI (x1)
ALD (x1)
Plastic Parts
TOOLS REQUIRED
(2) (2) (2) (1)
1/2” 9/16” 1/2” Socket
EAP (x2) AAQ (x2)
ABK (x4) AAV (x2) ADR (x4)
AJW (x2)
AOU (x1)
AOW (x1)
DFE (x4)
APY (x1)
ABQ (x1)
ALX (x1)
AMA (x1)
ABB (x4)
DFD (x1)
AMY (x2)

14
X SECTION 3 (CONTINUED)
TOOLS AND HARDWARE REQUIRED
3.1
3.2
• Insert two Carriage Bolts (EAP) through the Rim Pivot Bracket (APY) as shown.
• Use the 1/2” socket head from a socket wrench to press one Push Nut (AAQ) onto one end of the Axle (ABQ).
• The Push Nut should rest about 1/8” from the end of the Axle.
If the Push Nut slips on too far, continue sliding it to the other
end of the Axle to remove it and try again.
(Not to scale)
EAP (x2)
APY (x1)
AAQ (x1)
ABQ (x1)
(Not to scale)
EAP EAP
APY
AAQ
ABQ
1/2” Socket Head
1/2” (x2)
!

15
X SECTION 3 (CONTINUED)
TOOLS AND HARDWARE REQUIRED
3.3
3.4
• Slide the end of the Axle (ABQ) through the Rim (ALX) and the Rim Pivot Bracket (APY). Press the Push Nut (AAQ) onto
the end of the Axle. Use the 1/2” socket head to secure the Push Nut if needed.
• Insert the U-Bolt (AOU) through the U-Bolt Support Bracket (DFD) and into the upper part of the opening on the backside
of the Backboard (AJI) as shown.Connect the Rim (ALX) and Plastic Guard (ALD) to the Backboard (AJI) with the hardware
shown. Secure the Nylock Flange Nuts (ABK) onto the Carriage Bolts (EAP).
ABK (x2)AAQ (x1)
1/2”
APY
ALX
ABQ
ABQ
AAQ
APY
ALX
ABK
ALD
EAP
AJI
AOU (x1)
AOU
DFD
1/2” (x2)

16
X SECTION 3 (CONTINUED)
TOOLS AND HARDWARE REQUIRED
3.5
3.6
AAV (x2)
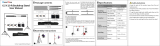
• Slide the Compression Springs (AJW) onto the U-Bolt, and place the Spring Retainer Plate (AOW) over the Compression
Springs. Tighten the Nylock Flange Nuts (ABK) until the Rim (ALX) does not wobble to complete this step.
(Not to scale)
ABK (x2)
AJW (x2)
AOW (x1)
(Not to scale)
AJW
AOW
ABK
• DO NOT COMPLETELY TIGHTEN THE NYLOCK FLANGE NUTS IN
THIS STEP! Only tighten the Nuts until the Rim (ALX) does not
wobble. Tightening the Nuts will adjust the Rim tension.
!
AJW
AAV
AOU
AOU
• Thread the 5/16” Jam Nuts (AAV) all the way down on the U-Bolt (AOU) as shown.
!
1/2” (x2)

17
X SECTION 3 (CONTINUED)
TOOLS AND HARDWARE REQUIRED
3.7
3.8
• Attach the Rim Cover Plate (AMA) to the Rim with the hardware shown.
• Attach the Backboard Brackets (AMY) to the Backboard using the hardware shown.
ADR (x4)
9/16” (x2)
ADR
ADR
ADR
ADR
AMA
ABB
DFE
DFE
DFE
DFE
ABB
AMY
DFE (x4)
ABB (x4)

18
Metal Parts Plastic Part
Hardware Bag
TOOLS REQUIRED
PARTS REQUIRED
HARDWARE REQUIRED
BACKBOARD TO POLE ASSEMBLY
4
(2)
3/4”
(1)
BCR
AAX (x4)
DFB (x2)
ABN (x8)
AKC (x2)
AKB (x2)
21 1/8”
7 1/2”
AAD (x2)
DGA (x2)
7 1/16”
ALM (x1)
25 7/8 ”

i
This page intentionally left blank
Remove This Section
PARTS IDENTIFIER

ii
PARTS IDENTIFIER
Metal Part
Remove This Section
ALH (x1)
ALF (x1)
ALE (x1)
ALI (x2)
ALL (x1) DFD (x1)
AKB (x2)
AJD (x1)
AMA (x1)
AMY (x2)
ALX (x1)
ALS (x2)
AKC (x2)
21 3/4 ”
21 1/8”
Warning Sticker
SI NO SE OBEDECEN ESTAS ADVERTENCIAS PUEDEN
PRODUCIRSE GRAVES LESIONES Y/O DAÑOS A LA
PROPIEDAD.
WARNING
(OSURSLHWDULRGHOVLVWHPDGHEHDVHJXUDUVHGHTXHWRGRV
los jugadores conozcan y respeten estas reglas para que el
VLVWHPDVHXVHHQIRUPDVHJXUD
FAILURE TO FOLLOW THESE WARNINGS MAY RESULT I
N
SERIOUS INJURY AND/OR PROPERTY DAMAGE.
2ZQHUVPXVWHQVXUHWKDWDOOSOD\HUVNQRZDQGIROORZWKHVH
UXOHVIRUVDIHRSHUDWLRQRIWKHV\VWHP
y2QO\KDQJIURPWKHULPEULHÀ\WRUHJDLQEDODQFHRUDYRLGLQMX
U
RWKHUV5HOHDVHWKHULPDVVRRQDVVDIHO\SRVVLEOH
y'XULQJSOD\HVSHFLDOO\ZKHQSHUIRUPLQJGXQNW\SHDFWLYLWLHVN
H
SOD\HU¶VIDFHDZD\IURPWKHEDFNERDUGULPDQGQHW6HULRXVLQM
FRXOGRFFXULIWHHWKIDFHFRPHLQFRQWDFWZLWKWKHEDFNERDUG
U
RUQHW3OD\HUVKRXOGZHDUDPRXWKJXDUGGXULQJSOD\
y'RQRWVOLGHFOLPERUSOD\RQEDVHRUSROH
y&RPSOHWHO\¿OOEDVHDFFRUGLQJWR PDQXIDFWXUHU¶VLQVWUXFWLR
1HYHUOHDYHWKHXQLWVWDQGLQJLQDQ XSULJKWSRVLWLRQZLWKRXW
¿
¿OOLQJWKHEDVHZLWKZHLJKWRUWKHV\VWHPZLOO WLSTXLFNO\FDX
V
serious personal injury.
y:KHQDGMXVWLQJKHLJKWRUPRYLQJV\VWHPNHHSKDQGVDQG¿QJ
DZD\IURPPRYLQJSDUWV
y'RQRWDOORZFKLOGUHQWRPRYHRUDGMXVWV\VWHP
y'RQRWZHDUMHZHOU\ULQJVZDWFKHVQHFNODFHVHWFGXULQJS
2EMHFWVPD\HQWDQJOHLQQHW
y.HHSRUJDQLFPDWHULDODZD\IURPSROHEDVH*UDVVOLWWHUHWFF
R
FDXVHFRUURVLRQDQGRUGHWHULRUDWLRQ
• &XpOJXHVHGHO DURVyORHQIRUPD EUHYHSDUDUHFXSHUDU
HTXLOLEULRRHYLWDUOHVLRQDUDRWURVMXJDGRUHV6XpOWHVHGHODUR
PiVSURQWRTXHSXHGDKDFHUORFRQVHJXULGDG
• 'XUDQWHHO MXHJRHVSHFLDOPHQWHDOHPERFDU YLROHQWDPH
Q
GHDOWRODFDUDGHORV MXJDGRUHVGHEHPDQWHQHUVHDOHMDGD
G
WDEOHURHODUR\ODUHG3XHGHQSURGXFLUVHOHVLRQHVJUDYHVVLO
R
GLHQWHVRODFDUDHQWUDQHQFRQWDFWRFRQHOWDEOHURHODURRODU
H
/RVMXJDGRUHVGHEHQXVDUXQSURWHFWRUEXFDOGXUDQWHHOMXHJR
• 1RVHGHVOLFHQRWUHSHQLMXHJXHVREUHODEDVHRHOSRVWH
• /OHQHODEDVHFRPSOHWDPHQWHVLJXLHQGR ODVLQVWUXFFLRQHV
G
IDEULFDQWH1XQFDGHMHODXQLGDGHQ SRVLFLyQGHXVRVLQKD
E
OOHQDGRSUHYLDPHQWHODEDVHFRQPDWHULDOGHFRQWUDSHVRSXHV
VLVWHPDSRGUtDWXPEDUVHUiSLGDPHQWH\FDXVD UJUDYHVOHVLRQ
H
personales.
• 0DQWHQJDODVPDQRV\ORVGHGRVDOHMDGRVGHODVSLH]DVPRYLEO
H
FXDQGRUHJXOHODDOWXUDRGHVSODFHHOVLVWHPD
• 1RGHMHTXHORVQLxRVUHJXOHQQLGHVSODFHQHOVLVWHPD
• 1RXVHMR\DVDQLOORVUHORMHVFROODUHVRJDUJDQWLOODVHW
F
GXUDQWHHOMXHJR(VWRVREMHWRVSXHGHQHQJDQFKDUVHHQODUHG
• /DVXSHU¿FLHGRQGHVHFRORTXHODEDVHGHEHHVWDUOLVD
GHVSURYLVWDGHSLHGUDVJUDYDXRWURVREMHWRV/DVSHUIRUDFLRQ
H
SXHGHQRULJLQDUSpUGLGDV\pVWDVS XHGHQKDFHUTXHHOVLVWH
P
VHWXPEH
• 1RSHUPLWDTXHODEDVHGHOSRVWHHQWUHHQFRQWDFWRF
R
PDWHULDOHVRUJiQLFRV(OSDVWRORVGHVHFKRVDQLPDOHVHW
F
SXHGHQFDXVDUFRUURVLyQ\RGHWHULRURV
• &RQWUROHHOSRVWH\WRGDVODVSLH]DVPHWiOLFDVXQDYH]DOP
H
HQEXVFDGHVLJQRVYLVLEOHVGHFRUURVLyQR[LGDFLyQSLFDGXU
D
HVFDPDGR(OLPLQHWRGRUDVWURGHy[LGR\YXHOYDDSLQWDUF
R
HVPDOWHSDUDH[WHULRUHV6LHOy[LGRKDSHQHWUDGRFXDOTXLHUSLH
]
GHDFHURUHHPSODFHHVDSLH]DGHLQPHGLDWR
• ,QVSHFFLRQHHOVLVWHPD DQWHVGHFDGDXVRSDUDYHUL¿FD UT
X
HVWpDGHFXDGDPHQWHFRQWUDSHVDGRTXHORVHOHPHQWRVGH¿MDFL
y
QRHVWpQÀRMRVTXHQRKD\DGHVJDVWHH[FHVLYRLQHVWDELOLG
D
QLVLJQRVGHFRUURVLyQ6LHQFXHQWUDLUUHJXODULGDGHVUHSiUHO
D
DQWHVGHXVDUHOVLVWHPD
Nunca juegue con un equipo dañado.
• 1RXVHHOVLVWHPDHQSUHVHQFLDGHYLHQWRVIXHUWHVRFRQGLFLRQ
H
FOLPiWLFDVDGYHUVDV\DTXHSXHGHWXPEDUVH&RORTXHODXQLG
D
HQVXSRVLFLyQGHDOPDFHQDPLHQWR\RHQXQD]RQDDUHVJXDU
G
del viento, lejos de propiedades personales que puedan dañar
s
VLHOVLVWHPDVHFDH\GHOtQHDVGHVXPLQLVWURGHHQHUJtD
• 1RXVHHOVLVWHPDSDUDOHYDQWDUQLQJ~QREMHWR(O PHFDQLV
P
HVWiGLVHxDGRSDUDHOHYDUVRODPHQWHHO SHVRGHOWDEOHURFRQ
DUR1RFXHOJXHQDGDGHODDJDUUDGHUDHODUR HOWDEOHURQLO
R
EUD]RVGHHOHYDFL yQ\DTXHHVWRSXHGHGDxDU HOVLVWHPD\DQXO
ODJDUDQWtD
ADVERTENCIA
Portable Bas
e
#FS16400
10/12/2004
38”
31”
25 7/8 ”
Page is loading ...
Page is loading ...
Page is loading ...
Page is loading ...
Page is loading ...
Page is loading ...
Page is loading ...
Page is loading ...
Page is loading ...
Page is loading ...
Page is loading ...
Page is loading ...
Page is loading ...
Page is loading ...
Page is loading ...
Page is loading ...
Page is loading ...
Page is loading ...
Page is loading ...
Page is loading ...
-
 1
1
-
 2
2
-
 3
3
-
 4
4
-
 5
5
-
 6
6
-
 7
7
-
 8
8
-
 9
9
-
 10
10
-
 11
11
-
 12
12
-
 13
13
-
 14
14
-
 15
15
-
 16
16
-
 17
17
-
 18
18
-
 19
19
-
 20
20
-
 21
21
-
 22
22
-
 23
23
-
 24
24
-
 25
25
-
 26
26
-
 27
27
-
 28
28
-
 29
29
-
 30
30
-
 31
31
-
 32
32
-
 33
33
-
 34
34
-
 35
35
-
 36
36
-
 37
37
-
 38
38
-
 39
39
-
 40
40


Ask a question and I''ll find the answer in the document
Finding information in a document is now easier with AI
Related papers
Other documents
-
Reebok 51549 User manual
-
VIRTUFIT 1763-213cm Adjustable Basketball Post User manual
-
Porter PRO PAD BOLT-ON BACKBOARD PADDING Operating instructions
-
 LIFESPAN KIDS Basketball Hoop Adaptor for Timber Swing Sets Owner's manual
-
 Lifetime Brands Inc. Backyard Playset 90440 User manual
-
Costway SP37743 User manual
-
 MOUNTDOG MOUNTDOG Backdrop Support Stand 10x6.5ft Adjustable Photography Studio Background Support System Kit Installation guide
-
 MOUNTDOG 2.6x3BJJ Installation guide
-
 MOUNTDOG C-BS Installation guide
-
Air Master Windows and Doors 40585 User manual


