Page is loading ...

Operating Elements
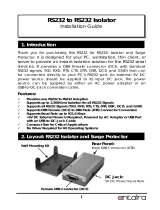
Item No. 1885494 4x RS232 ports pictured below.
4
RXTX
1
3
RX
4
TX
2
2
RXTX
1
RXTX
3
1 2 3
4 5
1 RS232 port
2 PWR: Threaded barrel plug for 5 to 12 V/DC
power supply (not included)
3 USB Type B port
4 TX LED - RS232 receive data
5 RX LED - RS232 transmit data
Installation
There is a risk of a life-threatening electric shock! The electrical installation (such as wiring) of
the product must be handled by a professional, who is familiar with the regulations and safety
precautions.
Be especially careful when installing the product in an electrical control cabinet with dangerous
voltages.
Use caution when installing or modifying wiring or components. Always disconnect the power
supply before connecting, disconnecting, and installing equipment.
a) Wall Mount
Mount the device to a vertical surface. Check that the
provided screws are appropriate for the surface material. If
in doubt consult a professional.
Before drilling, always check for concealed wires or pipes
beneath the surface that could be damaged or cause
harm.
• Attach the wall mounting brackets using the included screws as
shown.
b) Rubber Feet
Rubber feet may leave marks on sensitive surfaces.
Do not attach the feet too close to the wall mounting screw
holes otherwise there will not be enough space for the wall
mount brackets.
• Attach the rubber feet as shown, at opposite ends close to the edges.
c) USB Cable lock
• The USB Type B end of the cable comes with a locking screw. This
prevents the unwanted disconnection of the USB cable from the
device.
• Make sure the screw is securely fastened.
Device Driver Software
The software installation disc includes drivers for Windows
®
and Mac operating systems.
a) Windows
®
Plug and Play
• When you connect the converter to the USB port on your computer, the “Found New Hardware” wizard may
automatically discover and install the converter. Allow Windows
®
to install the converter “Automatically”.
Each RS232 port will be discovered and installed.
If your computer does not automatically recognize the device when connecting to the USB port,
you may need to install the device driver included on the CD ROM. See section “Install Driver”
for further information.
• When the installation process is complete, the serial ports on the converter will appear in “Device Manager”
as new COM ports. See section “Checking the Communication Port" for further information.
Install Device Driver
• Insert the CD ROM into your disc drive.
• Selectthefolderthatcontainstheinstallationlesandruntheinstallationsoftware.
If a popup window indicates that the software has not passed Windows
®
logo testing, select “Continue
Anyway.”
• Follow the on-screen instructions to complete the installation process.
Checking the Communication Port
• Open “Control Panel” and select “System”.
• Select “Device Manager” to open the Device Manager dialog box.
• Click“COM&LPT”toexpandthelistandviewthecommunicationsPort(COM#).Thedeviceshouldbe
listed as one of the COM ports.
Operating Instructions
USB to RS232 Converter
Item No. 1885493 (8x RS232 Ports)
Item No. 1885494 (4x RS232 Ports)
Intended Use
This product is an industrial USB 2.0 High-Speed (480 Mbps) signal to RS232 converter. It supports
maximumspeedsof921.6Kbps,hasawideoperatingtemperaturerangeof-40to+85°Candprovides
surge protection.
It is intended for indoor use only. Do not use it outdoors. Contact with moisture must be avoided under all
circumstances.
For safety and approval purposes, you must not rebuild and/or modify this product. If you use the product
for purposes other than those described above, the product may be damaged. In addition, improper use
canresultinshortcircuits,res,electricshocksorotherhazards.Readtheinstructionscarefullyandstore
them in a safe place. Make this product available to third parties only together with its operating instructions.
This product complies with the statutory national and European requirements. All company names and
product names are trademarks of their respective owners. All rights reserved.
Delivery Content
• Unit
• USB cable
• CD ROM (device driver)
• 4x Screws
• 2x Rubber feet
• 2 x Wall mount brackets
• Operating instructions
Up-to-date Operating Instructions
Download the latest operating instructions at www.conrad.com/downloads or scan the
QR code shown. Follow the instructions on the website.
Explanation of Symbols
The symbol with the lightning in the triangle is used if there is a risk to your health, e.g. due to an
electric shock.
The symbol with the exclamation mark in the triangle is used to indicate important information in
these operating instructions. Always read this information carefully.
The arrow symbol indicates special information and advice on operation.
Safety Instructions
Read the operating instructions carefully and especially observe the safety information.
If you do not follow the safety instructions and information on proper handling in this
manual, we assume no liability for any resulting personal injury or damage to property.
Such cases will invalidate the warranty/guarantee.
a) General Information
• Thedeviceisnotatoy.Keepitoutofthereachofchildrenandpets.
• Do not leave packaging material lying around carelessly. This may become dangerous playing
material for children.
• Protect the device from extreme temperatures, direct sunlight, strong jolts, high humidity,
moisture,ammablegases,steamandsolvents.
• Do not place the product under any mechanical stress.
• If it is no longer possible to operate the product safely, take it out of operation and protect it
from any accidental use. Safe operation can no longer be guaranteed if the product:
- is visibly damaged,
- is no longer working properly,
- has been stored for extended periods in poor ambient conditions or
- has been subjected to any serious transport-related stresses.
• Please handle the product carefully. Jolts, impacts or a fall even from a low height can damage
the product.
• Also observe the safety and operating instructions of any other devices which are connected
to the product.
• Consult an expert when in doubt about the operation, safety or connection of the appliance.
• Installation,maintenance,modicationsandrepairsmustonlybecompletedbyatechnician
or an authorised repair centre.
• If you have questions which remain unanswered by these operating instructions, contact our
technical support service or other technical personnel.
• In schools, training facilities, hobby or self-service workshops, handling of electrical devices
must be monitored by trained personnel.
• When operating on commercial premises, the relevant accident prevention regulations of
workers’ compensation boards for electrical equipment must be observed.
b) Device
• Install the converter in an environment compatible with the operating temperature range
speciedin“TechnicalData”.
• A closed or multi-unit rack assembly can experience a greater operating ambient temperature
thantheambientroomtemperature.Allowsufcientairowforoperation.
• Do not use the device as a shelf.
• Never install wiring or components during a lightning storm.
• Be aware of loose or damaged cable connections. Never touch bare wires or terminals unless
the wiring has been disconnected at the interface.
• Use caution when installing or modifying wiring or components. Disconnect the power supply
before connecting / disconnecting equipment.

This is a publication by Conrad Electronic SE, Klaus-Conrad-Str. 1, D-92240 Hirschau (www.conrad.com).All rights
includingtranslationreserved.Reproductionbyanymethod,e.g.photocopy,microlming,orthecaptureinelectronicdata
processing systems require the prior written approval by the editor. Reprinting, also in part, is prohibited. This publication
represents the technical status at the time of printing.
Copyright 2019 by Conrad Electronic SE. *1885493-4_v2_0119_02_dh_m_en
Congure the Serial Ports
• Open “Control Panel” and select “System”.
• Select “Device Manager” to open the Device Manager dialog box.
• Click“COM&LPT”toexpandthelistandviewthecommunicationsPort(COM#).
• Double-clicktheportyouwouldliketocongure.
• On the “Port Settings” window, set the required communications parameters.
• If necessary, select “Advanced...” and set up the advanced settings for the selected COM Port.
b) Mac OS
Install Driver
• Insert the CD ROM into your computer disc drive.
• Selectthefolderthatcontainsthe*.pkgleandruntheinstallationsoftware.
• Follow the on-screen instructions to complete the installation process.
c) External Power Supply
• When a DC adaptor is used, it can supply power through DE9 pin #9 with maximum 1.5A.
• There are jumpers for each port inside the case. Users can select modes by changing the position of a
jumper. (Default: RI Signal Selected).
• You can attach an external power supply (not included) to the PWR input (2).
• Make sure the supplied power is between 5 to 12 V/DC.
Port X Description
Use #9 pin of DE9 connector as RI signal (Default: DC adaptor not required)..
Use #9 pin of DB9 connector to supply 5 to 12V/DC power (DC adaptor required).
LED Indicators
LED indicators are located in two places to indicate RS232 communication port status.
TxDRxD
RxD
TxD
Symbol LED Description
TX (TxD) Green Blinks when data is transmitted from RS232.
RX (RxD) Yellow Blinks when data is received by RS232.
Pin Conguration
R
I/PWR
RTS
2
9
TXD
GN
D
8
DC
D
3
RXD
DSR
7
4
6
CTS
1
DTR
5
Wiring Conguration
a) Direct Modem Cable Wiring (for modem cable)
3
RTS
7
6
RXD
4
9
1
CTS
5
GND
1
5
2
DTR
RI
TXD
88
DCD
2
DSR
7
3
4
9
6
DCE (DE9)DTE (DE9)
b) Cross Null Modem Cable Wiring (3-wire null modem cable)
1
5
6
2
9
GND
4
7
TXD
3
8
RXD
DTE (DE9)DTE (DE9)
RXD
TXD
1
2
3
4
5
9
8
7
6
c) Cross Null Modem Cable Wiring (5-wire null modem cable)
TXD
3
8
CTS
5
CTS
6
DTE (DE9)
1
9
RTS
RXD
2
RXD
4
RTS
7
DTE (DE9)
GND
TXD
1
2
3
4
5
9
8
7
6
d) Cross Null Modem Cable Wiring (7-wire null modem cable)
9
DTE (DE9)
DTR
DSR
DTR
1
5
6
2
9
3
8
4
7
4
DTE (DE9)
CTS
GND
RXD
RTS
CTS
RTS
DSR
5
2
8
7
6
RXD
1
3
TXD TXD
Care and Cleaning
• Disconnect the product and allow to cool down before each cleaning.
• Do not use any aggressive cleaning agents, rubbing alcohol or other chemical solutions as they can cause
damage to the housing and malfunctioning.
• Cleantheproductwithadry,bre-freecloth.
Disposal
Electronic devices are recyclable waste and must not be disposed of in the household waste.
At the end of its service life, dispose of the product in accordance with applicable regulatory
guidelines. You thus fulll your statutory obligations and contribute to the protection of the
environment.
Technical Data
a) General
Power supply ........................................ 5 to 12 V/DC power supply (not included)
via threaded barrel plug with center positive (+) pin
LED ....................................................... TX (green), RX (yellow)
Supported OS ....................................... Windows
®
, Mac OS X
Included driver software ....................... Windows
®
2000 and above (including 64-bit variants)
MacOS X 10.4 and above
Operating / storage temperature .......... -40 to +85 °C, 5 – 95 % RH (non-condensing)
Dimensions (H x W x D) ....................... 180 x 44 x 44 mm (Item No. 1885494)
250 x 44 x 44 mm (Item No. 1885493)
Weight .................................................. 286 g (Item No. 1885494)
394 g (Item No. 1885493)
b) USB
Port ....................................................... 1x USB 2.0 (high-speed)
Connector ............................................. USB type B
Speed ................................................... Max. 480 Mbps
Cable .................................................... USB type A to B
Protection ............................................. IEC 6100-4-2 (ESD), IEC 6100-4-4 (EFT), IEC 61000-4-5 (Surge)
c) RS232
Ports ..................................................... 8x RS232 (Item No. 1885493)
4x RS232 (Item No. 1885494)
Connector ............................................. DE9 Male
Signal lines ........................................... TXD, RXD, RTS, CTS, DTR. DSR, DCD, RI, GND
Baud rate .............................................. Max.921.6Kbps
Data bits ............................................... 7, 8
Stop bit(s) ............................................. 1, 2
Parity .................................................... None, Even, Odd, Space, Mark
Flow control .......................................... RTS / CTS, XON / XOFF
FIFO ..................................................... 2Kbytes
Protection ............................................. IEC 6100-4-2 (ESD), IEC 6100-4-4 (EFT), IEC 61000-4-5 (Surge)
/