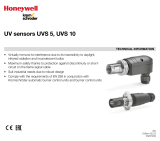
Net Safety Monitoring
TABLE OF CONTENTS
Important Information ...................................................................................... 3
Warranty .......................................................................................................... 3
Contact Information ......................................................................................... 3
Introduction ...................................................................................................... 5
Spectral Sensitivity Range ........................................................................... 5
Locate Detector ........................................................................................... 5
Typical applications ..................................................................................... 5
Potential ignition sources ............................................................................. 5
Potential inhibitors ....................................................................................... 5
Absorbing Gases ......................................................................................... 6
Range .............................................................................................................. 6
Field of View (as per FM and NFPA definition) ............................................... 6
Installation Considerations .............................................................................. 7
Unpack ............................................................................................................ 7
Reflector Positioning ....................................................................................... 9
Field Installation .............................................................................................. 9
Wiring .............................................................................................................. 9
Grounding .................................................................................................... 9
Sealing ....................................................................................................... 10
Connecting................................................................................................. 10
Detector Setup .............................................................................................. 12
System Sensitivity ..................................................................................... 12
DIP Switch Access ................................................................................. 12
Sensitivity Setting ................................................................................... 12
Time Delay Setting ................................................................................. 12
Closing the Housing ............................................................................... 13
Relay Settings ............................................................................................... 13
Coil and Latch Status ................................................................................ 13
Remote Reset ........................................................................................ 13
Final Setup ............................................................................................. 13
Detector Functionality ................................................................................... 14
Detector Window/Lens .............................................................................. 14
Start Up Procedure .................................................................................... 14
System Check ........................................................................................... 14
Monitor ....................................................................................................... 14
Condition Status—LEDs ........................................................................ 14
Condition Status—Current Output ......................................................... 15
Detector Maintenance ................................................................................... 16
Testing ....................................................................................................... 16
Manual Check Procedure .......................................................................... 16
Automatic Visual Integrity (VI) Test ........................................................... 16
Manual VI Test........................................................................................... 16
Test Procedure....................................................................................... 17
Cleaning Window/Lens and Reflector ........................................................... 18
O-ring ......................................................................................................... 18
Troubleshoot ................................................................................................. 20
Appendix A: Common UV Absorbing Gases ................................................ 21
Appendix B: Electrostatic Sensitive Device (ESD) ........................................ 22
Appendix C: Resistance Table ...................................................................... 23
Appendix D: Specifications ........................................................................... 24
Appendix E: UVS DATA ................................................................................ 25
Appendix E: UVS DATA (continued) ............................................................. 26