
Easy Installation Steps
Pasos para una instalación fácil
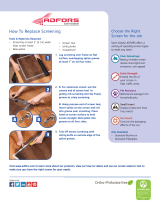
Cut base and attach to
wood framing. Base strips
are typically butted together
and do not require mitering
or notching.
Roll screen into base strip
with spline and screening
tool. Remember to trim all
excess screen. Note: Use
.175 for berglass and
.160 for aluminum screen.
Snap cap over the base
strip to serve as trim piece.
Always attach cap from
one end to the other.
Materials and Tools Needed for Installation
1.Herramienta estriada para malla
2. Tapa y base para ajuste de la malla
3. Mazo
4. Tijeras para podar
5. Herramienta para colocar malla
6. Destornillador
1. Screen Spline
2. Screen Tight Base & Cap
3. Mallet
4. Pruning Shears
5. Screening Tool
6. Screwdriver
How to Screen a Porch
Using the Screen Tight® System
1
2
3
Corte la base y fíjela a la estructura de madera.
Las tiras de base se empalman generalmente
unas con otras y no requieren ningún corte a
inglete ni muescas.
Enrolle la malla en la tira de base con la
herramienta estriada y con la herramienta
para colocar mallas. Recuerde cortar todo el
exceso de la malla. Nota: Utilice 0,175 para
la bra de vidrio y 0,160 para la malla de
aluminio.
Coloque la tapa sobre la tira de base para
servir como pieza de reborde. Fije la tapa
siempre de un extremo al otro.
• Easy to Install and Repair
• Affordable
• Low Maintenance
• Fits 2-in x 4-in or 4-in x 4-in Framing
• Screen Stays Tight & Secure
• No Painting Required
• Fácil de instalar y de reparar
• Económico
• De poco mantenimiento
• Se adapta a estructuras de 2 pulg. x 4 pulg. y 4 pulg. x 4 pulg.
• La malla permanece ajustada y segura
• No necesita pintura
Cómo colocar una malla en un porche con ayuda
del sistema Screen Tight®
Materiales y herramientas necesarios para la instalación:
PSS Tearpad_R5.indd 1 5/25/17 3:48 PM

Planning Your Project: Steps and Example
Planicación de su proyecto: Pasos y ejemplo
Your
Needs
Sus
necesidades
Unit
Price
Precio de la
unidad
Total
Cost
Costo total
1.5-in Cap
3.5-in Cap
1.5-in Base
3.5-in Base
Spline
Screen
1-in Screws
1
Is your porch a one, two or three
sided porch?
2
Sketch the front and side views of your
porch in the space above.
3
Where is your door? Place in drawing
above.
4
Add dimensions to sketch above. Using
this information, determine the amount
of material needed for your project.
Total
Tapa de
3,81 cm
Tapa de
8,89 cm
Herramienta
estriada
Malla
Tornillos
de 1 pulg.
*Base and cap come in lengths of 8-ft
*La base y la tapa vienen en largos de 2,43 m
How to Screen a Porch
Using the Screen Tight
®
System
Cómo colocar una malla en un porche con ayuda
del sistema Screen Tight
®
1. ¿Su porche es de uno, dos o tres lados?
2. Dibuje las vistas frontal y lateral de su porche en el espacio de arriba.
3. ¿Donde está la puerta? Coloque la puerta en su dibujo.
4. Agregue las dimensiones al bosquejo arriba. Utilizando esta información,
determine la cantidad de material necesario para su proyecto.
Base de
3,81 cm
Base de
8,89 cm
19-ft/5,79 m
FRONT VIEW
VISTA FRONTAL
SIDE VIEW
VISTA LATERAL
8-ft/2,43 m
8-ft/2,43 m
Reorder # G225865
PSS Tearpad_R5.indd 2 5/25/17 3:48 PM
-
 1
1
-
 2
2


Ask a question and I''ll find the answer in the document
Finding information in a document is now easier with AI
in other languages
Related papers


Other documents
-
 Saint-Gobain ADFORS FCS10294-U Operating instructions
-
Saint-Gobain ADFORS FCS9288-M Operating instructions
-
 ADFORS FCS8624-M Operating instructions
-
ODL RSSTBE Installation guide
-
Mantis 7228 User guide
-
-
Kobalt KMP 6080D-06 Operating instructions
-
Unbranded 3021662 User manual
-
Best MD6TR BEST MD Installation Guide
-

