Page is loading ...

1
5
6
3
7
If your 2
x
4’s are not already cut to size:
Lay all nine 2x4’s on the ground, square the ends so all are the same length
.
*With all 2
x
4’s now the same length, cut two 2
x
4’s 12
1
/2"shorter. Set
these shorter 2x4’s aside for later use.
IF YOU ARE PLANNING TO PAINT OR FINISH THE
LUMBER, NOW IS THE BEST TIME TO DO IT.
CONGRATULATIONS! YOUR CONVERTING TABLE IS
NOW COMPLETED AND READY TO ENJOY!
To convert to a table: Flip top up and push the Slide Locks inward
until they snap into place, flush with pivot.
To convert to a Bench: Pull the Slide Locks fully front, and then flip the
top down.
NOTE: We have provided a notch in the back of the pivot if you wish to
secure two Converting Tables together to make a full-size picnic table. If you
choose to do this, insert a
5
/
16
"x1
1
/
2
" bolt (not included) through the notches
of the matched Pivots and secure with a
5
/
16
" nut (not included).
To make the seat, position the first of the remaining three 2
x
4’s at the
front edge of the Bench Ends, and squared with the table top. Fasten
underneath through the screw slots, inside and out, with 12 of the
screws provided. Position and fasten the last (2) 2
x
4’s, squared and
spaced about
1
/
4
" apart.
Finley Products Inc. • Lancaster, PA 17601 USA •
email info@finleyproducts.com • website www.2x4basics.com
TO MAKE YOUR CONVERTING TABLE, YOU WILL NEED:
• Nine
2
x
4’s
of equal length up to 8 feet long (or lumber already cut to size).
• Screwdriver (preferably a Power Screwdriver), with a 4" or longer phillips head bit.
•
9
/16
" Wrenches (2).
•
1
/8" drill, awl or nail for pilot holes.
• Saw, if you did not purchase your lumber cut to size.
2 BENCH ENDS-#2115
Parts are identical and have
screw slots for easy drill and
screw positioning.
(36) #10 X 1in. Wood Screws • (2) 3
1
/2" Pivot Bolts • (2) Jam Nuts
2 PIVOTS-#2116
Parts are identical and
have “FRONT” markings
inside and on top for
correct assembly.
2 SLIDE LOCKS-#2117
Parts are identical and have “T”
finger pulls for easy operation when
correctly installed. They slide in, to
lock the table top in place and slide
out, to go to the bench mode.
ITEMS INCLUDED IN THIS KIT
HARDWARE PACK-#2019
SCREW SLOTS FOR EASY
SCREW PLACEMENT
FRONT OF PIVOT
IS OPEN
SLIDE LOCK SNAPS INTO
PIVOT LOCK SLOTS AND PULL
OUT OF THE “FRONT” OF PIVOT
TO UNLOCK
OPEN END OF PIVOT
SQUARED ENDS
CUT HERE
SQUARED EVEN
2. PUSH LOCK IN UNTIL
FLUSH WITH PIVOT
1. PULL TO UNLOCK
2. TILT DOWN
1. TILT UP
DRILL & SCREW
INSIDE AND OUT
DRILL & SCREW
INSIDE AND OUT
SLIDE LOCKS
(8' Max.)
PIVOT
LOCK SLOT
SLIDE LOCK
FRONT
Stringer Boards
Align the ends of the stringer boards flush to the end of the holes in the
Legs of the Bench Ends. Drill pilot holes into 2x4’s at all of the screw slots,
inside and outside, of both Legs and fasten with 8 of the screws provided.
BOLTS & JAM NUTS
To Use As A Table. To Use As A Bench. To Use As A Picnic Table...
Slide Two Together.
DRILL & SCREW
SLOTS (8 SCREWS)
Stringer Boards
2x4
NOTE:
If you make a
converting table
longer
than 6ft.
, we recommend
using the scrap 2
x
4's
from step1to fasten to the
underside of the bench seat
and seat back/table top for
support toreduce any
warpage. (See diagram)
12
1
/
2
"
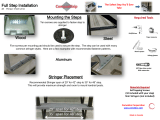
NOTE: For 8' benches, place the
pivots 15”in from the squared ends.
5"
5"
NOTE: For an 8' bench,
cut the stringer boards
32
1
/2
"
shorter than the back and
seat boards.That way,there
will be more overhang and
less span between the bench
ends so the 2x4
’
s won
’
t
tend to sag. Save the
32
1
/
2
"
pieces for use later.
P/N 2018-00 (12/03)
Make sure the Slide Locks are in the open position and the front (open slide
lock end) is installed exactly as shown in the above Diagram!
Fit tops of Bench Ends into Pivots. Secure as shown with Pivot Bolts and Jam
Nuts provided. Turn the Bench upright.
NOTE: The Jam Nuts are locking-type so they do not loosen after
assembly, and will tighten with some difficulty. Use Wrenches
to make certain Jam Nuts are snug in order to avoid wobble in
the table top. (Do not over tighten,
typically when one thread
shows out of the Jam Nut, it is tightened properly.)
2
4
Lay four long 2
x
4’s on the ground, ends squared.
*Place the Pivots, “FRONTS” (open end) to you, on top of the 2
x
4’s and
5" in from the ends. Make sure the outer 2
x
4’s are flush with the front
and back of the Pivots and squared at the ends.
Space the inner 2
x
4’s evenly (about
1
/
4
" apart, or approximately the
width of a pencil). Drill pilot holes into 2x4’s through screw holes in
pivots and fasten with 16 of the screws provided.
ATTENTION: IF THE PIVOTS AND SLIDE LOCKS
ARE NOT CORRECTLY
POSITIONED, THE CONVERTING TABLE WILL NOT WORK PROPERLY.
Firmly snap Slide Locks into Pivot Lock Slots. Slide Locks should slide freely
in slots and close completely.
Insert the two shorter 2x4
’
s(stringer boards) cut in Step 1 into their holes in the legs
of both Bench Ends as shown.(NOTE: There are rounded tabs in the bottom of these
holes that help to correctly position these 2x4
’
s).
ATTENTION: DO NOT SECURE THE STRINGER BOARDS TO THE LEGS AT THIS TIME.
FRONT
(SLIDE LOCKS MUST BE OPEN)
FRONT
Full Lifetime Warranty for this 2x4basics product purchased for normal household use in the United States
of America. FPI warrants this product to the original retail purchaser against any defects due to faulty material or
workmanship. FPI will repair, replace or refund the purchase price of the product, at the option of FPI, upon the
return of the product and the original receipt. This warranty gives you specific legal rights that may vary from
state to state.
ASSEMBLY INSTRUCTIONS
New CVT Instructions 02/03 3/11/04 7:49 AM Page 1
/