Page is loading ...

028-03004
Printed in Japan

4
Paper Requirements
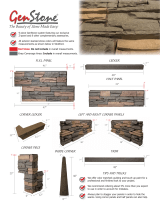
Size and Weight
❏
Size
Minimum: 148mm
182mm (5.8” 7.2”) / A5
Maximum: 320mm
450mm (12.6” 17.7”) /
A3 (Ledger)
Note:
❖
When using the Stapling mode, A4 (Letter)-size
paper is only available.
❏
Weight
Minimum: 52 g/m
2
(14lb bond)
Maximum: 128 g/m
2
(34lb bond)
Important!
Do not use the following types of paper, as they can
cause jams or misfeeds :
● Chemically treated or coated paper (such as thermal
paper)
● Transparent sheets (such as tracing paper or OHP
transparencies)
● Paper that is not squarely cut
● Wrinkled, curled or torn paper
● Pasted or stapled paper
Minimum
Maximum
182mm
450mm
320mm
148mm
Guides in Loading Paper
When you load paper in the bins, follow the directions below to avoid collating errors or jams.
● Make sure ink is completely dry.
If ink is wet, loaded sheets stick together and are likely to cause feed errors such as double feed. Besides, wet ink might
smudge the Paper Feed Roller or the Paper Stripper Pad, causing collated sheets to be smudged as well.
● Fan sheets well.
They might stick together in a stack due to static electricity, thus causing jams or double feed.
● Flatten sheets if you cannot avoid use curled ones or if they have folds or waves.
If the curled sheets cannot be flattened well, place them so that their leading edge may
curl up, except when using the Stapling mode, in which curled paper is not available.
● Do not load too many sheets at a time.
The respective bins can hold an up-to-28mm(1”)-thick stack of sheets (equivalent to approx. 280 sheets of 64g/m
2
or 17lb
bond paper).
● Do not mix different sizes or types of sheets in the stack.
False double feed detection might occur if the sheets of different weight or type are mixed there.
● Arrange loaded sheets neatly.
If they are stacked disorderly, their corner might be folded when collated.
1
Welcome to the RISO Collator TC5100
Welcome to the RISO Collator TC5100
Safety Guides............................................................................................................................ 2
Paper Requirements ................................................................................................................. 4
Knowing the Parts and Components......................................................................................... 5
Joint Section (Optional) ................................................................................................... 5
Paper Feed Section ......................................................................................................... 6
Paper Receiving Section ................................................................................................. 6
Stapler Section (Optional)................................................................................................ 7
Accessories .....................................................................................................................7
The Control Panel ..................................................................................................................... 8
Display ............................................................................................................................. 8
Basic Control Panel ......................................................................................................... 9
Advanced Control Panel .................................................................................................. 9
Basic Operation....................................................................................................................... 10
Specifying the Number of Required Sets of Collated Sheets [Programme Mode] .................. 16
Inserting Partition Sheets at a Specified Interval [Partition Insertion Mode]............................ 17
Increasing Productivity for High-volume Collating Operation [Semiactive Control Mode]....... 20
Stapling Stacks [Stapling Mode] (Optional)............................................................................. 22
Advice Displays ....................................................................................................................... 24
Charging the Staple Cartridge................................................................................................. 29
Removing Jammed Staples .................................................................................................... 30
Cleaning or Replacing Paper Feed Rollers and Paper Stripper Pads..................................... 31
Specifications .......................................................................................................................... 33
Table of Contents
Thank you for purchasing the RISO Collator TC5100, which allows you fast and easy collation
of printed copies of multiple-page originals. Given the user-friendly control panel and the
application-extension features, the TC5100 will be one of the strong finishing tools in making
various booklets from copies printed on your RISO printer.
About This User's Guide
This guide provides all the information necessary to use your RISO Collator TC5100. It is
designed to help you take advantage of the features built into your RISO Collator TC5100 and
provides information on maintenance and troubleshooting.
Read through this guide before use and keep it at hand to consult it whenever you have any
questions during operation.

2
Safety Guides
This section explains the precautions you have to observe when handling the TC5100.
Never fail to read this section before using your TC5100 for the first time.
About the Alert Notices
WARNING
Caution
Important!
Indicates a potentially hazardous situation which, if disregarded, might result in serious injury.
Indicates a potentially hazardous situation which, if disregarded, might result in injury or physical
damage.
Gives you helpful advice for trouble-free operation.
The following alert notices are used in this manual to alert a user to operate the TC5100 correctly and prevent damage or
injury.
Installation
Your dealer will help determine the proper location for this
unit at the time of delivery.
WARNING
● Do not place water containers or metallic objects on this
unit. If water drips inside this unit or a metallic object
drops inside it, it can result in a fire or an electric shock.
Caution
● Install this unit near an electrical socket (outlet) to avoid
using an extension cord between this unit and the
electrical socket (outlet). If an extension cord is
unavoidable, do not use one longer than 5m (15 ft) nor
one without the ground pin on the plug.
● Place this unit on a flat and stable surface
[maximum of ±5mm (±3/16 inch) differential
allowed]. Injury might occur if it falls.
● Do not place heavy objects on this unit. The objects
might fall and cause injury.
● Keep this unit away from dusty or humid areas.
Otherwise, a fire or an electric shock might occur.
● If this unit is placed on the dedicated stand, lock the
stand casters. Injury might occur if the stand moves or
turns down.
● Unplug the electrical (power) cord before
moving this unit. Otherwise, the electrical
(power) cord might be damaged and a fire or
an electric shock might occur.
Important!
● Avoid installing this unit in the locations listed below.
Failure to observe this precaution may lead to machine
failure or human injury.
❏
Extremely bright locations such as locations close to
windows or locations that are exposed to direct
sunlight (provide a curtain if you have no choice but
to install this unit in such a location)
❏
Locations that are subject to sudden temperature
change
❏
Extremely hot and humid locations or cold
and dry locations. The recommended
temperature/humidity range: 15˚C to 30˚C
(59˚F to 86˚F) with 40% to 70% (no
condensation)
❏
Locations exposed to direct cold air, direct hot air or
direct radiant heat
❏
Badly ventilated locations
❏
Locations where it is impossible to provide a
clearance of 10cm (4 inch) or wider behind this unit.
● Secure sufficient installation space according to the
following space requirements for the respective
configurations:
❏
When placed on the tabletop ➔ 861mm 631mm
1031mm (33.9” 24.9” 40.6”) [W D H]
❏
When placed on the dedicated stand ➔ 921mm
887mm 1529mm (36.3” 35.0” 60.2”) [W D H]
❏
When two units are jointed ➔ 2082mm 887mm
1529mm (82.0” 35.0” 60.2”) [W D
H]
40%
70%
15˚C
30
˚C
3
Power Connections
WARNING
● Do not overload an electrical socket (outlet) or
extension cord as it can result in fire or
electrical shock (Check the "Specifications"
section for the allowable range).
● Make sure that the electrical (power) cord is not
crushed under other pieces of machinery or stepped on
by normal traffic.
● Do not damage the electrical (power) cord by
placing heavy objects on it or pulling or
bending it. Otherwise, a fire or an electric
shock might occur.
● Do not plug or unplug the electrical (power) cord with
wet hands. Otherwise, an electric shock might occur.
Caution
● Do not pull the electrical (power) cord but hold the plug
itself when unplugging it. Otherwise, it could become
damaged and a fire or an electric shock might occur.
● Pull out the electrical (power) plug from the electrical
socket (outlet) more than once a year and clean the
teeth of the plug and their surroundings. If dust piles on
them, a fire might occur.
Important!
● Check the electrical (power) plug for poor
connections. Plug the electrical (power) cord
securely into a nearby electrical socket
(outlet).
● Be sure to turn off the POWER switch when connecting
or disconnecting the electrical (power) cord.
Handling Precautions
WARNING
● Do not insert or drop any metallic material or flammable
substance into this unit through any opening.
Otherwise, a fire or an electric shock might occur.
● Do not remove the covers. Otherwise, you might be
electrically shocked by the high-voltage parts inside.
● Do not disassemble or rebuild this unit by
yourself. Otherwise, a fire or an electric shock
might occur.
● If this unit gets uncomfortably hot, smokes or
smells bad, immediately turn off the power,
unplug the electrical (power) cord and contact
your service representative because a fire or an electric
shock might occur.
● If something drops inside this unit, turn off the
power switch first, then unplug the electrical
(power) cord and contact your service
representative. If you continue using it, a fire or an
electric shock might occur.
● Never stick your hands or fingers in the bins or the
Paper Receiving Tray during operation.
● Keep loose clothing or long hair away from moving
parts to avoid becoming entangled.
● Before cleaning any part of this unit, turn off the power.
Caution
● Do not remove the support feet at the base of this unit.
Injury might occur if it falls.
● Do not open any covers or move this unit during
operation.
● Unplug the electrical (power) cord, if you do not use this
unit for a long time.
Important!
● Do not unplug the electrical (power) cord or turn off the
power during operation.
● Be sure to open and close any cover gently.
● Do not place heavy objects on or apply shocks to this
unit.
● This unit has precision parts and driving parts inside. Do
not handle this unit in other ways than described in this
guide.
● Contact your local service representative before moving
this unit.
Safety Guides
❏
When placed on the tabletop with the optional
Stapler unit ➔ 1101mm
631mm 1013mm (43.4”
24.9” 40.6”) [W D H]
❏
When placed on the dedicated Stand with the
optional Stapler unit ➔ 1101mm
887mm 1529mm
(43.4”
35.0” 60.2”) [W D
H]

4
Paper Requirements
Size and Weight
❏
Size
Minimum: 148mm
182mm (5.8” 7.2”) / A5
Maximum: 320mm
450mm (12.6” 17.7”) /
A3 (Ledger)
Note:
❖
When using the Stapling mode, A4 (Letter)-size
paper is only available.
❏
Weight
Minimum: 52 g/m
2
(14lb bond)
Maximum: 128 g/m
2
(34lb bond)
Important!
Do not use the following types of paper, as they can
cause jams or misfeeds :
● Chemically treated or coated paper (such as thermal
paper)
● Transparent sheets (such as tracing paper or OHP
transparencies)
● Paper that is not squarely cut
● Wrinkled, curled or torn paper
● Pasted or stapled paper
Minimum
Maximum
182mm
450mm
320mm
148mm
Guides in Loading Paper
When you load paper in the bins, follow the directions below to avoid collating errors or jams.
● Make sure ink is completely dry.
If ink is wet, loaded sheets stick together and are likely to cause feed errors such as double feed. Besides, wet ink might
smudge the Paper Feed Roller or the Paper Stripper Pad, causing collated sheets to be smudged as well.
● Fan sheets well.
They might stick together in a stack due to static electricity, thus causing jams or double feed.
● Flatten sheets if you cannot avoid use curled ones or if they have folds or waves.
If the curled sheets cannot be flattened well, place them so that their leading edge may
curl up, except when using the Stapling mode, in which curled paper is not available.
● Do not load too many sheets at a time.
The respective bins can hold an up-to-28mm(1”)-thick stack of sheets (equivalent to approx. 280 sheets of 64g/m
2
or 17lb
bond paper).
● Do not mix different sizes or types of sheets in the stack.
False double feed detection might occur if the sheets of different weight or type are mixed there.
● Arrange loaded sheets neatly.
If they are stacked disorderly, their corner might be folded when collated.
1
Welcome to the RISO Collator TC5100
Welcome to the RISO Collator TC5100
Safety Guides............................................................................................................................ 2
Paper Requirements ................................................................................................................. 4
Knowing the Parts and Components......................................................................................... 5
Joint Section (Optional) ................................................................................................... 5
Paper Feed Section ......................................................................................................... 6
Paper Receiving Section ................................................................................................. 6
Stapler Section (Optional)................................................................................................ 7
Accessories .....................................................................................................................7
The Control Panel ..................................................................................................................... 8
Display ............................................................................................................................. 8
Basic Control Panel ......................................................................................................... 9
Advanced Control Panel .................................................................................................. 9
Basic Operation....................................................................................................................... 10
Specifying the Number of Required Sets of Collated Sheets [Programme Mode] .................. 16
Inserting Partition Sheets at a Specified Interval [Partition Insertion Mode]............................ 17
Increasing Productivity for High-volume Collating Operation [Semiactive Control Mode]....... 20
Stapling Stacks [Stapling Mode] (Optional)............................................................................. 22
Advice Displays ....................................................................................................................... 24
Charging the Staple Cartridge................................................................................................. 29
Removing Jammed Staples .................................................................................................... 30
Cleaning or Replacing Paper Feed Rollers and Paper Stripper Pads..................................... 31
Specifications .......................................................................................................................... 33
Table of Contents
Thank you for purchasing the RISO Collator TC5100, which allows you fast and easy collation
of printed copies of multiple-page originals. Given the user-friendly control panel and the
application-extension features, the TC5100 will be one of the strong finishing tools in making
various booklets from copies printed on your RISO printer.
About This User's Guide
This guide provides all the information necessary to use your RISO Collator TC5100. It is
designed to help you take advantage of the features built into your RISO Collator TC5100 and
provides information on maintenance and troubleshooting.
Read through this guide before use and keep it at hand to consult it whenever you have any
questions during operation.

8
The Control Panel
5
6
1
2
3
4
5
6
7
89
0
c
START
TEST
STOP
JOINT-ON
INSERTION
STRAIGHT
SWING
STACK
SLOW FAST
SPEED
SEMIACTIVE
FEED CHECK
OFF
1
2
3
4
5
6
7
8
9
10
DOUBLE
FEED
JAM FULL
JOINT POINT
ANOTHER TOWER
123
MIS-
FEED
CALL
SERVICE
CHECK
SETTING
RESET
STAPLE
3
2
1
4
5
6
7
10
Display
1 Check & Error Display (
☛
See p.24)
Shows errors or machine status.
2 Machine Monitor Display (
☛
See p.24)
Shows locations which should be checked in relation
with the error or machine status indicated in the
Check & Error Display.
Note:
❖
The Control Panel on the sub tower is
available only for checking the machine
status and clearing error display. Other
operations can be controlled from the
Control Panel on the main tower.
12 13 14 15 16 17
9
8
11
3 Meter Display Key
Shows the total of finished sets of collated sheets in
the Main Display.
4 Main Display
Counts the number of finished sets of collated sheets
or shows other numeric settings and advice
messages.
18
5
Sub Tower (Optional)
1
4
2
5
Paper Feed Section
(
☛
See p.6)
Paper Receiving Section
(
☛
See p.6)
Knowing the Parts and
Components
3
1 Control Panel (
☛
See p.8 & 9)
2 Power Switch
3 Transport Belt Cover (
☛
See p.24)
Open to remove jammed sheets.
Joint Section (Optional)
4 Joint Unit
Transports the collated sets in the sub tower to the Paper Receiving
Tray of the main tower.
5 Stand / Joint Stand
Required when two towers are joined. This is also available with a
single tower installation.
Main Tower

6
9
8
10
11
12
6
7
6 Bin Tray
Holds sheets to be collated.
7 Extension Tray
Pull out when loading A3(ledger)-size sheets.
8 Bin Number Label
Indicates the page order of sheets to be collated.
9 Paper Feed Pressure Adjustment Lever
Adjusts the paper feed pressure according to paper
thickness.
10 Paper Feed Guide
Supports and guides sheets in feeding.
11 Paper Stripper Pad (Green plate under the Paper
Feed Roller)
Separates a single sheet from the stack of paper.
12 Paper Feed Roller
Feeds a single sheet from the stack of paper.
13 Paper Receiving Tray
Holds collated sheets.
14 Paper Stacking Guides
Align collated sheets neatly.
15 Paper Stacking Support
Leads collated sheets to sit on the tray orderly.
16 Swing Stacking Wings
Swing collated sheets to right and left in the Swing
action stacking mode.
17 Paper Stopper
Stops the collated sheets ejected into the Paper
Receiving Tray.
14
13
16
15
17
Knowing the Parts and Components
Paper Feed Section
Paper Receiving Section
7
Accessories
22 Extension Stopper (
☛
See p.13)
Attach to the Paper Stopper when collating small-size paper.
The paper sizes which require this accessory are smaller than
B5 (or 7.2”
10.2”).
23 Swing Stacking Base (
☛
See p.13)
Place on the Paper Receiving Tray when collating sheets in
the Swing action stacking mode. This accessory is not
required for large-size paper, such as A3 or ledger-size paper.
22
23
Knowing the Parts and Components
Stapler Section (Optional)
18 Stapler Unit
Staples collated sheets and ejects them into the
Paper Receiving Tray.
19 Stapler Top Cover
Open to remove jammed sheets.
20 Staple Cartridge Door
Open to charge the empty cartridge with staples
or remove jammed staples.
21
Staple Cartridge
19
18
20
21

6
9
8
10
11
12
6
7
6 Bin Tray
Holds sheets to be collated.
7 Extension Tray
Pull out when loading A3(ledger)-size sheets.
8 Bin Number Label
Indicates the page order of sheets to be collated.
9 Paper Feed Pressure Adjustment Lever
Adjusts the paper feed pressure according to paper
thickness.
10 Paper Feed Guide
Supports and guides sheets in feeding.
11 Paper Stripper Pad (Green plate under the Paper
Feed Roller)
Separates a single sheet from the stack of paper.
12 Paper Feed Roller
Feeds a single sheet from the stack of paper.
13 Paper Receiving Tray
Holds collated sheets.
14 Paper Stacking Guides
Align collated sheets neatly.
15 Paper Stacking Support
Leads collated sheets to sit on the tray orderly.
16 Swing Stacking Wings
Swing collated sheets to right and left in the Swing
action stacking mode.
17 Paper Stopper
Stops the collated sheets ejected into the Paper
Receiving Tray.
14
13
16
15
17
Knowing the Parts and Components
Paper Feed Section
Paper Receiving Section
7
Accessories
22 Extension Stopper (
☛
See p.13)
Attach to the Paper Stopper when collating small-size paper.
The paper sizes which require this accessory are smaller than
B5 (or 7.2”
10.2”).
23 Swing Stacking Base (
☛
See p.13)
Place on the Paper Receiving Tray when collating sheets in
the Swing action stacking mode. This accessory is not
required for large-size paper, such as A3 or ledger-size paper.
22
23
Knowing the Parts and Components
Stapler Section (Optional)
18 Stapler Unit
Staples collated sheets and ejects them into the
Paper Receiving Tray.
19 Stapler Top Cover
Open to remove jammed sheets.
20 Staple Cartridge Door
Open to charge the empty cartridge with staples
or remove jammed staples.
21
Staple Cartridge
19
18
20
21

8
The Control Panel
5
6
1
2
3
4
5
6
7
89
0
c
START
TEST
STOP
JOINT-ON
INSERTION
STRAIGHT
SWING
STACK
SLOW FAST
SPEED
SEMIACTIVE
FEED CHECK
OFF
1
2
3
4
5
6
7
8
9
10
DOUBLE
FEED
JAM FULL
JOINT POINT
ANOTHER TOWER
123
MIS-
FEED
CALL
SERVICE
CHECK
SETTING
RESET
STAPLE
3
2
1
4
5
6
7
10
Display
1 Check & Error Display (
☛
See p.24)
Shows errors or machine status.
2 Machine Monitor Display (
☛
See p.24)
Shows locations which should be checked in relation
with the error or machine status indicated in the
Check & Error Display.
Note:
❖
The Control Panel on the sub tower is
available only for checking the machine
status and clearing error display. Other
operations can be controlled from the
Control Panel on the main tower.
12 13 14 15 16 17
9
8
11
3 Meter Display Key
Shows the total of finished sets of collated sheets in
the Main Display.
4 Main Display
Counts the number of finished sets of collated sheets
or shows other numeric settings and advice
messages.
18
5
Sub Tower (Optional)
1
4
2
5
Paper Feed Section
(
☛
See p.6)
Paper Receiving Section
(
☛
See p.6)
Knowing the Parts and
Components
3
1 Control Panel (
☛
See p.8 & 9)
2 Power Switch
3 Transport Belt Cover (
☛
See p.24)
Open to remove jammed sheets.
Joint Section (Optional)
4 Joint Unit
Transports the collated sets in the sub tower to the Paper Receiving
Tray of the main tower.
5 Stand / Joint Stand
Required when two towers are joined. This is also available with a
single tower installation.
Main Tower

12
Adjust the position of the Paper Stacking
Guides.
❏
Adjusting the right-hand Paper Stacking Guide
Align the base notch with the guide pictograph
corresponding to the selected stacking mode on the
Paper Receiving Tray.
❏
Adjusting the left-hand Paper Stacking Guide
Align the base notch marked with the guide pictograph
corresponding to the selected stacking mode with the
guide indicator corresponding to the size of sheets to
be collated on the Paper Receiving Tray.
Note that there are two different guide indicators for A3
(ledger)-size paper according to the stacking mode. Make
sure to align the base notch with the guide indicator
marked with the selected stacking mode pictograph when
using A3(ledger)-size paper.
Stacking mode guide pictograph
: Straight alignment mode
: Swing action mode
: Stapling mode
Important!
To move the Paper Stacking Guides, push the lower
part. Otherwise, they may be damaged.
5
A4
B5
8
1
/
2
A5R
A4
B5
8
1
/
2
A5R
Right-handLeft-hand
Basic Operation
Right-handLeft-hand
Note:
❖ When using irregular size sheets;
Adjust the position of the right-hand Paper Stacking
Guide as instructed above and place the irregular size
sheets along it, setting their front edges against the
inner panel. Then slide the left-hand Paper Stacking
Guide to the edge of the placed sheets (in the Straight
alignment mode) or to the point where approx. 20mm
(0.8”) space can be secured before the placed sheets
(in the Swing action mode).
<Straight alignment mode>
<Swing action mode>
20mm (0.8”) space
A4
1
/
2
A5R
B5
8
Right-handLeft-hand
<Stapling mode>
9
Basic Control Panel
5 All Reset Key
Returns all settings to initial status. This key is also
used to clear error displays after troubleshooting.
6 Numeric Keys (0 to 9 Keys)
Use these keys to enter the number of sheets to be
collated or other numeric values.
7 Clear Key
Cancels the number entered and clears the number
of finished sets of collated sheets in the Main
Display.
8 X Key (
☛
See p.18)
Use when specifying the number of partition sheets
in
the Partition insertion mode.
9 Start Key
Starts operation. The indicator lights when the key is
active.
10 Test Key
Makes a sample set of collated sheets, memorising
the size and thickness of collated sheets and the
activated bin numbers. The indicator lights when the
key is active.
11 Stop Key
Interrupts operation or lowers bin trays.
Advanced Control Panel
12 Stapling Mode Key (
☛
See p.23)
Activates the optional Stapler unit to staple collated
sheets. The indicator lights when this mode is
selected.
13 Joint Mode Key (
☛
See p.10)
Activates another tower when two towers are joined.
The indicator lights when another tower is available.
14 Feed Check Control Key (
☛
See p.26)
Suspends the operation of the paper feed monitors.
The indicator lights when the operation is
suspended.
15 Semiactive Control Mode Key (
☛
See p.20)
Divides active bins into two equal parts for tandem or
alternate collating operation, increasing productivity
for high-volume collating operation. The indicator
lights when this mode is selected.
16 Partition Insertion Mode Key (
☛
See p.18)
Inserts a specified number of partition sheets per a
given number of finished sets of collated sheets. The
indicator lights when this mode is selected.
17 Stacking Mode Selection Key (
☛
See p.11)
Switches the current stacking mode between the
straight alignment mode and the swing action mode.
The corresponding indicator lights according to the
selected mode.
18 Collating Speed Adjustment Key (
☛
See p.14)
Increases or decreases the collating speed. The
corresponding indicator lights according to the
current
speed setting. When the standard speed
setting
is selected, neither of the indicators lights.
The Control Panel

10
Basic Operation
This section describes the basic operation procedures.
For this operation, you can select how to stack collated sheets on the Paper Receiving
Tray between; Straight alignment mode and Swing action mode.
About the Stacking Modes
The TC5100 provides you with two stacking modes, Straight alignment mode and Swing action mode. You can select
either of them by pressing the Stacking Mode Selection Key.
Turn on the power switch.
[ ] : ON
[ ] : OFF
Note:
❖
When two towers are joined, turn on the
power switch of the sub tower first. If you
use both towers, press the Joint Mode Key
on the control panel of the main tower.
1
❏
Swing action mode ( )
Collated sheets are alternately swung to right and left
when ejected into the Paper Receiving Tray and
stacked zigzag (as illustrated below).
❏
Straight alignment mode ( )
Collated sheets are stacked straight along the Paper
Stacking Guides.
Place stacks of sheets in bins.
Fan sheets well and place them along the right-hand
paper guide on the Bin Trays, resting their leading edges
on the panel at front.
When placing sheets face up, arrange stacks of sheets
from the top bin (No.1) down in the order of pages. When
placing them face down, arrange them from the bottom
bin (No.10) up in the order of pages.
2
11
Important!
Be careful not to apply pressure to the sides of the
black plastic part protruding on the Bin Tray when
placing sheets because the part is easy to be damaged.
Note:
❖
The respective bins can hold an up-to-28mm(1”)-thick
stack of sheets (equivalent to approx. 280 sheets of
64g/m
2
or 17lb bond paper).
❖
The Extension Tray is stowed into the Bin Tray. Pull it
out when placing large-size paper, such as A3 or
ledger-size paper.
❖
Place sheets with their long side as the leading edge
when their size is smaller than B5 (or 7.2”
10.2”).
[Sub Tower] [Main Tower]
Bin No.1
Bin No.2
Bin No.3
Bin No.4
Bin No.5
Bin No.6
Bin No.7
Bin No.8
Bin No.9
Bin No.10
Bin No.11
Bin No.12
Bin No.13
Bin No.14
Bin No.15
Bin No.16
Bin No.17
Bin No.18
Bin No.19
Bin No.20
Slide the Paper Feed Guide to the edge of
stacked sheets.
Do not squeeze the stack with the Paper Feed Guide.
3
Black plastic part
Basic Operation
When two towers are used in collating operation, the top bin of the sub tower corresponds to bin No.1 and the bottom
one of the main tower to bin No.20. Take note of this arrangement rule when loading sheets in bins.
Select the Stacking mode.
Press the Stacking Mode Selection Key to light the
indicator of a desired mode. Two stacking modes, Straight
alignment mode and Swing action mode, are available.
4
5
6
INSERTION
STRAIGHT
SWING
STACK
SLOW FAST
SPEED
SEMIACTIVE

12
Adjust the position of the Paper Stacking
Guides.
❏
Adjusting the right-hand Paper Stacking Guide
Align the base notch with the guide pictograph
corresponding to the selected stacking mode on the
Paper Receiving Tray.
❏
Adjusting the left-hand Paper Stacking Guide
Align the base notch marked with the guide pictograph
corresponding to the selected stacking mode with the
guide indicator corresponding to the size of sheets to
be collated on the Paper Receiving Tray.
Note that there are two different guide indicators for A3
(ledger)-size paper according to the stacking mode. Make
sure to align the base notch with the guide indicator
marked with the selected stacking mode pictograph when
using A3(ledger)-size paper.
Stacking mode guide pictograph
: Straight alignment mode
: Swing action mode
: Stapling mode
Important!
To move the Paper Stacking Guides, push the lower
part. Otherwise, they may be damaged.
5
A4
B5
8
1
/
2
A5R
A4
B5
8
1
/
2
A5R
Right-handLeft-hand
Basic Operation
Right-handLeft-hand
Note:
❖ When using irregular size sheets;
Adjust the position of the right-hand Paper Stacking
Guide as instructed above and place the irregular size
sheets along it, setting their front edges against the
inner panel. Then slide the left-hand Paper Stacking
Guide to the edge of the placed sheets (in the Straight
alignment mode) or to the point where approx. 20mm
(0.8”) space can be secured before the placed sheets
(in the Swing action mode).
<Straight alignment mode>
<Swing action mode>
20mm (0.8”) space
A4
1
/
2
A5R
B5
8
Right-handLeft-hand
<Stapling mode>
9
Basic Control Panel
5 All Reset Key
Returns all settings to initial status. This key is also
used to clear error displays after troubleshooting.
6 Numeric Keys (0 to 9 Keys)
Use these keys to enter the number of sheets to be
collated or other numeric values.
7 Clear Key
Cancels the number entered and clears the number
of finished sets of collated sheets in the Main
Display.
8 X Key (
☛
See p.18)
Use when specifying the number of partition sheets
in
the Partition insertion mode.
9 Start Key
Starts operation. The indicator lights when the key is
active.
10 Test Key
Makes a sample set of collated sheets, memorising
the size and thickness of collated sheets and the
activated bin numbers. The indicator lights when the
key is active.
11 Stop Key
Interrupts operation or lowers bin trays.
Advanced Control Panel
12 Stapling Mode Key (
☛
See p.23)
Activates the optional Stapler unit to staple collated
sheets. The indicator lights when this mode is
selected.
13 Joint Mode Key (
☛
See p.10)
Activates another tower when two towers are joined.
The indicator lights when another tower is available.
14 Feed Check Control Key (
☛
See p.26)
Suspends the operation of the paper feed monitors.
The indicator lights when the operation is
suspended.
15 Semiactive Control Mode Key (
☛
See p.20)
Divides active bins into two equal parts for tandem or
alternate collating operation, increasing productivity
for high-volume collating operation. The indicator
lights when this mode is selected.
16 Partition Insertion Mode Key (
☛
See p.18)
Inserts a specified number of partition sheets per a
given number of finished sets of collated sheets. The
indicator lights when this mode is selected.
17 Stacking Mode Selection Key (
☛
See p.11)
Switches the current stacking mode between the
straight alignment mode and the swing action mode.
The corresponding indicator lights according to the
selected mode.
18 Collating Speed Adjustment Key (
☛
See p.14)
Increases or decreases the collating speed. The
corresponding indicator lights according to the
current
speed setting. When the standard speed
setting
is selected, neither of the indicators lights.
The Control Panel

16
Specifying the Number of Required Sets
of Collated Sheets
[
Programme Mode
]
Before pressing the Test Key to make a sample set, enter the
number of required sets of collated sheets with the numeric keys
on the Control Panel. The entered number will appear on the
Main Display.
Note:
❖
If you enter a number incorrectly, press the Clear Key to reset
the number appearing in the Main Display to zero.
The number on the Main Display will decrease according as the
number of finished sets of collated sheets increases. The
operation will then stop when the number on the Main Display
becomes “0”.
Note:
❖
Press the Start Key or the Test Key to recover the specified
number on the Main Display and start another collating
operation.
❖
Press the Stop Key to lower the Bin Trays when removing the
remaining sheets there after the collating operation.
1
2
3
4
5
6
7
89
0
▼
▼
START
TEST
or
▼
You can specify how many sets of collated sheets should be made before starting the collating operation.
13
Adjust the Paper Stopper to the size of the
sheets to be collated.
Slide the Paper Stopper to a desired position along the
paper size scale on the Paper Receiving Tray, holding the
side parts by both hands. You can find the paper size
guide indicators on the scale.
6
Note:
❖
When selecting the Swing action mode for paper
stacking;
Join the Swing Stacking Base to the Paper Stopper
after position adjustment. To join them together, insert
the partly-indented-edge side of the Swing Stacking
Base into the triangular openings at the base of the
Paper Stopper from the tower side.
Note that this accessory is not required for large-size
sheets, such as A3 and ledger-size paper.
❖
When using the sheets whose size is irregular or
smaller than B5 (or 7.2” ✕ 10.2”);
Place them along the right-hand Paper Stacking Guide,
setting their front edges against the inner panel. Then
slide the Paper Stopper to the point where approx.
30mm (1.2”) space can be secured before the placed
sheets.
A4
14
Basic Operation
30mm (1.2”) space
If the sheet size is smaller than B5 (or 7.2”
10.2”),
attach the Extension Stopper (accessory) to the Paper
Stopper before position adjustment.
To attach this accessory, insert the hooks of the
attachment panel into the slits in the lower part of the
Paper Stopper (from the tower side) and secure the
attachment panel on the Paper Stopper with magnet.
When the Extension Stopper is used with the Swing
Stacking Base, join the Swing Stacking Base to the
base of the Paper Stopper before attaching the
Extension Stopper there.

14
STRAIGHT
SWING
STACK
SLOW FAST
SPEED
Specify desired settings on the Control Panel.
The following advanced operation modes are available
with panel key operation.
❏
Programme mode (
☛
See p.16)
❏
Partition insertion mode (
☛
See p.17)
❏
Semiactive control mode (
☛
See p.20)
❏
Stapling mode (
☛
See p.22)
Note:
❖
Holding down the All Reset Key longer than two
seconds returns the Control Panel to the initial settings,
i.e. the settings when the power switch is turned on.
❖
You can change the collating speed by pressing the
Collating Speed Adjustment Key. The following three
speed settings are available.
❏
SLOW: approx. 33 sets/minute
(with A4 or letter-size paper)
❏
STANDARD: approx. 40 sets/minute
❏
FAST: approx. 60 sets/minute
The selected speed setting is [STANDARD] when
neither of the speed indicators lights.
Note that the collating speed cannot be changed when
two towers are in operation. In this case, it is
automatically set to 25 sets/minutes.
7
Press the Test Key.
A sample set of collated sheets is ejected into the Paper
Receiving Tray. Check if the order of the sample set is
correct.
The sample set is counted, advancing the total meter by
1, if no error message appears in the Main Display.
Note:
❖
The size and weight (thickness) of collated sheets and
the activated bin numbers are memorised and used as
reference data in monitoring operation conditions.
❖
In case missing pages (misfeed) or same pages
(double feed) are found in the sample set, check the
conditions of the sheets stacked on the corresponding
bins. Press the Test key again to make another sample
set.
8
TEST
STOP
Basic Operation
▼
15
Press the Start Key.
The collating operation starts. It automatically stops when
any bin becomes empty or a specified job is finished. The
number of finished sets of collated sheets appears on the
Main Display.
If you want to interrupt operation, press the Stop Key.
Note:
❖
When an error indicator lights in the Check & Error
Display, interrupting operation, check the area
concerned and then resume operation, following the
instructions given in the section “Advice Displays” on
p.24.
The set of collated sheets made when the error
indicator lights is not counted because it may be an
incomplete one. Therefore, remove it from the stack of
collated sheets in the Paper Receiving Tray before
resuming operation.
9
Remove finished sets of collated sheets from
the Paper Receiving Tray.
Slide back the Paper Stopper to let your hand go under
the stack of collated sheets. When the Swing Stacking
Base is placed under the stack, take it out, keeping the
stack placed on it.
Note:
❖
When the “Full Tray” indicator lights, interrupting
operation, the Paper Receiving Tray is full of collated
sheets. Remove collated sheets as instructed above
and resume operation, following the instructions given
in the section “Advice Displays” on p.24. The capacity
of the Paper Receiving Tray is an approx. 70mm(2.8”)-
thick stack of collated sheets.
10
0C
START
TEST
Basic Operation
▼
▼
FULL

16
Specifying the Number of Required Sets
of Collated Sheets
[
Programme Mode
]
Before pressing the Test Key to make a sample set, enter the
number of required sets of collated sheets with the numeric keys
on the Control Panel. The entered number will appear on the
Main Display.
Note:
❖
If you enter a number incorrectly, press the Clear Key to reset
the number appearing in the Main Display to zero.
The number on the Main Display will decrease according as the
number of finished sets of collated sheets increases. The
operation will then stop when the number on the Main Display
becomes “0”.
Note:
❖
Press the Start Key or the Test Key to recover the specified
number on the Main Display and start another collating
operation.
❖
Press the Stop Key to lower the Bin Trays when removing the
remaining sheets there after the collating operation.
1
2
3
4
5
6
7
89
0
▼
▼
START
TEST
or
▼
You can specify how many sets of collated sheets should be made before starting the collating operation.
13
Adjust the Paper Stopper to the size of the
sheets to be collated.
Slide the Paper Stopper to a desired position along the
paper size scale on the Paper Receiving Tray, holding the
side parts by both hands. You can find the paper size
guide indicators on the scale.
6
Note:
❖
When selecting the Swing action mode for paper
stacking;
Join the Swing Stacking Base to the Paper Stopper
after position adjustment. To join them together, insert
the partly-indented-edge side of the Swing Stacking
Base into the triangular openings at the base of the
Paper Stopper from the tower side.
Note that this accessory is not required for large-size
sheets, such as A3 and ledger-size paper.
❖
When using the sheets whose size is irregular or
smaller than B5 (or 7.2” ✕ 10.2”);
Place them along the right-hand Paper Stacking Guide,
setting their front edges against the inner panel. Then
slide the Paper Stopper to the point where approx.
30mm (1.2”) space can be secured before the placed
sheets.
A4
14
Basic Operation
30mm (1.2”) space
If the sheet size is smaller than B5 (or 7.2”
10.2”),
attach the Extension Stopper (accessory) to the Paper
Stopper before position adjustment.
To attach this accessory, insert the hooks of the
attachment panel into the slits in the lower part of the
Paper Stopper (from the tower side) and secure the
attachment panel on the Paper Stopper with magnet.
When the Extension Stopper is used with the Swing
Stacking Base, join the Swing Stacking Base to the
base of the Paper Stopper before attaching the
Extension Stopper there.

20
Increasing Productivity for High-volume
Collating Operation
[
Semiactive Control Mode
]
You can increase productivity for high-volume collating operation by dividing active bins into two equal parts for tandem or
alternate operation.
In this case, the number of pages to be collated will be half the number of available bins.
Place stacks of sheets in bins.
Divide active bins into halves and arrange the same
stacks of sheets in the same order in both halves.
Note:
❖
This mode is also available with the Partition insertion
mode for single tower application. (
☛
See p.17)
1
Press the Semiactive Control Mode Key.
The corresponding indicator lights.
2
Press the Test Key.
Each sample set of collated sheets is made for both
halves, delivering two sample sets into the Paper
Receiving Tray. Check them as instructed in step 8 of the
basic operation.
They are counted, advancing the total meter by 2, if no
error message appears in the Main Display.
3
5
6
JOINT-ON
INSERTION
STRAIGHT
STA
SEMIACTIVE
FEED CHECK
OFF
Bin No.1
Bin No.6
<Single tower application>
Bin No.1
Bin No.10
[Sub Tower] [Main Tower]
Bin No.11
Bin No.20
<Double tower application>
17
Inserting Partition Sheets at a Specified
Interval
[
Partition Insertion Mode
]
You can insert partition sheets of a different colour into the stack of collated sheets at a specified interval.
Place partition sheets in bin No.1.
Use other bins for the sheets to be collated.
1
Bin No.1
Partition Sheets
Partition Sheets
Bin No.1
[
Sub Tower
][
Main Tower
]
Partition Sheets
Bin No.1
Bin No.6
Note:
❖
This mode is also available with the Semiactive control
mode for single tower application. In this case, partition
sheets are to be placed in the top bins of both halves.
<Single tower application> <Double tower application>
<Single tower application>

18
5
6
INSERTION
STRAIGHT
SWING
STACK
SEMIACTIVE
FEED CHECK
OFF
0
c
START
▼
▼
Press the X Key and enter the number of
partition sheets (groups).
Use the numeric keys.
Skip this step when you do not specify the number of
partition sheets.
Enter the number of sets of collated sheets
per which a partition sheet is to be inserted.
Use the numeric keys to enter a desired number.
Note:
❖
If you enter a number incorrectly, press the Clear Key
to reset the number appearing in the Main Display to
zero.
Press the Partition Insertion Mode Key.
The corresponding indicator lights.
Inserting Partition Sheets at a Specified Interval [Partition Insertion Mode]
2
3
4
▼
▼
19
Press the Test Key.
A partition sheet is fed to the Paper Receiving Tray and a
sample set of collated sheets is ejected on it. Check it as
instructed in the step 8 of the basic operation.
Note:
❖
When using the Stapling mode, partition sheets are not
to be stapled.
5
Press the Start Key.
Partition sheets are inserted into the stack per the
specified number of sets of collated sheets. The number
of finished sets of collated sheets appears on the Main
Display.
If you specify the number of partition sheets, operation will
automatically stop after the specified numbers of partition
sheets are all inserted and the specified number of finished
sets of collated sheets are stacked on them. In this case,
the count indications in the Main Display will be “0”.
6
Specified number of sets
Partition sheets
1 set of collated sheets
Inserting Partition Sheets at a Specified Interval [Partition Insertion Mode]
TEST
or
▼
START
or
▼
or
▼
/