Page is loading ...

!
Villa"Barcelona"TandG"Install"Instructions" " " Page"1"of"8"
Villa Barcelona
Installation Instructions
Engineered Tongue and Groove Hardwood Flooring
Document"ID#:""VBHF062320_ENGTandG"
Staple-down, Glue-down, or Edge-glue and Float
FOR TECHNICAL SUPPORT, PLEASE CALL 800-758-9580
OWNER/INSTALLER RESPONSIBILITY:
The hardwood veneer is a product of nature, thus there will be some variations in grain, patterns, and shade/color from box
to box. When ordering flooring 5% - 7% more flooring must be added to allow for cutting and grading allowances. For
diagonal installations add 15% more for waste.
• Before installation inspect the flooring for any manufactured defects. Defects on the face of the planks can be avoided by
trimming the plank, and the remainder of the plank used, this is expected to minimize waste. Any board deemed
unacceptable should simply not be used. If there are concerns with the quality of the product, please stop installation and
contact your local retailer.
• Before installation the installer must determine if the environment and subfloor conditions meet or exceed all
applicable standards, and are within the tolerances set in these installation guidelines. The manufacture declines any
responsibility for failures caused by improper job site and subfloor conditions.
• Once the boxes are brought into the home check the box labels to verify vender information matches.
• Save a box label which has the product information for future reference.
• It is acceptable to touch up flooring during and after installation with stain, filler, or putty.
• After installation it is the homeowner’s responsibility to make sure the proper indoor environment is maintained. Failure to
do so can result in gapping, squeaking, buckling, or cupping.
APPLICATIONS
Float/Glue/Staple
Engineered flooring is our most versatile flooring and can be applied on every level of the home. When nailing, engineered
flooring is typically installed using specially designed engineered wood pneumatic flooring staplers or cleat nailers, both types
can work. Ensure the use of correct sized fasteners and adaptors. Engineered Flooring can be fully-glued to wood subfloors and
concrete. Follow the glue manufactures labeling instructions regarding correct trowel size, removal of surface sealers or
contaminates and use of moisture barriers. Engineered Flooring can also be edge-glued and floated over a dense pad
underlayment to meet the needs of customers, building specifiers and condominium associations desiring a quieter and warmer
floor (see underlayment section) and some floors can be applied over in-floor radiant heat. Specific details are outlined in this
document; installations outside these guidelines are viewed as experimental.
JOBSITE CONDITIONS:
• The building should be enclosed with all doors and windows in place.
• All wet work which includes painting, drywall, tiling, concrete, and masonry should be completed with ample time
to dry before flooring is delivered.
• Crawlspaces, basements, and garages should be dry and well ventilated.
• Crawlspaces must be a minimum 18” from the bottom of the floor joist to the ground. Crawlspaces must have a
minimum 6 mil thick polyethylene film covering the entire crawlspace ground. Crawlspaces should have proper
ventilation as determined by local building codes.
• All gutters should be in place and functioning properly. Yard grading should be sloped to run water away from
home foundation.
• HVAC systems should be operational for at least two weeks prior to flooring being delivered.
ACCLIMATION/MOISTURE TESTING:
• After purchase / delivery the flooring must be stored inside the home, and allowed to acclimate in the rooms, where it
will be installed. Flooring is typically ready to install the day it arrives as long as normal living conditions are present.
(60-80 degrees and 30% -50% relative humidity, otherwise acclimate as long as necessary for the environment.
• For best results the rooms should be maintained between 60F – 80F, with a humidity range between 30% to 50%.
• Use a reliable species specific moisture meter to verify the moisture of the floors veneer. Follow the moisture meters
manufactures guidelines for this step.
MOISTURE TESTING PROCESS:
STEP 1: Test the flooring moisture content. Test at least 40 planks per 1000 sqft of flooring, using the meter manufacturers
recommended setting for engineered flooring. Calculate the average moisture content of all 40 readings.
STEP 2: Check the wood subfloor moisture. Set the meter to the recommended setting for that specific type of subfloor. Check
with the meter manufacture for specific settings. Test 20 different locations per 1000sqft area, and calculate the
average moisture content. The wood subfloor should not exceed 12% in moisture. Skip this step if you have a
concrete subfloor.
STEP 3: WOOD SUBFLOOR: It’s recommended for installation to begin when the hardwood flooring moisture content is within
4% of the average wood subfloor moisture content. Flooring should not exceed 12% moisture content. Extend
acclimation time until these conditions are met. Document and Save your moisture testing results.

!
Villa"Barcelona"TandG"Install"Instructions" " " Page"2"of"8"
CONCRETE SUBFLOOR: It’s recommended that vapor emission not exceed 3lbs per 1000sf as measured using a calcium
chloride test or 75% RH when using an in-situ RH (RH=Relative Humidity). It is recommended to use an adhesive with a
vapor retarder or an adhesive system that incorporates a vapor retarder.
WOOD/CONCRETE SUBFLOOR REQUIREMENTS:
Approved Wood subfloors
Note that joist spacing determines minimum subfloor thickness.
• Joist spacing 16” on center (OC) Plywood: Minimum of (5/8˝) Oriented Strand Board (OSB): Minimum (3/4˝, 23/32”).
• Joist spacing 16” up to 19.2” (OC) Plywood: Minimum of (3/4˝, 23/32”) Oriented Strand Board (OSB): Minimum of (3/4˝, 23/32”).
• Joist spacing over 19.2”up to maximum 24” (OC) Plywood: Minimum of (7/8”) Oriented Strand Board (OSB): Minimum of (1”).
• Do not install flooring directly over floor joist without subflooring. All structural panels/underlayment must be installed sealed-side
down, and provide minimum ¾” perimeter spacing. Square-edged or non-tongue and grooved panels used as a subfloor will require a
minimum 1/8˝ (3 mm) expansion space placed between all plywood seams. Panels must meet minimum CDX grade Exposure 1 and
US Voluntary Product Standard PS1-95, PS2-04 or Canadian performance standard CAN/CSA 0325-0-92 for construction sheathing.
Check panel for codes.
• Pressure-treated plywood may have elevated moisture or latent with rot resistant chemicals, not for interior use.
• Solid-board subflooring should be ¾” x 5 1/2” (1” x 6” nominal), Group 1 dense softwoods, No. 2 Common, kiln-dried to less
than 12% percent moisture content. Add min. 3/8” plywood over solid board subfloors.
• Particleboard, Luan or Masonite is approved for floating installations only and must be covered with a minimum of 3/8˝CDX
plywood when gluing this product to the subfloor.
• Do not install over existing plywood subfloors that are directly installed over concrete without proper moisture
protection between the plywood and the concrete.
• Nail wood flooring perpendicular to the floor joist.
• Nailing wood flooring parallel to the floor joist is an option using a combination of plywood, OSB, Advantech or
similar approved subfloors.
Floor joist (16” to 19.2 oc) The total subfloor thickness minimum must be 1-1/4”.
Floor joist greater than (19.2 up to 24”oc) The total subfloor thickness minimum must be 1-7/16”.
CLEAN: All wood and concrete subfloors must be swept clean or vacuumed to remove dust and debris. For glue down installations
remove all contaminates like paint, old adhesives, sealers, and dry wall mud that could affect the adhesive bond.
FLAT: All wood and concrete subfloors must be flat within 1/8” over a 6’ span, or 3/16” over a 10’ span. All areas of the subfloor
must be check prior to installation. High spots can be sanded or grinded down and low spots fill with appropriate patching
compounds. Never sand and grind materials covered with lead paint, or containing asbestos. Follow local building codes for proper
removal practices of asbestos and lead paints.
DRY: Wood subfloors should be dry. The moisture in wood subfloors should not exceed 12%. If high moisture is present stop
installation until the moisture source has been corrected.
Concrete subfloors must be fully cured for at least 60 days. Concrete subfloors must be tested for moisture by conducting a
Calcium Chloride test (ASTM F 1869) or Relative Humidity In-Situ Probe test (ASTM F 2170). Calcium Chloride test results cannot
exceed 3lbs per 1000sqft in 24hrs. Relative Humidity In-Situ probe test should not exceed 75%. A moisture barrier is required over
all concrete subfloors.
GENERAL INFORMATION (all installations)
• Install flooring in normal proper lighting.
• Save a box of flooring for future repairs.
• Do not install in full bathrooms or areas with steam.
• Inspect subfloor for flatness, squeaks, and moisture.
• Avoid board grouping, board sizes should be intermingled.
• Use breathable materials like paper when protecting a newly installed floor.
• Inspect flooring during installation, select out boards have milling and finish defects.
• The customer is advised to be home during the installation for consultation/direction.
• Customer and installer should discuss installation and layout to maximize satisfaction.
• It is helpful to save the item number found on the packaging box ends for future references.
• Jobsite subfloors can be dry today and wet tomorrow the use of moisture barriers is highly recommended.
• Floor should be installed from several cartons at the same time to ensure good color, shade and appearance.
• Do not install flooring under permanent or fixed cabinetry(should the cabinetry or flooring need to be removed in the future).
• An Expansion space must be left around the perimeter and at all vertical obstructions.
HELPFUL TOOLS
• Pencil
• Chalk line
• 6’ level or 10’ level
• Miter saw
• Table saw
• 60 tooth carbide tip saw blades
• Broom
• Jamb saw
• Eye protection
• Dust Mask
• Gloves
• Engineered Floor Stapler
• Floor fasteners
• Hygrometer (test home temperature and humidity)
• Blue painters tape (2080)
• PVA wood glue
• Air Compressor with regulator
• Air hose

!
Villa"Barcelona"TandG"Install"Instructions" " " Page"3"of"8"
• Drill bit set
• Hammer
• Tape measure
• Moisture meter (wood)
• Calcium chloride moisture test (concrete)
• Approved adhesive remover (glue down installs)
• Cloth rags
• Nail set
• Drill
• 6d finish nails
• Jig saw
• Ear protection
STAPLE DOWN OVERVIEW
[NAILING TIPS]:
• Test nailing a couple of planks in a well lit area, near a window.
• Place fasteners on tongue side that runs the length of the planks. Do not place fasteners into the groove.
• If the staples do not go in far enough raise the air pressure on the compressor up slightly and re-test until staples sit flush
into the wood above the tongue.
• If the staples go in too deep lower air pressure until staples sit flush above the tongue. Some floor staplers have the ability to
adjust the depth of the fastener. This may need to be adjusted for the staples to seat correctly.
• Tongue fractures can be reduced by lowering the compressor’s PSI and using the recommended floor stapler.
• Dimples can be reduced by seating the floor staplers correctly on the board or using thinner gauge fasteners like 20 gauge
staples. Make sure the staples are sitting flush in the wood or dimples can occur. Adjusting the depth of the stapler to seat
fasteners a bit deeper can help minimize dimples.
• Only use pneumatic nail guns designed for engineered wood flooring. Norge 4 n 1 floor stapler, Stanley Bostich, Powernail,
and similar engineered flooring staplers are acceptable.
• Check for squeaks after nailing. Squeaks can occur due to tongue fracture, uneven subfloor, improper fasteners, or improper
fastener spacing. Squeaks can be corrected or minimized by adding a PVA floating floor wood glue to the tongue and groove
of the plank before nailing.
• If stapler will not shoot staples, check for air leaks, jammed staples, staple size, and compressor air pressure.
• Its best to pre-drill and hand nail the first row using a 3/32” drill bit and 6d finish nail. This will help prevent finish chipping
due to pneumatic finish or brad nailers.
• If dimpling still occurs switch to a floating or glue down installation. We do not recommend the use of water base adhesives.
ENGINEERED WOOD RECOMMENDED FASTENER SELECTION
1/2” – 9/16”
18 , 19, or 20 gauge engineered flooring staples
1-1/4” or 1 -1/2” long
FASTENER SPACING
Place fasteners 3”- 4”apart (for staples) within 1- 2″ from each end with at least two fasteners.
Important: Set air compressor to 70-80 PSI. Test and adjust air pressure to ensure proper setting of fasteners. Make sure that the
fastening machine is fully adjustable, is in good working condition, is at the appropriate angle and seats properly against the tongue
of the board to prevent top edge and surface dimple damage.
Note: Only use flooring stapler that are fully adjustable and that engage the top profile over the tongue at the
appropriate angle. Make sure that the flooring stapler is in good working condition and seats properly against the
board to prevent top edge and surface dimple damage. Any damage caused by fasteners or nailers is not covered
by the warranty.

!
Villa"Barcelona"TandG"Install"Instructions" " " Page"4"of"8"
NAILDOWN INSTRUCTIONS
[CAUTION]: Nail flooring in good lighting. After nailing 100 sq ft, stop and inspect the installed floor for any defects or damages.
Stop at 20 sqft for installation under 100sqft. Make adjustments as needed. If satisfied, continue with the installation. When top
nailing pre-finished flooring (the first and last rows, stair treads, and risers) it is recommended to pre-drill and hand nail using a
3/32” drill bit and 6d finish nails. Pneumatic 16ga. finish nail or 18ga. brad nail guns can be used to secure the first and last rows,
but improper use can easily damage the board or finishes. When installing over crawl spaces, basements, or garages use an asphalt
saturated paper as a minimum to provide protection against moisture vapors.
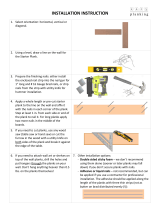
INSTALLATION PREP
Use a manual or electric jamb saw to undercut all door jambs/casing to allow enough clearance for the wood flooring to easily slide
underneath. A credit card thick gap between the top of the wood flooring and bottom of the door jamb is acceptable. Sand down high
areas of the subfloor. Correct low areas (See subfloor prep). Sweep or vacuum the subfloor clean of dust and debris. Install moisture
retardant underlayment, and staple it down to prevent movement/sliding(See underlayments).
STEP 1: THE FIRST THREE ROWS
• Determine the starting wall, usually the longest or outside foundation wall. At the two opposite ends of this wall, measure
out the width of the board including the tongue, plus the expansion space, and place a mark. An expansion gap must be
left around the perimeter and at all vertical obstructions. This gap will be the same as the thickness of the new flooring.
For example; 1/2” flooring requires 1/2” expansion gap.
• Snap a chalk line connecting the two marks. Align the tongue side of the first row of boards on the chalk line with the
groove side towards the starting wall, maintain the expansion space.
• Install the flooring with the tongue side facing away from the starting wall(Use long straight planks for first two rows).
• Pre-drill and top nail the first row of boards using a 3/32” drill bit and 6d finishing nails about an 1” from the back edge.
Pneumatic finish nail guns or brad nail guns can also be used. If hand nailing countersink the finish nail using a nail punch
and fill with close matching wood filler. Blind nail the 2
nd
and 3
rd
rows using the flooring stapler, and seat the staples slightly
above the tongue.
STEP 2: LOOSE LAY (Rack) THE FLOORING
After installation of the first three rows, loose lay about 100sqft of flooring about 4” or 5” away from the last secured row. Pull from
several boxes to mix board color and sizes to create a random look. Visually inspect flooring for defects while racking. Stagger boards
randomly as possible, avoid creating patterns. See picture for proper layout guidance.
Correct Board Stagger Incorrect Stagger circled
STEP 3: INSTALLATION CONTINUED
• After racking out 100sqft of flooring begin nailing the floor. (See fastener recommendations). Visually inspect boards for
defects while nailing. Use proper fastener spacing (See fastener spacing). Continue nailing until you get to the last one or two
rows. The lasts one or two rows will have to be top nailed. Again pre-drill using a 3/32” drill bit and 6d finishing nails.
• The last rows can be pulled tightly together using a floor Jack or pry bar. Protect base boards before using these tools.
• The last row may have to be ripped down in width to fit. If the last row is less than 1” in width use a PVA carpenters wood
glue to join the last piece to the previous row.
STEP 4: FINISHING UP
• Fill in nail holes and minor gaps with close matching wood filler.
• Install any base board molding and shoe molding.
• Install transition moldings.
• Sweep the floor.
• Clean floor with approved cleaner (contact you’re flooring retailer for approved cleaner).
• Use felt pads under furniture legs. Protect floor before moving appliances and heavy furniture.
"

!
Villa"Barcelona"TandG"Install"Instructions" " " Page"5"of"8"
Glue Down Installation Method:
When gluing down the flooring, install the flooring the same way as you would using the floating installation method. The only
difference is that adhesive will be trowel applied to the subfloor, and the flooring will be laid into the adhesive bonding it to the
subfloor. Always check the adhesive manufactures guidelines on proper subfloor prep, moisture testing, approved substrates, trowel
sizes, cure times, and coverage. A moisture barrier is required over all concrete subfloors. It is strongly advised to use moisture
barriers that offer 100% moisture protection over concrete.
Recommended Adhesives: Use 100% urethane adhesives that are designed for use with engineered wood floors. Technical Data
Sheets for these adhesive can be found on the adhesive manufactures website. Technical data sheets provide the guidelines for
approved subfloors, approved floors, subfloor prep, cure times, and trowel sizes among other information.
Expansion Space: A minimum 1/2” expansion space is required around all fixed objects and walls. T-molding expansion breaks are
not required with glue down installation methods, but can be helpful in minimizing overall floor movement due to seasonal
humidity changes inside the home.
Glue down Install: Start the installation parallel to the longest exterior wall in the room. Spread out only enough adhesive to install
the first row of flooring leaving a min. 1/2” expansion gap at all walls. A laser level or string line can be used to make sure the first
row is straight. Allow the first row to set up before installing additional rows. This helps prevent the first row from moving as the
next rows are installed. Spread out enough adhesive to install 4 rows at a time. Planks must be wet laid into the adhesive. Discard
badly bowed or warped planks. Periodically lift up a plank to verify proper adhesive coverage to the subfloor and bottom of the
plank. After laying 4 rows clean up any glue that gets on the finish right away using the adhesive manufactures recommended
adhesive remover. Use #2080 blue painters tape to hold planks together if needed until the adhesive cures. Don’t leave tape on for
more than 24hrs. Wait 24hrs before placing furniture back onto the flooring.
FLOATING FLOOR INSTRUCTIONS
During installation, Carpenters PVA Floating Floor Wood adhesive should be applied to each groove on the short and long sides of
the planks to ensure bond with the other planks. Two separate continuous beads of glue should be applied: one continuous bead applied
inside the groove, and one continuous bead applied to the top part of the tongue at all seams to ensure a secure bond with the top and
bottom of the tongue. This double-gluing helps to minimize squeaks, board gaps, or separation. Note that seasonal gapping is normal in
wood flooring and does not constitute a product failure. Seasonal gapping can be minimized by keeping the indoor humidity above
30%.
Floating Installation Method:
Underlayments should be approved for wood and concrete subfloors installations. Caution before installing over concrete a minimum
6 mil polyethylene sheeting moisture barrier must be installed prior to installing the underlayment pad to help protect the flooring
from excessive moisture.
Expansion Space/T-molding Breaks: An expansion break is required to break continuous runs exceeding 40’ in width and 40’ in length.
T-molding transitions are used to filled in the gap required for expansion breaks. A 3/4” gap is required at all walls and fix objects.
Installations fewer than 30’ in length or width can use a ½” gap at all walls and fixed objects. For room dimensions of greater than
40’ in length or width, the flooring should be glued down using an approved adhesive.
Installation:
• Determine the starting wall, usually the longest or outside foundation wall. At the two opposite ends of this wall, measure out
the width of the board, and place a mark. (Do not include the tongue of the board when measuring). An Expansion gap or space
must be left around the perimeter and at all vertical obstructions.
• Snap a chalk line connecting the two marks. Tack down fern strips or carpet tack strips along the chalk line.
• Install the first row of flooring against the tacked wood strips.
• The flooring should be installed from left to right, tongue side towards the wall, with the groove side facing out from the wall.
• Install the first row end to end until the entire row is complete. Be sure to use PVA carpenters wood glue on all plank butt ends.
• When edge-gluing, ensure that the glue is still wet when the planks are joined. Special attention should be paid to ensure that
there is no excess glue dripping to the subfloor as this could bond the plank to the underlayment and hamper floor movement.
A lightly water dampened rag can also be used to remove any PVA glue.
• Next, install the second row of planks, installing left to right. Each plank should be installed long side first into the previous row.
Make sure carpenters PVA wood glue is applied to all tongue and groove seams. Insert a spacer at the wall, then install the long
side of the plank into the previous row. Once the tongue is inserted into the groove fold the plank down onto the subfloor. The
butt ends will be lightly tapped over from right to left to close the end seams. Be sure to keep a minimum stagger of 6” between
end seams from row to row. Use a pry bar to close the end seam of the last plank installed in each row.

!
Villa"Barcelona"TandG"Install"Instructions" " " Page"6"of"8"
• After installing 4 or 5 rows apply #2080 blue painters tape to the plank surface perpendicular to the installed floor. This is
used to hold the planks together until the glue cures(incorrect tape can damage the finish).
• Continue installing the flooring until you reach the opposite wall in the room. The last row of flooring by the wall may need to
be ripped down to fit. Make sure you have proper expansion space between the last installed row and the wall.
• Go back to the first row of flooring, remove the fern strip or tack strip and insert the final row of flooring to complete the
room installation. Make sure proper expansion is left between the floor and wall.
• Remove the blue painters tape after 8 to 10hrs.
• To pass obstacles through the floor covering(pipes, radiator mounts), use a pencil to trace the center position for drilling. Use a
big enough drill bit to leave a ½” expansion around the pipe. A jig saw may be needed for bigger rounded cuts. Next, cut the
strip in two so that the saw mark goes through the center of the drilled hole, so that the strip can be glued and reassembled
around the pipe.
Post-installation
• After installation, allow glue to fully cure for 24 hrs before replacing furniture and heavy foot traffic.
• Protect flooring before moving any heavy furniture or appliances(damages from furniture and appliances are not covered).
• Fill in minor gaps with close matching wood filler.
• Check for adhesive on floor finish and remove with appropriate adhesive manufacture remover.
• For best matching of sheen or milling save a box of flooring for future repairs.
• Clean floor with an approved floor cleaner.
Radiant Heat Systems
• The radiant heat system must have been tested and in operation for a few weeks prior to installation.
• The radiant heating system needs to be turned off prior to installation and the floor needs to be close to room temperature
65 to 75 degrees. If the radiant heat pipes are visible or exposed in the subfloor, you must cover them with 3/8” plywood to
spread heat more evenly.
• After the flooring is installed, slowly raise the temperature to the preferred comfort level (over at least a 5 day timeframe)
beginning two days after installation or at the onset of colder weather conditions.
• The radiant heat system must be controlled and the surface temperature of the flooring must never be allowed to exceed 85°F.
• Proper relative humidity must be maintained within your home at all times during the year. For best results and to minimize
seasonal gaps keep indoor humidity between 30% to 50% RH. If you are in an arid part of the USA or Canada, it is
especially imperative that you use a humidifying system to maintain this moisture in the air.
• Forced air heating system also can dry out the air inside your house much more than you might imagine, so use of a
Relative Humidity meter (Hygrometer) is recommended to ensure you know when you must use a humidifier to keep the
relative humidity above 30%.
• Even when these guidelines are followed it is still possible that your flooring may experience some cracks (seasonal checking)
on the plank surface and/or gapping between planks due to slight shrinkage, which are not covered by the products limited
warranty.
MOLDINGS and TRANSITIONS:
Install transition moldings directly to the subflooring. Pre-drill and hand nail transitions moldings to wood subfloors using 6d finishing
nails, pneumatic finish nailers, or pneumatic brad nailers. Use a wood urethane tube adhesive to bond wood transitions to concrete.
Cut moldings using a electric miter saw using a 60 tooth or 80 tooth fine finish carbide tipped blade makes the best cuts. Attach base
or quarter round moldings to the wall, never into the floor. Mitered cuts hide better when joining moldings.
• Base Board – for hiding imperfections and adding a custom finish along any wall.
• Quarter-Round - for covering the expansion left at walls and other fixed surfaces.
• Reducer Moldings - used to transition to lower floors.

!
Villa"Barcelona"TandG"Install"Instructions" " " Page"7"of"8"
• Stair Nosing - for finishing the exposed edges of stairs and landings.
• T-Expansion - for joining two areas of flooring of similar heights.
• End Cap - for finishing the space at sliding glass doors, at bath tubs or transitioning to carpet.
Routine Care/Protection
Care
• Use an approved cleaner.
• Apply mineral spirits on a cloth to help remove oil, paint, markers, lipstick, ink, or tar. Then buff with dry cloth.
• Only use vacuums designed for hard surface floors.
• Do not use wet mops, steam cleaners, oils, polishes, waxes on the floor.
• Do not use buffing or polishing machines.
• Remove hardened candle wax and chewing gum with ice, then gently scrape with a plastic scraper, such as a credit card.
• Repair white scratches with stain markers. Dents and chips can be concealed with wood putty, wax crayons, or wood epoxy
sticks.
• Maintain home climate between 60F and 80F with humidity between 30% to 50% year round.
• UV light can cause wood to lighten or darken overtime. Periodically rearranging your area rugs and furniture will allow the
floor to antique or age evenly.
Protection
• Use mats at entrance doors to collect dirt, grit, and wet shoes.
• Only use breathable rugs and rug pads that are safe for hardwood floors. Verify with rug manufacture. Do not use PVC,
petroleum or solvent based backings.
• Use floor protectors and wide-load bearing leg bases for heavy object like fish tanks, pool tables, and pianos.
• Do not walk on your floor with stiletto heels, shoes with sports cleats or exposed metal parts.
• Keep pet nails trimmed to prevent scratching the floor.
• Use protection when moving heavy furniture or appliances. Never try to slide or roll heavy objects across the floor.
• Felt pads should be used under chair legs. Use soft rubber castors or felt castors on office chairs.
Care and Maintenance
Daily Maintenance
1.
Sweep dust mop or vacuum your floor regularly to remove any particles that could cause abrasion or scratch your floor.
CAUTION:
Vacuums with a beater bar or power rotary brush head can damage a floor and should never be used.
2.
Apply appropriate cleaning solution to the cleaning cloth / mop. Use a cleaner specifically manufactured for hardwood
flooring. Do Not
Use Water or Vinegar. Do NOT apply directly to the floor.
•
For tougher spots, use a higher concentration of isopropyl alcohol and distilled water.
•
For extreme cases, a solution of nail polish remover (acetone) and distilled water can be used.
HINT: For best results, clean the floor in the same direction of the planks. When the cleaning cloth/mop becomes soiled, rinse
or replace it
with a clean one. Following up with a clean, dry cloth will remove residual streak marks and spots.
3.
Do NOT leave any amount of liquids (water, juice, soft drinks, spills, etc.) on the floor. Clean any wet spots immediately.
4.
Do NOT use a steam cleaner.
5.
Do NOT use a wet mop or douse floor with water or liquid cleaners. Liquid can seep between the cracks and cause moisture
damage.
6.
Do NOT use any cleaning agents containing wax, oil or polish. Left over residue will form a dull film.
7.
Do NOT use steel wool or scouring powder which will scratch the floor.
Branded or Off-the-shelf Floor Care Products
•
If none of the above are effective and you choose to use a store bought product, test the product in a non-conspicuous area
(i.e., closet,
corner, or scrap pieces) for potential adverse side effects.
Preventative Maintenance
•
Protect your floor when using a dolly for moving furniture or appliances. Protective sheets and/or plywood may be needed.
Never slide
or roll heavy furniture or appliances across the floor.
•
Place protective pads beneath furniture legs and other heavy objects.
•
Avoid excessive exposure to water from being tracked in during periods of inclement weather.
•
Minimize abrasive material and dirt by placing mats on both sides of exterior doors and by using area rugs in high-traffic areas.
•
Rearrange furniture and rugs periodically to avoid uneven color and shade changes from light exposure.
•
Use protective mats beneath rolling chairs and keep furniture casters clean.
•
Keep pets’ nails trimmed.
•
Remove shoes with cleats, spikes or exceptionally pointy heels before walking on the floor.

!
Villa"Barcelona"TandG"Install"Instructions" " " Page"8"of"8"
Climate Maintenance
•
Care should be taken to control humidity levels within the 30% - 50% range. Hardwood flooring can be affected by
varying levels of
humidity.
•
Dry Climates: A humidifier is recommended to maintain humidity levels. Wood stoves and electric heat tend to create
very dry
conditions during the winter months this also will cause shrinkage in flooring.
•
Humid, Wet Climates: By using an air conditioner, heater, or dehumidifier proper humidity levels can be maintained to
prevent
excessive expansion due to high moisture content.
Floor Repair
•
Very light and small surface scratches can be repaired with a staining “touch up” pen of the appropriate color.
•
Slightly deeper scratches can be repaired by means of colored putty and or stains. Fill the scratches with the putty. Level
with putty
knife. Wipe off excess putty.
•
Very deep scratches may require the replacement of the planks
FOR TECHNICAL SUPPORT, PLEASE CALL 800-758-9580
"
"
"
"
"
"
"
"
"
"
"
"
"
"
"
"
"
"
"
"
"
"
"
"
"
"
"
"
"
"
"
"
"
"
"
"
"
"
"
/