Page is loading ...

Fluxient
LED Bicycle Light User Manual
Model: 3XU2

1. Please Read Before Use
Please read this user manual to completely familiarize you with this product. Make sure you
understand all functions before hitting the trails.
Cycling in the dark is inherently dangerous. Always make sure the light is firmly secured and
the battery is fully charged before you go for a ride. Like all other electronic devices, the light
can fail at any unexpected time. It is advised to always keep a backup light and battery pack
with you whenever you go on an extended ride. Please note that your Fluxient light is very
bright, never aim it directly at any oncoming motorists/cyclists.
Your Fluxient bicycle light is equipped with a high capacity Lithium-ion battery pack. Please
completely charge the battery before first use of the light. While the battery pack is double
protected, you should always observe the following:
• While charging the batteries, never leave it unattended for a long time.
• Only use the Fluxient charger to charge the batteries. Using other chargers to charge
Fluxient batteries may cause battery failure and/or other serious damage.
Your Fluxient bicycle light uses high power U2 LEDs which, in high mode generate a significant
amount of heat. The aluminum body is designed to draw most of the excess heat away. The
light head may get extremely hot during this process if sufficient air flow is not provided. Please
use with caution. NOTE: The over-heating protection circuit will automatically reduce the high
bright level to low in the event of over-heating. When the temperature returns to the normal
operating range full bright will automatically resume.
2. Charging the battery pack
The battery pack is shipped half charged. You need to fully charge it before first use.
• Connect the battery to the charger- the charger LED will turn Green.
• Plug the charger into the power outlet – the charger LED will turn Red indicating that the
battery is charging. A full charge from empty will take approximately 4 hours.
• Once fully charged the LED will turn Green. Unplug the charger and disconnect the
battery.

WARNING: Use common since when installing your lights and make
sure that your light, cables and battery don’t interfere with the proper
use of your handlebar or the control levers. Your handlebars should be
able to turn full left/right without binding or stretching cables or
interfering with the controls. If you’re not comfortable about your
installation, please have your Local Bike Shop install the lights for you.
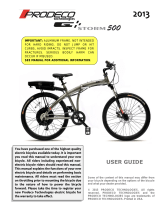
Too many threads,
use a strip-spacer.
Cut strip
-
spacers as needed
Perfect threads
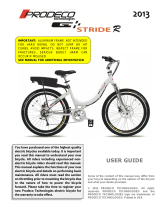
Stem mount battery pack Frame mount battery pack Handlebar mount battery pack
3. Handle Bar Mounting
• Remove the screw from the handlebar mount and install the mount
on the bar with the release tab facing forward.
• The rubber strip spacers included are used to achieve a proper fit
to your handlebars. The spaces can be trimmed with scissors to
achieve a good solid fit.
• Re-install the mounting screw and tighten as needed to secure the
mount (Don’t over-tighten). The nut shouldn’t show more than two
threads above the surface. If too much thread is protruding, the
light will not slide onto the mount. Simply add an additional piece of
rubber strip as needed.
• Find the most suitable place for
mounting the battery. If you have a long
enough stem, this is the best place to
put it; otherwise you can mount it to
your bike frame or handlebars
(Opposite side to where the light is).
• Estimate how much cable length you
will require and then secure up the excess cable.
• Wrap the Velcro strap around the stem/frame/handle bars, at the same time securing the
excess cable with a Velcro strap.
• Plug the light cable into the battery cable.

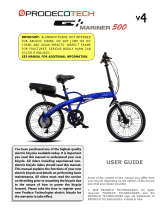
4. Operating Fluxient 3XU2 light
• The switch is illuminated while plugged in which makes it easy to locate in the dark.
• The light starts in the OFF mode.
• Quick Push the switch button for High, Medium, Low and Strobe
• Push and hold the switch button for two seconds (from any setting) to turn the light OFF.
5. Battery Level Indicator
As the battery depletes, the backlit switch button will change color from Blue to Red.
Blue 100%-20% Red 20% - 0%
6. Battery Storage
Disconnect the battery pack from the light head when not using. Store the battery pack fully
charged and re-charge it before using the lighting system again. If not used for an extended
period of time, please store the battery pack in a cool dry place to avoid excessive discharge.
7. Troubleshooting
Failure
Caused
Solution
No light Battery is over discharged Charge the battery
Battery is not plugged in
correctly Make sure all parts are firmly
connected
Running time too short Battery is not fully charged Charge the battery
New battery Charge the battery
Very old battery Replace the battery
Cold temperature Keep the battery warm
Defective charger Replace the charger
Flicker Cables not secured Make sure all parts are firmly
connected
8. Technical Data
LED: 3 Cree XML U2 LED’s
LED lifespan: 50,000 hours +
Brightness: 3000 lumens
Range: 500m
Lens: High transparent Hardened Glass
Modes: 3-level adjustable brightness &flashing.
Over-heat protection function: If the unit
overheats the light will auto power down to 30%
until the temp cools then it will auto power back
up to 100% (This is to save the LED’s and
Battery.)

Output levels: Max: 3000 lumens - Medium: 1500 lumens - Low: 700 lumens
Runtime: Max: 2.7 hours - Medium: 6 hours - Low : 12 hours
Battery capacity/Voltage: 7.4V 8x18650 quality Li-ion battery cells (water resistant design)
Charger: 8.4V 2A output fast charger
Charge time: 4.5 hours
Shell material: Aircraft Grade Aluminum alloy
Mount: 25.2 to 31.8 mm Bar
Waterproof Grade: IP65
Weight : 196g without battery pack, 596g with battery pack
Package Includes: head light, battery pack, charger, extension cable, handlebar mount, allen
wrench, Velcro tape and storage bag.
Manufacture Warranty: 2 Years for the Light, Charger, Battery Pack, Mount and extension
wire. Crashes and mis-handling are not covered.
Warranty Info:
US Importer: http://www.Fluxient.us
Contact: John McKenzie
3531 Valle Vista Dr. Chino Hills, CA 91709
E-mail: [email protected]
Fluxient electric appliance Co., Ltd.
Add: #124 East Street, Qingshuipu Village, Jiaochuan Block, Zhenhai District, Ningbo City,
Zhejiang Province, China. Zip code: 315221
Contact: Alwin Wu
Tel: ++86 13656780095
Fax:++86-574-86382908
E-mail: [email protected]
Website: www.fluxient.cn
/