Page is loading ...

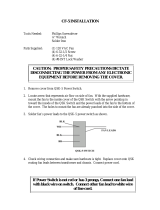
IMPORTANT WARRANTY INFORMATION! PLEASE READ
Return Policy on Kits When Not Purchased Directly From Vectronics: Before continuing
any further with your VEC kit check with your Dealer about their return policy. If your Dealer
allows returns, your kit must be returned before you begin construction.
Return Policy on Kits When Purchased Directly From Vectronics: Your VEC kit may be
returned to the factory in its pre-assembled condition only. The reason for this stipulation is,
once you begin installing and soldering parts, you essentially take over the role of the device's
manufacturer. From this point on, neither Vectronics nor its dealers can reasonably be held
accountable for the quality or the outcome of your work. Because of this, Vectronics cannot
accept return of any kit-in-progress or completed work as a warranty item for any reason
whatsoever. If you are a new or inexperienced kit builder, we urge you to read the manual
carefully and determine whether or not you're ready to take on the job. If you wish to change
your mind and return your kit, you may--but you must do it before you begin construction, and
within ten (10) working days of the time it arrives.
Vectronics Warrants: Your kit contains each item specified in the parts list.
Missing Parts: If you determine, during your pre-construction inventory, that any part is
missing, please contact Vectronics and we'll send the missing item to you free of charge.
However, before you contact Vectronics, please look carefully to confirm you haven't misread
the marking on one of the other items provided with the kit. Also, make certain an alternative
part hasn't been substituted for the item you're missing. If a specific part is no longer
available, or if Engineering has determined that an alternative component is more suitable,
Vectronics reserves the right to make substitutions at any time. In most cases, these changes
will be clearly noted in an addendum to the manual.
Defective Parts: Today's electronic parts are physically and electrically resilient, and
defective components are rare. However, if you discover an item during your pre-construction
inventory that's obviously broken or unserviceable, we'll replace it. Just return the part to
Vectronics at the address below accompanied with an explanation. Upon receipt, we'll test it.
If it's defective and appears unused, we'll ship you a new one right away at no charge.
Missing or Defective Parts After You Begin Assembly: Parts and materials lost or
damaged after construction begins are not covered under the terms of this warranty. However,
most parts supplied with VEC kits are relatively inexpensive and Vectronics can replace them
for a reasonable charge. Simply contact the factory with a complete description. We'll
process your order quickly and get you back on track.
Factory Repair After You Begin Assembly: Kits-in progress and completed kits are
specifically excluded from coverage by the Vectronics warranty. However, as a service to
customers, technicians are available to evaluate and repair malfunctioning kits for a minimum
service fee of $18.00 (½ hour rate) plus $7.00 shipping and handling (prices subject to
change). To qualify for repair service, your kit must be fully completed, unmodified, and the
printed circuit board assembled using rosin-core solder. In the event your repair will require
more than an hour to fix (or $36.00, subject to change), our technicians will contact you in
advance by telephone before performing the work. Defective units should be shipped prepaid
to:
Vectronics
1007 HWY 25 South
Starkville, MS 39759

When shipping, pack your kit well and include the minimum payment plus shipping and
handling charges ($25.00 total). No work can be performed without pre-payment. Also,
provide a valid UPS return address and a day time phone number where you may be reached.

VEC-1220K/1230K/1240K/1280K Owner's Manual
1
INTRODUCTION
This kit provides a great introduction to QRP operation, one of the hottest and
fastest growing activities in amateur radio. With these little rigs, you'll discover
what thousands of QRP enthusiasts already know--the magic of communicating
world-wide using less energy than it takes to illuminate a pen-light bulb!
Your VEC QRP-CW Transmitter Kit is simple to build, yet it gives you many
sophisticated features to make QRP operating both easy and fun. For example, a
built-in diode antenna switch handles T/R transfer in milliseconds for full QSK
operation in between CW characters. In fact, if your receiver has a good AGC,
you can simply plug into the T/R jack and copy both sides of the conversation
simultaneously, without receiver muting. In addition to full QSK, you get
shaped keying--just like on the most expensive commercial transceivers.
For drift-free frequency stability, the transmitter is crystal-controlled. However,
that doesn't mean you're "stuck" in one spot. The wide-range VXO circuit uses a
high-Q variable-capacitor for maximum frequency shift. Also, a second optional
crystal frequency may be added and selected with the push of a switch. Best of
all, there's no need to order crystals to get started--each kit already includes one
cut for the internationally recognized QRP calling-frequency on that band.
Finally, when your kit is assembled and it's time to fire up, you won't need to
fiddle with tricky tuning--or to substitute output transistors for best results.
You'll get a solid 1-watt plus signal that's filtered through a high-Q toroid low-
pass filter to ensure compliance with FCC rules. In short, your kit provides
everything you need to get on the air fast!
TOOLS AND SUPPLIES
Construction Area:
Kit construction requires a clean, smooth, and well-lighted
area where you can easily organize and handle small parts without losing them.
An inexpensive sheet of white poster board makes an excellent construction
surface, while providing protection for the underlying table or desk. Well-
diffused overhead lighting is a plus, and a supplemental high-intensity desk lamp
will prove especially helpful for close-up work. Safety is an important
consideration. Be sure to use a suitable high-temperature stand for your
soldering iron, and keep the work area free of combustible clutter.
Universal Kit-building Tools:
Although your particular kit may require
additional items to complete, virtually all construction projects require a work
area outfitted with the following tools and supplies:
!
Soldering Iron

VEC-1220K/1230K/1240K/1280K Owner's Manual
2
!
High-temperature Iron Holder with Cleaning Sponge
!
Rosin-core Solder (thin wire-size preferred)
!
Needle Nose Pliers or Surgical Hemostats
!
Diagonal Cutters or "Nippy Cutters"
!
Solder Sucker, Vacuum Pump, or Desoldering Braid
!
Bright Desk Lamp
!
Magnifying Glass
Special Tools for This Kit:
!
RF power meter or VSWR bridge
!
50-ohm dummy load or 1-watt 47 ohm carbon-film resistor
!
Telegraph key with a 3.5 mm "mini" phone plug.
!
LED (any color)
BEFORE YOU START BUILDING
Experience shows there are four common mistakes builders make. Avoid these,
and your kit will probably work on the first try! Here's what they are:
1. Installing the Wrong Part:
It always pays to double-check each step. A 1K
and a 10K resistor may look almost the same, but they may act very
differently in an electronic circuit! Same for capacitors--a device marked
102 (or .001 uF) may have very different operating characteristics from one
marked 103 (or .01uF).
2. Installing Parts Backwards:
Always check the polarity of electrolytic
capacitors to make sure the positive (+) lead goes in the (+) hole on the
circuit board. Transistors have a flat side or emitter tab to help you identify
the correct mounting position. ICs have a notch or dot at one end indicating
the correct direction of insertion. Diodes have a banded end indicating
correct polarity. Always double-check--especially before applying power to
the circuit!
3. Faulty Solder Connections:
Inspect for cold-solder joints and solder
bridges. Cold solder joints happen when you don't fully heat the connection--
or when metallic corrosion and oxide contaminate a component lead or pad.
Solder bridges form when a trail of excess solder shorts pads or tracks
together (see Soldering Tips below).

VEC-1220K/1230K/1240K/1280K Owner's Manual
3
4. Omitting or Misreading a Part:
This is easier to do than you might think!
Always double-check to make sure you completed each step in an assembly
sequence.
Soldering Tips:
Cleanliness and good heat distribution are the two secrets of professional
soldering. Before you install and solder each part, inspect leads or pins for
oxidation. If the metal surface is dull, sand with fine emery paper until shiny.
Also, clean the oxidation and excess solder from the soldering iron tip to ensure
maximum heat transfer. Allow the tip of your iron to contact both the lead and
pad for about one second (count "one-thousand-one") before feeding solder to
the connection. Surfaces must become hot enough for solder to flow smoothly.
Feed solder to the opposite side of the lead from your iron tip--solder will wick
around the lead toward the tip, wetting all exposed surfaces. Apply solder
sparingly, and do not touch solder directly to the hot iron tip to promote rapid
melting.
Desoldering Tips:
If you make a mistake and need to remove a part, follow these instructions
carefully! First, grasp the component with a pair of hemostats or needle-nose
pliers. Heat the pad beneath the lead you intend to extract, and pull gently. The
lead should come out. Repeat for the other lead. Solder may fill in behind the
lead as you extract it--especially if you are working on a double-sided board with
plate-through holes. Should this happen, try heating the pad again and inserting
a common pin into the hole. Solder won't stick to the pin's chromium plating.
When the pad cools, remove the pin and insert the correct component. For ICs
or multi-pin parts, use desoldering braid to remove excess solder before
attempting to extract the part. Alternatively, a low-cost vacuum-bulb or spring-
loaded solder sucker may be used. Parts damaged or severely overheated during
extraction should be replaced rather than reinstalled.
Work Habits:
Kit construction requires the ability to follow detailed instructions and, in many
cases, to perform new and unfamiliar tasks. To avoid making needless mistakes,
work for short periods when you're fresh and alert. Recreational construction
projects are more informative and more fun when you take your time. Enjoy!
Sorting and Reading Resistors:
The electrical value of resistors is indicated by a color code (shown below). You
don't have to memorize this code to work with resistors, but you do need to
understand how it works:

VEC-1220K/1230K/1240K/1280K Owner's Manual
4
1st Digit
2nd Digit
Multiplier
Tolerence
Black = 0 (tens)
Brown = 1 (hundreds)
Red = 2 (K)
Orange = 3 (10K)
Yellow = 4 (100K)
Green = 5 (1Meg)
Blue = 6
Violet = 7
Gray = 8
White = 9
Silver = 10%
Gold = 5%
Resistor Color Code
(gold or silver)
When you look at a resistor, check its multiplier code first. Any resistor with a
black multiplier band falls between 10 and 99 ohms in value. Brown designates
a value between 100 and 999 ohms. Red indicates a value from 1000 to 9999
ohms, which is also expressed as 1.0K to 9.9K. An orange multiplier band
designates 10K to 99K, etc. To sort and inventory resistors, first separate them
into groups by multiplier band (make a pile of 10s, 100s, Ks, 10Ks, etc.). Next,
sort each group by specific value (1K, 2.2K, 4.7K, etc.). This procedure makes
the inventory easier, and also makes locating specific parts more convenient later
on during construction. Some builders find it especially helpful to arrange
resistors in ascending order along a strip of double-sided tape.
Some VEC kits may contain molded chokes which appear, at first glance, similar
to resistors in both shape and band marking. However, a closer look will enable
you to differentiate between the two--chokes are generally larger in diameter and
fatter at the ends than resistors. When doing your inventory, separate out any
chokes and consult the parts list for specific color-code information.
Reading Capacitors:
Unlike resistors, capacitors no longer use a color code for value identification.
Instead, the value, or a 3-number code, is printed on the body.
Multilayer
271
(270 pF)
Ceramic Discs
|
|
1uF
35V
+
-
104
Electrolytic
1 uF
10 pF = 100
100 pF = 101
1000 pF = 102
.001 uF = 102*
.01 uF = 103
.1 uF = 104
Value Code
102
(.001 uF) (.1 uF)
As with resistors, it's helpful to sort capacitors by type, and then to arrange them
in ascending order of value. Small-value capacitors are characterized in pF (or
pico-Farads), while larger values are labeled in uF (or micro-Farads). The
transition from pF to uF occurs at 1000 pF (or .001 uF)*. Today, most

VEC-1220K/1230K/1240K/1280K Owner's Manual
5
monolithic and disc-ceramic capacitors are marked with a three-number code.
The first two digits indicate a numerical value, while the last digit indicates a
multiplier (same as resistors).
Electrolytic capacitors are always marked in uF. Electrolytics are polarized
devices and must be oriented correctly during installation. If you become
confused by markings on the case, remember the uncut negative lead is slightly
shorter than the positive lead.
Diodes:
Diodes are also polarized devices that must be installed correctly. Always look
for the banded or cathode end when installing, and follow instructions carefully.
Cathode
Diode
LED
(shorter Lead)
Transistors:
If transistors are installed incorrectly, damage may result when power is applied.
Transistors in metal cases have a small tab near the emitter lead to identify
correct positioning. Semiconductors housed in small plastic cases (TO-92) have
an easily-identified flat side to identify mounting orientation. Many specialized
diodes and low-current voltage regulators also use this type packaging. Larger
plastic transistors and voltage regulators use a case backed with a prominent
metal tab to dissipate heat (T-220). Here orientation is indicated by the
positioning of the cooling tab.
Emitter
Flat Side
Metal Tab
Metal Can Device Plastic Device Tab-cooled Device
Integrated Circuits:
Proper IC positioning is indicated by a dot or square marking located on one end
of the device. A corresponding mark will be silk-screened on the PC board and
printed on the kit's parts-placement diagram. To identify specific IC pin
numbers for testing purposes, see the diagram below. Pin numbers always start
at the keyed end of the case and progress counter-clockwise around the device,
as shown:

VEC-1220K/1230K/1240K/1280K Owner's Manual
6
1 2 3 4
8 7 6 5
Installation
Key
Key
Installation
Pin Numbers
PARTS LIST
The parts list for your kit is presented in two parts. First, you'll identify and
inventory the generic parts--those items common to all VEC QPR transmitter
kits regardless of band. Then, you'll inventory the parts specifically for your
particular VEC QPR transmitter, which contains frequency-critical parts that
determine the specific band of operation.
If any parts are missing or damaged, refer to the manual's warranty section for
replacement instructions. If you can't positively identify an unfamiliar item on
the basis of the information given, set it aside until all other items are checked
off. You may then be able to identify it by process of elimination. Finally, your
kit will go together more smoothly if parts are organized by type and arranged by
value ahead of time. Use this inventory as an opportunity to sort and arrange
parts so you can identify and find them quickly.
First, locate and identify the generic parts bags. These items are common to all
four models of the VEC QRP-CW Transmitter Kit:
Generic Parts
Resistors:
(fourth gold color band indicates 5% tolerance)
"
Qty Part Description Designation
!
2 100 ohm (brown-black-brown) R4,R7
!
1 270 ohm (red-violet-brown) R8
!
3 470 ohm (yellow-violet-brown) R5,R9,R11
!
1 1K (brown-black-red) R10
!
3 10K (brown-black-orange) R1,R2,R3
!
1 47K (yellow-violet-orange) R6
Capacitors:
"
Qty Part Description Designation

VEC-1220K/1230K/1240K/1280K Owner's Manual
7
!
10 .1 uF disc ceramic (103 or 103Z) C1,C3,C9,C10,C11
C12,C15,C17,C18,C21
!
1 470 uF electrolytic C4
!
1 .1 uF disc ceramic (104 or 104Z) C2
!
1 multi-section variable capacitor C5
Chokes, Coils:
(molded chokes are larger than resistors)
"
Qty Part Description Designation
!
2 100 uH (brown, black, brown, silver) RFC4, RFC5
!
1 T37-2 toroid form (round, red) L1
Semiconductors:
"
Qty Part Description Designation
!
1 2N3906 transistor Q1
!
1 2N3904 transistor Q2
!
1 PN2222 transistor Q3
!
1 2N3053 transistor Q4
!
2 1N4007 diode D1,D2
!
1 1N4148 diode D3
Jacks, Switches:
"
Qty Part Description Designation
!
1 3.5mm key jack J1
!
1 2.1mm coaxial power jack J2
!
2 RCA type phone jack J3,J4
!
2 DPDT push-button switch SW1,SW2
Miscellaneous Items:
"
Qty Part Description
!
1 clip-on transistor heat sink
!
1 printed circuit board
!
1 instruction manual
!
1 length, double-sided tape
!
1 1/2" tuning shaft extension
Now, to complete the inventory, select the correct list below for the specific
model of your kit--and check off those items:
VEC-1220K (20-Meter QRP-CW Transmitter Kit)
Capacitors:
"
Qty Part Description Designation

VEC-1220K/1230K/1240K/1280K Owner's Manual
8
!
1 22 pF multilayer (22 or 220) C6
!
1 47 pF multilayer (47 or 470) C8
!
1 68 pF multilayer (68 or 680) C16
!
3 220 pF multilayer (221) C7,C19,C20
!
1 330 pF multilayer (331) C14
!
1 470 pF multilayer (471) C13
Inductors/Chokes:
"
Qty Part Description Designation
!
3 1.8 uH (brown, gray, gold, silver) RFC1,RFC2,RFC3
!
1 12" length of #22 enameled wire for L1
Crystal:
"
Qty Part Description Designation
!
1 14.060 MHz crystal Y1
VEC-1230K (30-Meter QRP-CW Transmitter Kit)
Capacitors:
"
Qty Part Description Designation
!
1 33 pF multilayer C6
!
1 47 pF multilayer C8
!
1 100 pF multilayer C16
!
1 220 pF multilayer C7
!
2 330 pF multilayer C19,C20
!
1 470 pF multilayer C13
!
1 680 pF multilayer C14
Inductors/Chokes:
"
Qty Part Description Designation
!
3 2.2 uH (red, red, gold, silver) RFC1,RFC2,RFC3
!
1 12" length of #22 enameled wire L1
Crystal:
"
Qty Part Description Designation
!
1 10.108 MHz crystal Y1
VEC-1240K (40-Meter QRP-CW Transmitter Kit)
Capacitors:
"
Qty Part Description Designation
!
1 47 pF multilayer C6
!
2 100 pF multilayer C8,C16

VEC-1220K/1230K/1240K/1280K Owner's Manual
9
!
1 220 pF multilayer C7
!
3 470 pF multilayer C13,C19,C20
!
1 1000 pF multilayer C14
Inductors/Chokes:
"
Qty Part Description Designation
!
3 4.7 uH (yellow, violet, gold, silver) RFC1,RFC2,RFC3
!
1 12" length of #24 enameled wire L1
Crystal:
"
Qty Part Description Designation
!
1 7.040 MHz crystal Y1
VEC-1280 (80-Meter QRP-CW Transmitter Kit)
Capacitors:
"
Qty Part Description Designation
!
1 68 pF multilayer C6
!
1 100 pF multilayer C8,C16
!
2 470 pF multilayer C13,C16
!
2 820 pF multilayer C19,C20
!
2 1000 pF multilayer C7,C14
Inductors/Chokes:
"
Qty Part Description Designation
!
3 10 uH (brown, black, black, silver) RFC1,RFC2,RFC3
!
1 12" length of #24 enameled wire for L1
Crystal:
"
Qty Part Description Designation
!
1 3.579 MHz crystal Y1
Once again, if any parts are missing, consult the warranty page on the inside
cover for specific replacement instructions. If your parts inventory is complete,
you're ready to start building. Remember, once construction begins, you may no
longer return your kit.
Many builders find it helpful to make a Xerox copy of the parts placement
diagram and the schematic diagram. These may then be posted in your work


VEC-1220K/1230K/1240K/1280K Owner's Manual
11
STEP-BY-STEP ASSEMBLY
Your VEC QRP-CW Transmitter Kit will be constructed in three stages. First,
you'll install the smaller generic parts (resistors, capacitors, etc.) that are
common to all four models. Next, you'll mount frequency-determining
components--those parts that determine the specific band of operation for your
particular kit. Finally, you'll complete the project by installing larger generic
parts such as jacks and switches--things that might get in the way if installed
first.
In these instructions, when you see the term install, this means to locate, identify,
and insert the part into its mounting holes on the PC board. This includes pre-
bending or straightening leads as needed so force is not required to seat the part.
Once a component is mounted, bend each lead over to hold it in place. Use
sharp side-cutters to clip off excess lead length before soldering. Make sure
trimmed leads don't touch other pads and tracks, or a short circuit may result:
Good
Not Good
The term solder means to solder the part's leads in place, and to inspect both (or
all) solder connections for flaws or solder bridges. Nip off excess protruding
leads with a sharp pair of side cutters.
This kit contains 11 fixed-value 1/4-watt resistors. Begin construction by
mounting these first, starting with the smallest value and moving to the largest.
Before installing each one, carefully bend both leads to form right-angles, as
shown below:
.4"
When installing resistors, save some of the clipped-off resistor lead ends--you'll
need these for pc-board jumpers later on.
Phase 1: Resistors
Find two (2) 100 ohm resistors (brown-black-brown).
!
!
1. Install a 100 ohm resistor at R4 and solder.
!
!
2. Install a 100 ohm resistor at R7 and solder.
!
!
3. Find a 270 ohm resistor (red-violet-brown). Install this at R8 and
solder.

VEC-1220K/1230K/1240K/1280K Owner's Manual
12
Find three (3) 470 ohm resistors (yellow-violet-brown).
!
!
4. Install a 470 ohm resistor at R5 and solder.
!
!
5. Install a 470 ohm resistor at R9 and solder.
!
!
6. Install a 470 ohm resistor at R11 and solder.
!
!
7. Locate a 1K resistor (brown-black-red). Install at R10 and solder.
Find three (3) 10K resistors (brown-black-orange).
!
!
8. Install a 10K resistor at R1 and solder.
!
!
9. Install a 10K at R2 and solder.
!
!
10. Install a 10K at R3 and solder.
!
!
11. Find a 47K resistor (yellow-violet-orange). Install at R6 and solder.
This completes installation of the 11 fixed-value resistors supplied with the kit.
Take a moment to inspect your solder connections and to confirm each resistor
has been installed in the right PC board location. Next, you'll install the kit's 11
disc ceramic capacitors. Note that all but one has a value of .01 uF.
Phase 2: Ceramic and Electrolytic Capacitors
Locate ten (10) .01 uF disc ceramic capacitors (marked 103).
!
!
1. Install a .01 uF disc ceramic at C1 and solder.
!
!
2. Install a .01 uF disc ceramic at C3 and solder.
!
!
3. Install a .01 uF disc ceramic at C9 and solder.
!
!
4. Install a .01 uF disc ceramic at C10 and solder.
!
!
5. Install a .01 uF disc ceramic at C11 and solder.
!
!
6. Install a .01 uF disc ceramic at C12 and solder.
!
!
7. Install a .01 uF disc ceramic at C15 and solder.
!
!
8. Install a .01 uF disc ceramic at C17 and solder.
!
!
9. Install a .01 uF disc ceramic at C18 and solder.
!
!
10. Install a .01 uF disc ceramic at C21 and solder.
!
!
11. Find the single .1 uF disc ceramic (104). Install this at C2 and solder.
Your kit also contains one electrolytic capacitor.
Electrolytic caps are polarized
and must be installed the correct way in order to work.
The capacitor's plus (+)
mounting hole is noted on both the circuit board and parts placement diagram. If

VEC-1220K/1230K/1240K/1280K Owner's Manual
13
the markings on the capacitor body are unclear, the plus (+) lead is always the
longer of the two.
!
!
12. Locate the 470 uF capacitor. Observing polarity, install this at C4 and
solder.
This completes capacitor installation for now. There are several multilayer
capacitors remaining, but these will be installed later as frequency-determining
components. Also, the VXO variable capacitor will be installed near the end of
construction because of its larger size. Before moving on, make a quick
inspection of your work to make sure each part is installed at the correct
location. Also, double-check the polarity of C4.
Now that you've accumulated good collection of nipped-off lead-ends, this is a
good time to install the board's four (4) jumper leads. These jumpers tie together
the ground areas surrounding the transmitter circuitry. Each should be pre-
formed prior to installation, as shown below. An approximate distance between
mounting holes is given to help you pre-form each one. When installed, each
jumper should lay flat against the PC board.
span
discarded lead end
Phase 3: Jumpers
!
!
1. Form a 11/32" jumper and install at JMP1.
!
!
2. Form a 11/32" jumper and install at JMP2.
!
!
3. Form a 3/8" jumper and install at JMP3.
!
!
4. Form a 1/4" jumper and install at JMP4.
Save one additional resistor lead for connecting variable capacitor C5 later on.
There are five (5) molded-epoxy radio-frequency chokes in your kit. The two
100-uH chokes are generic, and should be installed now. Note that the fourth
color-code band on a molded choke indicates tolerance. This may be either gold
(5%) or silver (10%).
Phase 4: Chokes
Find the two 100 uH molded chokes (brown-black-brown-silver or gold).
!
!
1. Install 100 uH at RFC4
!
!
2. Install 100 uH at RFC5
Next, you'll install the kit's transistors and diodes.
Positioning of these parts is
critical--they must be oriented correctly.

VEC-1220K/1230K/1240K/1280K Owner's Manual
14
Phase 5: Transistors and Diodes
!
!
1. Locate the 2N3906 transistor (black plastic case), checking its
identification markings closely. Find its flat side, and make sure this is
aligned with the printed outline on the PC board before inserting the
leads. Install the 2N3906 at Q1 and solder.
2N3906
E B C
!
!
2. Locate a 2N3904 transistor (black plastic case). Install at Q2 and
solder.
!
!
3. Locate a PN2222 transistor (black plastic case). Install at Q3 and
solder.
!
!
4. Find the 2N3053 transistor (metal case). Install at Q4, inserting leads
all the way so the metal case rests on the surface of the PC board. The
metal "emitter" tab should point toward R7. Solder.
Locate two (2) 1N4007 diodes. Note the white band at one end of the diode
case. When installing, position this band to correspond with the marking on the
PC board.
!
!
5. Install a 1N4007 at D1, observing the position of the band. Solder.
!
!
6. Install a 1N4007 at D2, observing the position of the band. Solder.
Save the clipped-off lead ends from the 1N4007s to use during installation of the
VXO tuning capacitor later on. This stiff "bus wire" will be used to support the
capacitor.
!
!
7. Locate a 1N4148 diode (small glass case). Identify the banded end
and install at D3, matching the band to the PC board marking.
Solder.

VEC-1220K/1230K/1240K/1280K Owner's Manual
15
This concludes the first phase of construction (small generic parts). Next, you'll
install frequency-determining components. However, before you start, this
might be a good time to take a well-deserved break! Be sure to check transistor
and diode positioning and polarity before moving on.
Phase 7: Frequency-Determining Parts
In this section, you'll select a specific set of instructions for your particular kit
(VEC-1220K, VEC-1230K, etc). However, before you do this, please review
these two important general construction tips that apply to all four models of the
kit.
Installing Multilayer Capacitors:
There are 8 multilayer capacitors in your kit.
A multilayer cap is similar to a surface-mount "chip" capacitor, except that it has
a lead spot-welded onto each end of the capacitor body. Each cap is then
coated with an epoxy coating. Multilayers have superior radio-frequency
operating characteristics, but the lead welds may fail if the leads are placed
under stress while being heated during installation or removal. For this reason,
never use force to seat a multilayer cap into the PC board. If the spacing isn't
right, pre-form the leads to the correct spacing before installation!
Incorrect
Ooops!
Correct
Winding and Installing Toroid Coil L1:
The transmitter's low-pass filter uses
a high-Q toroid inductor wound on a T37-2 form (T37 means the powdered-iron
form is .37-inches in diameter). When winding L1, the number of turns are
counted inside the form (not on the outside). This means, if the instructions call
for a 12-turn coil, you must pass the wire through the center of the core 12
times.
When winding this coil, be sure to pull each turn up tight before starting the
next. If the coil is wound loosely, its inductance increases--a condition that may
reduce transmitter output power.
Count turns on inside of form.
Tin leads with solder before installing.
Pull each turn tight before winding the next.

VEC-1220K/1230K/1240K/1280K Owner's Manual
16
Finally, before installing L1 on the PC board, be sure to tin both leads with
solder. The coil wire provided with your kit is coated with heat-stripable enamel
insulation that breaks down at soldering-iron temperatures. If you touch the tip
of an iron to the end of the wire for several seconds, the insulation should start to
melt, allowing solder to adhere to the copper underneath. If your iron isn't hot
enough to start this process, carefully scrape the insulation off with a small
hobby knife and tin.
If necessary, refer back to these instructions at any time during assembly. You
may now move ahead to the section of the manual that corresponds with your
particular kit.
VEC-1220K 20-Meter QRP-CW Transmitter Kit
!
!
1. Find a 22 pF multilayer cap (marked 22 or 220). Install at C6 and
solder.
!
!
2. Find a 47 pF multilayer cap (47 or 470). Install at C8 and solder.
!
!
3. Find a 68 pF multilayer cap (68 or 680). Install at C16 and solder.
Find three (3) 220 pF multilayer caps (marked 221).
!
!
4. Install a 220 pF multilayer at C7 and solder.
!
!
5. Install a 220 pF multilayer at C19 and solder.
!
!
6. Install a 220 pF multilayer at C20 and solder.
!
!
7. Find a 330 pF multilayer cap (marked 331). Install at C14 and solder.
!
!
8. Find the remaining 470 pF multilayer cap (471). Install at C13 and
solder.
Locate three (3) 1.8 uH chokes (brown-gray-gold-silver or gold).
!
!
9. Install 1.8 uH at RFC1 and solder.
!
!
10. Install 1.8 uH at RFC2 and solder.
!
!
11. Install 1.8 uH at RFC3 and solder.
Locate the T37-2 toroid coil form (a donut-shaped part about 3/8" in diameter
and color-coded red). Also, find the #22 enameled coil wire provided with your
kit.
!
!
12. Wind twelve (12) turns of #22 wire onto the T37-2 form. Note that
turns are counted inside the form, and each turn is pulled tight before
winding the next. When done, spread the windings out, distributing
them over 80% of the form's circumference.
!
!
13. Trim each coil lead to 1/2" in length and tin with solder.

VEC-1220K/1230K/1240K/1280K Owner's Manual
17
!
!
14. Install the coil at L1 and solder.
!
!
15. Locate the 14.060 MHz crystal (metal can, two wire leads). Install at
Y1 and solder.
This completes stage 2 construction of the
VEC-1220K 20-meter kit
.
After
checking for errors, you may now move on to the final stage of construction.
VEC-1230K 30-Meter QRP-CW Transmitter Kit
!
!
1. Find a 33 pF multilayer capacitor (marked 33 or 330). Install at C6
and solder.
!
!
2. Find a 47 pF multilayer cap (47 or 470). Install at C8 and solder.
!
!
3. Find a 100 pF multilayer cap (101). Install at C16 and solder.
!
!
4. Find a 220 pF multilayer cap (221). Install at C7 and solder.
Find two (2) 330 pF multilayer caps (331).
!
!
5. Install 330 pF at C19 and solder.
!
!
6. Install 330 pF at C20 and solder.
!
!
7. Find a 470 pF multilayer cap (471). Install at C13 and solder.
!
!
8. Find the remaining 680 pF multilayer cap (681). Install at C14 and
solder.
Locate three (3) 2.2 uH molded chokes (red-red-gold-silver or gold)
!
!
9. Install a 2.2 uH choke at RFC1 and solder.
!
!
10. Install a 2.2 uH choke at RFC2 and solder.
!
!
11. Install a 2.2 uH choke at RFC3 and solder.
Locate the T37-2 toroid form, a donut-shaped part about 3/8" in diameter and
color-coded red. Also, find the #22 enameled coil wire provided with your kit.
!
!
12. Wind fifteen (15) turns of #22 wire onto the T37-2 form. Turns are
counted inside the form, and each one is pulled tight before winding
the next. When done, spread windings to distribute them over 80% of
the form's circumference.
!
!
13. Trim coil leads to 1/2" and tin with solder.
!
!
14. Install the coil at L1 and solder.
!
!
15. Locate the 10.108 MHz crystal (metal can, two wire leads). Install at
Y1 and solder.

VEC-1220K/1230K/1240K/1280K Owner's Manual
18
This completes stage 2 construction of the
VEC-1230K 30-meter kit
.
After
checking for errors, you may now move on to the final stage of construction.
VEC-1240K 40-Meter CW Transmitter Kit
!
!
1. Find a 47 pF multilayer capacitor (47 or 470). Install at C6 and
solder.
Find two (2) 100 pF multilayer caps (101).
!
!
2. Install 100 pF at C8 and solder.
!
!
3. Install 100 pF at C16 and solder.
!
!
4. Find a 220 pF multilayer cap (221). Install at C7 and solder.
Find three (3) 470 pF multilayer caps (471).
!
!
5. Install 470 pF at C13 and solder.
!
!
6. Install 470 pF at C19 and solder.
!
!
7. Install 470 pF at C20 and solder.
!
!
8. Find a 1000 pF multilayer cap (102). Install at C14 and solder.
Find three (3) 4.7 uH molded chokes (yellow-violet-gold-gold or silver).
!
!
9. Install a 4.7 uH choke at RFC1.
!
!
10. Install a 4.7 uH choke at RFC2.
!
!
11. Install a 4.7 uH choke at RFC3.
Locate the T37-2 toroid form, a donut-shaped part about 3/8" in diameter and
color-coded red. Also, find the #24 enameled coil wire provided with your kit.
!
!
12. Wind eighteen (18) turns of #24 wire onto the T37-2 form. Turns are
counted inside the form, and each one is pulled tight before winding
the next. When done, spread windings to distribute them over 80% of
the form's circumference.
!
!
13. Trim each lead to 1/2" tin with solder.
!
!
14. Install the coil at L1 and solder.
!
!
15. Locate the 7.040 MHz crystal (metal can, two wire leads). Install at
Y1 and solder.
This completes stage 2 construction of the
VEC-1240K 40-meter kit
.
After
checking for errors, you may now move on to the final stage of construction.
VEC-1280K 80-Meter CW Transmitter Kit
/