Page is loading ...

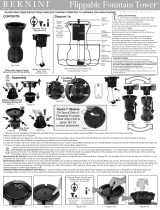
Figure 2a
Locating
Dowel
Locating
Dowel
Large Bowls Small Bowls
17 in (43.18cm)
diameter or
larger bowls
11.5 in (29.21cm)
to 17 in (43.18cm)
diameter bowls
Self-Contained
Fountain Tower
Battery Compartment,
Water Tube
& Water Pump
CONTENTS:
Assembly
Water
Pump
Battery
Compartment
(4 1.5v D
Batteries
Not Included)
Water Pump
Tube
Battery
Compartment
Screws
x2
Start/Stop
Button
Planter Bowl
Minimum
Water Level
(3 inches from
bottom of
Fountain Base)
Fountain
Base
Fountain
Top
Dancing
Water
Attachments
Diagram 1a:
OWNERS MANUAL
INSTALLING BATTERIES:
1. Lift Fountain Top with Battery Compartment & Water
Pump out of the Fountain Base (Figure 5). Disconnect
the Water Tube from the Battery Compartment.
2. Unscrew (counter clockwise) the Battery Compartment
Screws and open cover (Figure 1a, 1b). Note: Cover fits tightly
4. Insert x2 D Batteries with the (+) side facing up in
Battery Compartment and x2 D Batteries with the (-) facing up in
Battery Compartment (Figure 2a).
5. Reinstall the Fountain Top by aligning the locating dowel in
the Battery Compartment and Fountain Top. Set the Battery
Cover down onto the Battery Compartment ensuring the dowel
sets into the alignment hole. Apply pressure and tighten the
Battery Cover Screws by turning clockwise. NOTE: Pressure must
be applied to the Battery Compartment while tightening the
screws for the threads to catch and assure the compartment is
properly sealed. If needed while holding battery compartment
and place upside-down on an even surface to tighten screws.
1. Take the Fountain Top/Battery Compartment and Water Pump, connect one side of the Water Tube to the Water Pump and the other end to the bottom side of the
Battery Compartment (A & B of Figure 4).
2. Find a suitable bowl and place it on a flat, level surface. Place the Fountain Base, without the Fountain Top with Battery Compartment and Water Pump, into the center of the bowl.
3. Lower the Fountain Top with Battery Compartment and Water Pump into the Fountain Base.
you align the Fountain Top to the Fountain Base. Fit these into place and your Fountain Top and Base should be secure. Fountain Battery Compartment should be flush with fountain top (Figure 6).
4. Fill bowl with water, water level should be 4 inches from the bottom of the Fountain Base. (Diagram 1a).
Turn Fountain on and set timer: When the Fountain is off, set the run time from 1 to 4 hours by slowly pressing the button 1 to 4 times (Figure 7a & 7b). 3 seconds after pressing
the button, the LED light will repeatedly flash the number of times the button was pressed (Figure 7a). This indicates the number of hours the Fountain will run every day. The
Fountain will turn on at the same time, for the selected number of hours, daily thereafter.
Stop Fountain for one day: To stop the Fountain manually for one day, press the button once (Figure 7a & 7b). The Fountain will turn off for one day, but will still turn on at the same time,
for the same number of hours selected, daily thereafter.
Reset/Change the timer: To change the run time, stop the Fountain if its running by press the button once (Figure 7a & 7b). The Fountain will stop. Once the Fountain is off, you can press
the button again to set the duration (See Step 1). Fully shut off and clear timer: To fully turn off the Fountain so that it will not turn on automatically the next day, press the button once to
turn it off (Figure 7a & 7b). When the Fountain is NOT operating, simply press hold the button again for over 2 seconds, the LED will come on for 3 seconds steady to confirm daily program
is off.
DANCING WATER ATTACHMENTS: (OPTIONAL): To prevent overspray there are 3 Dancing Water Attachments designed for large bowls and 1 designed for small bowls please use
accordingly. When Fountain is not running, select one of the Dancing Water Attachments and attach to the outlet in the middle of the Fountain Tower (Figure 8a, 8b & 8c).
*PLEASE READ THESE INSTRUCTIONS COMPLETELY BEFORE ATTEMPTING TO ASSEMBLE YOUR NEW FOUNTAIN
Figure 6Figure 5
Figure 1b
Figure 1a
Figure 3b
Figure 4
Figure 7
A
B
Figure 3a
STEP
2.
STEP
3.
STEP
CHANGING BATTERIES:
1. Remove any Dancing Water Attachment, lift Battery
Compartment and Water Pump out of the Fountain (Figure 5),
ensure Battery Compartment and Water Pump are completely
dry before opening Battery Compartment. It is important that
no water enters the Battery Compartment.
2. See Installing Batteries Section above on how to reinstall
batteries and reassemble.
3. Set the Battery Compartment and Water Pump back into the
Fountain (Figure 6).
Figure 7b
Figure 7a
ButtonButton
Figure 7: (Below)
On Spout Side of
Self-Contained
Fountain Tower
Align LED to
arrow for
correct placement.
Battery Compartment
Retaining Screws X2
Battery Compartment
Retaining Screws X2
Battery Cover
O-Ring
Figure 8a Figure 8b Figure 8c
Max. Water
Level
(2 inches
from top of
Planter Bowl)
Please note, images of parts
are not to scale with one another.
Battery Cover
O-Rings
Dancing Water Attachments
Please use accordingly
to prevent overspray
Dancing Water
Attachments
Figure 2b
Self-Contained 4-in-1 Fountain Tower with Planter BowlTM

Need Help?
Call us for assistance at:
+1 (619) 449-2392
or you can email us at:
customercare@berninifountains.com
Our Customer Care Department is available:
Monday - Friday
8:30am to 4:00pm PST
11:30am - 7:00pm EST
Troubleshooting Troubleshooting Guide
OWNERS MANUAL
4.
STEP
Care & Maintenance
5.
STEP
IMPORTANT BATTERY SAFETY INSTRUCTIONS:
WARNING: When using electric devices, basic safety precautions should always be followed to reduce the risk of fire, electric shock and personal injury, including the following:
WARNING: 1. Do not incinerate the battery even if it is severely damaged or is completely worn out. The battery can explode in a fire. Check with municipal codes in your area for possible special disposal
instructions.
2. If liquid leaks from the battery cell, discontinue use immediately and dispose of properly.
3. Use only 4-1.5V D Cell Batteries.
4. Do not attempt to disassemble, remodel or destroy the batteries, as it may cause battery leakage, fire, or bursting; and could also create sulfuric acid spills from the battery resulting in possible burns to
person and damage to the immediate environment.
5. Never dispose of batteries in the garbage. Disposal of batteries in the garbage is unlawful under state and federal environmental laws and regulations. Always take used batteries to your local battery-re-
cycling center.
Step 1 Step 2 Step 3 Step 4
PRIMING THE WATER PUMP
If you find the Water Pump is running, but water is not
flowing from your Fountain, you can try priming the Water
Pump:
Turn off Fountain, grab both sides of the Fountain and
quickly shake your Fountain for ten seconds. This is to
dislodge any air bubbles that may be caught in your Water
Pump. Press the button to turn your Fountain on.
Water should be flowing from the top of your Fountain. If
water is not flowing, press and hold button for over 2
seconds again to turn your Fountain off, and repeat the
step above.
WATER PUMP CONNECTION
If your Fountain Water Pump becomes disconnected from
the Water Tube inside of the Fountain or if the Water Tube
gets disconnected from the Battery Compartment, go to
the Assembly Section to reconnect the Water Pump.
Indicator light not turning on: Check batteries are installed correctly: See Installing Batteries Section.
Indicator light not turning on: Check that batteries are new & good condition: See Installing Batteries Section.
Pump is on but no water flow: Check water level.
Pump is on but no water flow: Check pump is free of debris, kinks or obstructions. See Care & Maint. Section.
Pump is on but no water flow: Check tube is connected properly. See Installing Batteries Section.
Indicator light on: Check that batteries are new and good condition. See Installing Batteries Section.
Pump is on but low water flow: Check pump is free of debris, kinks or obstructions. See Care & Maint. Section.
Pump is on but low water flow: Check water level. Air in pump: See Priming The Water Pump Section.
Loud sound and weak flow: Air in pump: See Priming The Water Pump Section.
Loud sound and weak flow: Check pump is free of debris, kinks or obstructions. See Care & Maint. Section.
Pump suddenly stops: Check pump is free of debris, kinks or obstructions. See Care & Maintenance Section.
Step 1 Step 3
Simply remove the Battery Compartment, Water Tube & Water Pump Assembly flip the Self-Contained Fountain
Tower, set the Battery Compartment, Water Tube & Water Pump Assembly back into the Self-Contained Fountain
Tower and you have a new look for your Self-Contained Fountain Tower, One Fountain two unique looks.
Step 2
FLIPPING THE SELF-CONTAINED FOUNTAIN TOWER:
CLEANING YOUR FOUNTAIN
In order to keep your Fountain in tip-top shape and for a prolonged life, it is best if your
Fountain and the bowl or water container that the Fountain is placed in are cleaned
periodically. To clean your fountain, drain of all water and disassemble. Use a mild soap
and a soft cloth to clean the parts of your Fountain.
COLD STORAGE
Turn power off, remove from container, clean and dry the Fountain of all water. Remove the
batteries for long term storage and bring it indoors. (Now is a great time to clean the pump
to remove any debris that may have accumulated throughout the year).
CLEANING THE WATER PUMP’S PARTS
The impeller inside of the Water Pump is what pushes
water up through your Fountain, allowing you to enjoy the
soothing sounds and wonderful sights of your Fountain.
After long periods of usage, this part will need to be
cleaned to make sure your Fountain runs optimally.
Step 1: Remove the front panel of the Water Pump by
grabbing the sides of the front panel and pulling it off the
unit.
Step 2: Remove the impeller chamber cover. This is tightly
fitted but will come off.
Step 3: Remove the impeller from its chamber.
Step 4: Rinse the impeller until all debris has been
removed.
Step 5: Re assemble in reverse order.
Self-Contained 4-in-1 Fountain Tower with Planter BowlTM

OWNERS MANUAL
001223 B4I1FFTWWCI rev v1c us
Santee, California 92071 | World Wide Patents Pending | Email: [email protected] | On the web: www.berninifountains.com
Facebook & Pinterest: Bernini Fountain Company | Instagram: @berninifountains Twitter: @yrdllc
© Yeiser Research & Development, LLC; 2020. All rights reserved.
Made in China | Designed in the USA
LIMITED ONE YEAR WARRANTY
This warranty gives you specific legal rights and you may also have other rights which vary from state to state. This product has a
one year limited warranty on all materials and workmanship. Bernini® warrants the original purchaser of this product that the
product will be free from manufacturing defects in workmanship and material for a period of one (1) year from the date of original
purchase. If within one (1) year this product fails due to defect in material or workmanship, Bernini® will repair, replace or supply
any defective part at their discretion. The purchaser must contact Bernini® and provide a description of the defective part,
including digital pictures if requested, with the original purchase documentation as validation of warranty coverage. This warranty
does not cover or apply to: (a) damage to the product due to misuse, mishandling, or abuse, (b) products not used in accordance
with instructions, (c) product not assembled or installed according to instructions, and (d) normal wear and tear. Call us for assis-
tance at +1 (619) 449-2392 or you can email us at customercare@berninifountains.com or mail us at: 9545 Pathway Street,
Santee, CA 92071, Our Customer Care Department is available: Monday - Friday 8:30am to 4:00pm PST / 11:30am - 7:00pm EST
Assembly Of Battery Compartment Housing and Battery Cover:
1. Place Battery Cover on Battery Compartment Housing. Turn over assembled Battery unit and place on a flat, level surface. Using a Phillips
screwdriver (not included) first, tighten left screw down firmly.
2. After tightening the left screw, you will notice a small gap between the Battery Cover and the Battery Compartment Housing.
3. Using a Phillips screwdriver (not included) tighten the right screw down firmly.
4. After both screws have been tightened, you may notice a small gap between the Battery Cover and the Battery Compartment Housing.
5. Press down firmly on the bottom of the Battery Compartment Housing to help tighten the gap.
6. Using a Phillips screwdriver re-tighten the screws (left screw first, right screw second) to further tighten the gap between the Battery Cover
and the Battery Housing Compartment.
Please read first before returning:
Please call us for assistance at 1-619-449-2392 or email us at customercare@berninifountains.com. Our Customer Care
Department is available: Monday - Friday 8:30am to 4:00pm PST, 11:30am to 7:00pm EST. If you have any questions regarding
assembly, parts, or operation, please visit our website at www.berninifountains.com. You will find instructional videos on how to
assemble and operate your fountain and keeps you up to date on our newest products. This product comes with a one year
limited warranty against materials and workmanship.
Self-Contained 4-in-1 Fountain Tower with Planter BowlTM

Infinty Bowl
To install the Bowl as an Infinity Pool, take the Bowl and the Cap, screw the Cap into the inside of the bowl turning clockwise (Figure 1, 2 & 6b). Do not overtighten. Place infinity Bowl on the
fountain spout just as you would place one of the Dancing Waters Attachments. Push button to enjoy your fountain.
Planter
To install the Bowl as a Planter, take the Bowl and 3 Prong Foot, line up the arrows on the 3 Prong Foot to the “Planter” position located on the bottom of the bowl (Figure 5). Align the
arrows and push firmly to lock in place. There are 2 small holes on the bottom of the planter that will allow water to be absorbed from the bottom of the bowl when fountain is running
(Figure 6a, 7 & 8). Place the Bowl and Foot on top of the fountain. Be sure not cover the button or light on top of the fountain. Push on 3 Prongs Foot to secure. Once Planter is in place use
your favorite soil (do not over pack) and plant your new addition to your family. Push button to enjoy your fountain.
How the Self-Watering System Works
Your self-watering garden fountain waters from the bottom up. Do not worry if you do not see the top soil
becoming wet after the first day or two of use. The bottom layer of the soil will be watered every time you
run the fountain. After approximately 3 days, the soil will reach its maximum water level. The water will
steadily climb to just below the surface of the soil, while your fountain is on, the water level rises, watering
your plant from bottom to top. (Figure 7).
When your fountain is off, the roots of your plant will be aerated to produce strong healthy roots. When the
fountain is on, the water level will rise above the surface of the top planter bowl, saturating the soil (Figure 8).
Bird Feeder
To install the bird feeder, take the Infinity bowl and 3 prong foot, line up the arrows on the 3 prong foot to
the bird feeder position located on the bottom of the bowl (Figure 4 & 6c). Align the arrows and push firmly to
lock in 3 prong foot. Place the bowl and foot on top of the fountain. Be sure not cover the button or light on top
of the fountain. Push on 3 prongs foot to secure. Fill bowl with bird food, avoid over-filling to prevent
bird seed from going in your fountain. Push button to enjoy your fountain.
OWNERS MANUAL
Self-Contained 4-in-1 Fountain Tower with Planter BowlTM
Installation of Accessories
6.
STEP
Water Container
A multi-use water container has been included to use with your fountain (Figure 9). Once your fountain is fully assembled, place your fountain into the Water Container. To secure fountain,
place the Fountain Tower into the Water Container and turn until the notches are aligned and the Fountain Tower is level and secure (Figure 10), press firmly. (Applies to both sides/styles of
the Fountain Tower) Your Water Container is multifunctional, not only can it be used as your fountains water container; it can also be used as a spacer for a deeper container (Figure 11), a
liner for a non-waterproof container or a container with a hole in the bottom, as a complementary planter or anyway you choose (Figure 12 & 13).To use your water bowl as a spacer, fill
container with water, then submerge water bowl sideways until water bowl is completely submerged. Then turn the bowl upside down, ( bowl will float to surface.) Take fully assembled
Fountain Tower and place on top of spacer. Just as you would your favorite bowl, make sure your pump is fully submerged in water.
Figure 10
Figure 9
Figure 1 Figure 2 Figure 3
Figure 5Figure 4 Figure 6c
Figure 6a
Figure 6b
Figure 7 Figure 8
Figure 11 Figure 12 Figure 13
Multiuse Container
CONTENTS:
Please note, images of parts
are not to scale with one another.
Infinity Bowl/Planter
/Bird Feeder
3 Prong Foot
Cap
InstallInstall
Birdfeeder
Birdfeeder
Planter
RemoveRemove
Planter
/