Page is loading ...

THIS MANUAL CONTAINS IMPORTANT SAFETY,
PERFORMANCE AND MAINTENANCE INFORMATION.
READ THE MANUAL BEFORE TAKING YOUR FIRST
RIDE ON YOUR NEW TRICYCLE, AND KEEP THE
MANUAL HANDY FOR FUTURE REFERENCE.
To register your bike visit
www.schwinnbikes.com/registerbike
A D U LT
TRICYCLE

Contents
1 Introduction
Safety Signal Words ..................2
2 Safety
User Responsibility...................2
Protective Gear and Clothing . . . . . . . . . . . 3
Riding Safety . . . . . . . . . . . . . . . . . . . . . . . 3
Wet Weather ........................4
Night Riding . . . . . . . . . . . . . . . . . . . . . . . . 5
3 Parts...............................6
4 Assembly...........................8
Getting Organized . . . . . . . . . . . . . . . . . . . 8
Initial Set-up - Attach the Handlebars.....9
Attach the Rear Frame ...............11
Attach the Secondary Chain...........12
Attach the Rear Wheels . . . . . . . . . . . . . . 13
Attach the Front Fender . . . . . . . . . . . . . . 15
Attach the Front Wheel...............17
Assemble the Front Brake ............18
Rear Brake Adjustment . . . . . . . . . . . . . . 25
Brake Locking Buttons . . . . . . . . . . . . . . . 27
Attach the Rear Fenders . . . . . . . . . . . . . 28
Assemble the Wire Basket ............29
Attach the Wire Basket ...............30
Attach the Saddle ...................31
Attach the Pedals ...................32
Adjust the Handlebar ................33
Adjust the Seat .....................34
5 Use...............................35
Pre-Ride Checklist . . . . . . . . . . . . . . . . . . 35
6 Maintenance and Troubleshooting.....40
Parts Maintenance . . . . . . . . . . . . . . . . . . 40
Hub Bearings . . . . . . . . . . . . . . . . . . . . . . 44
InatingtheTireTube ................45
RepairingaFlatTire .................46
7 Warranty . . . . . . . . . . . . . . . . . . . . . . . . . . 47
8 Purchase Record . . . . . . . . . . . . . . . . . . . 49

1
This manual contains important information
regarding safety, assembly, use, and maintenance
of the tricycle but is not intended to be a complete or
comprehensive manual covering all aspects concerning
tricycle ownership. We recommend consulting a tricycle
specialist if you have any doubts or concerns regarding
your experience or ability to properly assemble and
maintain the tricycle.
Our customer service department is dedicated to your
satisfactionwithPacicCycleandit’sproducts.Ifyou
have questions or need advice regarding assembly,
parts, performance, or returns, please contact the
expertsatPacicCycle.
Enjoy the ride.
Toll free: 1-800-626-2811.
Customer Service hours: 8 AM- 5 PM (Central
StandardTime,CST)MondaythruFriday.
You may also reach us at:
Web: www.schwinnbikes.com
Email:customerservice@pacic-cycle.com
Mail:PacicCycle
PO Box 344
4730ERadioTowerLn
Olney, IL 62450
Do not return this item to the store. Please call
Pacic Cycle customer service if you need
assistance.
Introduction
1

2
Safety
2
Safety Signal Words
Thefollowingsafetysignalwordsindicateasafety
message.Thesymbolalertsyoutopotentialhazards.
Failure to follow the warning may result in damage to
property, injury, or death.
!
WARNING!
Indicates a hazard or unsafe practice that will result in
severe injury or death.
Failure to read, understand and follow the safety
information in this manual may result in serious injury
or death.
!
CAUTION!
Indicates a hazard or unsafe practice that could result
in minor injury.
NOTICE
Indicates a hazard unrelated to personal injury, such as
property damage.
User Responsibility
• All persons assembling, using, and maintaining
the tricycle must read and understand the safety
warnings and operating instructions in this manual
before using the tricycle.
• It is the responsibility of the user, or in the case of
a child rider, an adult, to ensure the tricycle is in
proper operating condition before each use.
See the Safety Checklist in the Use section of
this manual.
• A responsible adult must supervise the use of the
tricycle by a child. You must ensure:
•Thechildiswearingtheproperprotective
attire and approved tricycle helmet.
•Thechildisseatedsecurelyandthetricycle
isproperlyttedtothechild.
•Thechildunderstandsapplicablelawsand
common sense rules of safe responsible
bicycling.

3
Protective Gear and Clothing
Always wear proper attire when riding the tricycle, you
should wear:
• Colors that are easily seen and, if possible,
reectiveclothing.
• Clothing appropriate for the weather conditions.
• Use of protective gear such as pads for the knees
and elbows is highly recommended for children.
• Aproperlytted,ASTMorSNELLapproved,
tricycle helmet shall be worn at all times by riders
of the tricycle. For information regarding how to
properlytahelmetvisit:http://www.nhtsa.gov/
people/injury/pedbimot/bike/easystepsweb
Note: Some states have helmet laws regarding
children. Always follow local or state regulations
regarding helmet use.
Do not wear:
• Loose clothing parts, strings, jewelry that may
become entangled with moving parts on the
tricycle or interfere with handling of the tricycle.
• Pants with loose pant legs. If necessary, always
tuck pant legs into a sock or use a leg band to
avoid the clothing becoming caught in the
drive chain.
• Shoes with untied shoe laces.
Use of Reector and Lights
• Federal regulations require every tricycle over
16” to be equipped with front and rear wheel
reectorsaswellaspedalreectors.
• Statesmayrequirespecicsafetydevices.
Always follow state or local regulations regarding
required safety devices.
• Alwayscheckthereectorsareinplacebefore
using the tricycle.
• Tohelpenhanceyourvisibilitytoautomobile
drivers use front and rear lights.
Riding Safety
• Familiarizeyourselfwithallthetricycle’sfeatures
before riding. Practice gear shifts, braking, and
the use of toe clips and straps, if installed.

4
• Always ride defensively in a predictable, straight
line.Neverrideagainsttrafc.
• Concentrate on the path ahead. Avoid pot holes,
gravel, wet road markings, oil, curbs, speed
bumps, drain grates and other obstacles.
• Cross train tracks at a 90 degree angle or walk
your tricycle across.
• Expect the unexpected (e.g. opening car doors or
carsbackingoutofconcealeddriveways).
• Takeextracareatintersectionsandwhen
preparing to pass other vehicles.
• Maintain a comfortable stopping distance from all
other riders, vehicles and objects. Safe braking
distances and forces are subject to the prevailing
weather conditions. Do not lock up the brakes.
Whenbraking,alwaysapplytherearbrakerst,
thenthefront.Thefrontbrakeismorepowerful
and if it is not correctly applied, you may lose
control and fall.
• Always use the correct hand signals to indicate
turning or stopping.
• Obeythetrafclaws(e.g.stoppingataredlight
orstopsign,givingwaytopedestrians).
• Wearproperridingattire,reectiveifpossible,
and avoid open toe shoes.
• Avoid wearing loose pants. If you are wearing
loose pants, tuck the pant leg into a sock or use
leg clips/elastic bands to prevent them from being
caught in the drive chain.
• Don’tuseitemsthatmayrestrictyourhearing.
• Don’tcarrypackagesorpassengersthat
will interfere with your visibility or control of
the tricycle.
Wet Weather
• Be aware of road conditions. Pot holes and
slippery surfaces such as line markings and train
tracks all become more hazardous when wet.
• Decrease your riding speed, avoid sudden
braking and sharp turns.
• Braking will require additional distance. Initiate
braking slowly and earlier than usual.
• Wearreectiveclothingandusesafetylightsfor
increased visibility.

5
Night Riding
• Riding at night is not recommended. Check with
local law or regulations regarding the use of lights
for night riding.
• Ensure tricycle is equipped with a full set of
correctlypositionedandcleanreectors.
• Use a white light on the front and a red light
ontherear.Ifpossible,uselightswithashing
capability. Flashing lights enhance visibility.
• If using battery powered lights, make sure
batteries are well charged.
• Wearreectiveandlightcoloredclothing.
• Slow down and use familiar roads with
street lighting.
• Ride at night only if necessary.

6
Before assembly check and see that all the parts are included. If parts are missing or damaged call customer
service toll free at 1-800-626-2811.
Parts
3
secondary chain
front wheel
handlebar
pedals(2)
rear frame
rearfenders(2)
rearwheels(2)
main frame
rear brake
rear brake lever
front brake lever
front fender
wire basket
saddle
seat stem
plastic wheel
caps(2)

7
Hardware
4
Frame Assembly Hardware
Handlebar Hardware
4 nuts 4 washers
stem wedge cap
Secondary Chain Hardware
secondary chain
2 master links
Rear Wheel Axle Hardware
2 plastic caps 2 nuts 2 washers
Front Wheel Axle Hardware
2 nuts
Basket Hardware
4 washers
4 bolts
Rear Fender Hardware

!
WARNING!
8
Assembly
5
Improperly assembly of the tricycle may result in
unexpected product performance and serious injury
or death. Assemble the tricycle according to the
instructions in this manual or have a professional
tricycle mechanic assemble the tricycle.
Getting Organized
Thefollowingtoolsanditemsareneededforassembly:
• Phillipsheadscrewdriver(minimumfourinchshaft)
• 6 mm, 10 mm Allen keys
• Adjustable wrench or 10 mm, 15 mm, and 17 mm
open and box end wrenches
• Needle nose pliers with cable cutting ability
• Grease(Automotiveoranti-slipcoppergrease)

9
Initial Set-up - Attach the Handlebars
Parts: Handlebar, main frame
Hardware:Thestemwedgeboltandbinderboltcome
attached to the handlebar. Stem wedge bolt cap.
Tools: 6 mm Allen wrench, grease
1. Remove the cap covering the stem wedge bolt.
2. Apply a light layer of grease to the stem and
frame head tube.
3. Insert the stem of the handlebar into the frame
head tube until the Minimum Insertion mark is not
visible. If necessary, unscrew the stem wedge bolt
until there is play in the stem wedge.
NOTICE
Thestemmaybreakordamagemayoccurifthestem
is not inserted the minimum amount. Insert the stem
until the Minimum Insertion mark is not visible.
4. Rotate the handle bar so it is square with the fork.
5. Tightenthestemwedgebolttolockthestem
in place.
6. Replace the cap onto the stem wedge bolt.
7. Loosen the handlebar binder bolt and rotate the
handlebar into the riding position.
8. Using the 6 mm Allen wrench, tighten the handlebar
binder bolt until the handlebar is locked in place.
9. Turnthetricyleassemblyoversoitrestsonthe
handlebar and main frame.
9

11
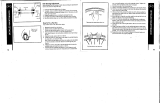
Attach the Rear Frame
Parts: rear frame, main frame
Hardware: 4 nuts, 4 square bolts, 4
washers, come attached to the
frame. Remove the nuts and
washers only.
Tools: None required.
1. Join the rear frame and main frame
together by sliding the bolts from the
main frame into the slots on the rear
frame.Theboltsonthefrontofthe
mainframe(furthestfromthegears)
shouldtintotheslotsonthebackof
therearframe.Theboltsontheback
of the main frame (closest to the
gears)shouldtintotheslotsonthe
front of the rear frame.
2. Slide a washer over the end of a bolt
and fasten a nut to the end of the bolt.
Note: Do not tighten the nuts at this
time.Thiswillbedoneafterthe
secondary chain is attached.
3. Repeat step 2 on the remaining bolts.
rear frame slots
main frame bolts
3
2
Side view of frame alignment
1
Rear and main frame attached
gears

12
Attach the Secondary Chain
Parts: secondary chain, frame assembly
Hardware: 2 master links
Tools: 17 mm open and box end wrench.
1. Wrap the secondary chain around the inner sprocket
on the rear hub and drive sprocket on the rear axle.
2. Adjust the position of the rear frame until the ends of
the secondary chain meet each other, leaving one
chain link length space in between the ends.
3. Toconnectthetwoendsofthechain:
a. Insert the post of a master link through the
hole on the end of the secondary chain link.
b. Insert the post of the other master link through
the opposite end of the secondary chain, and
on the opposite side of the chain.
c. Pull the chain so the posts are inserted into
the smaller hole of the master chain.
4. Pull the rear frame back so the secondary chain is
taut and there is less than 5 mm of play up or down.
Important! Be sure the rear frame is perpendicular
to main frame. Failure to square the frames will affect
performance of the tricycle.
5. Firmly tighten the four bolts holding the rear frame to
the main frame.
inner
sprocket
drive
sprocket
b
5
2
Have a second
person pulling the
chain taut while
tightening the bolts.
Tip!
3
4
a
1
c
Front view of chain
Post inserted into link

!
WARNING!
13
Attach the Rear Wheels
Failure to properly tighten the nuts holding the wheels
onto the tricycle may result in poor riding performance,
the tire falling off and serious injury or death. Always
be sure the wheels are securely attached to the frame
before using the tricycle.
Parts: Drive wheel, non-drive wheel
Hardware: 2 plastic caps, 2 locknuts, 2 washers.
The locknuts come attached to the axle.
Remove the locknuts before you begin this
procedure.
Tools: 17 mm open and box end wrench
See the facing page for diagrams of the following steps.
1. Placethedrivewheel(withanotchedopening)on
the axle.
2. Place the washer on the axle.
3. Place the locknut on the axle and tighten securely.
Note:Thedrive
wheel hub has
a notched
opening that
matches the
notched axle.
4. Screw the plastic caps on each end of the axles.
5. Toattachthenon-drivewheelrepeatstepsone
through four.
Note:Topreventtheaxlefromturningwhile
attaching the non-drive wheel, it is important to hold
the drive wheel while tightening the locknut on the
non-drive wheel.

15
Attach the Front Fender
Parts: Front fender, main frame
Hardware: washer, long screw, small screw,
Tools: Phillips head screwdriver
See the facing page for diagrams of the following steps.
1. Removetheforkprotector(notshown).
2. Disconnect the brake noodle from the brake
carrier by:
a. Using a 5 mm Allen wrench loosen the
cable anchor bolt enough so the cable
can move freely.
b. Lift the brake noodle and cable out of the
brake carrier.
3. Remove the hardware from the fork.
2
hex wrench
a
cable anchor bolt
brake
noodle
brake
carrier
b

16
4. Position the front fender so the attachment bar is
on the inside of the main frame, and aligns with the
threaded screw hole of the fork.
5. Place a washer on the large screw and slide it
through the attachment bar, and into the threaded
hole in the fork.
6. Align the fender braces with the small hole on the
ends of the fork.
7. Loosely screw the fender braces to the fork.
Note:Thefenderwillbepositionedandrmlyfastened
after the front tire is attached.
Decal should be
on the outside of
the frame.
Tip!
4
5
3
6
7

!
WARNING!
17
Attach the Front Wheel
Failure to properly tighten the nuts holding the wheels
onto the tricycle may result in poor riding performance,
the tire falling off and serious injury or death. Be sure
the wheels are securely attached to the frame before
using the tricycle.
Parts: Front wheel, main frame assembly
Hardware: 2 large nuts
Tools: 15 mm open and box end wrench,
Adjustable Pliers
1. Place the front wheel into the fork openings.
Be sure both sides of the axle rest on the
metal and the wheel is centered.
2. Place the nut on the axle and loosely tighten.
3. Place the remaining nut on the opposite side and
loosely tighten.
4. Tighteneachnutuntilbotharermly
set,aminimumof20ftlbs(240in-lb).
5. Inspect the wheel for even rotation.
Before proceeding to the next step,
lift and rotate the tricycle.
3
2
1
Tip!

!
WARNING!
18
Assemble the Front Brake
Failure to properly set the brakes may result in the
inability to stop the tricycle movement and cause serious
injury or death. Be sure the brakes are functioning
properly before using the tricycle.
Note:Thetricycleisshippedwiththebrakecable
attached to the brake lever. Follow these steps if there
is a need to re-attach the brake cable to the brake lever:
1. Rotate the cable adjustment barrel and cable nut
until the slots are aligned with the slot on the brake
lever body.
2. Press the brake lever towards the grip.
3. Slide the brake cable through the slots and place the
cable head into the brake lever.
4. Release the brake lever.
5. Lightly pull on the cable, and rotate the cable nut
and cable barrel so they are no longer aligned.
1
cable adjustment
barrel slot
cable nut slot
brake lever slot
2
brake lever
3
cable head
4
5
brake cable

19
Attach the Brake Cable to the Brake Carrier
1. Squeeze the two brake arms together until the brake
pads touch the wheel rim.
2. With your opposite hand, pull the brake cable and
insert the end of the noodle into the brake carrier.
Adjust the Brake Cable
Parts: Brake cable, brake arms
Tools: 5 mm Allen wrench
1. Using a 5 mm Allen wrench loosen the cable anchor
bolt enough so the cable can move freely.
2. Pull on the cable to move the left brake arm towards
the rim until there is approximately a 1/8”
(3mm)gapbetweenthebrakepadandrim.
3. Move the right brake arm towards the rim until there
is approximately a 1-2 mm gap between the brake
pad and rim.
4. Usingthe5mmAllenwrench,rmlytightenthe
cable anchor bolt completely.
noodle
brake
carrier
brake
arm
brake
cable
brake
arm
1
2
wheel rim

20
Check for the brake pads for the following conditions:
See pages 21 -24 to adjust and align the brake pads.
3
4
Brake pads are centered
on the wheel rim.
Clearance between the
brake pad and wheel rim is
a 1-2 mm gap.
Brake pads are aligned
(parallel)withtherim
1/8”
3
cable anchor bolt
1
2
1
2
/