Page is loading ...

Tools and Materials
Before You Begin
CAUTION: Risk of personal injury or product damage.
Handle with care. Product can break, chip or cause injury if
handled carelessly. Get help lifting the lavatory.
Observe all local plumbing and building codes.
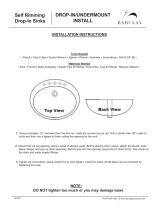
Prior to installation, unpack the new lavatory and inspect it for
damage. Return the lavatory to its protective carton until you are
ready to install it.
Inspect the existing drain and supply tubing. Replace if necessary.
These instructions are for installing the lavatory to wood frame
construction. For other installations, supply suitable bracing and
fastening devices of sufficient size and strength.
Do not substitute another sealant if one is supplied with this
lavatory.
Use the template supplied with the lavatory.
For replacement installations, make sure the existing cutout is the
same size or smaller than needed for the new lavatory.
Use these instructions for wall-mount, self-rimming and above
counter installations. Follow only the instructions that apply to
your installation.
You can choose between a wall-mount or countertop faucet
installation, depending upon the setting and styling you desire. A
wall-mount faucet is recommended.
Kohler Co. reserves the right to make revisions in the design of
products without notice, as specified in the Price Book.
Pencil
Scissors
Drill
Keyhole Saw
Plus:
• Template (supplied)
• Rags or Paper Toweling
• Sealant
Tape
Measure
Safety
Glasses
Claw
Hammer
Jigsaw
1052863-2-B 2 Kohler Co.

1. Preparation
Position the template on the countertop.
For Wall-Mount Faucets: Provide sufficient spout overhang into
the lavatory basin. The faucet spout length must be at least 5″
(12.7 cm) to provide proper performance.
For Countertop Faucets: Pay special attention to the spout and
handle fit clearance when locating the faucet. Use the template to
locate the faucet spout hole centerline on the countertop. This
centerline is recommended to provide adequate clearance
between the edge of the lavatory and the spout.
Check for adequate clearance between the backsplash, faucet
spout and handles, and lavatory. Kohler Co. recommends a
clearance of at least 1″ (2.5 cm).
Refer to the faucet installation instructions for required clearance,
and mark the preferred faucet hole locations using a soft lead
pencil.
Trace the template on the countertop.
Cut-out
Line
Outside
Edge of
Lavatory
Countertop
Countertop
Backsplash
Template
Kohler Co. 3 1052863-2-B

2. Install the Lavatory
CAUTION: Risk of personal injury or product damage.
Handle with care. Product can break, chip or cause injury if
handled carelessly. Get help lifting the lavatory.
Cut out the opening by carefully following the pencil line traced
from the template.
Temporarily position the lavatory in the countertop cutout so the
″Kohler″ logo is to the back. Adjust to fit.
Remove the lavatory.
Drill the faucet holes.
Install the faucet and drain according to the manufacturer’s
instructions.
Clean the countertop, and carefully position the lavatory in the
countertop opening so the ″Kohler″ logo is to the back.
Apply a thin, continuous bead of sealant around the lavatory
edges.
Immediately wipe away any excess sealant, and fill any voids as
needed.
Verify that the lavatory has not moved out of position.
Allow the sealant to cure at least 30 minutes before proceeding.
Connect and tighten the trap to the drain, and complete the water
supply connections to the faucet according to the instructions
packed with the faucet.
Apply sealant.
Countertop
Cutout
1052863-2-B 4 Kohler Co.

Install the Lavatory (cont.)
Run water into the lavatory and check for leaks.
Clean up with a non-abrasive cleaner.
Kohler Co. 5 1052863-2-B
/