Sharp PN-L601B User manual
- Category
- Flat panel accessories
- Type
- User manual
This manual is also suitable for

PN-L601B
LCD MONITOR
MONITEUR LCD
MONITOR LCD
SETUP MANUAL
MANUEL D’INSTALLATION
MANUAL DE INSTALACIÓN
ENGLISH FRANÇAIS ESPAÑOL
ENGLISH ..... E1
FRANÇAIS .... F1
ESPAÑOL .... S1

IMPORTANT:
To aid reporting in case of loss or theft, please record the
product’s model and serial numbers in the space provided.
The numbers are located in the rear of the product.
Model No.:
Serial No.:
U.S.A. ONLY
FOR CUSTOMERS IN U.K.
IMPORTANT
The wires in this mains lead are coloured in accordance with the following code:
GREEN-AND-YELLOW: Earth
BLUE: Neutral
BROWN: Live
As the colours of the wires in the mains lead of this apparatus may not correspond with the coloured markings identifying the
terminals in your plug proceed as follows:
•ThewirewhichiscolouredGREEN-AND-YELLOWmustbeconnectedtotheterminalintheplugwhichismarkedbythe
letter E or by the safety earth
orcolouredgreenorgreen-and-yellow.
•ThewirewhichiscolouredBLUEmustbeconnectedtotheterminalwhichismarkedwiththeletterN or coloured black.
•ThewirewhichiscolouredBROWNmustbeconnectedtotheterminalwhichismarkedwiththeletterL or coloured red.
Ensurethatyourequipmentisconnectedcorrectly.Ifyouareinanydoubtconsultaqualiedelectrician.
“WARNING: THIS APPARATUS MUST BE EARTHED.”
Products that have earned the ENERGY STAR
®
are designed to protect the environment through superior
energyefciency.
Les produits labellisés ENERGY STAR
®
sont conçus pour protéger l’environnement par un rendement
énergétique supérieur.
Los Productos que han conseguido el ENERGY STAR
®
están diseñados para proteger el medio ambiente a
travésdeunamejorecienciaenelconsumodeenergía.

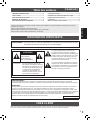
ENGLISH
1
E
WARNING: TO REDUCE THE RISK OF FIRE OR ELECTRIC SHOCK, DO NOT EXPOSE THIS PRODUCT
TO RAIN OR MOISTURE.
RISK OF ELECTRIC
SHOCK
DO NOT OPEN
CAUTION
CAUTION: TO REDUCE THE RISK OF ELECTRIC
SHOCK, DO NOT REMOVE COVER.
NO USER-SERVICEABLE PARTS
INSIDE.
REFER SERVICING TO QUALIFIED
SERVICE PERSONNEL.
The lightning ash with arrowhead symbol, within
an equilateral triangle, is intended to alert the
user to the presence of uninsulated “dangerous
voltage” within the product’s enclosure that may
be of sufcient magnitude to constitute a risk of
electric shock to persons.
The exclamation point within a triangle is
intended to alert the user to the presence of
important operating and maintenance (servicing)
instructions in the literature accompanying the
product.
Thank you for your purchase of a SHARP LCD product. To ensure safety and many years of trouble-free operation of your
product, please read the Safety Precautions carefully before using this product.
DEAR SHARP CUSTOMER
IMPORTANT INFORMATION
WARNING:
FCC Regulations state that any unauthorized changes or modications to this equipment not expressly approved by the
manufacturer could void the user’s authority to operate this equipment.
NOTE:
This equipment has been tested and found to comply with the limits for Class A digital device, pursuant to Part 15 of the
FCC Rules. These limits are designed to provide reasonable protection against harmful interference when the equipment
is operated in a commercial environment. This equipment generates, uses, and can radiate radio frequency energy and, if
not installed and used in accordance with the instruction manual, may cause harmful interference to radio communications.
Operation of this equipment in a residential area is likely to cause harmful interference in which case the user will be required
to correct the interference at his own expense.
U.S.A. ONLY
Contents
Read the manuals in the “Manual” folder of the provided CD-ROM. (Adobe Reader is required to view the manuals.)
Operation Manual (PNL601B_manual_English.pdf)
Touch Panel Driver Operation Manual (PNL601B_driver_English.pdf)
Pen Software Operation Manual (PenSoftware_manual.pdf)
IMPORTANT INFORMATION ............................................1
DEAR SHARP CUSTOMER ..............................................1
SAFETY PRECAUTIONS ..................................................2
SAFETY INSTRUCTION ...................................................3
MOUNTING PRECAUTIONS ............................................4
Supplied Components .....................................................5
Preparing the Remote Control Unit and
the Touch Pen ..................................................................5
Attaching the Holder .......................................................5
Connections .....................................................................6
Turning Power On/Of .......................................................7
[ENGLISH]

2
E
SAFETY PRECAUTIONS
Electricity is used to perform many useful functions, but it can also cause personal injuries and property damage if improperly
handled. This product has been engineered and manufactured with the highest priority on safety. However, improper use can
resultinelectricshockand/orre.Inordertopreventpotentialdanger,pleaseobservethefollowinginstructionswheninstalling,
operatingandcleaningtheproduct.ToensureyoursafetyandprolongtheservicelifeofyourLCDproduct,pleasereadthe
following precautions carefully before using the product.
1. Read instructions — All operating instructions must be read and understood before the product is operated.
2. Keepthismanualinasafeplace—Thesesafetyandoperatinginstructionsmustbekeptinasafeplaceforfuture
reference.
3. Observe warnings — All warnings on the product and in the instructions must be observed closely.
4. Follow instructions — All operating instructions must be followed.
5. Cleaning—UnplugthepowercordfromtheACoutletbeforecleaningtheproduct.Useadryclothtocleantheproduct.Do
not use liquid cleaners or aerosol cleaners.
6. Attachments—Donotuseattachmentsnotrecommendedbythemanufacturer.Useofinadequateattachmentscanresult
in accidents.
7. Waterandmoisture—Donotusetheproductnearwater.Donotinstalltheproductinaplacewherewatermaysplashonto
it.Becarefulofequipmentwhichdrainswatersuchasanair-conditioner.
8. Ventilation—Theventsandotheropeningsinthecabinetaredesignedforventilation.
Donotcoverorblocktheseventsandopeningssinceinsufcientventilationcancauseoverheatingand/orshortenthelife
oftheproduct.Donotplacetheproductonasofa,rugorothersimilarsurface,sincetheycanblockventilationopenings.
Donotplacetheproductinanenclosedplacesuchasabookcaseorrack,unlessproperventilationisprovidedorthe
manufacturer’s instructions are followed.
9. Power cord protection — The power cords must be routed properly to prevent people from stepping on them or objects from
resting on them.
10. The screen used in this product is made of glass. Therefore, it can break when the product is dropped or applied with
impact.Becarefulnottobeinjuredbybrokenglasspiecesincasethescreenbreaks.
11. Overloading—DonotoverloadACoutletsorextensioncords.Overloadingcancausereorelectricshock.
12. Enteringofobjectsandliquids—Neverinsertanobjectintotheproductthroughventsoropenings.Highvoltageowsin
the product, and inserting an object can cause electric shock and/or short internal parts.
For the same reason, do not spill water or liquid on the product.
13. Servicing—Donotattempttoservicetheproductyourself.Removingcoverscanexposeyoutohighvoltageandother
dangerousconditions.Requestaqualiedservicepersontoperformservicing.
14. Repair—Ifanyofthefollowingconditionsoccurs,unplugthepowercordfromtheACoutlet,andrequestaqualiedservice
person to perform repairs.
a. Whenthepowercordorplugisdamaged.
b. Whenaliquidwasspilledontheproductorwhenobjectshavefallenintotheproduct.
c. Whentheproducthasbeenexposedtorainorwater.
d. Whentheproductdoesnotoperateproperlyasdescribedintheoperatinginstructions.
Donottouchthecontrolsotherthanthosedescribedintheoperatinginstructions.Improperadjustmentofcontrols
notdescribedintheinstructionscancausedamage,whichoftenrequiresextensiveadjustmentworkbyaqualied
technician.
e. Whentheproducthasbeendroppedordamaged.
f. Whentheproductdisplaysanabnormalcondition.Anynoticeableabnormalityintheproductindicatesthattheproduct
needs servicing.
15. Replacementparts—Incasetheproductneedsreplacementparts,makesurethattheservicepersonusesreplacement
partsspeciedbythemanufacturer,orthosewiththesamecharacteristicsandperformanceastheoriginalparts.Useof
unauthorizedpartscanresultinre,electricshockand/orotherdanger.
16. Safety checks — Upon completion of service or repair work, request the service technician to perform safety checks to
ensure that the product is in proper operating condition.
17. Wallmounting—Whenmountingtheproductonawall,besuretoinstalltheproductaccordingtothemethod
recommended by the manufacturer.
18. Heatsources—Keeptheproductawayfromheatsourcessuchasradiators,heaters,stovesandotherheat-generating
products(includingampliers).
19. Batteries—Incorrectuseofbatteriesmaycausethebatteriestoburstorignite.Aleakybatterymaycorrodetheequipment,
dirty your hands or spoil your clothing. In order to avoid these problems, make sure to observe the precautions below:
•Usethespeciedbatteriesonly.
•Installthebatterieswithdueattentiontotheplus(+)andminus(-)sidesofthebatteriesaccordingtotheinstructionsinthe
compartment.
•Donotmixoldandnewbatteries.
•Donotmixbatteriesofdifferenttypes.Voltagespecicationsofbatteriesofthesameshapemayvary.
•Replaceanexhaustedbatterywithanewonepromptly.
•Ifyouwillnotusetheremotecontrolforalongtime,removethebatteries.
•Ifleakedbatteryuidgetsonyourskinorclothing,rinseimmediatelyandthoroughly.Ifitgetsintoyoureye,batheyour
eyewellratherthanrubbingandseekmedicaltreatmentimmediately.Leakedbatteryuidthatgetsintoyoureyeoryour
clothing may cause a skin irritation or damage your eye.
20. Usage of the monitor must not be accompanied by fatal risks or dangers that, could lead directly to death, personal injury,
severe physical damage or other loss, including nuclear reaction control in nuclear facility, medical life support system, and
missile launch control in a weapon system.

ENGLISH
3
E
SAFETY INSTRUCTION
-Donotusethemonitorwherethereisalotofdust,where
humidity is high, or where the monitor may come into contact
withoilorsteam,asthiscouldleadtore.
-Ensurethatthemonitordoesnotcomeintocontactwith
waterorotheruids.Ensurethatnoobjectssuchaspaper
clipsorpinsenterthemonitorasthiscouldleadtoreor
electric shock.
-Donotplacethemonitorontopofunstableobjectsorin
unsafeplaces.Donotallowthemonitortoreceivestrong
shocksortostronglyvibrate.Causingthemonitortofallor
topple over may damage it.
-Donotusethemonitornearheatingequipmentorinplaces
where there is likelihood of high temperature, as this may
leadtogenerationofexcessiveheatandoutbreakofre.
-Donotusethemonitorinplaceswhereitmaybeexposedto
direct sunlight.
-TheACoutletshallbeinstalledneartheequipmentandshall
be easily accessible.
-Donotoperatethescreenwithahardorpointedobjectsuch
asangernail,pen,orpencil.
The Power Cord
-Useonlythepowercordsuppliedwiththemonitor.
-Donotdamagethepowercordnorplaceheavyobjectson
it, stretch it or over bend it. Also, do not add extension cords.
Damagetothecordmayresultinreorelectricshock.
-Donotusethepowercordwithapowertap.
Addinganextensioncordmayleadtoreasaresultof
overheating.
-Donotremoveorinsertthepowerplugwithwethands.
Doingsocouldresultinelectricshock.
-Unplugthepowercordifitisnotusedforalongtime.
-Donotattempttorepairthepowercordifitisbroken
or malfunctioning. Refer the servicing to the service
representative.
21. Donotstayincontactwiththepartsoftheproductthatbecomehotforlongperiodsoftime.Doingsomayresultin
low-temperatureburns.
WARNING:
This is a class A product. In a domestic environment this product may cause radio interference in which case the user may be
required to take adequate counter measures.
Ifamonitorisnotpositionedinasufcientlystablelocation,itcanbepotentiallyhazardousduetofalling.Manyinjuries,
particularly to children, can be avoided by taking simple precautions such as:
•Usingxingdeviceslikewallmountbracketsrecommendedbythemanufacturer.
•Onlyusingfurniturethatcansafelysupportthemonitor.
•Ensuringthemonitorisnotoverhangingtheedgeofthesupportingfurniture.
•Notplacingthemonitorontallfurniture(forexample,cupboardsorbookcases)withoutanchoringboththefurnitureandthe
monitor to a suitable support.
•Notstandingthemonitorsonclothorothermaterialsplacedbetweenthemonitorandsupportingfurniture.
•Educatingchildrenaboutthedangersofclimbingonfurnituretoreachthemonitororitscontrols.
Especially for child safety
-Don’tallowchildrentoclimbonorplaywiththemonitor.
-Don’tplacethemonitoronfurniturethatcaneasilybeusedassteps,suchasachestofdrawers.
-Rememberthatchildrencanbecomeexcitedwhilewatchingaprogram,especiallyona“largerthanlife”monitor.Care
should be taken to place or install the monitor where it cannot be pushed, pulled over, or knocked down.
-Careshouldbetakentorouteallcordsandcablesconnectedtothemonitorsothattheycannotbepulledorgrabbedby
curious children.
SAFETY PRECAUTIONS (Continued)

4
E
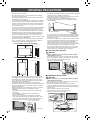
MOUNTING PRECAUTIONS
• Thisproductisforuseindoors.
• Sincethemonitorisheavy,consultyourdealerbeforeinstalling,
removingormovingthemonitor.
• Wheninstalling,removingormovingthemonitor,ensurethatthis
iscarriedoutbyatleast2people.
• AmountingbracketcompliantwithVESAspecicationsisrequired.
DonotuseanyscrewholesotherthanVESAholesforinstallation.
•
ToattachaVESA-compliantmountingbracket,useM6screwsthat
are5/16inch(8mm)to3/8inch(10mm)longerthanthethickness
ofthemountingbracket.
•
Whenmovingthemonitor,besuretoholditwitheitherbothhandles
orthe4cornersonthebottomoftheunit.Donotplaceyourhand
onthescreen.Thismaycauseproductdamage,failure,orinjury.
• Installthemonitorwiththesurfaceperpendiculartoalevelsurface.
• Mountingthemonitoronthewallrequiresspecialexpertiseand
theworkmustbeperformedbyanauthorizedSHARPdealer.You
shouldneverattempttoperformanyofthisworkyourself.Our
companywillbearnoresponsibilityforaccidentsorinjuriescaused
byimpropermountingormishandling.
• Thismonitorshouldbeusedatanambienttemperaturebetween
41°F(5°C)and95°F(35°C).Provideenoughspacearoundthe
monitortopreventheatfromaccumulatinginside.
For the monitor in horizontal orientation
7-7/8 [20]
Unit: inch [cm]
2 [5]
2
[5]
2
[5]
For the monitor in vertical orientation
Unit: inch [cm]
2 [5]
2
[5]
2
[5]
7-7/8 [20]
1-7/16 [3.5]
1-13/16 [4.5]
• Ifitisdifficulttoprovidesufficientspaceforanyreasonsuchas
theinstallationofthemonitorinsideahousing,oriftheambient
temperaturemaybeoutsideoftherangeof41°F(5°C)to95°F
(35°C),installafanortakeothermeasurestokeeptheambient
temperaturewithintherequiredrange.
• Temperatureconditionmaychangewhenusingthedisplay
togetherwiththeoptionalequipmentsrecommendedbySHARP.In
suchcases,pleasecheckthetemperatureconditionspecifiedby
theoptionalequipments.
• Adheretothefollowingwheninstallingthemonitorinitsvertical
orientation.Failingtoadheretothefollowingmaycause
malfunctions.
-InstallthemonitorsuchthatthepowerLEDislocatedonthe
bottomside.
-SettheMONITORontheSETUPmenutoPORTRAIT.
(SeeOperationmanual.)
-Besuretoclampthepowercord(supplied)ontothecable
clampattachmentbelowusingthesuppliedcableclamp.When
clampingthepowercord,takecarenottostresstheterminalof
thepowercord.Donotbendthepowercordexcessively.
Power cord (Supplied)
Cable clamp
Cable clamp attachment
• Donotblockanyventilationopenings.Ifthetemperatureinsidethe
monitorrises,thiscouldleadtoamalfunction.
• Aftermounting,pleasecarefullyensurethemonitorissecure,and
notabletocomeloosefromthewallormount.
• Donotplacethemonitoronadevicewhichgeneratesheat.
• Usethesuppliedverticalstickerwhenyouinstallthemonitorin
verticalorientation.
Operation panel
Logo
Donotremovethefactory-afxedstickerbutafxthelogosticker
overit.Becarefulnottocovertheremotecontrolsensororbuttons.
• Besuretouseawall-mountbracketdesignedordesignatedfor
mountingthemonitor.
• Thismonitorisdesignedtobeinstalledonaconcretewallorpillar.
Reinforcedworkmightbenecessaryforsomematerialssuchas
plaster/thinplasticboard/woodbeforestartinginstallation.
Thismonitorandbracketmustbeinstalledonawallwhichcan
endureatleast4timesormoretheweightofthemonitor.Installby
themostsuitablemethodforthematerialandthestructure.
• Donotusetheproductinlocationswheretheunitisexposedto
directsunlightorotherstronglight.Sincethisproductoperates
withinfraredrays,suchlightmaycauseamalfunction.
■
Connecting the USB cable
Warning:
Contact your dealer or a service engineer to have the USB •
cable installed or removed.
Riskofelectricalshockorinjuryifyouattempttheworkyourself.
• BeforeconnectingtheUSBcable,turnoffthemainpowerswitch
anddisconnectthepowercablefromtheoutlet.
• UseonlythesuppliedUSBcable.
■
Installing the power switch
Warning:
Contact your dealer or a service engineer to have the power •
switch installed or removed.
Riskofelectricalshockorinjuryifyouattempttheworkyourself.
1.Removethescrew(x1)fromthemonitor.
2.Removetheprotectivesealandconnectthepowerswitch
connector,makingsuretheconnectorisinthecorrectorientation.
3.Aligntheclampswiththeslotinthebottomoftheunitandtighten
thescrews(x2).
Makesurethattheclampsarermlysecured.
Takecarethatthecableisnotcaughtorpinched.
4.Replacethescrewthatwasremovedin1.
Bottom
Power switch
Mounting
bracket
Protective seal
Connector
Mounting
bracket

ENGLISH
5
E
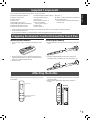
Attaching the Holder
Supplied Components
Preparing the Remote Control Unit and the Touch Pen
Installing the batteries
1. Press the cover gently and slide it in the direction of the
arrow.
2. See the instructions in the compartment and put in the
suppliedbatteries(R-6(“AA”size)x2)withtheirplus(+)
andminus(-)sidesorientedcorrectly.
3. Closethecover.
Inserting the battery
1. Rotate the battery cap and remove it, and then pull out the
cover.
Battery cap
2. Insertthesuppliedbattery(LR-03(“AAA”size))inthe
orientation shown, and attach the cover and battery cap.
If any component should be missing, please contact your dealer.
LiquidCrystalDisplayMonitor:1
Remote control unit: 1
Cableclamp:2
Power cord
R-6battery(“AA”size):2
CD-ROM(UtilityDiskforWindows):1
Setup Manual (this manual): 1
Stand hole protection cover: 2
* SharpCorporationholdsauthorshiprightstotheUtilityDiskprogram.Donotreproduceitwithoutpermission.
* For environmental protection!
Donotdisposeofbatteriesinhouseholdwaste.Followthedisposalinstructionsforyourarea.
Verticalsticker(Operationpanel):1
Verticalsticker(Logo):1
Touch pen: 1
Pen tip (for touch pen): 2
Touch pen battery
(LR-03(“AAA”size)):1
USBcable:1
Power switch: 1
Eraser: 1
Holder:1(With2hookandloopfasteners)
CoverSharplogo:1
Place this sticker onto the SHARP logo to
cover the logo.
The touch pen, remote control unit, and eraser can be stored
in the holder.
Touch pen
Remote control unit
and Eraser
1. Removethepeel-offsheetsfromthefastenersontheback
side of the holder.
2. Withtheholderspreadtaut,afxittothesideofthe
monitor.
Back side

6
E
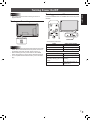
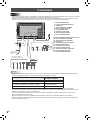
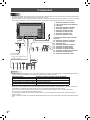
Connections
Caution
• Besuretoturnoffthemainpowerswitchanddisconnecttheplugfromthepoweroutletbeforeconnecting/disconnecting
cables. Also, read the manual of the equipment to be connected.
• Becarefulnottoconfusetheinputterminalwiththeoutputterminalwhenconnectingcables.Accidentallyreversingcables
connected to the input and output terminals may cause malfunctions and the other problems.
3
567894
When the PN-ZB01 (optional)
is attached
11 12 1413
16
18
1
2
For power
outlet
10 15 17 19
TIPS
• SettheaudioinputterminalusedforeachinputmodeinAUDIOSELECTontheOPTIONmenu.Thefactorysettingsare
shown below.
Input mode Audio input terminal (Factory setting)
PCD-SUB,PCDVI-D,PCRGB Audio input terminal
AVDVI-D Audio1 input terminal
AVCOMPONENT,
AVS-VIDEO,AVVIDEO
Audio2 input terminal
PCHDMI,AVHDMI PC/AVHDMIinputterminal
• Whenconnectingtheexternalspeaker,attachthespeakercablecore(includedwiththePN-ZB01).
• Tousethetouchpanel,thetouchpanelmustbeconnectedtoacomputer,andthetouchpaneldriverandPenSoftwaremust
beinstalledonthecomputerfromtheprovidedCD-ROM.
Toconnectthetouchpanelandinstallthetouchpaneldriver,seetheTouchPanelDriverOperationManual.
To install the Pen Software, see the Pen Software Operation Manual.
• HDMI,theHDMIlogoandHigh-DenitionMultimediaInterfacearetrademarksorregisteredtrademarksofHDMILicensing
LLC.
1. AC input terminal
2. Power cord (Supplied)
3. USB cable
4. PC/AV HDMI input terminal
5. PC D-sub input terminal
6. Audio input terminal
7. Audio output terminals
8. RS-232C output terminal
9. RS-232C input terminal
When the PN-ZB01 (optional) is attached
10. PC/AV DVI-D input terminal
11. PC/AV DVI-D output terminal
12. LAN terminal
13. External speaker terminals
14. Audio 1 input terminals
15. Audio 2 input terminals
16. PC RGB input terminals
17. AV component input terminals
18. AV video input terminal
19. AV S-video input terminal

ENGLISH
7
E
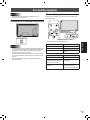
Turning Power On/Off
Caution
• TurnonthemonitorrstbeforeturningonthePCor
playbackdevice.
Turning on the main power
Main power switch
Caution
• Themainpowermustbeturnedon/offwiththemainpower
switch.Donotconnect/disconnectthepowercordorturn
thebreakeron/offwhilethemainpowerswitchison.
• WhenswitchingthemainpowerswitchorthePOWER
buttonoffandbackon,alwayswaitforatleast5seconds.
• Foracompleteelectricaldisconnection,pulloutthemain
plug.
Turning power on/off
PressthePOWERbuttonorPOWERswitchtoturnthepower
ON/OFF.
Power LED
Touch panel power LED
• StatusofthepowerLED
Status Status of the monitor
Greenlit Poweron
Orangelit Poweroff(Standbymode)
Greenashing Inputsignalwaitingmode
• StatusofthetouchpanelpowerLED
Status Status of the touch panel
Greenlit Operatingnormally
Blinkingorange
Alternatelyblinkinggreenand
orange
Initializing
Off
Touchpaneloff(powernot
supplied,etc.)

8
E
n
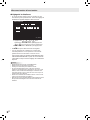
Date/time setting
• Ifthetimehasyettobesetwhenthemonitorisrstturned
on, the date/time setting screen appears. Set the date and
time.
DATE/TIME SETTING
SET
CANCEL
10
//
OK···[MENU]
20
01
/
01
/
00 00
:
: :
1. Press , , or to select the date and
time, and press
or to change the numerical
values.
2. Select SET and then press
MENU
.
• Besuretosetthedateandtime.
• Thedate/timesettingscreenwillcloseautomaticallyifno
operationisperformedforabout15seconds.Thedate
andtimecanbesetusingDATE/TIMESETTINGfrom
the OPTION menu when the date/time setting screen
disappears.
TIPS
•
Setthedatein“Year/Month/Day”order.
•
Setthetimeona24-hourbasis.
•
The clock is maintained by the internal battery.
•
If you already set the time but the date/time setting
screen appears when the power is turned on, the
internal battery may be exhausted. Please contact
your local Sharp servicing dealer or service center for
assistance with battery replacement.
•
Estimatedservicelifeoftheinternalbattery:About5
years (depending on monitor operation)
•
Astherstbatterywasinsertedatthefactory,itmaybe
exhausted prior to the expected continuous operation
life.
Turning Power On/Off
Page is loading ...
Page is loading ...
Page is loading ...
Page is loading ...
Page is loading ...
Page is loading ...
Page is loading ...
Page is loading ...
Page is loading ...
Page is loading ...
Page is loading ...
Page is loading ...
Page is loading ...
Page is loading ...
Page is loading ...
Page is loading ...
Page is loading ...

Printed in China
Imprimé en Chine
Impreso en China
10J KS2
TINSE1181MPZZ(2)
-
 1
1
-
 2
2
-
 3
3
-
 4
4
-
 5
5
-
 6
6
-
 7
7
-
 8
8
-
 9
9
-
 10
10
-
 11
11
-
 12
12
-
 13
13
-
 14
14
-
 15
15
-
 16
16
-
 17
17
-
 18
18
-
 19
19
-
 20
20
-
 21
21
-
 22
22
-
 23
23
-
 24
24
-
 25
25
-
 26
26
-
 27
27
-
 28
28


Sharp PN-L601B User manual
- Category
- Flat panel accessories
- Type
- User manual
- This manual is also suitable for
Ask a question and I''ll find the answer in the document
Finding information in a document is now easier with AI
in other languages
- français: Sharp PN-L601B Manuel utilisateur
- español: Sharp PN-L601B Manual de usuario
Related papers
-
Sharp PN-L601B Operating instructions
-
Sharp R-1880L User manual
-
Sharp PNQ701K Owner's manual
-
-
Sharp PN65SC1 Owner's manual
-
-
Sharp PN-E702 User manual
-
Sharp PNE602 Owner's manual
-
-
Sharp PN70HC1E Owner's manual
Other documents
-
Hitachi CMP5000WXE User manual
-
-
-
NEC CB751Q User manual
-
-
Hitachi CMP4121HDU User manual
-
Epson BrightLink 735Fi User manual
-
Toshiba Portégé X30W-J User guide
-
LG 75TC3D-B Owner's manual
-
Yamaha DPX-830 Owner's manual