Page is loading ...

1
5
2
6
3
7
4
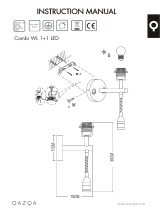
Multi- function Junction Box
Fixing Screws
(Supplied 3pcs)
Silicon Plugs
(Supplied 3pcs)
Upper Cover Plate
Upper Cover
Conduit Seal Caps 3/4"-14 NPS
(Supplied installed)
MEASUREMENTS (Unit: mm)
PRODUCT BREAKDOWN
Conduit Seal Cap water proof ring
Hingle Screws
(Supplied 4pcs)
8
Water proof ring
9
Self-tapping Screws
(Supplied 4pcs)
10
Base
10
41
Ø142
91.6
91.6
3
4
6
7
10
9
5
9
8
7
CDJBS11

20180523
INSTALLATION GUIDE
b) Attach camera to front of upper cover plate. Select
screw holes match the different model type. All
cameras ft centre of the junction box when
Note: The gap of the plate is always to face north, do
not try use incorrect ftting screws which break
the plate as will void the weather proof on the
b) Attach cover plate to base using screws ,be
5
a) Attach cables for camera and locate inside the
A
B
C
sure the screws are tight.
junction box.
correctly installed.
product.
Note: Different alphabets match
different models.
A
: CDI2112SV, CDI5112VIR,
CDT2S12VI, CDT2S12VIFW,
CDT2S12IFW
D: CDI4512VTIR, CTT2S12VIFW
E: CDI4512IR, CBI5112IR,
CBT2S12IFW
F: CBI2112XIR, CBI4512XIR
a) Fetch a matched silicon plug from the accessory
package, plug the multi-head cable of the camera
into the silicon plug. then plug them into the upper
cover.
a) Loosen screws
5
b) If using side conduit ensure
6
cap is ftted to
rear of base to make water tight.
c) Attach base to surface using the four
9
supplied. Be sure the rubber washer is attached
to assure waterproof attachment.
, remove upper cover.
screws
/