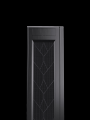
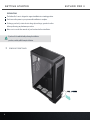
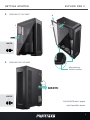
Phanteks Enthoo Pro 2 Closed Panel Owner's manual
- Category
- Computer cases
- Type
- Owner's manual
This manual is also suitable for

USER MANUAL V1.1
ENTHOO PRO II


Thank you
for choosing

2
25
27
28
29
32
33
TABLE OF CONTENTS ENTHOO PRO II
Introduction
Specications
Exploded View
Accessories
Congure your Enthoo Pro 2
Getting started
Installing the Motherboard
Installing the Power Supply
Installing a second Power Supply
Installing Fans
Installing Drives
Installing Water Cooling
Radiator Clearance
Drain Port
Installing the GPU Anti-Sag Bracket
Connecting Front I/O
Lighting Control
Cable Management
Dust Filters
Optional Upgrades:
Installing a Vertical GPU
Installing the 5.25 inch bay
Installing a Dual System
Contact Us
Warranty
3
4
5
6
7
8
10
11
12
13
14
17
18
19
20
21
22
23
24
1. WHAT’S INSIDE?
2. CHOOSE YOUR SETUP
3. SUPPORT

3
INTRODUCTION ENTHOO PRO II
Welcome to Phanteks!
The Enthoo Pro 2 has been designed with extreme performance in mind, featuring Phanteks’ innovative
‘High-Performance Fabric’ that sets a new airow performance standard in the PC enclosure industry. With
an extremely spacious and versatile interior design and state-of-the-art features, the Pro 2 is ready to house
any high-end conguration. From SSI-EEB motherboards to extreme water cooling to extensive storage
capabilities, anything is possible. When combined with the Revolt X or Revolt PRO even a Dual System or the
most powerful workstations can be a reality.
Phanteks believes that meaningful designs are created through
the fusion of form and function.
The Phanteks team

4
SPECIFICATIONS
INCLUDED ACCESSORIES
4x
1x
1x
1x
1x
1x
1x
330mm (13.49 in)
195 mm (7.7 in)
503 mm (19.95 in)
5 Years, see page 33
3.5” Stackable HDD Bracket
Vertical GPU Mount
Accessory Bag
GPU Anti-Sag Bracket
Dual PSU Cover
Dual System Cover
Toolbox
Max Motherboard width
CPU Cooler Clearance
GPU Clearance
Contact (International)
Contact (America)
Warranty
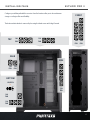
CLEARANCE
SUPPORT
240 mm x 580 mm x 560 mm
(9.45 x 22.83 x 22.05 in)
Full Tower
Steel chassis, Tempered glass window**
SSI-EEB, ATX, Micro-ATX, Mini-ITX, E-ATX *
*280mm wide to use grommets
Power button, 4x USB 3.0, Microphone,
Headphone, Reset Button, D-RGB Mode**,
D-RGB Color**, USB 3.1 GEN 2 Type-C
8x (+2x 3-vertical slot)
12x (4 included)
11x (11 included)
4x 3x
3x 3x
1x 1x
3x 1x
4x -
Up to 480 Up to 420
Up to 360 -
120 140
Up to 360 -
Up to 480 -
Dimension
(WxDxH)
Form Factor
Materials
MB Support
Front I/O
PCI slots
Internal 3.5”
Internal 2.5”
Front
Top
Rear
Bottom
Side
Front
Top
Rear
Bottom
Side
CASE SPECIFICATIONS
PCI SLOTS & DRIVE BAYS
FAN
RADIATOR
120 MM
120 MM
140 MM
140 MM
ENTHOO PRO II
** Only PH-ES620PTG model is equipped with a
Tempered Glass sidepanel and D-RGB lighting

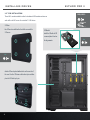
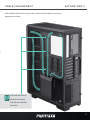
1. Chassis
2. Front Panel
3. Right Side Panel
4. Left Side Panel*
5. Dual PSU Bracket
6. SSD Cover
7. Front Dust Filter
8. Top Dust Filter
9. Side Dust Filters
10. Bottom Dust Filter
11. Bottom Radiator Bracket
12. SSD Bracket
5
6
11
12
9
7
4*
5
3
1
10
8
2
EXPLOADED VIEW ENTHOO PRO II
4* PH-ES620PC_BK version is not
equipped with a tempered glass panel

6
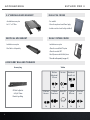
ACCESSORY BAG AND TOOLBOX
ACCESSORIES
3.5” MODULAR HDD BRACKET
- 4 included in accessory box
- For 3.5” or 2.5” Drive
VERTICAL GPU MOUNT
- Included in accessory box
- Riser Cable is sold separately
DUAL PSU COVER
- Pre-installed
- Allows for an optional second Power Supply
- Includes cover for a closed look (pre-installed)
DUAL SYSTEM COVER
- Included in accessory box
- Allows for a second Mini-ITX system
- Allows for a vertical GPU*
- Revolt X power needed for Dual System
* Riser cable sold separately (see page 26)
GPU Anti-Sag Bracket
6x Zip Tie 150mm
Phanteks Logo Badge
Accessory bag Toolbox
ENTHOO PRO II
Fan screw
Rubber PSU
pad
M3x5 mm
Motherboard /
SSD screw
6-32x6 mm
Hex screw
Motherboard
Stando + tool
6-32x6 mm
Thumb screw
6-32x9 mm
HDD screw
Riser Cable
screw
8x
38x
14x 4x 16x 3x12x
1x
6x

7
CONFIGURE YOUR ENTHOO PRO II
STORAGE - P14.
DUAL SYSTEM - P29.
DUAL PSU - P12.
WATERCOOLING - P17.
AIR COOLING- P13.
The Enthoo Pro 2 has the most versatile chassis design, providing you with a myriad of
options. With so many possibilities to pick from, you can use this overview to choose
and plan the best conguration for your build.
ENTHOO PRO II

8
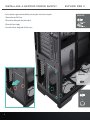
PULL CORNER
GETTING STARTED
PREPARATIONS
The Enthoo Pro 2 case is designed to support installation in a standing position.
Don’t turn on the power to your system until installation is complete.
Discharge your body’s static electric charge by touching a grounded surface
before performing any hardware procedure.
Make sure to consult the manuals of your hardware before installation.
If you do not feel comfortable with performing the installation
procedure, consult a qualied computer technician.
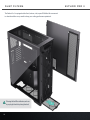
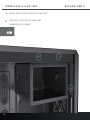
REMOVING FRONT PANEL
1.
ENTHOO PRO II

9
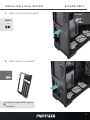
SLIDE & OPEN
GETTING STARTED
2x
LOOSEN:
2x
LOOSEN:
REMOVING LEFT SIDE PANEL*
2.
REMOVING RIGHT SIDE PANEL
3.
1
1
ENTHOO PRO II
SLIDE
Allign the tab in the
slot when re-installing
1
4
3
2
2
* Only PH-ES620PTG model is equipped
with a Tempered Glass sidepanel

10
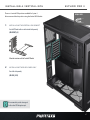
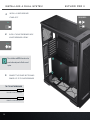
INSTALLING MOTHERBOARD
Some motherboards require installation or repositioning
of the standos. Please consult your motherboard
manual for the correct stando positioning.
STANDOFF POSITIONING
Micro ATX/SSI-EEB
(install extra standos)
ATX / E-ATX (Pre-installed)
For repositioning standos
9x
REQUIRES:
Use the motherboard screws from the toolbox to install your motherboard on the
pre-installed standos.
These standos have a special collar to keep the
motherboard in place when installing vertically.
ENTHOO PRO II

11
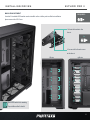
INSTALLING POWER SUPPLY
1
3
2
4x
2x
LOOSEN:
REQUIRES:
The power supply can be installed by opening the cable cover.
1. Open the Cable Cover.
2. Place the Power Supply.
3. Secure the Power Supply with 4x PSU screws.
ENTHOO PRO II

12
4x
4x
2x
REMOVE:
REQUIRES:
A second power supply can be installed by removing the cover in the rear panel.
1. Remove the rear PSU Cover.
2. Place the 4x rubber pads from the toolbox.
3. Place the Power Supply.
4. Secure the Power Supply with 4x PSU screws.
INSTALLING A SECOND POWER SUPPLY ENTHOO PRO II

13
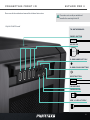
INSTALLING FANS
BOTTOM
140
FAN
120
FAN
TOP
140
FAN
120
FAN
Congure your airow-path with this overview. Some fan locations allow you to choose between
storage or cooling to oer more exibility.
The bottom radiator bracket is removed by loosening the thumb screw and sliding it forward.
120
FAN
140
FAN
120
FAN
FRONT
SIDE
140
FAN
120
FAN
REAR
1x
LOOSEN:
ENTHOO PRO II

14
INSTALLING DRIVES
4x
2.5” SSD INSTALLATION
Three SSDs can be installed on the 3x dedicated SSD bracket and two on
each of the 4x SSD covers for a total of 11 SSD drives.
1
2
3
REQUIRES:
Another SSD can be placed without tools on the rear side of
the cover. Press the SSD down on the bottom 2 pins and then
place the SSD in the top 2 pins.
SSD Cover
One SSD can be installed on the front of the cover with 4x
SSD screws:
SSD Bracket
Install the SSD with 4x SSD
screws and place it back on
the 4x grommets.
4x
1
2
ENTHOO PRO II

15
INSTALLING DRIVES
REQUIRES:
ENTHOO PRO II
2x
STACKSTACKSTACKSTACK
A
B
C
D
E
F
G
H
REQUIRES:
Stack 2 HDD brackets before mounting
if you install more than 1x bracket.
A total of 8 Stackable HDD brackets can be installed on the side fan positions. Before installation
please remove the SSD Covers.
MAIN COMPARTMENT
1. Mount the bracket in the
chassis.
2. Secure with 2x thumb screws
in the chassis.
left view right view
SCREW HOLES

16
INSTALLING DRIVES ENTHOO PRO II
HDD
REQUIRES:
3.5” HDD INSTALLATION
4x Phanteks Stackable 3.5” HDD Brackets are included.
Additional brackets are sold separately (PH-HDDKT_03).
The HDD bracket can also house
a 2.5” SSD instead of a 3.5” HDD.
HDD INSTALLATION
STACK / INSTALL
REMOVE
2
1
1. LIFT UP LATCH
2. PULL OUT
2
1
BOTTOM COMPARTMENT
4x HDD Brackets can be positioned in the bottom compartment. The cables can be
easily routed through the rubber grommet.
4x

17
120 FORM FACTOR
120 FORM FACTOR
max 135x530x32mm
120
240
360
480
SIDE
120 FORM FACTOR
max 120x450mm
120
240
360
BOTTOM
120 FORM FACTOR
max 145x530mm
140 FORM FACTOR
max 145*x530mm
120
140
240
280
360
480
420
FRONT
REAR
140 FORM FACTOR
120
140
TOP
120 FORM FACTOR
max 120x460mm
120
240
360
This overview shows all possible radiator form-factors, locations and clearances.
*max motherboard component height: 55mm
*160mm when SSD Covers rotated
INSTALLING WATER COOLING ENTHOO PRO II

18
A
B
If the HDD trays are installed on the side fan
locations no front radiator can be placed there.
Some radiator clearances depend on other hardware installed. Subtracting the radiator and fan thickness shows the
remaining clearance for other radiators.
RADIATOR CLEARANCE
INTERNAL DIMENSIONS:
:510mm
:530mm
A
B
INSTALLING WATER COOLING ENTHOO PRO II
Page is loading ...
Page is loading ...
Page is loading ...
Page is loading ...
Page is loading ...
Page is loading ...
Page is loading ...
Page is loading ...
Page is loading ...
Page is loading ...
Page is loading ...
Page is loading ...
Page is loading ...
Page is loading ...
Page is loading ...
Page is loading ...
-
 1
1
-
 2
2
-
 3
3
-
 4
4
-
 5
5
-
 6
6
-
 7
7
-
 8
8
-
 9
9
-
 10
10
-
 11
11
-
 12
12
-
 13
13
-
 14
14
-
 15
15
-
 16
16
-
 17
17
-
 18
18
-
 19
19
-
 20
20
-
 21
21
-
 22
22
-
 23
23
-
 24
24
-
 25
25
-
 26
26
-
 27
27
-
 28
28
-
 29
29
-
 30
30
-
 31
31
-
 32
32
-
 33
33
-
 34
34
-
 35
35
-
 36
36


Phanteks Enthoo Pro 2 Closed Panel Owner's manual
- Category
- Computer cases
- Type
- Owner's manual
- This manual is also suitable for
Ask a question and I''ll find the answer in the document
Finding information in a document is now easier with AI
Related papers
-
Phanteks MG-NE520A User manual
-
Phanteks GLACIER C3647i NARROW | SQUARE Owner's manual
-
-
Phanteks PH-PWSPR User manual
-
-
-
-
-
-
Other documents
-
METALLICGEAR MG-NE520G User manual
-
Rosewill RGBF-S12003 Dual Ring Addressable RGB Case Fan Set User manual
-
-
Razer Tomahawk Mini-ITX | RC21-01400 Owner's manual
-
-
ENERMAX Staray Lite Datasheet
-
Razer Tomahawk ATX Owner's manual
-
NOX NXCBAYSXR Datasheet
-
Chenbro Micom RM12800H-101 Datasheet
-
Sharkoon TG7M-RGB User manual