Page is loading ...

Operators Manual
12 Cu. Ft, Heaped
1,000-Pound Capacity
Removable Tail Gate
EASY DUMP CART
Model No. 610.243551
If there are any missing parts please call
1-800-652-2321.
All fasteners are readily available through any
hardware store.
Any questions on assembly, missing parts,
operation, maintenance or safety, please call
the above toll free number.
CAUTION:
Before using this product, read this
Manual and follow all it's Safety Rules
and Operating Instructions.
• Safety
• Assembly
• Operation
• Maintenance
• Parts
Sears, Roebuck and Co., Hoffman Estates, IL 60179 U.S.A.
Visit our Craftsman website: www.sears.com/craftsmen
243551-REV-D
9/O2

• Safety Instructions
• Tools Required for Assembly
• Maintenance / Storage
• Operation
• Assembly instructions
• Parts
• Warranty Information
• Perio_:Scally check all nuts and botts for
tightness.
• Check tires pressure regularly. 30 p.s.i, is
recommended.
• Grease Wheels at Axle for longer life.
• Keep Cart clean and dry to prevent rust
and corrosion.
= Store inside a clean, dry area when not in
use.
• Read this Manual before assembling
Cart.
• Never exceed load capacity of Cart -
1000 Ibs.
• When operating on slopes, use lowest
ground speed and limit load to 200 Ibs.
• Do not carry passengers in Cart.
• Do not use this Cart on public roads.
• Operate up and down slopes, never
across the face of slopes,
• Avoid sudden turns or maneuvers.
• With Cart Body attached to tractor,
remove Tailgate, and then pull up on
Cart Latch, Cart Body will tilt backwards,
dumping contents, Once empty, replace
Tailgate then pull Cart Body down until it
latches.
• Make sure you use the Safety Pin with
the Hitch Pin when attaching to the
Tractor.
• Follow all operating instructions in your
Tractors Owners manual.
liUm;] ih,-,ii--,ialel_Jn.-,iIqldll:ig] m_n mllali I
• 7/16" Wrench and / or Socket,
• V="Wrench and / or Socket.
• 9/16" Wrench and / or Socket.
• Large Blade Head Screw Driver,
• Vise Grip Wrench.
• Before beginning to assemble, layout
and identify all parts and hardware.
• Read all assembly instructions, pages
3 - 9 before beginning to assemble Cart.
• Some assembly may require two people.
FOR MISSING PARTS, Call 1-800-852-2321
Mon.- FRY,,O a.m. - 5p.m. E,S. T.
J
Page 2

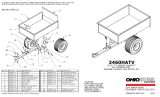
CARTON CONTENTS
14
10
33
21
8A
REF.NO.
1
2
3
4
5
7A
8A
9
10
3
QTY
1
,,,=,, ,, ,
1
1
2
1
1
1
1
1
DESCRIPTION
Right Body Half
Left Body Half
Front Gate
Comer
"Rear Support Bar '"
Gate Retainer- Right
Gate Retainer- Left
Front Support
Brace
REF,NO.
11
12
13
14
16
17
21
33
34
BB
,,,,,
QTY. DESCRIPTION
1 Axle Holder
1 Drawbar
2 Latch Post
1 Latch
1 Hitch Bracket
1 A)de
2 Wheel
1 Tail Gate
1 Owners Manua"l"not"shown
1 Bolt Bag - Not Shown
FOR MISSING PARTS, Ca/I 1-800-852-2321
Mon - Ft'/, 8 a.m. - 5 p, m. E,S. T.
Page 3

BAG 1
26 25
23 22
@ @
24 23W 23N
BAG 2
29
@
27N
28 27W
22LN 28LN
BAG
15
QTY.
1
2
4
2
2
2
12
42
42
4
22
19
'_ ,I I
32
31
Ill I
DESCRIPTION
Latch Spring
PVC Spacer
Axle Washer 3/4"
Hub Cap
Bolt 1/4" x 3/4" Hex Head
Lock Nut 1/4"
Bolt 5/16" x 1/2" Pan Head
Split Lock Washer 5/16"
Hex Nut 5/16"
Bolt 5/16" x 1/2" Hex Head
Bolt 5/16 "x3/4" Pan Head
BOLT BAG CONTENTS
REF.NO.
15
18
19
2o
22
22LN
23
23W
23N
24
25
30
REF,NO.
26
27
27W
27N
28
28LN
,,, ,,
29
30
31
.,.._:_.,
QTY.
4
4
6
6
6
6
2
1
1
2
DESCRIPTION '
Bolt 5/16" x 1" Pan Head
Bolt 3/8" x3/4" Pan'"Head
Split Lock Washer 3/8"
Hex Nut 3/8"
Bolt 318" x 3/4" Hex Head
Lock Nut 3/8"
Bolt 3/8" x "1"Hex Head
Hitch Pin (HP-3)
Hair Pin Cotter
Cotter Pin 1/8" x 1 1/2;"
O
FOR MISSING PARTS, Call 1-800-652-2321, Mon- Fr_ 8 a.m. - 5 p.m, E.S. T.
Pag= 4

f
Body Half Assembly "" * ,
Lock Washer 5/16"
Inset A
FRONT GATE INSIDE I
Nut 5/16"
5/16" x 1/2" Pan
Bolt 5/16" x 1/2" Hex
Hex Nut 5/16" Figure 1.
Inset B
_. NOTE: DO NOT TIGHTEN BOLTS UNTIL ALL CQ,M.,.P,ONENTS IN THIS STEP ARE IN PLACE. j
* Position Body Halves (1 & 2) as shown, front gate side up. Front gate side has fewer holes than tail gate side.
Assemble with four 5/16" x 1/2" Hex Head Bolts (24), 5/16" Lock Washers (23W), and 5/16" Hex Nuts (23N).
See inset B.
* NOTE: Front Gate is positioned INSIDE Cart Body.
"Lay assembled Body Halves down on floor. Add Front Gate (3), using eight 5/16" x 1/2" Pan Head Bolts (23).
with 5/16" Lock Washers (23W), and 5/16" Hex Nuts (23N).
* Add the two Corners (4) using four 5/16" x 1/2" Pan Head Bolts (23), 5/16" Lock Washers (23LW)
and 5/16" Hex nuts (23N). See inset A,
THIS STEP REQUIRES
I
42)- 5/16" x 1/2" Hex Bolt I
i t(16)- 5/16" x 1/2" Pan Head Bolt
- 5/!6" Lock Washer
- 5/16" Hex Nut
FOR MISSING PARTS, Call 1-800-652-2321, Mon- Frl, 8 a.rn. . 5 p.m.E.S.T.
Page 5

f
Rear Cart Assembly
5116"HexN,,t----..
5/16" Lock WasherS"
5/16" Hel, Nut ,,_ \
Bolt 5/16" x 1" Pan_ _
Rear Support
;/16" x 3/4" Pan
--Slide Tailgate
into position.
Inset Cl
Bolt 5/16" x 3/4" Pan
Inset C Figure 2.
J
* Insert the Rear Support Bar (5) BEHIND the rear flanges of the assembled Body Halves. Use two 5/16" x 3/4"
Pan Head Bolts (25), 5/16" Lock Washers (23W), and 5/16" Hex Nuts (23N). IN CENTER TWO HOLES ONLY.
"Add Gate Retainers (7A & 8A), as shown, using the common holes to each side, with 5/16" X 3/4" Pan Head
Bolt (25), 5/16" Lock Washer (23W), and 5/16" Hex Nut (23N). Do not tighten until Tailgate is inserted,
* Insert Tail gate as shown in inset C1, Tighten Gate Retainer bolts.
THIS STEP REQUIRES
10) - 5/16" x 3/4" Pan Head Bolt
4) - 5/16" x 1" Pan Head Bolt
14) - 5/16" Lock Washer
14) _5/16" Hex Nut
FOR MISSING PARTS, Call 1-800-652-2321, Mon - Fr/, 8 a.m. - 5p.m.E.S.T.
I
Poge 6

f
Bolt
Front Support Assembly
Lock Washer 3/8"_
Hex Nut
Lock Nut 3/8"
Front Support Brace.
Front Support
I
x 3/4" Pan
Lock Washer 318"
Hex Nut 3/8"
_'"" _ Figure 3.
Bolt 3/8" x 3/4" Hex
ii. J
* Pre-assemble the Front Support Assembly by Mounting the Brace (10) inside the Front Support (9).
NOTE: THE FLANGES ARE UP. Use four 3/8" x 3/4" Hex Head Bolts (28) with 3/8" Lock Nuts (28LN).
* Mount this assembly to the front of Cart as shown, with four 3/8" x 3/4" Pan Head Bolts (27), 3/8 Lock
Washers (27W) and 3/8" Hex Nuts (27N).
THIS STEP REQUIRES
318"x3,,"HexBO,t
3t8" Lock Nut
__4_ _3/8 '' x 3/4" Pan Head Bolt
FOR MISSING PARTS, Call 1.800-6r_-2321, Mon- Frl, 8 a.m. - 5p.m.E.S.T.
eoge 7

.4
f
(_ Drawbar Pre-Assembly
1/4" Lock
x 3/4" Hex
Latch
Latch Spring
Drawbar
O
3/8" Lock Washer
E
DETAIL OF LATCH
NOTE POSITION OF LATCH SPRING
-3/8" Hex Nut Figure 4.
* Assemble the Latch as shown with the Latch (14) between the two Latch Posts (13). Use one 1/4" x 3/4" Hex
Head Bolt (22) with 1/4" Lock Nut (22LN). Add the other 1/4" x 3/4" Bolt for stability.
* Hook up the Latch Spring (15) using the holes designated with the letter "X". SEE DETAIL.
* Mount the Latch Assembly to the Drawbar (12) with two 3/8" x 3/4" Hex Head Bolts (28) and Lock Nuts (28LN).
Adjust the Lock Nuts so that the Latch moves freely between Latch Posts.
* Hitch Bracket (16) is attached with 3/8" x 1" Hex Head Bolts (29) and Lock Washer (27W) and Hex Nut (27N).
THIS STEP REQUIRES
t2}!3_::L°CkNWu_ sher 3/8,,x3/,.HexBo,,
- 3/8" Lock Nut
(2) - 1/4" x 3/4" Hex Bolt
(2) - 1/4" Lock Nut
FOR MISS/NG PARTS, Call 1-800-652-2321, Mon- F/_ 8 a.m. - 5 p,m, E,S. T.
Page 8

f
Wheel/Axle Assembly
Spacer
Hitch Pin_
Hub Cap
Wheel
Hex Nut 5/16"
Bolt 5/16" x 3/4" Pan
Lock Washer 5/16' Fiaure
5.
J
"Position Cart to add the Axle Holder. Use twelve 5/16" x 3/4" Pan Head Bolts, with 5/16" Lock Washers and
5/16" Hex Nuts.
* Next, slide Axle through Axle Holder and Drawbar, Center as shown. Add Axle Washer, PVC Spacer, Wheel,
and Axle Washer in that order to each end of Axle. Make sure Valve Stem faces towards the outside,
* Insert Cotter Pins through holes in Axle and lock in place by spreading tine ends, Snap on Hub Caps. Set Cart
upright. Slide Tail Gate into position.
* Make sure ALL bolts are tight at this time.
* Insert supplied hitch pin through Hitch Plate and Drawbar as shown. Add Safety Pin through Hitch Pin,
*Apply Craftsman decals as pictured on front cover of this manual,
THIS STEP REQUIRES
(12) - 5/16" x 3/4" Pan Head Bolt
1_2/ 5/16" LockWasher
5/16" Hex Nut
FOR MISSING PARTS, Call 1-800-652-23.21, Mon- Frl, 8 a.m. . 5p.m.E.S.T.
Page9

REPAIR PARTS LIST
FOR MISSING PARTS, Call 1-800.652-2321
Mon- Frl, 8 a.m. - 5p.m.E.$.T
27
23W
7 55-7A
8 s_
9 55-0 1
10 55-10 1
il 55-11 1
12 55-12 1
13 55-13 2
14 55-14 1
,=,,,,, ,,,
15 55-15 1
16 55-16 1
17 55-17 1
18 55-18 2
19 55-i9 4
20 ss-_0 2
21 55-21 2
DESCRIPTION REF,NO. PART NO, AM'[. DESCRIPTION
Righ_BodyHalf 21T 55_1T 2 Tire4.80 x8
BodyHalf 21W 55-21W 2 Wheel
FrontGate , 22 5,5-22 2 Boltl/4x3/4Hax' "
Comer 22LN 8TD541425 2 Lo_kNut 1/4
Rear SupportBar 23 55-23 12 Bolt5/16 x112 Pan
23W STD5Sl131 42 LockWasher 5/16
P,_ateRetainerR_ght 23N STD541031 42 HexNut 5/16
Gate Retainer Left "_4 55*24 4 Bolt5/16 x 1/2 Hex
FrontSupport 25 55.25 22 Bolt5/16x 3/4 Pan
FrontSuppolt Bla.ce. , 26 55-26 4 Bolt5! 16 x 1Pan
Axle Holder 27 55-27 4 Bolt3/8 x3/4 Pan
Orawbar 27W STD551137 5 LockWasher 3/8
Latch Post 27N 8TD541037 6 Hex Nut 3/8
Latch 28 55-28 6 Bolt3/8 x 3/4 H'=_x
Latch Sp_g 28LN STD541437 6 Lock Nut 3/8
Hitch Bracket 29 55-29 2 Bolt 3/8 x 1 Hex
Axle 30 55.30 " 1 HitchPin
PVCSpacer 31 55,31 1 HairPinCotter
AxisWasher 32 55-32 2 Cotterpin 1/8 x 11/2
Hub Cap 33 5533 1 TaliGate
Wheel Complete 34 55-34 1 OwnersManuat
35 55,35 2 Decal
Poge 10

,vAwiWmmll
FULL ONE-YEAR WARRANTY
If this product fails due to a defect in matedal or workmanship within one year from the date of
purchase, Sears will at its option repair or replace itfree of charge. This warranty excludes Tires and
Wheels, which are expendable and become worn during normal use.
This warranty does not cover:
• Repairs necessary because of operator abuse or negligence.
• Equipment use for commercial or rental purposes.
Contact you're nearest Sears Service Center to arrange for product repair, or return this product to
place of purchase for replacement.
This warranty gives you specific Legal rights, and you may also have other rights, which vary from
state to state. This Warranty applies only while this product is in use in the United States.
Sears, Roebuck and Co., Dept. 817WA, Hoffman Estates, IL 60179
IUI{1_1111| Ih'i NIItl] NI]
In the space below record the model number
and purchase date of your Cart, The model
number can be found on a decal on the
drawbar,
Model Number-
Purchase Date -
Keep this booklet and your Sears receipt in a
safe place for future reference.
_.-uoalaiMmionmulmallmol
Always mention the Model Number when
requesting service or repair parts. All parts
listed herein may be ordered from any Sears
Service Center and most Sears Stores.
When ordering Repair Parts, Always give the
Following information:
Product- 12 CU. FT. HEAPED DUMP CART
Model Number - 610.243551
Part Number - *
Part Description - *
• Found on the Repair Parts List, Reference page 10.
Notes

Get it fixed, ,of rs!
For repair of major brand appliances in your own home...
no matter who made ft, no matter who sold it!
1-800-4-MY-HOME _ Anydme,dayornight
(1-800-469-4663)
www.sears.com
For repair of carry-in products likevacuums, lawn equipment, and electronics,
call for the location of your nearest Sears Parts & Repair Center,
1-800-488-1222 Anyldme,dayornight
www.sears,com
For the replacement parts, accessories and owner's manuals
that you need to do-it-yourself, call SearsPartsDIrect sM!
1-800-366-PART 6a,m.-11p.m.CST,
(1-800-366-7278) 7 days a week
www.sears.com/partsdlrect
To purchase or inquire about a Sears Service Agreement:
1-800-827-6655
7 a.m. - 5 p.m. CST, Mon,- Sat.
Patapedirserviciore repalaci_ adomidilo,
y paraordenarpiezasconentrL_aadomicilio:
1-888-SU-HOGAR sM
pv
(1-888-7B4-6427)
|
HomeCentral'"
IIII I I
AuCanada pourserviceenfrar_s:
1-877-LE-FOYER sM
® RegisteredTrademark/ _uTraaernarkof8ears, ROeBUcKand Co,
See_, Roebur,kvnd Co. @Mar_ Regmtmda/ TM Ma,'cadeF_brl_ de 8e_r6, Roebu_ andCo.
/