Page is loading ...

1
Important Safety Information
Please read this manual prior to installation.
We believe the more you know, the more enjoyable and healthy your family’s swimming experience will be - and the more you
will reduce the time, effort and cost of maintaining your pool. Pool owners who switch from chemical programs to the Nature2®
purification technology spend less time maintaining their pools.
Every pool has its own characteristics of water type, amount of sunlight, etc. Discuss with your dealer the right “recipe” of water
management to fit the particular circumstances of your pool and geographic climate.
Remember, your authorized Nature2 dealer can provide professional advice and service.
The Nature2 Pool Purifier is designed for residential swimming pools only.
Nature2® Purifier for Vinyl Lined Pools
Operating Manual
IMPORTANT: Pool Owner, save this manual. Builders, leave this manual with pool owner.
WARNING Failure to heed the following warnings can result in permanent
injury or drowning.
Capacity: 18,000 L - 114,000 L
Dimensions: 405 X 241 X 292 mm
Ports: 38 mm FPT threaded connections, inlet and outlet
Weight: 2.6 kg
Circulation system flow rate: 95 - 303 L/min
Purifier flow rate: 38 - 68 L/min (internal bypass)
Maximum operating pressure: 173 kPa
Cartridge dimensions: 248 x 118 mm
Replacement cartridge: A30 ec (18,000 - 114,000 L)
Important: The proper replacement cartridge for your purifier
is indicated on the label located on the front of your unit.
Cartridge life: 6 months from the date of installation
Run time: 6 hours minimum
Warranty: 2 years (housing)
P.C.P. ACT REG NOs: Model NA: 24575 / Model PA: 25139
DOMESTIC
This purifier is for vinyl lined pools only.
Any other use voids manufacturer’s warranty.
Nature2 Compatibility
Do not use with the following:
• Copper-based algaecides
• Bromine or bromide chemicals
• Biguanides
EQUIPMENT UNDER PRESSURE
• Always turn pump off prior to installing or changing Nature2 cartridge. Your pump/filter system is operated under
pressure and the pressure must be released before you begin work. Please see your pump/filter owner’s manual for
further instructions.
PREVENT CHILD DROWNING
• Do not let anyone, especially small children, sit, step, lean or climb on any equipment installed as part of your pool’s operational
system. Locate the components of your operational system at least 1 m (3 ft.) from the pool so children cannot use the equipment
to access the pool and be injured or drown.
Specifications

2
Installation
If you decide to install the Nature2® Purifier yourself, follow these
instructions.
Under normal pump and filter pressure conditions for vinyl liner
pool systems, the flow rate to the inlet side of the purifier is
95-303 L/min (80 gpm) which will allow proper flow through the
cartridge.
IMPORTANT If your pump system is designed to produce
flow rates greater than 303 L/min (80 gpm), ask your
dealer about installing in a bypass
configuration.
If the Nature2 Purifier is to be installed below the water level of
the pool, precautions must be taken to prevent the pool from
draining during installation and during cartridge change. Valves
should be installed to isolate the system for these situations.
Equipment needed:
• A set of shut-off valves or rubber winterizing line-plugs
to use during cartridge installation or replacement to
prevent draining (used in step 5).
• A filter connector hose of the same diameter as the
other hoses on your pool equipment (used in step 7).
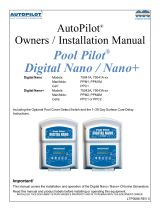
Cap
Cap O-ring
Cartridge
Vessel
Hose
Adapter
Winter
Drain Plug
Contents
Important Safety Information ......................................................1
Specifications .............................................................................1
Installation ..................................................................................2
Bypass Installation ......................................................................3
Balance the Water ......................................................................4
Start Up ......................................................................................4
Low-Chlorine Recipe ..................................................................4
Provide Filtration/Circulation .......................................................5
Troubleshooting .......................................................................... 5
Replacing the Nature2 Purifier Cartridge ....................................6
Winterizing Your Pool .................................................................6
Warranty .....................................................................................7
Install the Vessel
Refer to the diagram below for part references.
1. Decide where to install the Nature2 vessel. It should be
installed:
• On a concrete slab to support the weight of the vessel.
• After the filter on the main return to the pool.
• Before or after the heater (downstream of solar heating
systems).
• Before any chemical dispenser or the discharge of any off-
line chemical dispenser.
IMPORTANT
Install a check valve before chlorinators to
isolate the
Nature2
purifier from possible
backflow of highly chlorinated water
.
2. Wrap Teflon®* tape (supplied in the parts bag) around the
threaded end of the hose adapters as follows:
• Hold adapter with the threaded end towards you.
• Wrap the tape clockwise until you have completed three or
four wraps, overlapping about half of the tape already on
the threads.
NOTE Hose adaptors provided are designed for above
ground pool installations. If you are installing on
an inground pool, it is recommended that you
purchase the appropriate fitting for your application.
Ask your dealer for more information.
3. Hand-tighten both hose adapters into the base of the Nature2
purifier. Then, with a wrench, tighten not more than on-half
turn more. The purifier is now ready to be installed.
4. Run the pump with a clean filter and under normal operating
conditions. It is important to start with a clean filter. Fill in the
pressure reading found on the pressure gauge attached to
the filter.

3
5. Turn off the pump and isolate the equipment (to prevent
drain ing the pool) by plugging all lines running from the pool
to the equipment, closing in-line valves, and/or using the
winterizing line plugs to seal off the skimmer pipe and all
return inlets. You are now ready to insert the purifier into the
pool’s lines.
6. Disconnect the hose on the outlet side of the filter. Connect
it to the outlet side of the purifier.
7. Install a new section of connector hose between the outlet
side of the filter and the inlet side of the purifier. Use the hose
clamps from the parts bag to secure the two ends of the new
hose.
NOTE If your pool uses large diameter hose (1-1/2”) cut
off the ends of the adapter (the 1-1/4” stubs) as
marked on each adapter, so they do not block the
flow of water.
Thenewinstallationshouldbe:Pool→Pump→Filter→
Nature2Purifier→Pool.
8. Remove plugs or open all valves used to isolate the filter.
Screw on the cap until it is snug. Do not over tighten. Check
that all connections are secure.
IMPORTANT Do not install the Nature2 Cartridge until the
purifier installation is complete.
9. Turn on the pool pump and check for and repair any leaks
you find.
10. Compare the pressure reading on the filter gauge with the
pressure reading recorded above.
If the pressure increased by:
Between 1 and 2 psi: Pressure is good. Some increase is
necessary for water to be forced into the vessel. The vessel
installation is complete and ready for cartridge start-up.
More than 2 psi: There is too much pressure for the
circulating pump, filter and vessel to work efficiently. The
vessel may need to be connected via partial bypass. Consult
your dealer.
Less than 1 psi: Use the Flow Restrictor Installation.
Flow Restrictor Installation
1. Plug any lines (or close valves) to prevent pool from losing
water.
2. Disconnect hoses from vessel.
3. Remove cap and hose adapters.
4. Remove flow restrictor from the parts bag.
5. While holding the vessel with the inlet port facing up, reach in
and place restrictor (fingers facing down) into the flow control
collar (hole approximately 1” in diameter).
NOTE You may need to reach into the outlet port side of
the unit to help position the restrictor.
6. Once the restrictor is positioned properly, place the unit on a
flat, firm surface keeping the inlet port face up.
7. Apply downward pressure on restrictor using a blunt-handled
tool such as the end of a broom handle until it snaps into
place.
8. Reinstall the vessel and recheck the system pressure.
Bypass Installation
This 38 mm (1 1/2 in.) Nature2 Purifier system may need to be
installed in bypass to the filtration system if plumbing size is
greater than 38 mm (1 1/2 in.) diameter or if flow rates are greater
than 303 L/min (80 gpm).
The Nature2 Purifier is installed on a bypass loop after the filter
and always before a chemical dispenser, if equipped, as shown
below.
Pump
and
filter
Flow from pool
First
“T” Second
“T”
Control
valve
Pool heater,
if equipped
Chemical
dispenser,
if equipped
Return flow
to pool
Optional location
of Nature
2
Purifier
To Create the Bypass:
1. Install a “T” in the return line to allow water to divert to the
Nature2 Purifier. This “T” is then connected to the inlet of the
purifier.
2. Install a control valve in the return line after the first “T”
and before the second “T”.
3. Fully open any valves (including the control valve) that
were closed to isolate the purifier.
4. Start the pump allowing water to pass through the newly
plumbed system. The control valve in the return line
between the two “T”s will controll the flow through the
purifier.
NOTE For flows in excess of 303 L/min or 80 gpm with the
Nature2 in bypass, do not exceed a 10.3 kPa increase in filter
backpressure. Once 10.3 kPa is reached in this situation the
flow is corrected through the purifier.
5. Check the purifier for leaks and fix or replace any fittings.
6. Follow the start up procedures.

4
Balance the Water
To find out if your pool water is balanced:
• Take a water sample to your dealer to be tested regularly, or
• Ask your dealer to recommend a pool test kit for water balance.
Balance pool water before installing purifier cartridge.
• pH 7.2 - 7.8
• Total hardness 200 - 300 ppm
• Total alkalinity 80 - 120 ppm
Consult your Nature2 Dealer for specific water balance instructions.
Element:
Range:
pH
7.2 - 7.8
If it’s too low: The surface of your pool can become etched.
Metal parts in the pump and plumbing will corrode.
How to fix: Add pH increaser.
If it’s too high: “Scale” forms on the surface of your pool. The water can
become cloudy. “Scale” forms on your pool equipment.
How to fix: Add pH decreaser.
Element:
Range:
Calcium Hardness
200-300 ppm
If it’s too low: Water is less stable. In plaster pools, the calcium is taken
out of the plaster, causing the surface to deteriorate.
How to fix: Add calcium hardness
increaser.
If it’s too high: Rough, discolored deposits (“scale”) will form on the pool
surface and inside pool equipment.
How to fix: Drain or dilute the
pool water. Consult
your dealer.
Element:
Range:
Total Alkalinity
80-120 ppm
If it’s too low: It provides no buffer so that you constantly get fluctuating
pH readings, which can damage equipment and pool
surfaces.
How to fix: Use an alkalinity
increaser.
If it’s too high: White deposits (“scale”) form on the tile line. The plaster
on pool surface becomes rough or discolored. The water
becomes cloudy or milky white.
How to fix: Add acid to bring
alkalinity down.
Start Up
Before starting up a new Nature2 Cartridge, clean debris and algae out of the pool and pool equipment.
Important Do not install the new cartridge until the pool water is clean and chemically balanced.
1. Install the cartridge after water is balanced.
2. Shock the pool to burn off contaminants and to activate the cartridge. Follow label instructions of shock product being used.
3. Run the circulation pump either:
• 24 hours a day for 4 days, maintaining 1-3 ppm free available chlorine, or
• 6 hours a day for 14 days, maintaining 1-3 ppm free available chlorine.
4. Let free avialable chlorine residual drop but not below a minimum of 0.6 ppm once start-up period is completed.
Once the 4-day or 14-day start-up period is done, allow the free available chlorine
residual to drop but not below 0.6 ppm, then:
When: What to do:
Every day Run pump and filter at least 6 hours every day.
Once a week Balance pH and total alkalinity.
Twice a week Check chlorine residual, add chlorine to maintain a
minimum of 0.6 ppm free available chlorine.
As needed • If water is hazy, shock. Follow product label instructions.
• After heavy use or rainstorm, shock is recommended.
• Add cyanuric acid (stabilizer) to maintain 50 ppm.
Follow the Recipe
Low-Chlorine Recipe
(0.6 ppm free available chlorine minimum)
Ingredients:
• Nature2 Cartridge
• Chlorine granules, tablets, liquid or generator
• pH and total alkalinity adjusting chemicals
• Calcium hardness increaser, if needed
• Water test kit
• Cyanuric acid

5
Provide Filtration/Circulation
To manage: You need to:
Circulation Follow the manufacturer’s directions for keeping the circulating pump in good working order and operate it at least
six hours a day.
Filtration Check the pool’s filter periodically and clean it as recommended by the manufacturer.
Troubleshooting Guide
Use the guide below to correct common pool issues. For further assistance, consult your Nature2 dealer or call us at 1-800-822-7933.
Problem What to look for Treatment
Cloudy Water
Frequently caused by
improper start up. See
section on Start Up.
Poorltration Slowlterturnoverrates. 1.Backwashandcleanlter.
2.Runlterfor24hours.
3. Increase run time per day.
Algae growth Hazy pool water; may have slightly
green appearance.
Shock water (with dealer’s guidance)
and brush pool walls.
Unbalanced water 1. High Hardness.
2. High TDS (total dissolved solids).
3. High pH.
4. High total alkalinity.
Balance the pool water.
Algae Green algae Pea green colour; attaches to pool
walls; sometimes colours the entire
body of water.
1. Check pH and adjust if necessary
2. Shock water and brush pool walls.
3. Repeat steps 1 and 2 until algae is gone.
Black algae Black spots on pool walls. 1. Brush affected areas.
2. Shock water.
3. Add algaecide.
4. Vacuum pool.
5. Repeat steps 1 through 4 until algae is gone.
Mustard algae Yelloworbrownlmonstepsorwalls.
Note: Regular algaecide treatments are recommended for outdoor pools that experience persistent algae problems. Do
not use algae treatments containing either copper or sodium bromide.
Stains Blue/green Copper or iron from pool equipment
corrosion or water supply.
1. Adjust pH and total alkalinity to ideal ranges.
2. Vigorously brush stained areas.
3. Add sequestrant.
4.Runlter.
5. Twelve hours later, shock the pool.
6. Test and balance water.
7. Test pool water for dissolved metals.
Red/brown Iron or manganese from equipment
corrosion or water supply.
Black Manganese in water supply.
Metal tarnishing High native material content in water;
unbalanced water.
Clean with soft cloth and mild detergent. Test
water for minerals; use a sequestrant; maintain
water balance.
Scale Crusty deposits on pool
surfaces
High pH and high total alkalinity. Adjust pH and total alkalinity to ideal ranges.
High TDS (total dissolved solids) or high
hardness levels.
1. Replace a volume of pool water with water
low in calcium and dissolved solids.
2.
Use sequestrant to prevent scale buildup if
high hardness levels are a continuing problem.
Equipment Thepurierleaks A. O-ring missing or improperly seated;
or
B. Faulty plumbing.
LubricateO-ringwithTeonorsiliconelubricant.
Note: Do not use petroleum-based lubricants
(will void warranty). Be sure O-ring is seated
properly before securing housing cap.
Repair source of leak in plumbing.
Noowtopurier Dirtylter(oneindication:pressure
55-69 kPa higher than normal).
Cleanorbackwashltersooperatingpressure
isalwayswithin48kPaofanewlter.

6
Replacing the Nature2
Purifier Cartridge
The cartridge lasts six (6) months from the date of installation
under normal operating conditions.
To replace the cartridge:
1. Shut off your pool’s pump and filter.
2. Close any valves between the filter and pool to prevent
draining the pool.
3.
Unscrew the housing cap by twisting the cap counter-
clockwise until the cap is free of the housing base. If the
cap is hard to twist, use a long-shafted screwdriver as a twist
handle, placing it in the slot at the top of the housing cap.
4. Lift out the old cartridge and replace the O-ring with the
new one provided in the cartridge box.
5. Insert the new cartridge.
6. Set the O-ring and cap in place and screw the cap
clockwise until it is snug. Do not overtighten.
7. Open any valves that were closed to isolate the Nature2
Purifier in step 2.
8. Restart your pool’s pump. Check for leaks and fix any
leaking fittings.
9. Follow the start up procedures described on page 4.
Winterizing Your Pool
Use these steps as a guide. Consult your dealer for specific
information in your area.
Warm Climate
1. Reduce the number of hours the pump runs since the
cooler weather decreases the spread of algae and other
pollutants.
2. There is no need to shock the pool during cool weather
unless the water becomes cloudy (as may occur after a
winter storm). See Cloudy Water in Troubleshooting section.
Cold Climate
1. Check total alkalinity and pH of pool to make sure that they
are in proper balance.
2. Vacuum the pool bottom to remove any debris or other
potential contaminants.
3. Shock the pool to clear the water.
4. Add a winter algaecide following manufacturer’s
instructions.
IMPORTANT
Do not use a winter algaecide with copper in it.
This will void the Nature2 no-stain warranty.
5. Backwash the filter.
6. Drain part of the pool water. The amount to drain varies
from one part of the country to another. Consult your dealer
for advice.
7. Winterize the purifier as follows:
• Unscrew the housing cap from the purifier base.
• Remove the winter drain plug and drain the water completely
out of the base of the purifier.
• Lift out the purifier cartridge and dispose of it.
• Set the housing cap and cap O-ring in place and screw it tight.
• Store the purifier with your pool equipment, indoors if
possible.
8. Winterize the pipes with pool antifreeze following
manufacturer’s instructions.
9. Drain the water out of all equipment (pump, filter, etc.).
10. Store all baskets, hoses and cleaning equipment, indoors if
possible.
11. Cover the pool with a winter cover.

7
Warranty
HOUSING WARRANTY
The Nature2® Purifier you have purchased was manufactured
with care and is warranted to be free of defects in materials and
workmanship for two (2) years from the date it was installed.
Your warranty registration card must be completed and mailed
to Zodiac Pool Systems, Inc. to establish your installation date.
This warranty does not cover damage caused by abuse, misuse,
accidents, or any alterations to the purifier. Report claims to your
Nature2 dealer. Zodiac Pool Systems, Inc. reserves the right to
replace any purifier instead of repairing it.
SIX-MONTH PRO-RATED CARTRIDGE WARRANTY
The Nature2 Purifier cartridges are warranted to be free of defects
in materials and workmanship and to perform to your satisfaction
for a period of six (6) months from the date of installation. This
warranty does not cover damage caused by accident, misuse,
or alteration or by the use of any biguanide, copper-based
algaecides or any products containing bromine or bromide-based
chemicals. If the cartridge is defective or does not perform to your
complete satisfaction for the entire six (6) months, we will make
prorate rebate based on your actual period of use. Please consult
this Owner’s Manual for proper use.
NON-STAINING WARRANTY
Your Nature2 Purifier cartridge is warranted not to cause copper
staining in your pool. This warranty requires only that you
exercise reasonable care of your pool and keep water in balance
at all times, and not use a copper-based algaecide. This Nature2
Owner’s Manual will guide you as to how to maintain your pool
properly when using the Nature2 Purifier. This warranty does not
cover discoloration to chromium fittings which may discolor slightly
over time and are easily cleaned with mild detergent.
There are no other warranties, expressed or implied. All
incidental and consequential damages are excluded from the
warranty except where provincial law is different. This warranty
gives you specific legal rights. You may have other rights which
vary from province to province. Proof of purchase is required to
make any claims on the above warranties, so please keep your
dated receipt.
* All trademarks used herein are the properties of thier respective owners.

For warranty support in Canada:
Zodiac Pool Systems Canada, Inc.
2115 South Service Road West, Unit 3
Oakville, Ontario • Canada L6L 5W2
Tel: 888-647-4004 • Fax: 905-825-5780
Zodiac Pool Systems, Inc.
2620 Commerce Way, Vista, CA 92081
1.800.822.7933 | www.ZodiacPoolSystems.com
ZODIAC® is a registered trademark of Zodiac International, S.A.S.U., used under license.
All trademarks referenced herein are the property of their respective owners.
©2013 Zodiac Pool Systems, Inc. W17557 Rev B
/