suprema BioStation A2 User guide

Type
User guide
BioStation A2
USER GUIDE
Version 1.30
English
EN 102.00.BSA2 V1.30A
CONTENTS
Safety instructions 3
Instructional icons 3
Introduction 6
Components 6
Name and function of each part 7
Cables and connectors 8
How to enroll a fingerprint 10
Admin Menu 11
All Menus 11
User 12
Registering user information 12
Modifying User Information 13
Delete All Users 13
View User Usage 14
Authentication 15
Auth Mode 15
Modifying Auth Mode 15
Delete Auth Mode 16
Add Auth Mode 16
Operation 16
Fingerprint 17
Network 18
Network Settings 18
Ethernet 18
Wireless 19
Server 20
Serial Setting 20
Display & Sound 21
Device 22
Camera 22
Relay 22
Date & Time 22
Daylight Saving Time 23
Device Info 23
Memory Info 23
USB Memory 24
CONTENTS
Secure Tamper 24
Restart Device 24
Restore Default 25
Factory Default 25
Delete the Root Certificate 25
User ID Type 26
T&A 27
T&A Mode 27
Event Log 28
Search Log 28
Detail View Event Log 28
Delete All Logs 29
View Log Usage 29
Troubleshooting 30
Product specifications 31
Dimensions 33
FCC compliance information 34
EU Declaration of Conformity (CE) 34
Appendices 35
Disclaimers 35
Copyright notice 35
Open Source License 36
GNU General Public License 36
OpenSSL License 43
Original SSLeay License 44
Apache License 45
3
Safety instructions
Safety instructions
Please read this safety instructions before you use the product to prevent injury to yourself and others and to prevent
property damage. The term ‘product’ in this manual refers to the product and any items provided with the product.
Instructional icons
Warning: This symbol indicates situations that could result in death or severe injury.
Caution: This symbol indicates situations that may result in moderate injury or property damage.
Note: This symbol indicates notes or additional information.
Warning
Installation
Do not install or repair the product arbitrarily.
This may result in electric shock, fire, or product damage.
Damages caused by any modifications or failure to follow installation instructions can void your manufacturer’s
warranty.
Do not install the product in a place with direct sunlight, moisture, dust, soot, or a gas leak.
This may result in electric shock or fire.
Do not install the product in a location with heat from an electric heater.
This may result in fire due to overheating.
Install the product in a dry location.
Humidity and liquids may result in electric shock or product damage.
Do not install the product in a location where it will be affected by radio frequencies.
This may result in fire or product damage.
Operation
Keep the product dry.
Humidity and liquids may result in electric shock, fire, or product damage.
Do not use damaged power supply adapters, plugs, or loose electrical sockets.
Unsecured connections may cause electric shock or fire.
Do not bend or damage the power cord.
This may result in electric shock or fire.
4
Safety instructions
Caution
Installation
Do not install the product under direct sunlight or UV light.
This may result in product damage, malfunction, discoloration, or deformation.
Do not install the power supply cable in a location where people pass by.
This may result in injury or product damage.
Do not install the product near magnetic objects, such as a magnet, TV, monitor (especially CRT), or speaker.
The product may malfunction.
Keep the minimum distance between products when installing multiple products.
The product may be affected by radio frequencies emitted by other products and the product may malfunction.
Use the IEC/EN 62368-1 approved power adapter that supports higher power consumption than the product. It is
highly recommended to use the power adapter sold by Suprema.
If the right power supply is not used, the product may malfunction.
Refer to the Power in the product specifications for maximum current consumption specifications.
Use a separate power supply for the Secure I/O 2, electric lock, and the product.
If connecting and using the same power supply, the product may malfunction.
Do not connect and use the power supply and Power over Ethernet (PoE) simultaneously.
The product may malfunction.
It is recommended to use the enclosure if the product is installed outside.
5
Safety instructions
Caution
Operation
Do not drop the product or cause impacts to the product.
The product may malfunction.
Do not disconnect the power supply while upgrading the firmware of the product.
The product may malfunction.
Do not disclose the password to others and change it regularly.
This may result in illegal intrusion.
Do not press buttons on the product by force or do not press them with a sharp tool.
The product may malfunction.
Do not store your product in very hot or very cold places. It is recommended to use your product at
temperatures from -20 °C to 50 °C.
The product may malfunction.
When cleaning the product, mind the following.
Wipe the product with a clean and dry towel.
If you need to sanitize the product, moisten the cloth or the wipe with a proper amount of rubbing alcohol and gently
clean all exposed surfaces including fingerprint sensor. Use rubbing alcohol (containing 70% Isopropyl alcohol) and a
clean, non-abrasive cloth like lens wipe.
Do not apply liquid directly to the surface of the product.
BioStation A2 uses capacitive buttons and screen. If the environment is moist from wet weather or the product
surface is smeared with a lot of water, wipe off the product with a dry towel before using it.
Do not use the product for anything other than its intended use.
The product may malfunction.
RTC Battery
Use of an unapproved or incorrect type of battery may result in a risk of explosion. Discard the battery according to the
appropriate regional or international waste regulations.
6
Introduction
Introduction
Components
BioStation A2 Wall Bracket Drilling Template
Cables Diode 120 Ω resistor
PVC Anchor x4 Fixing Screw x4 Bracket Fixing Screw
(Star Shaped)
BioStation A2
IP Fingerprint Terminal
201.00.BSA2 V*.***
Open Source Software
Linux Kernel GPL
OpenSSL
Original SSLeay
AOSP Apache
306.01 V*.***
C
Ferrite Core Quick Guide Open Source Software Guide
Components may vary according to the installation environment.
When assembling the product with the bracket, you can use the included bracket fixing screw (Star Shaped)
instead of the product fixing screw for enhanced security.
For more details regarding the product, visit the Suprema website (https://www.supremainc.com) and refer to
the user guide.
7
Introduction
Name and function of each part
Microphone
LCD screen
RF card and
mobile access card
authentication unit
Cancel button
USB
memory slot
Mini USB cable slot
Ethernet
Relay 0 (3 pins)
Power supply
(2 pins)
Name Description
Microphone Delivers the voice of the user when the interphone is connected.
LCD screen Provides UI for operation.
Menu button ( ) Displays the list of menus.
Home button ( ) Navigates to the home screen.
Cancel button ( ) Navigates back to the previous screen.
Speaker Delivers sound.
LED lamp Indicates the operational status of the product with the color of the LED lamp.
Fingerprint authentication unit Part to scan the fingerprint for entrance.
RF card and mobile access card
authentication unit Part to scan a RFID card or mobile access card for entrance.
USB memory slot Connects USB memory.
Mini USB cable slot Will be supported in the future.
TTL input (4 pins) Connects the TTL input cable.
RS-485 (4 pins) Connects the RS-485 cable.
Camera
Speaker
LED lamp
Fingerprint
authentication unit
Home button
Menu button
TTL input (4 pins)
Wiegand input (4 pins)
Wiegand output (4 pins)
Relay 1 (3 pins)
RS-485 (4 pins)
8
Introduction
Relay (3 pins) Connects the relay cable.
Power supply (2 pins) Connects the power supply cable.
Ethernet Connects the Ethernet cable.
Wiegand input (4 pins) Connects the Wiegand input cable.
Wiegand output (4 pins) Connects the Wiegand output cable.
Cables and connectors
Power supply
2
1
PIN Name Color
1PWR +VDC Red (white stripe)
2PWR GND Black (white stripe)
Relay
3
1
PIN Name Color
1RLY NO White
2RLY COM Blue
3RLY NC Orange
RS-485
4
1
PIN Name Color
1485 TRXP Blue
2485 TRXN Yellow
3485 GND Black
4SH GND Gray
9
Introduction
TTL input
4
1
PIN Name Color
1TTL IN0 Red
2TTL IN1 Yellow
3TTL GND Black
4SH GND Gray
Wiegand input and output
4
1
PIN Name Color
1WG D0 Green
2WG D1 White
3WG GND Black
4SH GND Gray
10
Introduction
How to enroll a fingerprint
In order to improve the fingerprint authentication rate, register the fingerprint correctly. BioStation A2 can recognize
a fingerprint even if the angle and position of a user’s fingerprint input change. If you register the fingerprint with
attention to the following matters, the authentication rate can be improved.
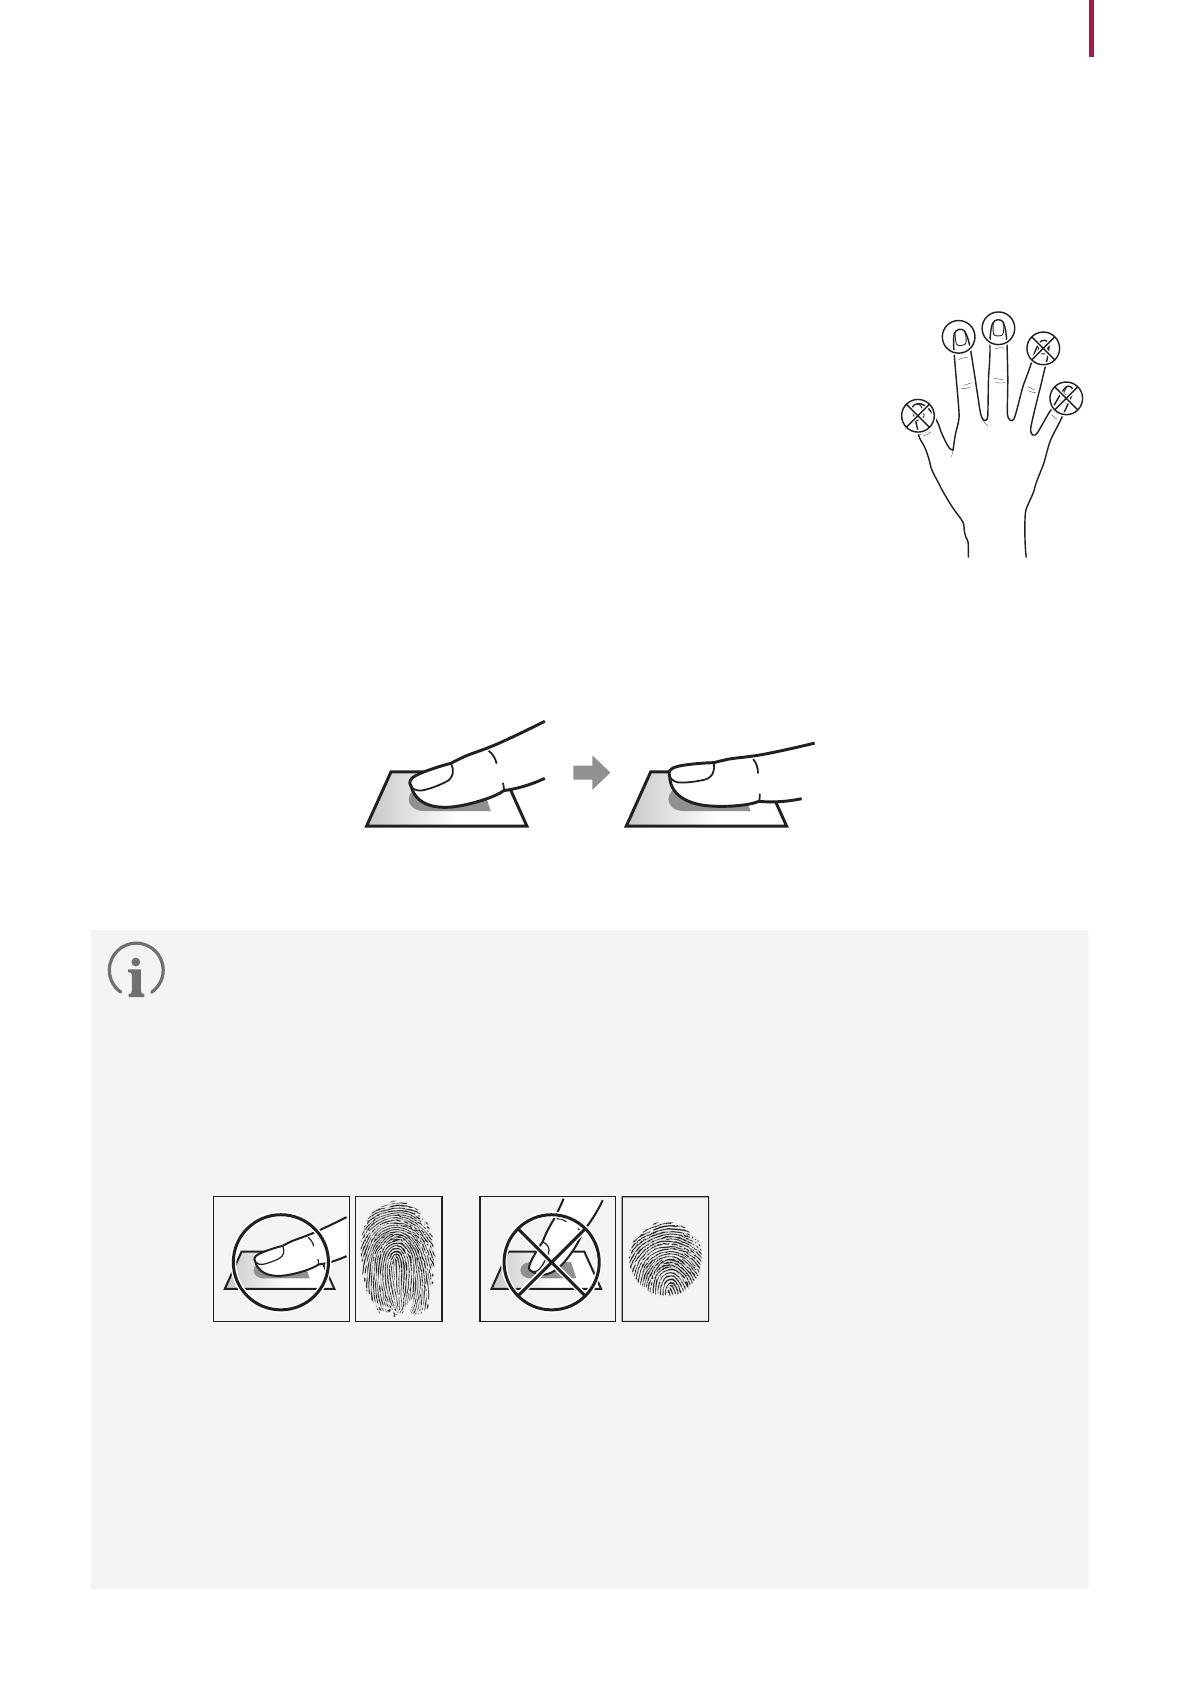
Selecting a finger for fingerprint input
In preparation for the case that the fingerprint of a specific finger cannot be used,
for example if the user is lifting a load with one hand or a finger gets hurt, up to 10
fingerprints for each user can be registered.
In the case of a user whose fingerprint cannot be recognized well, the authentication
rate can be improved by enrolling the same finger twice repeatedly.
If a finger has a cut or the fingerprint is blurry, select another finger for the fingerprint.
It is recommended to use the index finger or the middle finger when scanning the
fingerprint. The authentication rate can be reduced if it is difficult to place another
finger at the center of fingerprint sensor accurately.
Fingerprint enroll method
1
When a message saying “Scan Finger” is displayed on the LCD screen for enrolling the fingerprint, place the finger
with the fingerprint you wish to enroll on the fingerprint authentication unit and press the finger gently for better
authentication.
2
When the re-input screen is displayed after a beep sound, scan the fingerprint of the enrolled finger again. (scan the
fingerprint of a finger to be enrolled twice)
Cautions for enrolling a fingerprint
When a fingerprint is recognized, it is compared with the initially registered fingerprint, so the initial fingerprint
enroll is the most important. Pay attention to the following matters when enrolling the fingerprint.
Place the finger deep enough to contact with the sensor completely.
Place the center of the fingerprint in the center of the sensor.
If a finger has a cut or the fingerprint is blurry, select another finger for the fingerprint.
Scan the fingerprint correctly without moving according to the instruction on the screen.
If you make the finger upright so that the contact area with the sensor is decreased or the angle of finger is
warped, fingerprint authentication may not be performed.
When the fingerprint recognition fails
BioStation A2 can recognize a fingerprint regardless of a change in season or finger condition. However,
the authentication rate may vary according to the external environment or fingerprint input method. If the
fingerprint authentication cannot be done smoothly, it is recommended to take the following measures.
If the finger is smeared with water or sweat, dry off the finger and then scan the finger.
If the finger is too dry, blow your breath on the fingertips and then scan the finger.
If the finger has a cut, register the fingerprint of another finger.
The initially enrolled fingerprint often may have not been scanned correctly, so enroll the fingerprint again
according to ‘Cautions for enrolling a fingerprint’.
11
Admin Menu
Admin Menu
All Menus
1
Press and authenticate with the Admin level credential.
2
Select the desired menu.
If the administrator has not been designated, the menu screen will be displayed when you press .
12
User
User
Registering user information
The user information including fingerprints can be registered.
1
Press and authenticate with the Admin level credential.
2
Select USER
.
3
Select and set the desired item. When you press OK, the user information will be registered.
: Take a picture of a user with the built-in camera.
ID: Enter a number between 1 and 429467295 to register as the user ID. If User ID Type set to Alphanumeric, a
combination of alphanumeric characters and symbols (_, -) can be used for the ID. Up to 32 characters can be
input.
Name: Enter the username.
Validity Period: Set a Start Date and End Date to use the user account. When you press the first date, you can set
Start Date, and when you press the second date, you can set End Date.
Access Group: Select an access group for the user. Access groups can be registered only in BioStar 2.
User Level: Select the level you wish to assign to a user.
Available menus vary according to the set user level.
None: This is the general user level and menus cannot be accessed.
Administrator: All menus can be accessed.
Configuration: AUTHENTICATION, DISPLAY & SOUND, DEVICE, and NETWORK menus can be accessed.
User Mgmt: USER menu can be accessed.
Fingerprint: Enroll a fingerprint for user authentication. Press and enroll the fingerprint. Scan the fingerprint
of a finger you wish to enroll, and then scan the fingerprint of the same finger again. To enroll an additional
fingerprint, press again.
13
User
Card: Register a card for user authentication. Press and scan the card which will be assigned to the user. To
register an additional card, press again.
PIN: Enter the PIN you wish to use. Enter the PIN you wish to use, and then enter the same PIN again for
confirmation. Enter a number between 4 and 16 digits to prevent leaking.
Duress: Select a fingerprint to be used as a duress fingerprint. This can be used only when 2 or more fingerprints
have been enrolled.
Private Auth Mode: Change the authentication method according to the user.
Modifying User Information
User Mgmt or Administrator can modify the registered user information. A fingerprint or card can be added, and PIN
and level can be modified.
1
Press and authenticate with the Admin level credential.
2
Select USER
.
3
Select your search terms. You can search for a user by ID, Name, Fingerprint, and Card.
4
Select the user you wish to modify and press . Modify the information by referring to Registering user
information.
To delete a user, select and then press OK.
Access Group can be registered in BioStar 2. For detailed contents regarding registering an access group, refer
to the BioStar 2 Administrator Manual.
Delete All Users
You can delete all registered users at once.
1
Press and authenticate with the Admin level credential.
2
Select USER
and select Delete All or a user you wish to delete.
3
When you press OK, all registered users will be deleted.
14
User
View User Usage
You can see the number of registered users, fingerprints and cards at a glance.
1
Press and authenticate with the Admin level credential.
2
Select USER
. User usage information appears.
15
Authentication
Authentication
Auth Mode
Modifying Auth Mode
You can set the authentication method and schedule according to each credential.
1
Press and authenticate with the Admin level credential.
2
Select AUTHENTICATION
Auth Mode.
3
Select the authentication mode to modify.
4
When you press , the selected credential will be deleted, and when you press , available credentials to be
added will be displayed on the screen.
5
Set the desired auth mode and select a schedule.
Category Description
Fingerprint : Mode to use a fingerprint only
+ : Mode to authenticate with a fingerprint and then enter PIN
Card
: Mode to use a card only
+ : Mode to authenticate with a card and then authenticate with a fingerprint
+ : Mode to authenticate with a card and then enter PIN
+ / : Mode to authenticate with a card and then authenticate with a fingerprint or enter
PIN
+ + : Mode to authenticate with a card and then use both fingerprint authentication and
PIN input.
ID
+ : Mode to enter ID and then authenticate with a fingerprint
+ : Mode to enter ID and then enter PIN
+ / : Mode to enter ID and then authenticate with a fingerprint or enter PIN
+ + : Mode to enter ID and then use both fingerprint authentication and PIN input
6
When you press OK, settings will be saved.
A schedule can be set in BioStar 2. If there is no set schedule, only Always can be selected.
For detailed contents regarding setting a schedule, refer to BioStar 2 Administrator’s manual.
16
Authentication
Delete Auth Mode
1
Press and authenticate with the Admin level credential.
2
Select AUTHENTICATION
Auth Mode.
3
Press and select the authentication mode to delete. You can select multiple options.
4
To delete the selected option, press OK.
Add Auth Mode
You can register up to 3 auth modes.
1
Press and authenticate with the Admin level credential.
2
Select AUTHENTICATION
Auth Mode.
3
Press .
4
Set the desired auth mode by pressing , and then select a schedule.
5
When you press OK, the auth mode will be added.
Operation
1
Press and authenticate with the Admin level credential.
2
Press AUTHENTICATION and then modify items below Operation.
Face Detection: When you set Face Detection, BioStation A2 can detect real face, and authentication can be done
only when a face is detected after authenticating with a fingerprint, card, or PIN.
Server Matching: When you set Server Matching, the user authentication is not carried out in the device, but
instead is carried out in BioStar. Server Matching can be useful when there is a large amount of user information
in the device or you do not wish to publicly expose the device where user credential information is saved.
Auth Timeout: If the authentication is not completed during a set time, the authentication will fail. You can set a
time between 3 seconds and 20 seconds.
17
Authentication
Fingerprint
You can change settings regarding the fingerprint authentication.
1
Press and authenticate with the Admin level credential.
2
Press AUTHENTICATION and then modify items below Fingerprint.
Security Level: Set the security level for 1:N authentication.
Matching Timeout: Set the fingerprint matching timeout. If the authentication is not completed during a set
time, the authentication will fail.
View Image: Set to view the original image when scanning the fingerprint.
Sensor Sensitivity: Set the sensitivity of the fingerprint authentication sensor. To obtain more precise fingerprint
information by increasing the sensor sensitivity, set the sensor sensitivity higher.
1:N Fast Mode: Set the fingerprint authentication speed. If you select Auto, the authentication speed will be set
according to all fingerprint templates enrolled on the device.
Template Format: Set the fingerprint template format. SUPREMA is set as the default, and if you change the
template format, all fingerprints saved previously cannot be used. Use caution when changing the Template
Format.
Live Finger Detection: Set the level of the fake fingerprint detection. The higher the fake fingerprint detection
level, the higher the rejection rate of fingerprint.
Advanced Enrollment: Inspect the quality of a scanned fingerprint in order to save high quality fingerprint
information. When Use is set and the quality of the fingerprint is low, it notifies such information to the user and
helps the user scan the fingerprint correctly.
Duplicate Check: When registering fingerprints, you can check duplicates.
Change the template format after deleting the fingerprint information of all users. If the fingerprint information
of a user has been enrolled, the template format cannot be changed.
18
Network
Network
Network Settings
You can change the network settings of the device.
Ethernet
1
Press and authenticate with the Admin level credential.
2
Select NETWORK
Device
Ethernet.
3
Enable Ethernet setting.
PORT: Set the device port.
DHCP: Set whether to use DHCP. If DHCP setting is disabled, the user can modify PORT, IP Address, Gateway and
Subnet Mask.
IP Address: View the IP address of the device. To modify, disable DHCP setting.
Gateway: View the gateway of the device. To modify, disable DHCP setting.
Subnet Mask: View the subnet mask of the device. To modify, disable DHCP setting.
DNS: Set the DNS server address.
4
To modify network information manually, disable DHCP setting. When you press , you can modify PORT, IP
Address, Gateway, Subnet Mask and DNS.
Ethernet cannot be used with Wireless at the same time.
19
Network
Wireless
1
Press and authenticate with the Admin level credential.
2
Select NETWORK
Device
Wireless.
3
When you activate Wireless setting, the list of networks available to connect will be displayed.
4
Select the network you wish to connect to and enter the password. When you press OK, the connection to the
wireless network will be made.
5
To set the network information of wireless LAN manually, press of the network name you wish to use and disable
DHCP setting. Pressing allows you to modify IP Address, Gateway and Subnet Mask.
Wireless cannot be used with Ethernet at the same time.
To connect to Wireless, a wireless router is required. For content regarding the installation and configuration
of wireless router, refer to the user’s manual of the wireless router.
  • Page 1 1
  • Page 2 2
  • Page 3 3
  • Page 4 4
  • Page 5 5
  • Page 6 6
  • Page 7 7
  • Page 8 8
  • Page 9 9
  • Page 10 10
  • Page 11 11
  • Page 12 12
  • Page 13 13
  • Page 14 14
  • Page 15 15
  • Page 16 16
  • Page 17 17
  • Page 18 18
  • Page 19 19
  • Page 20 20
  • Page 21 21
  • Page 22 22
  • Page 23 23
  • Page 24 24
  • Page 25 25
  • Page 26 26
  • Page 27 27
  • Page 28 28
  • Page 29 29
  • Page 30 30
  • Page 31 31
  • Page 32 32
  • Page 33 33
  • Page 34 34
  • Page 35 35
  • Page 36 36
  • Page 37 37
  • Page 38 38
  • Page 39 39
  • Page 40 40
  • Page 41 41
  • Page 42 42
  • Page 43 43
  • Page 44 44
  • Page 45 45
  • Page 46 46
  • Page 47 47
  • Page 48 48

suprema BioStation A2 User guide

Type
User guide

Ask a question and I''ll find the answer in the document

Finding information in a document is now easier with AI