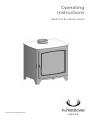
Aspect PA14B1 Operating instructions
- Category
- Stoves
- Type
- Operating instructions

Operating
Instructions
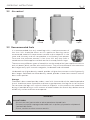
Aspect 14 Eco Boiler Stove
www.hunterstoves.co.uk

OPERATING INSTRUCTIONS
2GB
Contents
1 Introduction 3
2 SAFETY 3-4
2.1 General 3
2.2 Safety instructions 3-4
3 Operating Instructions 4-7
3.1 Door operation 4
3.2 Air control 5
3.3 Recommended flues 5
3.4 Lighting 6
3.5 Ash removal 6
3.6 Adding wood 7
3.7 Wood weights 7
4 Care & maintenance 8-9
4.1 Periods of prolonged non-use 8
4.2 Cleaning glass 8
4.3 Gaskets 8
4.4 Stove body 8
4.5 Chimney sweeping 8
5 Troubleshooting 10
5.1 Difficulty to light and maintain the fire 10
5.2 Abnormal amount of smoke 10
5.3 Excessive soot forming on the glass 10
5.4 Appliance body 10
6 Warranty 11-12

OPERATING INSTRUCTIONS
3
GB
Welcome to the Hunter Stoves family and congratulations on your purchase of this Hunter
Stoves fire. This appliance has been designed and manufactured to the highest quality,
and we hope it will bring you great enjoyment. The natural environment is important to
us, so our stoves are manufactured to provided you with a clean and efficient burn that
will keep you warm through cold winter nights. Please carefully read this user manual
prior to using the appliance and keep the user and installation manuals in a safe place.
1 Introduction
2 SAFETY
2.1 General
Please read all instructions carefully before attempting to install or operate this appliance.
Failure to do so could result in a fire causing property damage, personal injury, or loss
of life. Service and installation must be performed by a trained engineer. Hunter Stoves
cannot accept responsibility for any fault arising from incorrect installation or operation
of this product.
2.2 Safety instructions
• This appliance has been designed for domestic heating only. Please ensure that it is
operated in accordance with these instructions.
• Ensure the appliance and chimney is maintained and serviced on a yearly basis.
• Do not place flammable material closer than the safe distances indicated in the
installation instructions as this may cause a fire.
• It is essential that the stove has an adequate air supply for combustion and ventilation.
Do not obstruct the ventilation required for the safe use of this appliance.
• Only use approved fuels.
• Do not leave children and persons who cannot judge the consequences of their
actions alone with the appliance.
• Always use a fireguard in the presence of children, the elderly or the infirm. The
fireguard should be manufactured in accordance with BS8423 – Fireguards for use
with solid fuel appliances.
• It is a requirement to have carbon monoxide (CO) alarm that conforms to BS EN
50291 installed in the same room as the appliance. See BS EN 50292 and the alarm
manufacturer’s instructions for installation guidance. The use of such an alarm is not
considered a substitute for regular maintenance or servicing of the appliance and
flue system.
WARNING!
The appliance is a heating device. This means that all visible surfaces can become
extremely hot. Avoid contact with the appliance to prevent burn injuries.

4GB
OPERATING INSTRUCTIONS
3 Operating instructions
3.1 Door operation
• Close appliance air controls.
• Evacuate the building.
• Raise the alarm/call the fire brigade.
• Do not re-enter the building until it is deemed safe.
• Before using the appliance again ensure it has been inspected by a qualified
installer and it has been confirmed safe to use.
In the event of a chimney fire
Properly installed and operated, this appliance will not emit fumes. Occasional fumes
from de-ashing and refueling may occur. Persistent fume emission must not be
tolerated. If fume emission persists, then the following immediate actions should be
taken:
• Open doors and windows to ventilate the room.
• Evacuate the room.
• Let the fire go out or safely remove and dispose of fuel from the appliance.
• Check for flue/chimney blockages and clean if required.
• Do not attempt to re-light the fire until the cause of the fume emission has been
identified and corrected.
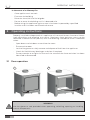
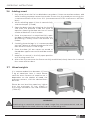
1 2
WARNING!
Use the gloves or tool provided when operating, refuelling, opening or handling
internal components.

OPERATING INSTRUCTIONS
5
GB
3.2 Air control
Closed Open
There are many different types of wood that can be used to fuel your appliance such as
oak, ash, beech, birch, conifers, elm and fruit tress.. They all have there own characteristics
but are generally split into two categories, hardwoods and softwoods.
Hardwoods are higher density woods, provide a higher heat content and will generally
burn longer. Softwoods are lower density woods, provide a lower heat content and will
burn much quicker.
3.3 Recommended fuels
WARNING!
DO NOT BURN
• Bituminous coal, petro-coke or other petroleum based fuels.
• Painted, stained or impregnated wood such as pallets, plywood or chipboard.
• Combustible fluids.
• Plastic, textiles or other waste materials.
It is recommended that only wood logs with a moisture content of
less than 20% should be burnt on this appliance. Burning wet or
unseasoned wood will create excess smoke and tar deposits in the
stove and chimney and will not produce a satisfactory heat output.
To ensure the moisture content is less than 20% only buy from a
woodsure certified supplier and look out for the ready to burn logo.
Storage
Firewood is best stored outside under a roof with the outside of the wood exposed to
the air. Avoid tree cover if possible and leave a gap between the logs for air to circulate.
Do not cover the logs with a plastic sheet or tarpaulin as this prevents the wood from
drying. If possible bring a small amount of wood indoors for several days before use to
enable any surface moisture to evaporate.

OPERATING INSTRUCTIONS
6GB
Hunter Stoves recommends the top down lighting method for a cleaner and more
convenient start.
• Ensure the air control is in the fully open
position.
• In the base of the stove, place 2 or 3 larger split
and dry logs. Ensure a gap is left between the
logs as this allows air movement to help the
fire breathe when lit.
• Place 2 smaller logs on top at 90° to the bottom
logs.
• Layer approximately six to eight pieces of
kindling (finely chopped wood) on top of the
logs in a crisscross pattern.
• Place 1 or 2 eco fire lighters on top of the
kindling in the centre.
• Finally, place 2 to 4 thin pieces of kindling on
top of the eco fire lighters.
• Close the door as soon as flames appear.
• A small amount of soot may appear on the
glass during the lighting. This is perfectly
normal and will go after a period of time.
• Extra logs should not be added until the logs have burnt down into a bed of glowing
embers.
3.4 Lighting
Before lighting the stove check with the installer that the installation work and
commissioning checks have been carried out correctly and that the chimney has been
swept clean, is sound and free from any obstructions. As part of the stoves commissioning
and handover, the installer should have shown you how to operate the stove correctly.
When lighting for the first time operate the appliance at a low temperature for a short
period to allow the fixing cement and paint to harden. During the first few uses the
appliance may emit an unpleasant odour. This is the paint curing. It is non-toxic, but for
your comfort you may wish to ventilate the room by opening the doors and windows.
Length - 15cm to 20cm
Diameter - 1cm to 3cm
Approximately 8-12 finely chopped pieces
Kindling is required to bridge the gap between firelighters and logs, creating the initial
heat required for clean combustion. A lack of kindling may cause the fire to smoulder
or potentially go out.
Kindling
3.5 Ash removal
The appliance will require the ash to be removed periodically. Ensure that no embers
remain when removing the ash from the appliance and take care not to damage the
fire bricks during ash removal. Store the ash in a fireproof container for at least a week
before disposing of them.

OPERATING INSTRUCTIONS
7
GB
3.6 Adding wood
1. Only refuel when the fire has died down to embers. If there are too few embers, add
some kindling to prevent excessive smoke. Ensure that the wood you are using has
a moisture content of less than 20% (we recommend 12-15% to ensure an efficient
burn).
2. When refuelling open all the air controls fully
and the damper (if fitted).
3. Open the door slowly by releasing the handle
and allow the pressure inside the stove to
equalise. Opening the door too fast will cause
smoke to be drawn into the room.
4. Once the pressure has equalised fully open
the door and break apart the remaining char,
distributing it evenly across the base of the
firebox.
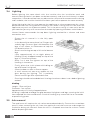
5. Carefully place the logs in. It is recommended
you use 3 pieces of wood, placed parallel with
each other as shown in the image.
6. Close the door. (All our stoves are tested as
closed door appliances and should be used as
such.)
7. Keep the air control in the fully open position
until the logs catch fire.
8. After a few minutes once the flames are fully established, slowly close the air control
for a more efficient burn.
3.7 Wood weights
It is recommended that between 2.5 and
3 kg of wood per hour is used. Please
note the exact amount of wood to use is
dependent on the species of wood, the
moisture content, and the desired burn
duration.
Please do not load the wood any higher
than the maximum fill line, shown in
the image, located on the side fire bricks
(~160mm).
WARNING!
Avoid using an excessive amount of wood. Large fires are uneconomical and can
cause damage to the stove, chimney and the surrounding walls.

OPERATING INSTRUCTIONS
8GB
4 Care & maintenance
4.1 Periods of prolonged non-use
If the stove is to be left unused for a prolonged period, then it should be given a thorough
clean to remove ash and unburned fuel residues. To enable a good flow of air through
the appliance to reduce condensation and subsequent damage, leave the air controls
fully open.
If the appliance has been unused for a long period, such as during the spring and summer
months, a competent person should check the chimney for potential obstructions
before lighting the stove e.g. have the chimney swept before the start of the heating
season.
4.3 Gaskets
It is important to periodically check any gaskets to ensure the appliance is operating
efficiently and safely. If any have become detached or damaged replace immediately.
Replacement gaskets are available through the Hunter Stoves spares website.
4.4 Stove body
4.5 Chimney sweeping
The stove body can be cleaned with a dry cloth. Damage to painted part of the appliance,
such as scratches can be repaired using Hunter stoves touch up paint available online.
It is important that the chimney, flue ways and any connecting ducts are swept at
least once a year by a qualified chimney sweep. If the appliance is used continuously
throughout the year more frequent sweeping is recommend.
Replacement parts can be purchased online at www.hunterstoves.co.uk
4.2 Cleaning the glass
Before cleaning the glass ensure the
appliance is cool. Use a dry cloth to remove
any soot deposits. This is usually sufficient
when cleaning the glass regularly. If more
thorough cleaning is required it can be
removed using an appropriate glass
cleaning agent. Avoid using cleaning agents
that contain abrasive, as these can scratch
the glass and make subsequent cleaning
more difficult.

OPERATING INSTRUCTIONS
9
GB
The Clean Air Act 1993 And Smoke Control Areas
Under the Clean Air Act local authorities may declare the whole or part of the district of the authority to be a
smoke control area. It is an offence to emit smoke from a chimney of a building, from a furnace or from any
fixed boiler if located in a designated smoke control area. It is also an offence to acquire an “unauthorised fuel”
for use within a smoke control area unless it is used in an “exempt” appliance (“exempted” from the controls
which generally apply in the smoke control area).
In England appliances are exempted by publication on a list by the Secretary of State in accordance with
changes made to sections 20 and 21 of the Clean Air Act 1993 by section 15 of the Deregulation Act 2015.
In Scotland appliances are exempted by publication on a list by Scottish Ministers under section 50 of the
Regulatory Reform (Scotland) Act 2014. Similarly, In Northern Ireland appliances are exempted by publication
on a list by the Department of Agriculture, Environment and Rural Affairs under Section 16 of the Environmental
Better regulation Act (Northern Ireland) 2016. In Wales appliances are exempted by regulations made by Welsh
Ministers.
Further information on the requirements of the Clean Air Act can be found here:
https://www.gov.uk/smoke-control-area-rules
Your local authority is responsible for implementing the Clean Air Act 1993 including designation and
supervision of smoke control areas and you can contact them for details of Clean Air Act requirements.
The following stoves have been recommended for use in smoke control areas when burning wood logs:
• Aspect 14 Eco Boiler
Each stove must be fitted with a permanent stop provided by the Hunter Stoves to prevent full closure of the
air controls. In a smoke control area, the air control stop must be fitted. If this is removed, then the stove will no
longer be exempt and therefore no longer suitable for burning unauthorised fuels in a smoke control area.
Refuelling on to a low fire bed
If there is insufficient burning material in the firebed to light a new fuel charge, excessive smoke emission can
occur. Refuelling must be carried out onto a sufficient quantity of glowing embers and ash that the new fuel
charge will ignite in a reasonable period. If there are too few embers in the fire bed, add suitable kindling to
prevent excessive smoke.
Fuel overloading
The maximum amount of fuel specified in this manual should not be exceeded, overloading can cause excess
smoke.
Operation with door left open
Operation with the door open can cause excess smoke. The appliance must not be operated with the appliance
door left open except as directed in the instructions.
Dampers left open
Operation with the air controls or appliance dampers open can cause excess smoke. The appliance must not be
operated with air controls, appliance dampers or door left open except as directed in the instructions.

OPERATING INSTRUCTIONS
10 GB
5 Troubleshooting
• The wood may not be dry enough. Check the moisture content of the fuel.
• The flue draught may be affected. Check the chimney is not blocked and that no
nearby buildings or trees affect the wind around it.
• Air ventilation to the room may be affected. Check the rooms air vent is not blocked
(if installed) and switch off any extraction fan in the house. Open a window near the
appliance and try heating the flue gradually to generate a draught.
• If this is only occurring occasionally it could be due to varying weather conditions,
especially the wind. An anti-down draught cowl might need to be fitted (speak to a
specialist) or a flue damper may also be of help.
5.1 Difficult to light and maintain the fire
This can happen for a variety of reasons e.g. cold air trapped in chimney/flue. As cold
air is denser, this causes smoke to be forced back down the chimney. We recommend
trying to heat the chimney before lighting for example, placing a firelighter on top of
the kindling. Ensure wood has a moisture content of less than 20% as this can cause
excess smoke. Also check the type of wood as softwood produces a lot more smoke.
5.2 Abnormal amount of smoke
If your glass is blackening this can be due to incorrect use of air controls (see instructions).
Alternatively, poor quality fuel which has a high moisture content can also be a cause.
When the glass has a white shadow(or crazing) on the inside then this can be caused
due to over-firing, too much primary air or a vacuum in the room.
5.3 Excess soot forming on the glass
5.4 Appliance body
The stove paint curing process takes place at room temperature and the surface coating
is virtually free from fumes and odours. When being put into operation for the first time
we would recommend that windows and doors are opened for a short time to provide
ventilation.
Paint curing
Paint discoloured
If the surface of the appliance turns grey or the paint starts to flake or peel then this is
due to an excessive temperature in the appliance. The reason for this can be to much
wood or the incorrect type of fuel has been used.
Noise
When the appliance body heats up and cools down it may make some clicking noises.
This is due to the large temperature differences and is not a problem with the appliance.

OPERATING INSTRUCTIONS
11
GB
6 Warranty
2 Year Standard Warranty
Any appliance bought through the showroom of an authorised Hunter Stoves Group
dealership will automatically be covered by our standard 2-year conditional guarantee.
However, this standard 2-year warranty can be extended to a 5 year or 10-year conditional
warranty dependent on the model type (5 years - Boiler model and Gas models, 10 years
- Room heater).
To qualify for this extended warranty option, you need to:
• Register your purchase online at https://www.hunterstoves.co.uk/ProductRegistration
• Retain your proof of purchase.
Warranty Conditions
For the Standard 2 year or extended 5/10-year warranty to be valid and to remain in force
throughout the warranty period the following must have been carried out:
• The appliance must have been installed by an appropriately qualified engineer (from
the Competent Person Scheme/Gas Safe) in accordance with the manufacturer’s
instructions and in compliance of any relevant national or local building regulations.
Please visit the following links for details on the Competent Person Scheme: https://
www.gov.uk/guidance/competent-person-scheme-current-schemes-and-how-
schemes-areauthorised and Gas Safe register: https://www.gassaferegister.co.uk/
• The appliance will need to be registered within two months of purchase and the
commissioning and installation documentation completed (these need to be kept
by the end user).
• The appliance must be serviced within 12 months of the installation date for the second
year of the standard warranty to be valid, and within every 12-month anniversary
thereafter to maintain the validity and coverage of any extended warranty. For this
purpose, the installation and user instructions, supplied with the appliance, makes a
provision for receipts and annual services to be recorded. This is needed in the event
of a claim during the warranty period.
• Only genuine Hunter Stoves spare parts or consumables can be used in the servicing
and maintenance of the appliance during any standard or extended warranty period.
These can be sourced from your authorised supplier directly or through our website
spares portal. www.hunterstoves.co.uk/spares.
• Any problems or issues giving rise to any claim under the standard or extended
warranty must be submitted to the authorised Hunter Stoves Group retailer from
whom you originally purchased the appliance. Hunter Stoves Group will then offer
appropriate support and help through your original authorised supplier to solve any
issues.
• The standard or extended warranty option is not transferable. It is solely for the
benefit of the original purchaser of the appliance. For this purpose, please retain the
proof of purchase.

OPERATING INSTRUCTIONS
12 GB
Warranty Exclusions
No warranty period is extended to naturally-wearing replaceable consumables and
spare parts within the appliance. Such parts include, but are not limited to:
• Gas pilot assemblies
• Thermocouples and pilot assembly
• Ceramic log & coal ‘fuel -effects’
• Batteries
Paint and Surface Coverings
The paint or surface covering of the appliance will be covered (for 2 years after installation)
provided the warranty conditions are met. However, damage due to the following events
will not be covered:
• Damage to the paint surface caused by the appliance being stored in a damp and
cold environment is not covered under warranty. Please be aware that any moisture
within the room where the stove is installed e.g. through clothes drying, can be a
cause of paint issues.
• In the course of the initial firings of the appliance the paint or enamel surface may
change colour. This is normal and as such is therefore not covered under warranty.
• Damaged caused by over firing/excessive temperatures, resulting in cracking,
bubbling or discolouration to the paint or enamelled surface finish is not covered
under warranty.
Warranty Limitations
• Damage to the appliance due to specific local conditions caused by draft or chimney
defects.
• Damage resulting from installation and use where installation is not in accordance
with the manufacturer’s instructions or local building and/or safety regulations.
• Consequential loss to associated non-Hunter Stoves Group products is not covered
under the warranty.
• Consequential loss relating to decorations, soft furnishings or other household assets
is not covered under the warranty.
• Cost associated with the removal and re-installation of an appliance subject to a
warranty claim.
Hunter Stoves Group total liability will only extend to the total purchase price paid for
the goods in any warranty claim. Hunter Stoves Group reserve the right to replace, repair
or refund to value of goods purchased.
ANY HUNTERS STOVES GROUP PRODUCT PURCHASED VIA AN INTERNET SUPPLIER,
OR THROUGH AN UNAUTHORISED STOCKIST WILL ONLY BE SUPPORTED BY THE
STATUTORY, 12 MONTH GUARANTEE AND WILL NOT QUALIFY FOR ANY EXTENDED
5- OR 10-YEAR WARRANTY.
The Hunter Stoves Group extended warranty option does not affect your statutory
rights. The standard/extended warranty applies to purchases of Hunter Stoves within
the United Kingdom and the Republic of Ireland. Purchases in all other countries are
subject to the warranty conditions specified by the distributor in those markets.


Hunter Stoves, 8 Emperor Way, Exeter,
Devon, EX1 3QS
www.hunterstoves.co.uk
Hunter Stoves reserve the right to change
dimensions and procedures described in these
instructions anytime without special notice.
JUN-ASB-A
2022-05-03
-
 1
1
-
 2
2
-
 3
3
-
 4
4
-
 5
5
-
 6
6
-
 7
7
-
 8
8
-
 9
9
-
 10
10
-
 11
11
-
 12
12
-
 13
13
-
 14
14


Aspect PA14B1 Operating instructions
- Category
- Stoves
- Type
- Operating instructions
Ask a question and I''ll find the answer in the document
Finding information in a document is now easier with AI
Related papers

Other documents
-
 DI Lusso EDDLE05CB Operating instructions
-
 DI Lusso EDDLR05 Operating instructions
-
 Hunter Stoves HERALD 5 SLIMLINE Installation And Operating Instructions Manual
-
 DI Lusso EDDLC06A Operating instructions
-
 Hunter Stoves Herald 80B CE V.II Installation And Operating Instructions Manual
-
Contura i50 Operating instructions
-
-
Contura 600-series Style Operating instructions
-
-


