Page is loading ...

INSTALLATION
INSTRUCTIONS
Swiss Madison
SMSB510 Concorde® 48” X 36” Center Drain Shower Base
SMSB511 St. Tropez® 36”
X 36” Center Drain Shower Base
SM-SB512 Voltaire® 60”
X 36” Right-Hand Drain Shower Base
SM-SB513 Voltaire® 60”
X 36” Left-Hand Drain Shower Base
SKU
SM-SB515 Voltaire® 60” X 32” Left-Hand Drain Shower Base
SM-SB514 Voltaire® 60”
X 32” Right-Hand Drain Shower Base
NAME
www.swissmadison.com | 19 Stults Rd, Dayton, NJ 08810 | 1-434-623-4766 | inf[email protected]

SHOWER BASE INSTALLATION INSTRUCTIONS
SUGGESTED TOOLS AND MATERIALS
SMSB510 Concorde® 48”
X
36”
X
5.5” Center
SMSB511 St. Tropez® 36”
X
36”
X
5.5” Center
SM-SB512 Voltaire® 60”
X
36”
X
5.5” Right-Hand
SM-SB513 Voltaire® 60”
X
36”
X
5.5” Left-Hand
SKU NAME
SM-SB515 Voltaire® 60”
X
32”
X
5.5” Left-Hand
SM-SB514 Voltaire® 60”
X
32”
X
5.5” Right-Hand
L x W x H DRAIN
L
W
H
Safety Glasses Utility Knife Pencil
Shims
Tape Measure
Adhesive
(1 tube)
Sealant
(1 tube)
Drop Cloth
Square
Level
Caulk Gun
Drain Wrench
Expansion
Foam
Split-Joint
Pliers
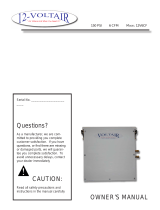
If installing a wall set, refer to wall set installation instructions.
1

Studs must be
ush and square
SHOWER BASE INSTALLATION INSTRUCTIONS
L
W
L
W
10”
10”
Rough-In
CAUTION: DO NOT use drywall screws to secure anges to wall studs. Product
damage will occur and will void the warranty.
Entire bottom support must be in contact with a at level surface.
1. Read the complete instruction manual before beginning installation.
2. Conrm that your model will t in intended location and plumbing xtures are
located where legally required before beginning installation.
3. Not all drawings on this manual are drawn to scale. Please refer to the model chart.
4. Walls and sub-oor must be solid, ush, and square.
5. Always use drop cloth to protect shower base from damage during installation.
6. Two people are recommended to install and move this product.
Roughing-in
• Rough plumbing must be pre-installed by a certied plumber before shower base
installation.
• If oor drain-hole installation is needed, contact a certied plumber.
10” x 10” Floor cut-out
Wall studs
2

SHOWER BASE INSTALLATION INSTRUCTIONS
Leveling the oor
1. Verify that the shower base is level using the “level” tool on all four sides.
• If the shower base is level proceed to step 2.
• If shower base level use shims or mortar compound to adjust accordingly. Verify with “level
tool.”
2. Mark drain hole on oor. (All in oor plumbing must be installed by a certied plumber.)
To ensure base is installed correctly,
entire bottom support must contact
a at, level surface.
Bottom Support
Bottom Support
Wall
Level
Square
Pre-attach Drain
WARNING: DO NOT discard cardboard ring.
1. Remove shower base from dry t.
2. Thread silicone or plumbers putty under drain lip, so when inserted excess sealant will squeeze out
from between drain and shower base oor creating an air tight seal.
3. Flip shower pan upside down: Add rubber ring then cardboard ring and lastly screw on the plastic
ring.
4. While holding the bottom of the shower drain in place with split-joint pliers, use shower wrench to
tighten the plastic ring until drain sits ush with shower base oor.
5. Use rubbing alcohol and a towel to remove all excess silicone/plumbers putty from around drain lip.
3

SHOWER BASE INSTALLATION INSTRUCTIONS
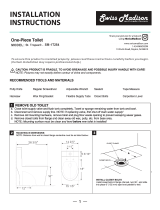
5. Place drop cloth in bathtub and stand inside the shower base to press it to the oor when
securing to the wall studs.
Installing Shower Base
1. Re-insert shower base into shower cavity making sure that shower base drain and oor rough-in are
aligned.
2. Before laying down shower base, ll shower cavity with expanding foam in snake formation. Leave
6-8 inches from end of shower area empty of expanding foam.
3. Re-insert shower pan into shower cavity leaving 1/8” (use shims) between wood studs and shower
base on all sides.
4. Verify shower base is level using level tool on all 4 sides.
NOTE: Expanding foam generally settles within10-15 minutes.
Level
Side Flange
Top Flange
Wall Studs
1/8” gap
Square
Square
Shim
4

Swiss Madison® products are made with quality materials and excellent craftsmanship to provide the
customers a long lasting product. In the case of any defects in materials or craftsmanship under regular
use were inspected in the rst year of purchase, Swiss Madison® will provide replacement parts at no
charge, or at its option, replace any product or part of the product that is deemed defective, under
normal installation, use, service and maintenance. This warranty applies only to the original purchaser.
Proof of purchase will be required in the case of a claim.
Swiss Madison® recommends the installations to be made by a licensed, professional plumber.
Swiss Madison® will not be held responsible for any damage or product failure due to improper
installation, misuse, or failure to use a licensed professional. Swiss Madison® is not responsible for any
removal or installation cost.
This One Year Limited Warranty will be voided if:
•The installation recommendations were not followed.
•The product has been moved from it’s initial place of installation.
•The product has been modied.
•The product has been subjected to improper maintenance, abuse, misuse, excessive use of
chemicals, accident or other damages.
Swiss Madison® makes no implication that products comply with any or all local building or plumbing
codes. It is the consumer’s responsibility to determine local code compliance. This warranty extends to
the original purchaser and rst consumer.
Swiss Madison® is not liable for any incidental, co
nsequential or special damages associated with the
return, replacement, installation or use of your product. This includes freight costs, labor, travel time, lost
prot, home damages and other contingent liabilities and costs (including, without limitation, costs
associated with experts, investigations, analyses, attorneys and other professionals and services).
The Swiss Madison® warranty is a comprehensive and explicit limit of liability, and all items outside of it
are not addressable by or the responsibility of Swiss Madison®. Certain states have variances regarding
implied warranties and in those situations we remain fully compliant.
In the case of any questions or a claim contact us directly at 1-434-MADISON (623-4766).
WARNING: Content may contain sharp and other po
ssibly harmful pieces and may cause hazard to
children and adults, Swiss Madison® is not responsible in any way for personal damage.
ONE YEAR LIMITED WARRANTY
1-434-MADISON
(623-4766)
19 Stults Rd., Dayton, NJ 08810
www.swissmadison.com
S
wiss
M
adison
/