Lexus IS350 Owner's manual

Type
Owner's manual

This manual is also suitable for

1
When Driving
Topic 3
Entering and Exiting
Topic 1
Before Driving
Topic 2
Overview
Contents
Engine (ignition) Switch P.19
Automatic Transmission P. 2 0
Manual Transmission P. 2 3
Parking Brake P. 23
Multi-information Display P. 2 4
Satellite Switches P. 2 5
Tu r n S i g n a l Lever P. 2 6
Emergency Flasher Switch P. 2 6
ECT Switch P. 2 7
Keys P. 7
Smart Access System with
Push-button Start P. 8
Theft Deterrent System P.9
The Quick Guide is not intended as a substitute for your
Owner’s
Manual
. We strongly encourage you to review the
Owner’s
Manual
and supplementary manuals so you will have a better
understanding of your vehicle’s capabilities and limitations.
ETCS Switch P. 2 7
Intuitive Parking Assist P. 2 8
Cruise Control P. 2 9
Dynamic Radar Cruise
Control P. 3 0
Seats (Manual) P.1 1
Seats (Power) P.1 2
Driving and Seat Position
Memory System P.1 3
Head Restraints P.1 4
Seat Belts P.1 4
Outside Rear View Mirrors
P.15
Anti-glare Inside
Rear View Mirror P.1 5
Steering Wheel P.1 6
Entering and Exiting
Before Driving
When Driving
Rain and
Night Driving
Driving Comfort
Opening and Closing
What to do if ...
Customizing
Yo u r L e x u s
2
Driving Comfort
Topic 5
Opening and Closing
Topic 6
What to do if ...
Customizing Your Lexus
Responding to warning/indicator lights
and other problems that may arise.
A list of features that can be customized.
Rain and Night Driving
Topic 4
Headlights P. 3 3
Fog Lights P. 3 4
Windshield Wipers and
Wa s h er P. 3 5
Headlight Cleaner P. 3 7
Rear Window and Outside Rear
View Mirror Defoggers P. 3 7
Instrument Panel Light Control
P. 3 7
Interior Lights P. 49
Rear Sunshade P. 4 9
Compass P.5 0
Trunk Storage Extension P. 5 0
Luggage Mat P. 5 1
Door Locks P. 5 3
Power Windows P.5 4
Moon Roof P. 54
Fuel Tank Cap P. 5 5
Hood P. 5 5
Tr u n k P. 5 6
Audio System P. 39
Air Conditioning System P. 4 2
Garage Door Opener P. 4 3
Ashtrays P. 45
Seat Heaters/Seat Heaters
and Ventilators P. 4 6
Console Boxes P. 4 7
Glove Box P. 4 8
Cup Holders P. 4 8
Depending on specifications, the vehicle shown in the illustration may
differ from your vehicle in terms of color and equipment.
3
Overview
Instrument Panel
Shift paddle switches (automatic transmission)
P.20
Headlight switch
Turn signal lever
Fog light switch
P.33
P.26
P.34
Headlight cleaner switch
P.37
Rear sunshade switch
P.49
Inside door lock button
P.53
Fuel filler door opener
P.55
Driving and seat position
memory switches
P.13
Power window switches
P.54
Window lock switch
P.54
Outside rear view
mirror switches
P.15
Trunk opener
P.56
Hood release lever
P.55
Parking brake pedal
(automatic transmission)
P.23
Satellite switches
P.25
Tilt and telescopic steering lock
release lever
P.16
Tilt and telescopic steering
control switch
P.16
Multi-information
display
P.24
Door lock switches
P.53
4
Shift paddle switches (automatic transmission)
P.20
Windshield wipers and
washer switch
P.35
Engine (ignition) switch
P.19
Air conditioning system
P.42
Emergency flasher switch
P.26
Rear window and outside rear
view mirror defoggers
P.37
Security indicator light
P.9
Audio system
P.39
Glove box
P.48
Trunk opener main switch
P.56
See P.5.
Cruise control switch
Dynamic radar cruise control switch
P.29
P.30
Distance switch
P.30
ECT switch (automatic transmission)
ETCS switch (manual transmission)
P.27
P.27
: If equipped
5
Overview
Instrument Panel
Seat heaters/seat heaters
and ventilators
P.46
Automatic transmission
shift lever
P.20
Ashtrays
P.45
Cup holders
P.48
Ashtrays
P.45
Manual transmission
shift lever
P.23
Parking brake lever
P.23
Seat heaters/seat heaters
and ventilators
P.46
Cup holders
P.48
Automatic transmission
Manual transmission
: If equipped
Entering and Exiting
Topic 1
Keys ............................................................................. 7
Smart Access System with
Push-button Start .................................................... 8
Theft Deterrent System......................................... 9
Topic 1
Entering and Exiting
7
Keys
Electronic key
Smart access system with push-button start
(P. 8, 1 9 )
*: If equipped
Mechanical key
Locks and unlocks the doors
Opens the trunk
Locks and unlocks the glove box
The mechanical key is stored inside the electronic
key. To extract the key, release the latch and pull,
or if equipped with a card key, press the button
and pull.
Wireless remote control
Press: locks all doors
Press once: unlocks the driver's door
Press twice: unlocks all doors
Press and hold: opens the windows and moon
roof*
Press and hold: opens the trunk
Press and hold: sounds the alarm
(Use the alarm to attract attention to the vehi-
cle in order to help deter break-ins. To stop the
alarm, press any button on the wireless remote
control.)
*: If equipped
Card key*
1
2
3
4
Topic 1
Entering and Exiting
8
Entering and Exiting
When Driving
Rain and
Night Driving
Driving Comfort
Opening and Closing
What to do if ...
Customizing
Yo u r L e x u s
Before Driving
Before Driving
Smart Access System with Push-button Start
Entering the vehicle
To unlock the vehicle, simply grasp either of the
front door handles.
Exiting the vehicle
To lock the vehicle, press the lock button on either
of the front door handles.
Opening the trunk
To open the trunk, press and hold the trunk
release button.
For details on what to do when the electronic key does not operate properly, see page 60.
Topic 1
Entering and Exiting
9
Theft Deterrent System
Engine immobilizer system
The engine immobilizer system prevents the
engine from being started in the event that an
attempt is made to start the vehicle using an
unregistered key.
The security indicator light flashes to indicate that
the system is set.
Alarm
The system sounds the alarm and flashes lights when forcible entry is detected.
To set the alarm: lock all the doors from outside the vehicle. The security indicator light
comes on to indicate that the alarm is in its preparation state. When the indicator light
begins to flash, the system is armed.
To deactivate or stop the alarm: turn the “ENGINE START STOP” switch to ACCESSORY
or IGNITION ON mode, or unlock the doors or trunk using the electronic key or the wire-
less remote control.
Steering lock
The steering wheel locks when the “ENGINE
START STOP switch is OFF.
When the steering lock cannot be released, the
green indicator light on the “ENGINE START
STOP” switch will flash and a message will be
shown on the multi-information display. To release
it, gently turn the wheel left or right while pressing
the “ENGINE START STOP” switch.
Before Driving
Topic 2
Seats (Manual) ........................................................ 11
Seats (Power).......................................................... 12
Driving and Seat Position
Memory System..................................................... 13
Head Restraints ..................................................... 14
Seatbelts................................................................... 14
Outside Rear View Mirrors ............................... 15
Anti-glare Inside Rear View Mirror................. 15
Steering Wheel ...................................................... 16
Topic 2
Before Driving
11
Seats (Manual)
Adjusting seat position
With the lever raised, slide the seat forward or
backward.
Adjusting seatback angle
With the lever raised, tilt the seatback forward or
backward.
Adjusting seat height
Raises the seat
Lowers the seat
Adjusting the front of the seat cushion
Raises the front of the seat cushion
Lowers the front of the seat cushion
1
2
1
2
Topic 2
Before Driving
12
Entering and Exiting
Before Driving
When Driving
Rain and
Night Driving
Driving Comfort
Opening and Closing
What to do if ...
Customizing
Yo u r L e x u s
Seats (Power)
Adjusting seat position
Moves the seat forward
Moves the seat backward
Adjusting seatback angle
Tilts the seatback forward
Reclines the seatback
Adjusting the seat cushion
Raises and lowers the front of the cushion
Raises and lowers the entire seat
Adjusting the lumbar support
Firmer
Softer
1
2
1
2
1
2
1
2
Topic 2
Before Driving
13
Driving and Seat Position Memory System (If Equipped)
Setting memory positions
Press the SET button, then within 3 seconds press
one of the memory buttons (1, 2, or 3) until you
hear a beep.
The current position of the seat, as well as the
position of the steering wheel and the outside
rear view mirrors (for the driver's seat only) is
recorded.
Recalling memory positions
Press one of the memory buttons (1, 2, or 3).
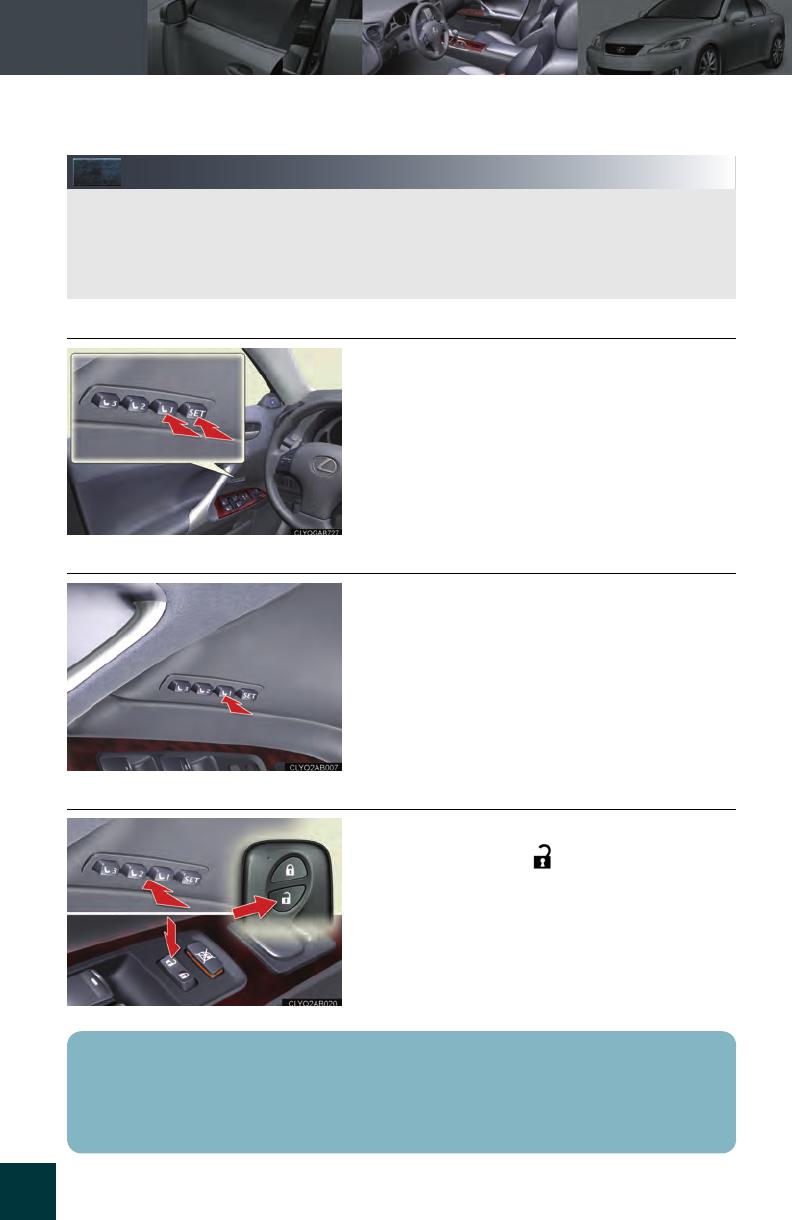
Linking driving position memory with door unlock operation (driver's seat only)
While holding down the desired memory button,
press and hold the button on the wireless
remote control or door lock switch until you hear a
beep.
To prevent triggering of the alarm, open one of
the doors within 180 seconds after the beep is
heard.
Linking driving position memory to the door unlock operation allows the memory position
to be recalled automatically when the driver's door is opened. (The linked function does not
operate if the driver's door is unlocked using the mechanical key or manually from inside
the vehicle.)
Topic 2
Before Driving
14
Entering and Exiting
Before Driving
When Driving
Rain and
Night Driving
Driving Comfort
Opening and Closing
What to do if ...
Customizing
Yo u r L e x u s
Head Restraints
Vertical adjustment
To ra is e: push the head restraint upward.
To lower (front and center rear seats): push the
head restraint down while pressing the lock
release button.
To lower (outside rear seats): push the head
restraint down.
Folding (outside rear seats only)
Pull the head restraint up while pressing the lock
release button.
Seatbelts
Adjusting shoulder belt height (front seats only)
To ra is e: pull the anchor upward.
To l ow e r: depress the button and push the anchor
down.
Seatbelt comfort guides (outside rear seats only)
If the shoulder belt sits close to the neck, slide the
comfort guide forward.
Lock
release
button
Lock release button
Topic 2
Before Driving
15
Outside Rear View Mirrors
To select the mirror you wish to adjust (L or R),
use the master switch.
To adjust mirror angle, use the control switch.
On some models, the mirrors will automatically
angle downwards when the vehicle is reversing.
To disable this function, set the master switch in
the neutral position (between L and R).
Anti-glare Inside Rear View Mirror
To turn AUTO mode ON/OFF, press the AUTO
button.
The indicator comes on when AUTO mode is
turned ON.
Topic 2
Before Driving
16
Entering and Exiting
Before Driving
When Driving
Rain and
Night Driving
Driving Comfort
Opening and Closing
What to do if ...
Customizing
Yo u r L e x u s
Steering Wheel
Manually adjustable type
To adjust the steering wheel, press the lever down
and move the steering wheel to the desired posi-
tion. Lock the steering wheel in place by pulling
the lever up.
Power-adjustable type
Up
Down
Away from the driver
Toward the driver
1
2
3
4
The power-adjustable type steering wheel retracts automatically when the “ENGINE
START STOP” switch is turned OFF to allow for easy exit and entry. The steering wheel
returns automatically to its previously set position when the “ENGINE START STOP
switch is switched to ACCESSORY or IGNITION ON mode.
Topic 2
Before Driving
17
When Driving
Topic 3
Engine (ignition) Switch....................................... 19
Automatic Transmission..................................... 20
Manual Transmission........................................... 23
Parking Brake........................................................ 23
Multi-information Display.................................. 24
Satellite Switches ................................................. 25
Turn Signal Lever.................................................. 26
Emergency Flasher Switch................................ 26
ECT Switch ............................................................. 27
ETCS Switch .......................................................... 27
Intuitive Parking Assist ....................................... 28
Cruise Control ...................................................... 29
Dynamic Radar Cruise Control....................... 30
Topic 3
When Driving
19
Engine (ignition) Switch
Starting the engine
Automatic transmission
Make sure the parking brake is engaged and the
shift lever is in P.
Depress the brake pedal.
The “ENGINE START STOP” switch indi-
cator light turns green.
Press the “ENGINE START STOP” switch.
Manual transmission
Make sure the parking brake is engaged and the
shift lever is in N.
Depress the clutch pedal.
The “ENGINE START STOP” switch indi-
cator light turns green.
Press the “ENGINE START STOP” switch.
Stopping the engine
Engage the parking brake and shift the shift lever to P (for automatic transmission) or N
(for manual transmission).
Press the “ENGINE START STOP” switch.
Topic 3
When Driving
20
Entering and Exiting
Before DrivingBefore Driving
When DrivingWhen Driving
Rain and
Night Driving
Driving Comfort
Opening and Closing
What to do if ...
Customizing
Yo u r L e x u s
Changing power modes
To change power modes without turning on the engine, press the “ENGINE START STOP
switch without depressing the brake pedal (for automatic transmission) or the clutch pedal
(for manual transmission). The modes can be changed in the following order:
Automatic Transmission (If Equipped)
Shift positions
P Park*
R Reverse
N Neutral (drive not engaged)
D Drive
S S mode
*: The engine can only be started in P.
The vehicle can only be shifted out of P when
the “ENGINE START STOP” switch is in
IGNITION ON mode and the brake pedal is
depressed.
  • Page 1 1
  • Page 2 2
  • Page 3 3
  • Page 4 4
  • Page 5 5
  • Page 6 6
  • Page 7 7
  • Page 8 8
  • Page 9 9
  • Page 10 10
  • Page 11 11
  • Page 12 12
  • Page 13 13
  • Page 14 14
  • Page 15 15
  • Page 16 16
  • Page 17 17
  • Page 18 18
  • Page 19 19
  • Page 20 20
  • Page 21 21
  • Page 22 22
  • Page 23 23
  • Page 24 24
  • Page 25 25
  • Page 26 26
  • Page 27 27
  • Page 28 28
  • Page 29 29
  • Page 30 30
  • Page 31 31
  • Page 32 32
  • Page 33 33
  • Page 34 34
  • Page 35 35
  • Page 36 36
  • Page 37 37
  • Page 38 38
  • Page 39 39
  • Page 40 40
  • Page 41 41
  • Page 42 42
  • Page 43 43
  • Page 44 44
  • Page 45 45
  • Page 46 46
  • Page 47 47
  • Page 48 48
  • Page 49 49
  • Page 50 50
  • Page 51 51
  • Page 52 52
  • Page 53 53
  • Page 54 54
  • Page 55 55
  • Page 56 56
  • Page 57 57
  • Page 58 58
  • Page 59 59
  • Page 60 60
  • Page 61 61
  • Page 62 62
  • Page 63 63
  • Page 64 64
  • Page 65 65
  • Page 66 66

Lexus IS350 Owner's manual

Type
Owner's manual
This manual is also suitable for

Ask a question and I''ll find the answer in the document

Finding information in a document is now easier with AI