TCHELICON Perform-Ve Quick start guide

Type
Quick start guide
TC HELICON PERFORM-VE Quick Start Guide
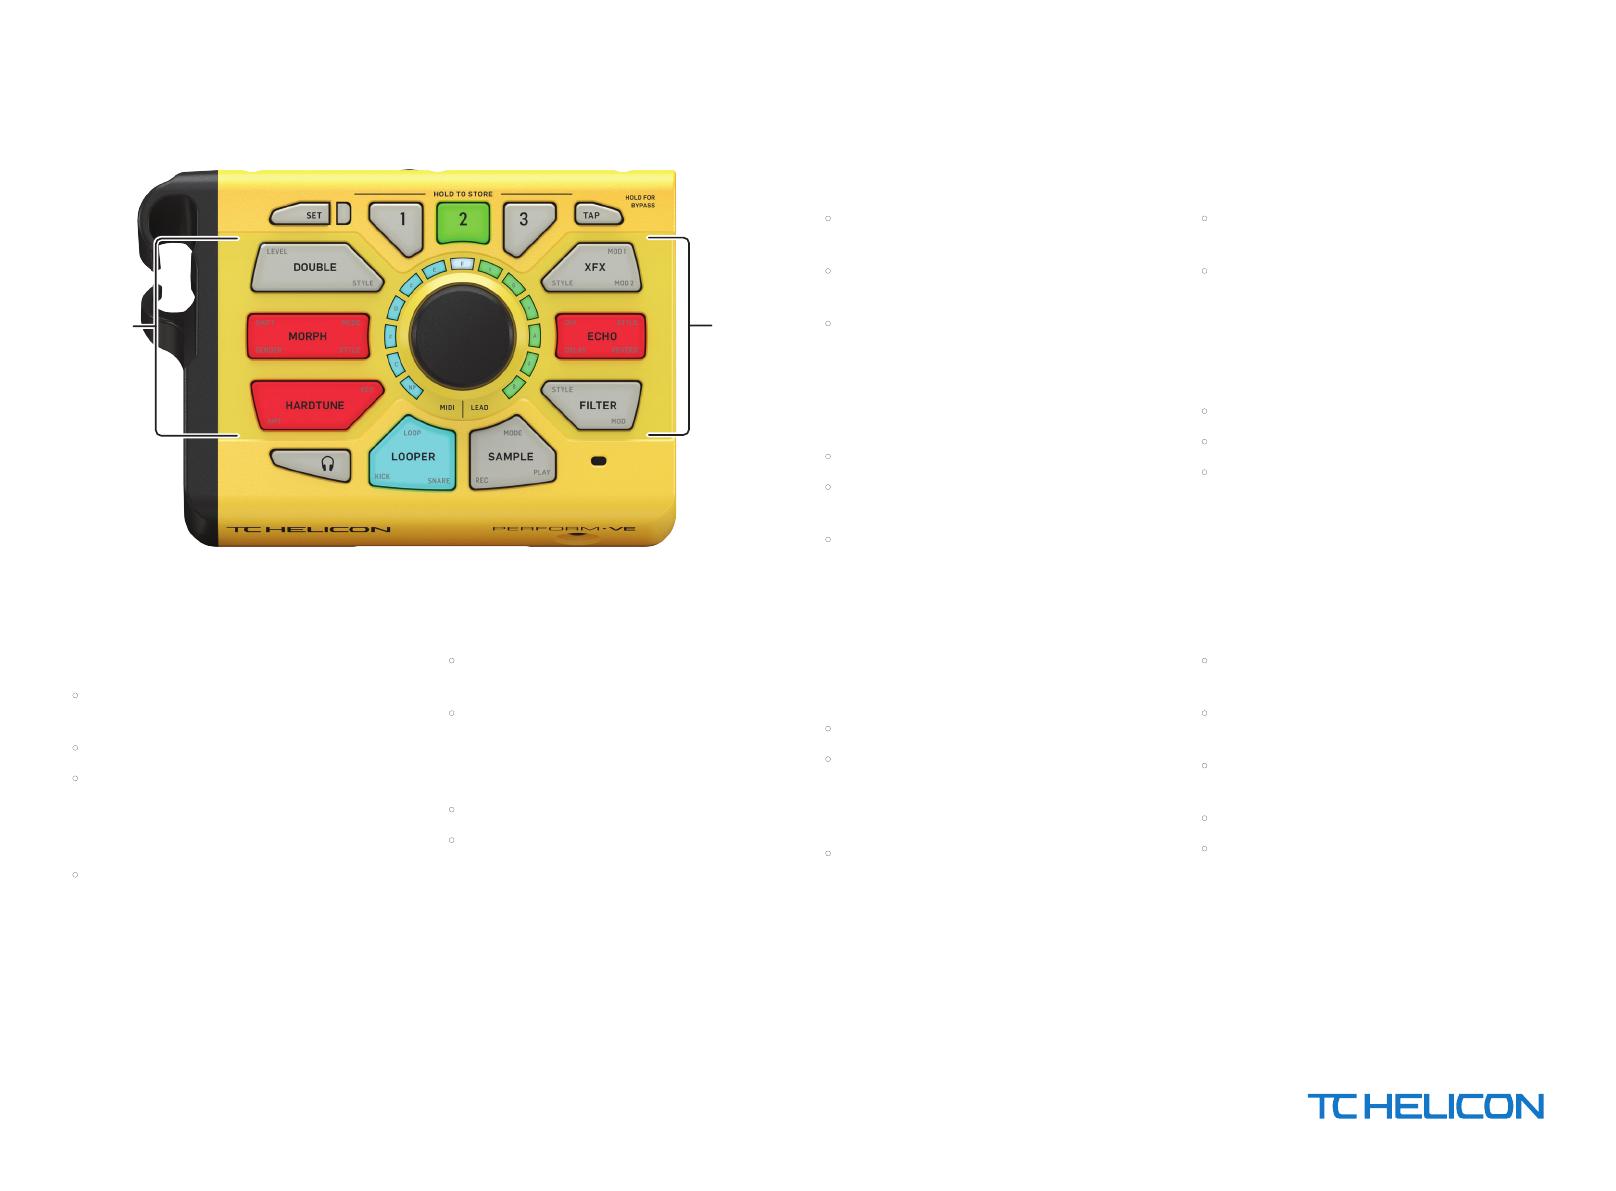
EFFECT
BUTTONS
EFFECT
BUTTONS
The way to have fun and get creative quickly
with this product is to connect as on shown on
the product box, then do the following:
• Refer to the legend on the bottom of the product to
set mic gain and MIDI channel.
• Press Eect buttons to enable/disable eects.
• Hold the corner of an eect button with a parameter
label and turn the knob to hear the eect change
- there are many parameters intended to have
real-time control.
• Follow the rest of this guide to preview the
product’s functionality.
EFFECT BUTTONS
• Pressing an EFFECT BUTTON enables/disables
the eect.
• Holding the corner of a button while turning the
knob adjusts the parameter labeled on that corner.
Pressing any button will quit the edit mode and
return to the home screen.
• STYLE parameters change the selected eect.
• MORPH MODEsets whether the MIDI operation is
polyphonic (green)or mono (red) and controls note
release time or portamento amount.
LOOPER BUTTON
• Hold KICK or SNARE while turning the knob to select
alternate drum sounds.
• Hold LOOP while turning the knob to adjust the
drum loop level.
• The looper has two tracks: one for the drum pattern
and one for the audio loop. The audio loop may be
multiples of the drum pattern loop in length.
How to make an initial DRUM loop:
• Arm loop recording by tapping LOOP.
•
Press KICK, SNARE or HEADPHONE (for hi-hat) to start
drum loop recording, then tap in a drum pattern.
• Press LOOP to set the loop point.
How to add an AUDIO loop:
• Press LOOP to initiate audio recording while the
drum loop plays.
• Press LOOP to set the audio loop length
(can be a multiple of the drum loop length).
How to start with audio loop
(with no DRUM loop):
• Arm loop recording by tapping LOOP.
• Press LOOP to start audio loop recording.
• Press LOOP to set the loop point.
How to add Drums or Audio to
your loop at any time during
Loop playback:
• Press LOOP to toggle overdub mode.
• Press Tap Button.
How to Delete Loop:
• Double press and hold LOOP.
SAMPLE BUTTON
• Hold REC while singing into a microphone to record
audio for sample playback.
• Play a MIDI instrument into the product for
pitch-attened sample playback.
• Press MODE to toggle from sample playback to MIDI
notes operation.
• Press PLAY to play back the sample as recorded.
•
Hold MODE while turning knob to set re-trigger sample
playback, legato sample playback, looped re-trigger
sample playback or looped legato sample playback.
LEGALDISCLAIMER
Music Tribe accepts no liability for any loss which may be suered by any person who relies either wholly or in part upon any description,
photograph, or statement contained herein. Technical specications, appearances and other information are subject to change without notice.
All trademarks are the property of their respective owners. Midas, Klark Teknik, Lab Gruppen, Lake, Tannoy, Turbosound, TC Electronic, TC Helicon,
Behringer, Bugera and Coolaudio are trademarks or registered trademarks of Music Tribe Global Brands Ltd. © Music Tribe Global Brands Ltd.
2018 All rights reserved.
LIMITEDWARRANTY
For the applicable warranty terms and conditions and additional information regarding Music Tribe’s Limited Warranty, please see complete details
online at musictribe.com/warranty.
Zhongshan Eurotec Electronics Limited
No. 10 Wanmei Road, South China Modern Chinese Medicine Park, Nanlang Town, 528451, Zhongshan City, Guangdong Province, China
Eect Application Table
Note: the Morph block does not apply to the Lead Voice when Sample block is enabled.
*Acts as Natural Shift on Sample Playback.
** The SideChain Pumping eect is caused by the kick drum on the rest of the signals - so you need to be hearing kick drum to experience this eect.
Eect Lead Voice
Sample/
MIDI Voice
Looped Audio Drums
Double x
Morph style 1: Natural Shift x x
Morph style 2: Warp Shift* x x
Morph style 3-11 : Synth Vocoder x x
Hardtune x
XFX style 1: Stutter x x
XFX style 2: Mono Chopper x x
XFX style 3: Stereo Chopper x x
XFX style 4: Ring Mod x x
XFX style 5: Stereo Flange x x x x
XFX style 6: Mono Flange x x x x
XFX style 7: SideChain Pumping** x x x
Echo x x
Filter style 1: HPF/LPF lter x x x x
Filter styles 2-5 x x
Install Drivers
In order for PERFORM-VE to send audio or MIDI to your
computer, youll need to install a driver. It can be found
here: tc-helicon.com/products/perform-ve/support/
Update Your Device!
After installing the driver, it is highly
recommended that you update your product
via our VoiceSupport application. Firmware updates
provide new features and stability xes.
Download VoiceSupport -
https://www.tc-helicon.com/brand/tchelicon/support
Connect PERFORM-VE to your computer using the
included USB cable.
Start the VoiceSupport application.
Follow on-screen prompts to update.
Power Supply
12 V / >1A
Full Manual
Visit the product page on tc-helicon.com to download
the full manual for a complete description of the
PERFORM-VEs functionality.
  • Page 1 1
  • Page 2 2

TCHELICON Perform-Ve Quick start guide

Type
Quick start guide

Ask a question and I''ll find the answer in the document

Finding information in a document is now easier with AI