Page is loading ...

PR150/300 and IP150 Drip Tray Drain Tube Fix Installation Instructions
© 2004-2015, Cornelius Inc. - 1 - Publication Number: 629088470INS
INSTALLATION INSTRUCTIONS
PR150/300 & ip150 Drip tray Drain tube Fix
SAFETY INSTRUCTIONS
!
WARNING:
Before starting installation, read and understand all safety label and warnings on the machine. Also review and
understand all safety instructions in the owners, installation and service manuals.
Failure to comply could result in serious injury, death or damage to the equipment.
QUALIFIED SERVICE PERSONNEL
!
WARNING:
Only trained and certified electrical, plumbing and refrigeration technicians should service this unit.
All wiring and plumbing must conform to national and local codes. Failure to comply
could result in serious injury, death or equipment damage.
SAFETY PRECAUTIONS
This unit has been specifically designed to provide protection against personal injury. To ensure continued
protection observe the following:
!
WARNING:
Disconnect power to the unit before servicing. Follow all lock out/tag out procedures established by the user. Verify
all power is off to the unit before performing any work.
Failure to comply could result in serious injury, death or damage to the equipment.
CAUTION:
!
Always be sure to keep area around the unit clean and free of clutter.
Failure to keep this area clean may result in injury or equipment damage.
Revision Date: January 20, 2015 www.cornelius.com Rev: F

PR150/300 and IP150 Drip Tray Drain Tube Fix Installation Instructions
Publication Number: 629088470INS - 2 - © 2004-2015, Cornelius Inc.
INSTRUCTIONS
!
WARNING:
Disconnect power to the unit before servicing. Follow all lock out/tag out procedures established by the user. Verify
all power is off to the unit before performing any work.
Failure to comply could result in serious injury, death or damage to the equipment.
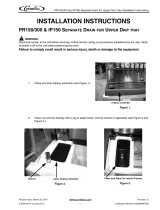
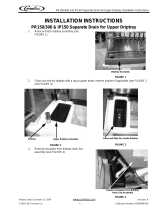
1. Raise and lock upper driptray assembly (see
Figure 1).
Figure 1.
2. Clean out and dry driptray with a rag or paper towel, remove strainer if applicable (see Figure 2 and
Figure 3).
Figure 2.
Figure 3.

PR150/300 and IP150 Drip Tray Drain Tube Fix Installation Instructions
© 2004-2015, Cornelius Inc. - 3 - Publication Number: 629088470INS
3. Cut existing driptray drain line assembly and discard
(see Figure 4).
Figure 4.
4.
Remove damaged drain tube and 45° elbow (see
Figure 5).
Figure 5.
5. Using a screwdriver, clean out as much foam to be
able to remove drain stub from underneath
driptray(see Figure 6).
IMPORTANT:
!
BE CAREFUL NOT TO DAMAGE DRIPTRAY!
6. From underneath, drill a 1-3/8” hole (hole saw
provided in kit) into bottom of driptray. Center new hole
as much as possible with existing hole.
7. Clean and deburr new hole as much as possible.
Figure 6.

PR150/300 and IP150 Drip Tray Drain Tube Fix Installation Instructions
Publication Number: 629088470INS - 4 - © 2004-2015, Cornelius Inc.
8. Install through the top of the driptray and re-center
new fitting into driptray bottom. Be sure O-Ring is
installed (see Figure 7).
9. From underneath, using nut (supplied in kit) to tighten
down fitting.
Figure 7.
10. Re-plumb and insulate drain line onto unit. Insulation and PVC fittings/pipe are supplied with the kit (see
Figure 8 for assembly and cut lengths, see Figure 9 for completed assembly).
IMPORTANT:
!
BE SURE TO USE A NSF APPROVED PVC CLEANER AND SOLVENT FOR ASSEMBLY!
11. Re-install driptray strainer (a strainer is supplied in the kit if one was not supplied with the unit).
12. Check driptray, fittings, and lines for leaks.
13. Lower upper driptray assembly.

PR150/300 and IP150 Drip Tray Drain Tube Fix Installation Instructions
© 2004-2015, Cornelius Inc. - 5 - Publication Number: 629088470INS
Figure 8. Assembly of New Drain Line
Figure 9. Completed Assembly
Note: Assemble this end to the upper drip tray.
/
