Page is loading ...

June
1976
FORM:
OM-1514
Effective
With
Serial
No.
HG030280
MODEL
FA
Automatic
Welding
Control
STOCK
NO.
079
197
ADDITIONAL
COPY
PRICE
50
CENTS
MODEL/STOCK
NO.
SERIAL/STYLE
NO.
DATE
PURCHASED
OWNERS
MANUAL
MILLER
ELECTRIC
MFG.
CO.
APPLETON,
WISCONSIN,
USA
54911
NWSA
CODE
NO.
4579
U.S
S.

LIMITED
WARRANTY
MILLER
Electric
Mfg.
Co.,
Appleton.
Wisconsin,
warrants
all
new
equipment
to
be
free
from
defects
in
material
and
factory
workmanship
for
the
periods
indicated
below,
provided
the
equipment
is
installed
and
operated
according
to
manufacturers
instructions.
~
I
I
I
I
:
MILLER
Electric
Mfg.
Co.s
obligation,
underthis
warranty,
is
expressly
limited
to
replacing
or
repairing
I
:
any
defective
part
or
correcting
any
manufacturing
defect
without
charge
during
the
warranty
period
if
MILLERS
inspection
confirms
the
existence
of
such
defects.
MILLERS
option
of
repair
or
replacement
will
be
f.o.b.
factory
at
Appleton,
Wisconsin
or
Lo.b.
a
MILLER
authorized
service
facility,
and
therefore
no
compensation
for
transportation
costs
of
any
kind
will
be
allowed.
I
I
The
warranty
period,
beginning
on
the
date
of
sale
to
the
original
purchaser-user
of
the
equipment,
will
be
as
follows:
I
1.
Arc
welders,
power
sources,
and
components
1
year
2.
Original
main
power
rectifiers
3
years
(unconditionally)
3.
20E,
20K,
and
all
welding
guns.
90
days
4.
All
other
Millermatic
Feeders
1
year
5.
All
engines
1
year
~
Engine
Warranties
are
covered
by
the
engine
manufacturers,
subject
to
their
procedures
and
to
be
handled
through
their
authorized
local
Service
Stations
or
agencies.
No
warranty
will
be
made
in
respect
to
trade
~
accessories,
such
being
subject
to
the
warranties
of
their
respective
manufacturers.
~
MILLER
Electric
Mfg.
Co.
will
not
be
liable
for
any
loss
or
consequential
damage
or
expense
accruing
directly
or
indirectly
from
the
use
of
equipment
covered
in
this
warranty.
~
C)
C)
C)
This
warranty
supersedes
all
previous
MILLER
warranties
and
is
exclusive
with
no
other
guarantees
or
C
warranties
expressed
or
implied.
c
4

ERRATA
SHEET
After
this
manual
was
printed,
refinements
in
equipment
design
occurred.
This
sheet
lists
exceptions
to
data
appearing
later
in
this
manual.
AMENDMENT
TO
SECTION
4
TROUBLESHOOTING
NOTEJ
The
circuit
diagram(s)
on
this
supplement
replace
any
other
circuit
diagram(s)
appearing
later
in
this.~
-
~manuaI.
Amend
Figure
4-2
and
4-3
as
follows:
US,
fr-f,
JUIIM
~OE
CSflES
I&U
~g
,~
Figure
4-2.
Circuit
Diagram
For
Standard
Models
Circuit
Diagram
No.
B.039
422-B
Circuit
Diagram
No.
B-052
513
Figure
4-3.
Circuit
Diagram
For
Models
With
Pre-FIow
And
Post-Flow
Options
OM-1514
Page
A


TABLE
OF
CONTENTS
Section
No.
Page
No.
SECTION
1
INTRODUCTION
1-1.
General
1
1
-
2.
Receiving-Handling
1
1
-
3.
Description
1
1-4.
Safety
1
SECTION
2
INSTALLATION
2-1.
Location
2
2
-
2.
Electrical
Input,
Contactor,
And
Voltmeter
Connections
2
2
-
3.
Secondary
Connections
2
2
-
4.
Weld
Head
Motor
Connections
3
2
-
5.
Shielding
Gas
Connections
3
2
-
6.
Fixture
Drive
Motor
Connections
3
2
-
7.
Fixture
Limit
Switch
3
2
-
8.
Water
Connections
3
2
-
9.
Flux
Hopper
Connections
3
SECTION
3
FUNCTION
OF
GENERATOR
CONTROLS
3
-
1.
Weld
Control
Cycle
4
3-
2.
Power
Switch
4
3-3.
Pilot
Light
4
3
-
4.
Wire
Feed
&
Weld
Current
Control
4
3
-
5.
Weld
Start
Push
Button
Switch
4
3
-
6.
Stop
Push
Button
Switch
4
3-
7.
Inch
Up
&
Inch
Down
Switches
4
3
-
8.
Purge
Push
Button
Switch
4
3-9.
Meters
4
3-10.
Run-In
Speed
Control
4
3-11.
Burn-Back
Time
Control
5
3-12.
Pre-FlowTimeControl
5
3-13.
Post-Flow
Time
Control
5
3-14.
Crater
Time
Control
5
3-15.
Crater
Speed
Control
5
SECTION
4
TROUBLESHOOTING
PARTS
LIST

a

SECTION
1
-
INTRODUCTION
Electrical
Input
To
Weld
Control
Overall
Dimensions
(Inches)
Weight
(Pounds)
Net
Ship
115
Volts
AC
Single-Phase
60
Hertz
Height-
21-1/2
Width
-
12
Depth
-
7-1/2
55
65
Figure
1-1.
Specifications
1-1.GENERAL
This
manual
has
been
prepared
especially
for
use
in
familiar
izing
personnel
with
the
design,
installation,
operation,
main
tenance,
and
troubleshooting
of
this
equipment.
All
informa
tion
presented
herein
should
be
given
careful
consideration
to
assure
optimum
performance
of
this
equipment,
1
-2.
RECEIVING-HANDLING
Prior
to
installing
this
equipment,
clean
all
packing
material
from
around
the
unit
and
carefully
inspect
for
any
damage
that
may
have
occurred
during
shipment.
Any
claims
for
loss
or
damage
that
may
have
occurred
in
transit
must
be
filed
by
the
purcha5er
with
the
carrier.
A
copy
of
the
bill
of
lading
and
freight
bill
will
be
furnished
by
the
carrier
on
request
if
Occasion
to
file
claim
arises.
When
requesting
information
concerning
this
equipment,
it
is
essential
that
Model
Description
and/or
Stock
Number
and
Serial
(or
Style)
Numbers
of
the
equipment
be
supplied.
1
-
3.
DESCRIPTION
This
weld
control
is
designed
to
automatically
cycle
prepro
grammed
welding
events
and
provide
constant
welding
wire
feed
speed
regardless
of
varying
weld
head
motor
load
condi
tions.
The
standard
weld
control
has
provisions
to
program
the
welding
wire
RUN-IN
SPEED,
the
welding
wire
feed
speed,
and
the
BURN-BACK
TIME.
Normally
open
and
normally
closed
contacts
are
provided
to
start
and
stop
the
welding
fixture
and
terminals
are
provided
for
connection
of
an
elec
trically
controlled
flux
hopper.
(MIG)
or
submerged
arc
welding.
It
other
welding
power
sources
(droopers)
are
to
be
used,
contact
the
manufacturer
of
the
weld
control
for
instructions.
1
-4.
SAFETY
The
following
definitions
apply
to
CAUTION,
IMPORTANT,
and
NOTE
blocks
found
throughout
this
manual:
CAUTION
Under
this
heading,
installation,
opera~,
and
main
tenance
procedures
or
practices
will
be
found
that
if
not
carefully
followed
may
create
a
hazard
to
per
sonnel.
I
I
E~TAr1
Under
this
heading,
installation,
operating,
and
main
tenance
procedures
or
practices
will
be
found
that
if
not
carefully
followed
may
result
in
damage
to
equip
ment.
Options
provide
for
programming
PRE-FLOW
TIME,
CRATER
TIME,
CRATER
SPEED,
and
POST-FLOW
TIME,
This
weld
control
can
be
used,
in
conjunction
with
a
constant
potential
welding
power
source,
for
either
Gas
Metal
Arc
I
Under
this
heading,
explanatory
statements
will
be
found
that
need
special
emphasis
to
obtain
the
most
efficient
operation
of
the
equipment.
I
Figure
2-1.
Overall
Dimensions
and
Mounting
Hole
Layout
TB-007
136
I
I
r~L1
SECTION
2
-
INSTALLATION
Front
View*
Rear
View
*
DImension
Of
Case
Only,
Leave
Sufficient
Clearance
For
Connections
And
Ventilation
OM-1514
Page
1

2-
1.
LOCATION
(Figure
2-1)
B.
Contactor
Connections
A
proper
installation
site
should
be
selected
for
the
weld
control
if
the
unit
is
to
provide
dependable
service,
and
re
main
relatively
maintenance
free.
A
proper
installation
site
permits
freedom
of
air
movement
into
and
out
of
the
weld
control,
and
also
least
subjects
the
unit
to
dust,
dirt,
moisture,
and
corrosive
vapors.
The
instal
lation
site
should
also
permit
easy
access
to
the
weld
control
for
operational
and
maintenance
functions.
Lead
lengths
must
be
considered
when
locating
the
control.
Holes
are
provided
in
the
weld
control
back
panel
and
bot
tom
plate
for
mounting
purposes.
Figure
2-1
gives
overall
dimensions
and
mounting
hole
layout.
Connect
a
two
lead
control
cable
between
the
contactor
receptacle
RC3
(Figure
2-2)
on
the
weld
control
and
the
115
volt
contactor
control
circuit
on
the
welding
power
source.
A
plug
(PLG3),
which
will
mate
to
receptacle
RC3,
is
furnished
with
the
weld
control.
Use
size
18
AWG
or
larger
control
cable.
C.
Voltmeter
Connections
Locate
terminal
62
on
the
terminal
strip,
which
is
mounted
inside
on
the
left
side
of
the
weld
control
(Figure
2-3).
Con
nect
a
size
18
AWG
or
larger
lead
from
terminal
62
to
either
the
work
terminal
of
the
welding
power
source
or
the
work.
Current
Shunt
Clamp
Cable
Reed
Switch
Bracket
TA-007
135
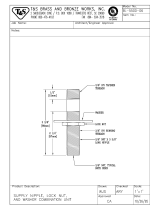
Figure
2-2.
External
Connections
2-2.
ELECTRICAL
INPUT,
CONTACTOR,
AND
VOLT
METER
CONNECTIONS
(Figure
2-2)
Ensure
that
the
115
volts
ac
power
supply
and
welding
power
source
are
deenergized
before
electrical
connec
tions
are
made.
Do
not
connect
the
conductors
to
the
115
volts
ac
power
supply
and
welding
power
source
until
all
electrical
connections
have
been
made
to
the
weld
control.
A
cable
access
hole
and
1/2
cable
clamp
is
provided,
on
the
left
side
panel
of
the
weld
control,
for
this
lead.
A.
Electrical
Input
Connections
Locate
the
supplied
electrical
input
cord
labeled
115
volts.
Insert
PLG1
into
the
115V
and
WELDER
receptacle
RC1
(Figure
2-2).
Rotate
the
plug
threaded
outer
ring
clockwise
onto
the
receptacle
threaded
body
as
far
as
possible.
Connect
the
three
prong
plug
to
a
115
volts
ac,
single
phase,
60
hertz
power
supply.
It
is
recommended
that the
welding
power
source
115
volts
ac
receptacle
be
used
as
the
115
volts
ac
power
supply.
If
it
is
necessary
to
connect
a
longer
cable,
connect
pins
A
and
B
to
the
115
vac
power
supply
and
pin
C
to
a
proper
ground.
Use
whatever
grounding
method
that
is
acceptable
to
the
local
electrical
inspection
authority.
CAUTION
I.
Pin
C
of
RC1
is
connected
to
the
weld
control
chassis
and
is
for
grounding
purposes
only.
Do
not
connect
pin
C
to
any
one
of
the
115
volts
ac
power
supply
terminals
as
this
will
result
in
an
electrically
hot
weld
control
chassis.
Connect
cables
of
suitable
length,
size,
and
construction
between
the
following
points
for
reverse
polarity
welding:
I
1.
Welding
power
source
positive
(+)
secondary
terminal
to
the
left
side
of
the
current
shunt
on
the
weld
control.
A
cable
clamp
is
provided
to
secure
this
cable.
2.
Weld
cable
terminal
on
the
gun
to
the
right
side
of
the
current
shunt
on
the
weld
control.
This
cable
must
be
routed
through
the
reed
switch
bracket.
3.
Welding
power
source
negative
I-)
secondary
terminal
to
the
weidment
(workpiece).
NOTE
If
the
welding
process
requires
straight
polarity,
reverse
the
leads
at
the
welding
power
source
and
re
verse
the
leads
on
the
weld
control
voltmeter
and
ammeter.
I
I
U
1/2
Cable
Clamp
From
0
_
a
_
0
0
000000
0
.0
0
Water
From
Supply
(optional)
I
.
2
-
3.
SECONDARY
CONNECTIONS
(Figure
2-2)
NOTE
U
I
All
directions,
such
as
right
or
left,
are
with
respect
to
the
operator
facing
the
weld
control
front
panel.
I
-
Page
2

2-4.
WELD
HEAD
MOTOR
CONNECTIONS
(Figure
2-2)
Locate
the
supplied
weld head
motor
control
cable.
Insert
plug
PLG2
into
the
WELD
HEAD
MOTOR
receptacle
RC2
on
the
weld
control.
Rotate
the
plug
threaded
outer
ring
clockwise
onto
the
receptacle
threaded
body
as
far
as
pos
sible.
Insert
the
plug
on
the
opposite
end
of
this
cable
into
the
receptacle
on
the
weld
head
motor.
Rotate
the
plug
threaded
outer
ring
clockwise
onto
the
receptacle
threaded
body
as
far
as
possible.
2-5.
SHIELDING
GAS
CONNECTIONS
Connect
a
hose
of
suitable
length
and
construction
from
the
shielding
gas
supply
to
the
weld
control
GAS
FROM
SUP
PLY
connector.
The
gas
flow
must
be
accurately
controlled
with
the
aid
of
a
regulator
and
flowmeter.
Connect
the
supplied
hose
from
the
weld
control
GAS
TO
WELD
HEAD
connector
to
the
weld
head.
Both
of
the
weld
control
gas
connectors
have
518-18
right
handed
threads.
Terminals
1
&
15
To
Fixture
Limit
Switch
Terminal
62
To
Voltmeter
Terminals
24
-
26
To
Fixture
Drive
Motor
Figure
2-3.
Internal
Connections,
TA-007
139
2-6.
FIXTURE
DRIVE
MOTOR
CONNECTIONS
(Figure
2-3)
Connect
fixture
drive
motor
circuits
requiring
a
normally
open
contact
to
terminals
24
and
26
of
the
weld
control.
Connect
fixture
drive
motor
circuits
requiring
a
normally
closed
contact
to
terminals
24
and
25
of
the
weld
control.
Refer
to
the
circuit
diagram
(Figure
4-2
or
4-3)
for
proper
Connections.
A
1/2
cable
clamp
and
access
hole
is
provided.
in
the
left
side
of
the
weld
control,
for
this
purpose.
If
a
crater
fill
option
is
supplied
but
a
pre.flow
option
is
not
supplied
and:
1.
It
is
desired
to
have
the
fixture
travel
during
crater
fill.
Move
the
jumper
to
terminals
57
and
58.
2.
It
is
desired
to
have
the
fixture
stop
during
crater
fill.
Move
the
jumper
to
terminals
56
and
58.
If
a
crater
fill
and
a
pre-flow
option
are
both
supplied
and:
1.
It
is
desired
to
have
the
fixture
wait
for
pre-flow
and
travel
during
crater
fill.
Move
the
jumper
to
terminals
57
and
59.
2.
It is
desired
to
have
the
fixture
wait
for
pre-flow
and
stop
during
crater
fill.
Move
the
jumper
to
terminals
56
and
59.
2
-7.
FIXTURE
LIMIT
SWITCH
(Figure
2-3)
If
it
is
desired
to
stop
the
fixture
travel,
and
start
the
weld
stop
cycle,
at
a
certain
fixture
position,
remove
the
jumper
from
terminals
1
and
16
and
connect
a
fixture
limit
switch
(normally
closed)
between
these
terminals.
2
-
8.
WATER
CONNECTIONS
(Optional)(Figures
2-2
and
2-3):
Connect
one
of
the
supplied
ten-foot
water
hoses
from
the
water
source
to
the
weld
control
WATER
FROM
SUPPLY
connector.
Connect
the
other
supplied
water
hose
from
the
weld
control
WATER
TO
WELD
HEAD
connector
to
the
weld
head.
Both
of
the
weld
control
water
connectors
have
5/8-18
left
hand
threads.
If
it
is
desireable
to
have
constant
water
flow
through
the
welding
gun
whenever
the
welding
control
power
switch
is
in
the
ON
position,
disconnect
the
water
solenoid
lead
from
terminal
27
and
connect
it
to
terminal
Z18.
2
-
9.
FLUX
HOPPER
CONNECTIONS
(Optional)
(Figure
2-3)
If
the
weld
control
is
to
be
used
for
submerged
arc
welding,
with
an
electrical
controlled
flux
hopper,
connect
a
two
lead
control
cable
from
terminals
27
and
28
of
the
weld
control
to
the
flux
hopper
solenoid
coil
(polarity
unimportant).
Use
size
18
AWG
or
larger
control
cable.
*Optional
Figure
3-1.
Weld
Control
Cycle
I
,
I
I
I
I
__________Post-Flow
_________
Ii
05-1.5
Sec.
I
Burn-Back
~~~~
I
.02
-
.3
Sec
I
F
G
TA-007
123
a______
_______
1:1
I:
I:
r:1:1:~
T.rminals
27
&
29
To
Flux
Hoppsr
And
Water
Solenoid
(Optional)
Terminals
5s
.59
Terminal
Z17
SECTION
3-FUNCTION
OFGENERATOR
CONTROLS
a
(A
II
DI
II
Run-In
I
I.
I
I
I
____________
Weld
______________
0
-
Infinity
I
A
B
Time
0
E
OM-1514
Page
3

3-
1.
WELD
CONTROL
CYCLE
(Figure
3-1)
The
weld
control
will
automatically
cycle
events
and
provide
required
wire
feed
speed
as
illustrated
in
Figure
3-1.
Depressing
the
WELD
START
push
button
switch
will
start
the
cycle
at
Time
A
if
the
pre-flow
option
is
supplied
or
Time
B
if
the
pre-flow
option
is
not
supplied.
The
wire
will
run-in
at
a
speed
determined
by
the
RUN-IN
SPEED
control
until
initiation
of
the
arc
(Time
C).
Wire
will
then
be
fed
into
the
weld
at
a
speed
determined
by
the
WIRE
FEED
and
WELD
CURRENT
control,
and
welding
will
continue
until
the
stop
cycle
is
initiated
(Time
Dl.
The
stop
cycle
is
initiated
by
depressing
the
STOP
push
but
ton
switch,
or
fixture
travel
causing
the
fixture
limit
switch
to
open.
When
the
stop
cycle
is
initiated:
the
crater
timer
is
activated
and
the
wire
feeds
at
a
speed
determined
by
the
CRATER
SPEED
control
(optional)
until
the
timer
runs
out
at
Time
E.
The
wire
feed
will
stop
(Time
El,
and
the
burn-
back
timer
will
time
out
causing
the
welding
power
source
contactor
to
open
and
extinguish
the
arc
(Time
F).
If
the
post-flow
option
is
provided,
post-flow
will
be
initiated
at
Time
E
and
continue
until
the
post-flow
timer
runs
out
(Time
GI.
If
a
crater
till
option
is
not
supplied,
the
fixture
will
travel
until
the
stop
cycle
is
initiated.
If
a
crater
fill
option
is
sup
plied,
the
fixture
may
be
programmed
to
stop
before
or
travel
through
crater
fill
(Refer
to
item
2-61.
3-2.
POWER
SWITCH
(Figure
3-2)
Placing
the
power
switch
in
the
ON
position
will
apply
115
volts
ac
to
the
unit
and
thereby
place
it
in
an
operational
condition,
permitting
the
welding
cycle
to
start
when
the
WELD
START
push
button
is
depressed,
or
gas
or
flux
to
flow
when
the
PURGE
button
is
depressed.
Placing
the
power
switch
in
the
OFF
position
will
shut
the
weld
control
down.
~ILWiUIlL.]~~jJ
Even
though
the
POWER
switch
is
in
the
OFF
posi
tion
and
the
unit
is
apparently
shutdown,
115
volts
will
still
be
present
at
the
input
terminals
of
the
POWER
switch
for
as
long
as
the
115
volts
cable
is
connected
to
its
activated
source.
3-
3.
PILOT
LIGHT
(Figure
3-2)
The
pilot
light,
when
illuminated,
indicates
that
the
weld
control
is
energized.
*Pre.Flow
Time
Control
Run-In
Speed
Control
*Crater
Time
Control
Crater
Speed
Control
Burn-Back
Time
Control
*post.Flow
Time
Control~
The
WIRE
FEED
&
WELD
CURRENT
control
is
a
ten-turn
potentiometer
which
is
calibrated
in
turns
and
percent
of
turns.
The
control
accurately
adjusts
wire
feed
speed
but
does
not
directly
indicate
inches
per
minute
or
weld
current.
When
the
control
is
set
at
0,
wire
will
feed
at
the
slowest
speed;
when
set
at
10,
the
wire
will
feed
at
the
fastest
speed.
3-
5.
WELD
START
PUSH
BUTTON
SWITCH
(Figure
3-2)
Depressing
the
WELD
START
push
button
switch
will
start
the
preprogrammed
weld
cycle
(refer
to
item
3-1).
3-
6.
STOP
PUSH
BUTTON
SWITCH
(Figure
3-2)
Depressing
the
STOP
push
button
switch
will
initiate
the
stop
cycle
(refer
to
item
3-1).
3-7.
INCH
UP
&
INCH
DOWN
SWITCHES
(Figure
3-2)
Depressing
the
INCH
UP
switch
energizes
the
weld
head
motor
to
retract
the
welding
wire
from
the
weld
at
the
run-in
speed
established
by
the
RUN-IN
SPEED
control.
Depressing
the
INCH
DOWN
switch
energizes
the
weld
head
motor
to
advance
the
welding
wire
to
the
weld
at
the
run-in
speed
established
by
the
RUN-IN
SPEED
control.
In
both
the
inch-up
and
inch-down
modes,
the
contactor
in
the
welding
power
source
and
the
gas
control
circuitry
re
main
deenergized.
3-
8.
PURGE
PUSH
BUTTON
SWITCH
(Figure
3-2)
The
PURGE
push
button
is
a
normally
open
momentary
con
tact
switch.
Depressing
the
push
button
will
energize
the
gas
or
flux
solenoid
thereby
purging
the
shielding
gas
line
to
the
gun
or
allowing
flux
to
flow.
If
an
optional
water
solenoid
is
supplied
and
connected
between
terminals
27
and
28,
water
will
flow
when
the
PURGE
push
button
switch
is
depressed.
3-
9,
METERS
(Figure
3-2)
This
weld
control
is
equipped
with
a
dc
ammeter
and
a
dc
voltmeter.
These
meters
are
connected
to
the
welding
power
source
output.
The
voltmeter
will
indicate
the
dc
voltage
at
the
welding
power
source
secondary
terminals,
but
will
not
necessarily
indicate
the
actual
voltage
at
the
welding
arc.
3-10.
RUN-IN
SPEED
CONTROL
(Figure
3-2)
The
RUN-IN
SPEED
control
provides
a
means
of
controlling
the
rate at
which
welding
wire
will
be
fed
prior
to
arc
initia
tion.
After
arc
initiation,
the
wire
feed
speed
is
governed
by
the
WIRE
FEED
&
WELD
CURRENT
control.
U
I
I
3-4.
WIRE
FEED
&
WELD
CURRENT
CONTROL
(Fig
ure
3-2)
The
WIRE
FEED
&
WELD
CURRENT
control
provides
a
means,of
controlling
the
rate
at
which
wire
is
fed
into
the
weld
during
the
weld
cycle.
DC
Ammeter
DC
Voltmeter
The
RUN-IN
SPEED
control
is
marked
0-10
for
reference;
when
set
at
0,
wire
will
feed
at
the
slowest
speed;
when
set
at
10,
wire
will
feed
at
the
fastest
speed.
Figure
3-2.
Front
Panel
Controls
tOptional
TA-007
137
Page
4

3-11.
BURN-BACK
TIME
CONTROL
(Figure
3-2)
The
BURN-BACK
TIME
control
adjusts
the
amount
of
time
occuring
between
the
time
the
welding
wire
feed
stops
and
the
contactor
in
the
welding
power
source
drops
Out,
thereby
regulating
the
amount
of
welding
wire
that
protrudes
beyond
the
end
of
the
contact
tube
at
the
completion
of
a
weld
cycle.
By
adjusting
this
control
properly,
the
welding
wire
will
neither
freeze
in
the
weld
puddle
nor
the
contact
tube.
The
BURN-BACK
TIME
control
is
marked
0-10
for
refer
ence.
Rotating
the
control
in
a
clockwise
direction
increases
the
amount
of
welding
wire
burn-back
toward
the
contact
tube.
The
POST-FLOW
TIME
control
is
provided
to
regulate
the
amount
of
time
gas
will
flow
after
the
arc
is
extinguished.
The
control
governs
the
operation
of
a
post-flow
timer
within
the
weld
control.
The
POST-FLOW
TIME
control
is
marked
0-10
for
reference.
Rotating
the
control
in
a
clockwise
direction
will
increase
post-flow
time.
If
the
control
is
used
with
an
electrically
controlled
flux
hopper
for
submerged
arc
welding.
the
POST-FLOW
TIME
control
should
be
set
to
minimum
to
prevent
excessive
flux
from
flowing
during
post-flow.
If
a
water
option
is
provided,
water
will
flow
during
post-
flow.
3-14.
CRATER
TIME
CONTROL
(Optional)(Figure
3-2)
The
CRATER
TIME
control
is
provided
to
regulate
the
amount
of
time
the
wire
feed
speed
will
be
controlled
by
the
CRATER
SPEED
control.
The
CRATER
TIME
control
is
marked
0-10
for
reference.
Rotating
the
control
in
a
clockwise
direction
increases
crater
fill
time.
3-15.
CRATER
SPEED
CONTROL
(Optional)(Figure
3-2)
The
CRATER
SPEED
control
is
provided
to
regulate
wire
feed
speed
during
the
crater
fill
portion
of
the
welding
cycle.
This
control
will
be
affected
by
the
setting
on
the
WI
RE
FEED &
WELD
CURRENT
control.
The
CRATER
SPEED
control
is
marked
0-10
for
reference.
Rotating
the
control
in
a
clockwise
direction
increases
wire
feed
speed
during
crater
fill.
3-12.
PRE-F
LOW
TIME
CONTROL
(Optional)(Figire
3-2)
The
PRE-FLOW
TIME
control
is
provided
to
regulate
the
amount
of
time
gas
or
flux
will
flow
before
the
welding
wire
is
fed
and
subsequent
arc
initiation.
The
control
governs
the
operation
of
a
pre-flow
timer
within
the
weld
control.
The
PRE-F
LOW
TIME
control
is
marked
0-10
for
reference.
Rotating
the
control
in
a
clockwise
direction
will
increase
pre-flow
time.
If
a
water
option
is
provided,
water
will
flow
during
pre-flow.
3-13.
POST-FLOW
TIME
CONTROL
(Optional)(Figure
3-2)
SECTION
4
-
TROUBLESHOOTING
The
following
chart
is
designed
to
diagnose
and
provide
remedies
for
some
of
the
common
troubles
that
may
develop
in
this
weld
control.
It is
assumed
that
proper
installation
has
been
made,
according
to
SECTION
2 of
this
manual,
and
that
the
weld
control
has
been
functioning
properly
until
this
trouble
developed.
Use
the
circuit
diagram
for
reference
while
performing
troubleshooting
procedures.
If
after
performing
these
procedures,
the
trouble
is
not
remedied,
it
is
recommended
that
the
nearest
authorized
service
station
be
contacted.
In
all
cases
of
equipment
malfunction,
the
manufacturers
recommendations
should
be
strictly
adhered
to.
TROUBLE
PROBABLE
CAUSE
REMEDY
Power
switch
(Si)
is
ON,
pilot
light
(PL)
does
not
illuminate,
115
vac
is
not
present
at
(RC1).
P~ssure
weld
control
is
connected
to
an
energized
115
vac
source.
If
connected
to
a
welding
power
source
assure
welding
power
source
is
ON.
Pilot
light
(PL)
burned
Out.
Replace
pilot
light
(PL).
Pilot
light
(PL)
illuminates,
wire
feed
motor
inoperative,
purge
operates.
Fuse
(F3)
open.
Replace
fuse
(F3),
Pilot
light
(PL)
illuminates,
wire
feed
motor
inoperative,
purge
inoperative.
No
water
pressure
(optional).
Turn
on
water
source.
Water
pressure
low
(optional).
If
water
pressure
is
less
than
20
Ibs,
adjust
the
water
pressure
switch
lS2).
Turning
the
adjustment
screw
counterclockwise
will
reduce
the
pressure
required
to
operate
the
switch.
Fuse
(Fl)
or
(F2)
open.
Replace
fuse
(Fl)
or
(F2).
Welding
cycle
starts
when
START
push
button
(PB1)
is
depressed
but
stops
as
soon
as
it
is
released.
Fixture
limit
switch
open.
Move
fixture
or
limit
switch
to
position
where
limit
switch
is
closed.
.
Fuse
opens
repeatedly
while
welding,
Improper
fuse.
Assure
that
slow-blow
type
fuses
are
being
used.
Standard
fuses
will
heat
on
motor
starts
and
may
open
at
low
motor
loads.
Overloaded
motor.
Assure
that
wire
reel
brake
and
feed
roll
pressure
are
properly
adjusted.
Assure
guides
and
feed
rolls
are
properly
aligned.
Assure
wire
feed
tube
and
tip
are
clean
and
free
of
obstructions.
Assure
wire
is
not
rusty
or
buckled,
OM-1514
Page
5

Power
Switch
ON
I
Pilot
Light
Illuminates
I
Fixture
Limit
Switch
Is
Closed
Or
Jumper
Is
Between
Terminals
1
And
16
I
Water
Pressure
Is
Present
Or
Jumper
Is
Between
Terminals
Z17
&
Z18
I
P.U.
Picks
Up
D.O.
Drops
Out
-l
4
I
WELD
START
Switch
Is
Depressed
Figure
4-1.
Flow
Chart
4
I
to
4
2
0
I
0
0
-J
U
0.
Post-Flow
Relay
(P)
P.U.
(Optional)
I
Hold
Relay
(H)
P.U.
Without
Crater
Fill
Option
I
I
I
Gas
Solenoid
(GS1)
Energized
Gas
Flows
Flux
Solenoid
(HS1)
Energized
(Optional)
Flux
Flows
Water
Solenoid
(WS1)
Energized
(Optional)
Water
Flows
Fixture
Motor
Starts
,
lSeeltem2-6)
U
Weld
Relay
(W)
P.O.
I
Welding
Wire
Feed
Motor
Starts
Speed
Governed
By
RUN-IN
SPEED
(R3)
Arc
Initiated
Crater
Fill
Relay
(CF)
P.U.
(Optional)
Pre-Flow
Timer
Starts
(Optional)
I
Pre-Flow
Timer
Times
Out
I
Contacts
(PF)
Close
III--
I
Start
Relay
IS)
P.O.
I
Without
Post-Flow
Option
Flux
Solenoid
Gas
Solenoid
(HS1)
Energized
(GS1)
Energized
(Optional)
Gas Flows
Flux
Flows
Welding
Power
Source
Contactor
Energized
-1
Reed
Switch
(R)
Closes
I
CR1
P.O.
I
Water
Solenoid
(WS1)
Energized
(Optional)
Water
Flows
Fixture
Motor
Starts
(See
Item
2-6)
2
2
D
0
-j
w
I
Welding
Wire
Feed
Motor
Speed
Governed
By
WIRE
FEED
&
WELD
CURRENT
CONTROL
(Ri)
Page
6

Welding
Wire
Feed
Motor
Speed
Governed
By
CRATER
SPEED
(R5)
Dynamic
Brake
Applied
To
Welding
Wire
Feed
Motor
Fixture
Limit
Switch
Opens
OR
I
I
I
I
Crater
Fill
Circuit
Starts
Timing
-
Time
Governed
By
CRATER
TIME
(R4)
(Optional)
I
Crater
Fill
Circuit
Times
Out
I
Crater
Fill
Relay
(CF)
D.O.
I
Optional
I
Burn-Back
Circuit
Starts
Timing
-
Time
Governed
By
BURN-BACK
TIME
(R6)
I
Burn-Back
Circuit
Times
Out
I
Weld
Relay
(W)
D.O.
F
Welding
Power
Source
Contactor
Opens
01
Gas
Solenoid
(GS1)
0.0.
Post-Flow
Circuit
Starts
Timing
-
Time
Governed
By
POST-FLOW
TIME
(R23)
Post-Flow
Circuit
Times
Out
Post-Flow
Relay
(P)
D.O.
C.,
z
Figure
4-lA.
Flow
Chart
STOP
Push
Button
Depressed
I
Hold
Relay
(H)
D.O.
ci
0.
at
U
5)
ol
Fixture
Motor
Stops
(See
Item
2-6)
L________
Start
Relay
(S)
0.0.
0.
0
I
Cd,
-a
2
0
I
0.
0
-a
-J
U.
w
I
C.)
Reed
Switch
(A)
Opens
I
Arc
Extinguishes
CR1
0.0.
Fixture
Motor
Stops
(See
Item
2-6)
Flux
Solenoid
(HS1)
D.O.
(Optional
Water
Solenoid
(WS1)
D.O.
(Optionat
I
I
I
Gas
Flow
Flux
Flow
Water
Flow
Stops
Stops
Stops
-j
2
0
I
0.
0
0
-j
U.
U)
0
a
TB-007
122
OM-1514
Page
7

B-006
496-A
Circuit
Diagram
No.
B-006
458
Figure
4-3.
Circuit
Diagram
For
Models
With
Pre-Flow
And
Post-Flow
Options
S.
NOTE
I
USE
SR56
JUMPER
WHEN
CRATER
FILL
OPTION
IS
NOT
SUPPLIED.
WITH
CRATER
FILL
OPTION
MOVE
JUMPER
TO ST-SO
~O
OAvE
FIOTORE
TRAVEL
MOVE
JUMPER
TO
SR-NP
TO
HAVE
FIRTURE
STOP
DURING
CRATER
FILL
Figure
4-2.
Circuit
Diagram
For
Standard
Model
NOTE
I
USE
S759
JUMPER
WREN
CRATER
FILL
OPTION
IS
NOT
SUPPLIED.
WITH
CRATER
FILL
OPTION
MOVE
JUMPER
TO
ST-SR
TO
HAVE
FIOTURE
WAIT
FOR
PREFLOW
AND
TRAVEL
DURING
CHAFER
FILL
MOVE
JUMPER
TO
Se-SR
TO
VAVE
FIOTLJRE
WAIT
FORPREFLOW
UNOSTOPDURIFIGCRATCRFILL
Page
8

September
1976
FORM:
OM-1514A
Effective
With
Serial
No.
HG030280
MODEL
FA
Automatic
Welding
Control
STOCK
NO.
079
197
MODEL/STOCK
NO.
SERIAL/STYLE
NO.
DATE
PURCHASED
PARTS
LIST
MILLER
ELECTRIC
MFG.
CO.
APPLETON,
WISCONSIN,
USA
54911
NWSA
CODE
NO.
4579

6
Figure
A
Main
Assembly
TD-007
415
Fig.
D
23
13
C
20
Fig.
B
OM-1514
Page
1

Item
Dia.
Factory
No.
Mkgs.
Part
No.
Description
Quantity
Figure
A
Main
Assembly
1
074
934
CABLE,
power
-
motor
lOft
(consisting
of)
1
2
073511
.
RECEPTACLE,4socket97-3101A-20-4S
1
3
073
296
.
CLAMP,
cable
2
4
600
342
.
CORD,
portable
No.
16
4/c
(order
by
foot)
10
ft.
5
073
295
.
PLUG,
4
pin
97-3101A-20-4P
1
6
079
212
HOSE,
gas
10
ft
(consisting
of)
1
7
056
851
.
FITTING,
hose
-
brass
barbed
nipple
3/16
TBG
1
8
010606
.FITTING,hose-brassnut5/8-18RH
1
9
073 839
.
FITTING,
hose
-
brass
ferrule
0.410
ID
x
1/2
long
2
10
604 550
.
HOSE,
neoprene
No.
1
x
3/16
ID
(order
by
foot)
10
ft.
11
056 849
.
FITTING,
hose
-
brass
nut
No.
10
3/8-24
RH
1
12
073
827
.
FITTING,
brass
-
barbed
nipple
3/16
TBG
1
13
t079
172
HOSE,
water
10
ft
(consisting
of)
2
14
056
851
.
FITTING,
hose
-
brass
barbed
nipple
3/16TBG
1
15
010
607
.
FITTING,
hose
-
brass
barbed
nut
5/8
x
18
LH
1
16
073
839
.
FITTING,
hose-
brass
ferrule
0.410
ID
x
1/2
long
2
17
604
550
.
HOSE,
neoprene
No.
1
x
3/16
ID
(order
by
foot)
10
ft.
18
056 849
.
FITTING,
hose
-
brass
nut
No.
10
3/8-24
RH
1
19
073
827
.
FITTING,
brass
-
barbed
nipple
3/16
TBG
1
20
Figure
B
DOOR,
with
components
(attaching
hardware
A,C,D,E&G)(See
Page
4)
1
21
Figure
C
CONTROL
BOX,
with
components
(See
Page
6)
1
22
010
145
CLAMP,
nylon
1/2
dia
1
23
Figure
D
CONTROL
PANEL,
with
components
(attaching
hardware
B&F)(See
Page
8)
1
24
074 966
CORD
SET,
115
volts
(consisting
of)
1
25
073 690
-
CAP,
grounded
2P3W
1
26
073
296
-
CLAMP,
cable
1
27
600
341
.
CORD,
portable
No.
16
3/c
10
ft.
28
073
261
-
PLUG,
4
socket
97-3106A-20-4S
1
Attaching
Hardware
A
602
080
SCREW,
machine
-
steel
round
hd
8-32
x
3/8
B
601
924
SCREW,
cap
-
steel
hex
hd
1/4-20x
3/8
C
602
082
SCREW,
machine
-
steel
round
hd
8-32
x
1/2
D
604
624
SCREW,
machine
-
steel
filister
hd
1/4-20
x
1/2
E
602 200
WASHER,
lock
-
steel
split
No.
8
F
602
207
WASHER,
lock
-
steel
split
1/4
G
601
860
NUT,
steel
-
hex
6-32
tOptional
Equipment.
BE
SURE TO
PROVIDE
STOCK,
MODEL,
AND
SERIAL
NUMBERS
WHEN
ORDERING
REPLACEMENT
PARTS.
OM-1514
Page
2

page
3
B
DoOT~tth
Components
TO-0O~
416
I
67

Item
Dia.
Factory
No.
Mkgs.
Part
No.
Description
Figure
B
Door,
With
Components
(See
Fig.
A
Page
2
Item
20)
602
068
602
084
602
080
602
198
602
200
603
586
601
859
601
860
Attaching
Hardware
SCREW,
machine-
steel
round
hd
6-32
x
3/8
SCREW,
machine
-
steel
round
hd
8-32
x
5/8
SCREW,
machine
-
steel
round
hd
8-32
x
3/8
WASHER,
lock
-
steel
split
No.
6
WASHER,
lock
-
steel
split
No.
8
WASHER,
flat
-
steel
SAE
No.
6
NUT,
steel
-
hex
6-32
NUT,
steel
-
hex
8-32
Quantity
41
075
171
BRACKET,
mounting
-
components
(attaching
hardware
A,D&H)
1
42
073
476
CLAMP,
strap
-
rubber
3/8
wide
x
4-5/8
long
(attaching
hardware
A,D&G)
7
43
073
344
GROMMET,
rubber
1/2
ID
x
5/8
hole
x
1/16
groove
1
44
S,H,W
073396
RELAY,enclosed
ilOvoItsac3PDT
ii
pin
3
44
PF
t073
396
RELAY,enclosed
iiOvoItsac3PDT
ii
pin
1
45
CR1
034674
RELAY,enclosed
ll5voltsacDPDT
1
1
~
46
47
48
49
50
51
P
PFT
Ri
Si
F3
t034
730
t075
188
073
422
073363
073
467
*073
426
RELAY,
enclosed
-
plug
type
10,000
ohm
TIMER,
pre-flow
-
plug
in
8
pin
POTENTIOMETER,
WW
10
turn
2
watt
500
ohm
SWITCH,toggle
DPDT2Oamp
i25voltsac
HOUSING,
indicator
-
light
FUSE,
miniature
-
glass
slo-blo
5
amp
1
1
1
1
1
1
52
F1,2
*073
429
FUSE,
miniature
-
glass
slo-blo
15
amp
2
53
073
395
HOLDER
ASSEMBLY,
fuse
1/4
x
1-1/4
(attaching
hardware
A,D&G)
1
54
074
900
MOUNTING
PAD,
holder
-
fuse
1
55
PL1
*073
448
BULB,
indicator
light
0.25
watt
125
volts
1
56
073
424
DIAL,
micro
10
turn
1
57
A
079
426
METER,
amp
dc
0-800
scale
(attaching
hardware
F)
1
58
V
073
449
METER,
volts
dc
0-50
scale
(attaching
hardware
F)
1
59
NAMEPLATE
(order
by
stock,
model,
and
serial
numbers)
1
60
078
979
PANEL,
door
1
61
073
589
SIR
IP,
marking
-
terminal
20
amp
ii
pole
1
62
073
586
BLOCK,
terminal
20
amp
11
pole
(attaching
hardware
B,E&H)
1
63
C3,4
t073
451
CAPACITOR,electrolytic80uf
l5Ovolts
2
077361
BLANK,snap-in3/8inch
4
64
R24
t073
922
POTENTIOMETER,
1
turn
2
watt
25K
ohm
1
65
R3
073
918
POTENTIOMETER,
1
turn
2
watt
500
ohm
1
66
R17
074107
RESISTOR,carbonlwatt4700ohm
1
66
R20,22
t074
107
RESISTOR,carbon
1
watt
4700ohm
2
67
D3
073
555
DIODE,
rectifier
1
amp
600
volts
straight
polarity
1
67
D6,7,8
+073
555
DIODE,
rectifier
1
amp
600
volts
straight
polarity
3
68
R6
073
921
POTENTIOMETER,
carbon
1
turn
2
watt
10K
ohm
1
68
R4,23
t073
921
POTENTIOMETER,
carbon
1
turn
2
watt
10K
ohm
2
69
R5
t073
918
POTENTIOMETER,
carbon
1
turn
2
watt
500
ohm
1
70
PB5
073473
SWITCH,pushbutton
6amp
l2OvoIts
yellow
purge
1
71
D4
073612
THYRECTOR,6RS5VP6B
1
72
R18
073414
RESISTOR,WWfixed20wattl000ohm
1
73
PB3,4
073
472
SWITCH,
pushbutton
6
amp
120
volts
black
inch
2
74
PB2
073
471
SWITCH,
pushbutton
6
amp
120
volts
red
stop
1
75
PBI
073
470
SWITCH,
pushbutton
6
amp
120
volts
green
start
1
76
073
437
SOCKET,
tube
8
pin
(attaching
hardware
A,D&G)
1
76
t073
437
SOCKET,
tube
8
pin
(attaching
hardware
A,D&G)
2
77
073
430
SOCKET,
tube
ii
pin
(attaching
hardware
A,D&G)
3
77
t073
430
SOCKET,
tube
11
pin
(attaching
hardware
A,D&G)
1
78
R21
074
103
RESISTOR,
carbon
1
watt
1000
ohm
1
A
B
C
D
E
F
G
H
*Recommended
Spare
Parts.
tOptional
Equipment.
BE
SURE TO
PROVIDE
STOCK,
MODEL,
AND
SERIAL
NUMBERS
WHEN
ORDERING
REPLACEMENT
PARTS.
OM-1514
Page
4

p4
1%
0
C)
C)
0
0
0
C)
0
3
0
0
-4
b
/