Page is loading ...

Print Date:12/02/2010
Brainboxes Limited, Unit 3C, Wavertree Boulevard South, Wavertree Technology Park, Liverpool, L7 9PF, UK
Tel: +44 (0)151 220 2500 Fax: +44 (0)151 252 0446 Web: www.brainboxes.com Email: sales@brainboxes.com
PX-260, PX-701, PX-320, PX-324,
PX-313, PX-346, PX-335, PX-146,
PX-157, PX-475, PX-310, PX-368,
PX-387, PX-376
Product Manual

PX Range Product Manual Version 2.0 © Copyright Brainboxes Limited 2010 Page 2 of 37
Contents
1. Introduction.................................................................................................................................................... 4
1.1. The PCI Express PX- Range.................................................................................................................. 4
1.2. Supported Operating Systems................................................................................................................ 5
2. Installation Instructions.................................................................................................................................. 6
2.1. Windows XP and Windows Server 2003 Installation.............................................................................. 7
2.2. Windows Vista & Server 2008 64 & 32 bit Installation.......................................................................... 10
2.3. Windows 7/Server 2008 R2 .................................................................................................................. 13
3. Product Configuration.................................................................................................................................. 16
3.1. Finding your Brainboxes COM port....................................................................................................... 16
3.2. Changing your COM label..................................................................................................................... 17
3.3. Port Settings.......................................................................................................................................... 18
3.4. RS422/485 Settings.............................................................................................................................. 20
3.5. UART Settings ...................................................................................................................................... 22
3.6. Termination Resistors........................................................................................................................... 24
4. Uninstallation – Windows Server 2008/Vista/Server 2003/XP.................................................................... 25
5. Boost.PCIe Driver Upgrade / Rollback........................................................................................................ 28
5.1. Upgrading the Boost.PCIe Driver.......................................................................................................... 28
6. Troubleshooting and Testing....................................................................................................................... 29
6.1. Installation problems............................................................................................................................. 29
6.2. Communication Problems..................................................................................................................... 29
6.3. Testing your Serial COM port ............................................................................................................... 30
7. Lifetime Warranty and Support.................................................................................................................... 31
8. Technical Specifications.............................................................................................................................. 32
8.1. Supported Serial Settings ..................................................................................................................... 32
8.2. Device Pin-out....................................................................................................................................... 32
8.3. Company Accreditation......................................................................................................................... 33
8.4. Europe – EU Declaration of Conformity................................................................................................ 34
8.5. WEEE Directive (Waste Electrical and Electronic Equipment)............................................................. 34
8.6. RoHS Compliance................................................................................................................................. 34

PX Range Product Manual Version 2.0 © Copyright Brainboxes Limited 2010 Page 3 of 37
9. Copyright ..................................................................................................................................................... 36
10. Version History .......................................................................................................................................... 37

PX Range Product Manual Version 2.0 © Copyright Brainboxes Limited 2010 Page 4 of 37
1. Introduction
1.1. The PCI Express PX- Range
The PX-Range are PCI Express (PCIe) cards providing several RS232 and RS-422/485 9-pin COM ports
(see datasheets for alternatives) to any computer with a PCIe Lane. The advantage of Brainboxes PCI
Express cards is that they can fit into any standard 1x, 4x, 8x or 16x PCIe Lane.
Using the PCI Express card’s COM ports, all supporting 921,600 Baud, makes fast and effective
communication between multiple devices simple.

PX Range Product Manual Version 2.0 © Copyright Brainboxes Limited 2010 Page 5 of 37
1.2. Supported Operating Systems
The PCI Express PX Range can be used with the following Microsoft Operating Systems with the supplied
Boost.PCIe drivers;
• Windows Server 2008 R2
• Windows 7 32-bit
• Windows 7 64-bit
• Windows Server 2008 32-bit
• Windows Server 2008 64-bit
• Windows Vista 32-bit
• Windows Vista 64-bit
• Windows Server 2003 32-bit
• Windows Server 2003 64-bit
• Windows XP 32-bit
• Windows XP 64-bit
• Windows 2000
Brainboxes PCI Express Drivers have undergone Microsoft testing with the PX RS232 and RS422/485
family. Upon passing these tests, the drivers were signed by Microsoft, as an indication of their quality and
stability.

PX Range Product Manual Version 2.0 © Copyright Brainboxes Limited 2010 Page 6 of 37
2. Installation Instructions
PLEASE READ CAREFULLY
• For RS232 Cards, there are TWO Installation steps to installing the Boost.PCIe driver:
1. CARD driver
2. PORT driver
• For RS422/485 Cards, there are THREE Installation steps to installing the Boost.PCIe driver:
1. CARD driver
2. PORT driver
3. BASE SYSTEM DEVICE driver. This is the RS422/485 Controller
• Each step will take you through a full installation using the Found New Hardware wizard.
• Once the Card is installed, the Operating System will detect the COM Port. All you will need to do to
install the COM Port is to run through the same installation steps as the Card. This also applies to
the RS-422/485 Controller
• Follow the Operating System specific instructions below to start the installation procedure.
If you have any issues with installation, please follow the steps in Section 4: Uninstallation, then
attempt to install again. If you still have issues, see Section 6: Troubleshooting and Testing

PX Range Product Manual Version 2.0 © Copyright Brainboxes Limited 2010 Page 7 of 37
2.1. Windows XP and Windows Server 2003 Installation
Note: Images below show a PX-260 4 Port RS232 device as an example. The same installation steps
can be applied to all other products in the PCI Express range.
1. Turn off the PC (unplug from power socket) and insert the PCI Express Card into a free PCIe slot.
2. Turn the PC on.
3. Insert the Boost.PCIe CD
4. If you would like to install via Windows Update, select “Yes, this time only”. Otherwise Select ‘No,
not this time’ to install from the CD and click next.

PX Range Product Manual Version 2.0 © Copyright Brainboxes Limited 2010 Page 8 of 37
5. The Found New Hardware Wizard will then ask you to locate the software drivers.
If you have chosen to search Windows Update, select “Install the software automatically
(Recommended)”. This will take you to Step 7. If you wish to install from the Boost.PCIe CD,
select “Install from a list or specific location (Advanced)” and click next to point to the CD
drive.
6. Select to ‘Search for the best driver in these locations’ and then ‘Search removable media’, as
shown below. Click Next

PX Range Product Manual Version 2.0 © Copyright Brainboxes Limited 2010 Page 9 of 37
7. The Installer will copy across all the drivers and associated registry files. Click Finish when
complete.
8. If you are installing a mulitport card, you will need to install each port manually following
steps 4-7 when prompted for each port on your card.
9. If you are installing a 422/485 card, you will also need to install the “Base System Device”.
This is the 422/485 Controller for your card. Follow steps 4-7 again when prompted.
10. Once installed, you can check the COM Number of the Port, by opening Device Manager (See
Section 3.1: Finding your Brainboxes COM port). If you need to change the COM port number,
see Section 3.2 Changing Your COM Label.

PX Range Product Manual Version 2.0 © Copyright Brainboxes Limited 2010 Page 10 of 37
2.2. Windows Vista & Server 2008 64 & 32 bit Installation
Note: Images below show a PX-260 4 Port RS232 device as an example. The same installation steps
can be applied to all other products in the PX PCI Express range.
1. Turn off the PC (unplug from power socket) and insert the PCI Express Card into a free PCIe slot.
2. Turn the PC on.
3. Insert the Boost.PCIe CD
4. The Found New Hardware Wizard will come up. If your computer is set to check Windows Update
Automatically for a driver, then it could take longer for this screen to pop up.
5. Select ‘Locate and install driver software’.
6. NB Vista will enter the Security Check to ensure that you have initiated the installation (and not
some malicious program). Click Continue

PX Range Product Manual Version 2.0 © Copyright Brainboxes Limited 2010 Page 11 of 37
7. If you would like to install via Windows Update, select “Yes, this time only”. This will take you to
Step 9. Otherwise select ‘Don’t search online’ to install from the CD.
8. The Found New Hardware Wizard will then ask you to locate the software drivers. Ensure that the
CD is in the drive and click Next

PX Range Product Manual Version 2.0 © Copyright Brainboxes Limited 2010 Page 12 of 37
9. Once the driver has been installed, click Close.
• If you are installing a mulitport card, the Operating System will install each subsequent Serial
Port automatically.
• If you are installing a 422/485 card, you will also need to install the “Base System Device”.
This is the 422/485 Controller for your card. Follow steps 4-9 again when prompted.
• Once installed, you can check the COM Number of the Port, by opening Device Manager (See
Section 3.1: Finding your Brainboxes COM port). If you need to change the COM port number,
see Section 3.2 Changing Your COM Label.

PX Range Product Manual Version 2.0 © Copyright Brainboxes Limited 2010 Page 13 of 37
2.3. Windows 7/Server 2008 R2
Note: The following installation instructions use a PX-346, but the installation instructions are the
same for any PX card.
1. When you boot up your computer on Windows 7, Windows update will automatically search for the latest
drivers. If you have a connection to the internet, the drivers will be installed and the device will be ready
to use.
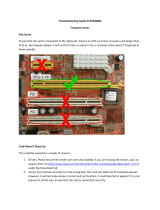
2. If there is no connection to the internet or the drivers can’t be found, a message will appear to tell you
that device driver software was not successfully installed.
3. To install the drivers Device manager will need to be opened. To open device manager go to the control
panel, system, hardware tab, then click on the device manager button.
4. Once this is open you will see the yellow ! icon in the other devices node. Right click on the device and
click on update driver software.

PX Range Product Manual Version 2.0 © Copyright Brainboxes Limited 2010 Page 14 of 37
5. If your Brainboxes card came with a CD insert it now and select to search automatically and the driver
software will be found and installed. Skip to step If not and you have a folder with the drivers, select to
browse your computer for the drivers.
6. Select the folder which contains the drivers that you want to install for your device.
7. The drivers will then be installed for the card.

PX Range Product Manual Version 2.0 © Copyright Brainboxes Limited 2010 Page 15 of 37
8. You will then need to install the Base System Device (RS422/485 devices only) and then install all of the
Serial ports using the same steps as above.
9. Once you have installed one of the ports you can scan for hardware changes and the other Serial Ports
will be installed automatically.

PX Range Product Manual Version 2.0 © Copyright Brainboxes Limited 2010 Page 16 of 37
3. Product Configuration
Note: Images below show a PX-260 4 Port RS232 device as an example. The same steps can be
applied to all other products in the PX PCI Express range.
3.1. Finding your Brainboxes COM port.
• Open Device Manager (Found by Right Clicking on My Computer and clicking Manage. Then Select
Device Manager from the left hand pane.) For Server 2008 users, Device Manager is found within
Diagnostics in Server Manager.
• Find the Brainboxes Serial Port entry in Device manager. (Found under the ‘Ports’ section)
• The Brainboxes Serial Port entry displays the current COM number in brackets after the name. (This
is usually COM3 following install, but may be different if other serial devices have been installed in
the past)
• To change your COM label, see Section 3.2: Changing your COM label

PX Range Product Manual Version 2.0 © Copyright Brainboxes Limited 2010 Page 17 of 37
3.2. Changing your COM label
• If you need to change the COM label, Double click on the Port entry in Device Manager
• Click on the ‘Port Settings’ tab and click Advanced
• A new COM Port label can be selected from the “Com Port Number” dropdown menu.

PX Range Product Manual Version 2.0 © Copyright Brainboxes Limited 2010 Page 18 of 37
• If the COM Port number is labelled “in use”, it is either currently used by a COM Port present on the
system, or is reserved for a device which is not currently present. It is possible to select this COM
number and force the change, if you are sure it is not required by any other device.
3.3. Port Settings
The Port Settings allow you to set Default or Override Settings for the serial communication and how to deal
with incoming hardware handshaking events.
• To open ‘Port Settings’, open device manager and Double Click on the Brainboxes COM Port Entry
under the ‘Ports’ section
• Then Click on the ‘Port Settings’ tab.

PX Range Product Manual Version 2.0 © Copyright Brainboxes Limited 2010 Page 19 of 37
• All options can be selected from the Dropdown Menus. In addition, you can enter a non-standard
value into the Baud rate
NB – Once the desired settings have been achieved, you must click OK to activate them. At anytime click
the ‘Restore Default’ button to return to the original setup.
Default / Override Settings
• The “Default Settings” will be set if an application does not specify the serial settings when it opens
the COM Port.
o This is sometimes the case with old Legacy applications and you will need to choose these
settings to match the communications that you wish to use.
o The majority of Applications will specify what Serial Settings they wish to use. In this case, it
will not matter what the Default settings are, as the Port will be opened with the Application’s
Settings.
• When the ‘Override’ box is checked next to the Default Setting, the Port will communicate at this
setting whether an application has requested it or not.
o For example, this will enable you to force baud rates that your application does not allow you
to select. This can be useful for interfacing to equipment which uses higher baud rates or
unusual baud rates, which your application does not support.
o In a case where you want to use hardware handshaking, but your application is not capable,
you can select RTS / CTS Always True – Hardware state ignored and choose to Override it.
o NB with the use of Override Settings, you need to ensure that the equipment you are
connecting to is setup to match the communications settings you are forcing.
CTS / DSR Always True
• CTS and DSR are incoming hardware handshaking lines. This means they receive signals from the
connected device which tell the ExpressCard when it is and isn’t OK to send data.
o Sometimes these signals may want to be ignored. By forcing CTS or DSR True, the
ExpressCard will ignore those signals and always send data.

PX Range Product Manual Version 2.0 © Copyright Brainboxes Limited 2010 Page 20 of 37
These settings are especially helpful when CTS and DSR are not physically connected (such as in a 3
wire setup) and it is not acceptable for the data flow to stop and start due to arbitrary variances on the
unconnected signal lines.
3.4. RS422/485 Settings
For RS422/485 products only, there is an additional tab in the Advanced Settings to allow you to change
duplex mode.
• The drop down list allows users to choose the desired RS422/485 operations mode.
• Select “RS422 full duplex mode” for Full Duplex communications.
• Select “RS485 half duplex autogating mode” for Half Duplex communications.
• For further details on wiring, see Section 8.2: Device Pinout
• Restore Defaults: Pressing this button will reset all settings on this Property Page back to the factory
defaults of this device. The default settings for this Property Page are “RS422 full duplex mode”.
Background Information:
• DTR/DSR Handshaking is not available on 422/485 devices.
• Full Duplex Mode
This mode is generally used between one transmitter / receiver to only one other transmitter /
receiver, but it is possible for each output to drive up to 10 receivers.
Generally, in RS422 systems, all 8 signal lines from the 9 pin D connector participate in the data
transfer sequence. Thus 4 twisted pair cables are used. One twisted pair carries the TXD data
outwards, one pair brings the RXD data inward, another pair carries the RTS handshaking signal
/