Page is loading ...


161103ronbow.eu | ronbow.comINSTALLATION SHEET
1
Model :
FREE Marble Floating Plane Sinktop
Designed By: DANELONMERONI | UK
E020731-8-CW
E020747-8-CW
E028015 towel bar
Tools Required
PRE-INSTALLATION
Materials Included
E020731
8 long screws
2 wall brackets
4 rubber levelers
4 leveling screws
E020747
12 long screws
3 wall brackets
6 rubber levelers
6 leveling screws
Materials Required
1 2x8 beam cut to size
Install 2x8 backing material behind the finished wall to
properly secure the vanity.
• To properly secure the vanity, the middle of the required
2x8 backing material must be 33-1/2” (85cm) from the
finished floor.
• Extend the backing material beyond the width of the
vanity to the nearest stud. This will ensure proper support
for the vanity.
• Front-notch the studs to ensure the 2x8 backing material
is flush against the studs.
• Secure the 2x8 backing material to the studs with
framing nails.
• Rough-in the water supply and drain lines into the rough-
in plumbing areas of the vanity.
INSTALLING SUPPORT FOR THE VANITY
2” x 8”
backing material
33-1/2” (85cm)*

161103ronbow.eu | ronbow.comINSTALLATION SHEET
2
Model :
FREE Marble Floating Plane Sinktop
Designed By: DANELONMERONI | UK
E020731-8-CW
E020747-8-CW
E028015 towel bar
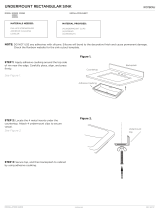
Figure 1.
Step 2: Place the left wall bracket on the left
outline and mark the location of the
bolt openings.
Repeat for the wall bracket on
the right.
Step 3: Secure each wall bracket to the wall
with the bolts provided.
Place the backsplash over the dry
wall area where the 2x8 was installed.
Verify the backsplash is level.
Draw the outline of the 2 openings
where the wall bracket will be installed.
Each bracket will have 4 bolts.
See Figure 1.
See Figure 1.
See Figure 2.
Step 1:
INSTALLATION
Figure 2.
NOTE: For the 47” model there will be
3 openings for the wall brackets.
NOTE: For the 47” model follow step 2
for each wall bracket.
See Figure 2.

161103ronbow.eu | ronbow.comINSTALLATION SHEET
3
Model :
FREE Marble Floating Plane Sinktop
Designed By: DANELONMERONI | UK
E020731-8-CW
E020747-8-CW
E028015 towel bar
See Figure 3.
See Figure 5.
Step 4:
Step 5:
Slide the backsplash over the
wall brackets.
Verify the backsplash is level.
If adjustments are necessary, repeat
steps 1 - 3.
Minor adjustments are sometimes
needed to level the stone.
Install two screws in each wall bracket.
These will act as levelers.
Make adjustments from the bottom of
the leveler using a screwdriver, then
verify the top is level.
Figure 3.
Figure 4.
Figure 5.
See Figure 4.
NOTE: See Figure 4 if installing the
47” model.

161103ronbow.eu | ronbow.comINSTALLATION SHEET
4
Model :
FREE Marble Floating Plane Sinktop
Designed By: DANELONMERONI | UK
E020731-8-CW
E020747-8-CW
E028015 towel bar
Figure 6.
Step 7: Fasten each bracket to the stone using
the screws provided.
Be careful not to over-tighten as this
can put unecessary pressure on
the stone.
Slide the stone top onto the wall
brackets and let it sit on the levelers.
See Figure 6.
See Figure 7.
Step 6:
Figure 7.

161103ronbow.eu | ronbow.comINSTALLATION SHEET
5
Model :
FREE Marble Floating Plane Sinktop
Designed By: DANELONMERONI | UK
E020731-8-CW
E020747-8-CW
E028015 towel bar
Figure 8.
Install the optional towel bar either
on left or right under side with the
3 screws provided with towel bar
(E028015-PC sold separately).
See Figure 8.
Step 1:
INSTALLING OPTIONAL TOWEL BAR

161103ronbow.eu | ronbow.comINSTALLATION SHEET
6
Model :
FREE Marble Floating Plane Sinktop
Designed By: DANELONMERONI | UK
E020731-8-CW
E020747-8-CW
E028015 towel bar
Natural Stone
Recommended Cleaning / Sealing Products
The fine furniture finish of your new vanity, mirror or other bathroom accessories are designed to
protect against normal home use. With proper care, your product will provide years of use and beauty
in your home.
General Care Tips
PRODUCT CARE AND MAINTENANCE
• After installing your vanity top, it is mandatory that you clean and seal the top to make the surface more
resistant to staining.
• Clean up any spills or liquids immediately. Never allow liquids of any kind to remain on the surface.
• Use a non-abrasive, damp cloth to wipe down surfaces.
• Use a gentle (pH balanced) detergent with warm water to clean the surface of your vanity top.
• DO NOT use any abrasive cleaning products that contain any of the following chemicals: trichloroethane or
methylene chloride (such as paint removers or strippers), hydrofluoric acid, liquid bluing or gentian violet.
• SCI Clean Enounters Spray Cleaner
• Simple Green Stone Cleaner
• Profession’s Choice - Miracle 511 H2O Plus Sealer
• SCI - Stone Spray-N-Seal
DISCLAIMERS: Eectiveness of cleaning your Ronbow products is dependent on various factors that include: water temperature, concentration and/or amounts
of cleansers. Because of these many dierent conditions, Ronbow cannot guarantee that the above Product Care & Maintenance methods will eectively clean
your product.
• Install 2x8 backing material behind the finish wall to properly secure the vanity.
• Test cleaning product on small, discrete area prior to applying to entire surface.
• Wipe surfaces frequently with dry, soft, non-abrasive and lint-free towel.
• Do not allow liquids and moisture to accumulate on the surface of products.
• For warranty information, please visit our website at www.ronbow.com or contact the Customer Service
Department at (510) 713-1188.

/