ATEN SN3101 Quick start guide

Type
Quick start guide

ATEN SN3101 is a versatile and feature-rich serial device server designed for flexible data transmission and communication. It enables users to connect serial devices to a network or the Internet, allowing remote access, monitoring, and control. With its multiple mounting options, including wall mounting and DIN rail mounting, the SN3101 offers convenient installation and deployment.

ATEN SN3101 is a versatile and feature-rich serial device server designed for flexible data transmission and communication. It enables users to connect serial devices to a network or the Internet, allowing remote access, monitoring, and control. With its multiple mounting options, including wall mounting and DIN rail mounting, the SN3101 offers convenient installation and deployment.

Package Contents
1
Restrictions and Requirements
2
3
Hardware Review (Front View)
1. Power LED
2. Link LED
3.10/100 Mbps Data LED
4. Tx/Rx (ACT) LED
5. Grounding Terminal
6. Serial Port
7. Reset Switch
1. DC Terminal
2. DC Jack
3. LAN Port
4
Hardware Review (Rear View)
1 SN3101 Serial Device Server
1 Power Adapter
1 DC Terminal Connector
1 Mounting Kit
1 User Manual
1 Quick Start Guide
1 Software CD
• Sun's Java 2 JRE 1.4.2 or higher must be installed on your computer. Java is available for
free download from the Sun Java website: http://java.sun.com
• The devices that connect to the SN3101 must support one of the following serial protocols:
• RS-232 (protocol or terminal operations)
• RS-422
• RS-485
• The Virtual COM port driver (Real COM port) support requires Windows 2000 or higher.
• Under Vista (32-bit version), only the administrator can install the Virtual Port
Management Utility – ordinary users can only operate the mapped Real COM ports.
• The current Linux TTY driver supports kernels up to version 2.6.19.
Mounting
5
For flexibility and convenience, the SN3101 can be wall mounted or DIN rail mounted, as
described in the sections that follow.
Wall Mounting
To wall mount the SN3101:
1. Use the smaller screws supplied with the Mounting Kit to screw the mounting brackets into
the back of the unit:
Note: If you use third party screws, the length of the shank (the threaded portion) must not
exceed 4.50 mm.
DIN Rail Mounting
To mount the SN3101 on a DIN rail:
1. Screw the mounting brackets to the back of the SN3101 as described in step 1 of the wall
mounting procedure.
2. Use the larger screws supplied with the Mounting Kit to screw the DIN rail brackets to the
mounting brackets – as shown in the diagram, below:
SN3101 Serial Device Server Quick Start Guide
© Copyright 2011 ATEN
®
International Co., Ltd. www.aten.com
Altusen and the Altusen logo are trademarks of ATEN International Co., Ltd.
All rights reserved. All other trademarks are the property of their respective owners.
This product is RoHS compliant PAPE-1214-Z00G Printing Date: 05/2011
5 6
7
1 2 3 4
1 2 3
3. Hang the unit on the DIN Rail.
2. Screw the mounting brackets to the wall.
Online Registration
International:
• http://support.aten.com
North America:
• http://www.aten-usa.com/product_registration
Technical Phone Support
International:
• 886-2-8692-6959
China:
• 86-10-5255-0110
Japan:
• 81-3-5615-5811
Korea:
• 82-2-467-6789
North America:
• 1-888-999-ATEN Ext: 4988
United Kingdom:
• 44-8-4481-58923
All information, documentation, and specifications contained in this media are subject to change without prior notification by the manufacturer.
Please visit our website to find the most up to date version.
Hardware Installation
6
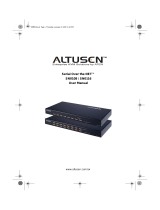
Refer to the Installation diagram as you do the following:
a. Use a null modem cable to connect the SN3101's serial port to your serial device.
b. Ground the device.
c. Plug the cable that connects the SN3101 to the network or the Internet into the LAN port.
d. Connect the DC power source to the device.
SN3101 Installation Diagram:
To install the SN3101, do the following:
1. If you intend to use the DC terminal, screw the DC terminal connector to the block – as
shown in the following diagram
Logging In
SN3101 operation is Internet browser based. To begin:
1. Open your browser and specify the IP address of the SN3101 you want to access in the
browser's URL location bar.
Note: If you are logging in for the first time, use SN3101’s default IP address:
192.168.0.10.
2. A Security Alert dialog box appears. Accept the certificate.
3. A login dialog box, like the one below, appears:
4. Provide a valid Username and Password (set up by the administrator), then Click Login to
continue.
Note: If you are the administrator, and are logging in for the first time, use the default
Username: administrator; and the default Password: password. For security
purposes, we strongly recommend you change these and give yourself a unique
Username and Password.
After you have successfully logged in, the Main Screen appears:
Operation
7
Specifications
8
d
d
12 – 48V
c
or
b
a
SN3101
Serial Device
Function Specification
Connectors
Serial 1 x DB-9 M (Black)
Network 1 x RJ-45 (Black)
Power
PWR1 1 x 2-pin Terminal Block (Green)
PWR2 1 x DC Jack (Black)
Switches Reset 1 x Semi-recessed Pushbutton
LEDs
Power 1 x Green
Link 1 x Green
10/100 Mbps 1 x Orange/Green
TxRx (ACT) 1 x Green
Power Input
PWR1 12—48V DC (2-pin Terminal Block)
PWR2 9—30V DC (Power Adapter Jack)
Power Adapter 100—240V AC; 50–60 Hz
Power Line Protection
4KV burst (EFT), EN61000-4-4 2KV surge,
EN61000-4-4
Power Consumption 9V, 2.7W
Interfaces
Serial
Standards RS-232/422/485; Software selectable
Baud Rate 460Kbps
RS-232 Signals TxD, RxD, RTS, CTS, DTR, DSR, DCD, GND
RS-422 Signals Tx+, Tx-, Rx+, Rx-, RTS+, RTS-, CTS+, CTS-, GND
RS-485 Signals Data+, Data-, GND
Serial Protection 15 KV ESD Protection for the serial port
Parity None, Even, Odd, Mark, Space
Stop Bits 5, 6, 7, 8
Flow Control None, XON/XOFF, RTS/CTS
Network
Standards 10/100BaseTX; Autosensing
Protection 1.5 KV Magnetic Isolation
Protocols
ARP, DHCP, DNS, HTTP, HTTPS, ICMP, IP, TCP,
UDP, NTP, PPP, RADIUS, Telnet, SNMP, SNMP
Trap, SMTP, SSH
Regulatory Approval FCC Class A, CE Class A, RoHS
Environment
Operating Temp. 0–60˚C
Storage Temp. -20–85˚C
Humidity 0–95% RH , Non-condensing
Physical
Properties
Housing Metal
Weight 0.22 kg
Dimensions (L x W x H) 10.69 x 7.90 x 2.44 cm
  • Page 1 1
  • Page 2 2

ATEN SN3101 Quick start guide

Type
Quick start guide

ATEN SN3101 is a versatile and feature-rich serial device server designed for flexible data transmission and communication. It enables users to connect serial devices to a network or the Internet, allowing remote access, monitoring, and control. With its multiple mounting options, including wall mounting and DIN rail mounting, the SN3101 offers convenient installation and deployment.

Ask a question and I''ll find the answer in the document

Finding information in a document is now easier with AI