Page is loading ...

Providing a brighter solution.™
Section 4:
Programming the Three-Circuit Clock
Mechanism
Overview of Three Circuit Clock Control Panel
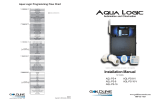
The Intermatic Three-Circuit Clock Control Panel is easy to program and capable of automatically
switching loads on three circuits according to a preset 24-hour daily schedule, and providing
control over a variety of different applications. Figure 4-1 shows the front of the mechanism.
PROGRAM BUTTON—used to
enter programming mode and
access different programming
features.
ENTER BUTTON—used to
save programming changes
to memory and exit
programming mode.
DISPLAY—Indicates time
of day and programming
settings during
programming mode.
ON/OFF BUTTONS—Turn
on and off circuit
functions.
CIRCUITS 1, 2, & 3—These six terminals are where you wire the equipment
source voltage and equipment load lines. You can have different source
voltages for each circuit, depending on your equipment requirements.
NOTE: The three-circuit clock breaks only one leg to the load. Wire the
other leg directly from the line to the load. (Refer to the illustration on the
clock, above the terminals.)
ARROW BUTTONS—used
to increase or decrease
programming parameters
when in programming mode.
MODE BUTTON—With a small tool, press and hold this button down
for 5 seconds. Using the Up and Down arrow keys, you can select the
appropriate preprogrammed mode that matches your particular pool or spa
equipment pad configuration. Hit the ENTER key when finished.
TIMER POWER—the two terminals where you wire
120V or 240V to power the multipurpose control. Be
sure the jumper on the back, matches the source
voltage. See page 26.
Figure 4-1
http://waterheatertimer.org/Digital-control-centers-and-manuals.html#P1353ME
http://waterheatertimer.org/How-to-wire-P1353-and-PE153.html
P1353ME instruction manual/ 2020

26 I-Wave PE5 Installation Guide
Copyright © 2006 Intermatic, Inc.
Identifying Connections and Selecting Proper Input Voltage
Figure 4-2 below shows the reverse side of the Three-Circuit Clock Control Panel. Detailed
connection information is provided below the diagram.
CAUTION: If the Source Voltage Selector Jumper is in the wrong position, the F1 fuse
will blow and you may damage the circuit board, voiding the warranty.
Before making any connections: Set the Source Voltage Selector Jumper.
The factory default position for this jumper is the 240 Volt position.
If the input voltage for the clock is 120 Volts, change this jumper to the
120 Volt position.
Connection Detail
Freeze Sensor Connection — For the Intermatic Freeze Sensor (178PA28A), which is
necessary for the freeze protection circuit and programming to work. Disconnect power when
connecting the freeze sensor. Only an Intermatic sensor can be used. Refer to page 35 for
programming information.
Firemen Switch Connection — For the remen switch wires that connect to the Pool/Spa
heater. If installing with a Wireless Remote Control, use the two brown wires coming from the
panel-mounted receiver to create the circuit between this switch and the heater. Connectors
should be ¼” female spade connectors crimped to insulated-type wire. This connection is a
simple SPST contact, and switches the supplied heater voltage. It does not supply voltage to
the heater thermostat. In non-wireless installations, clip the “loop” supplied, then connect
with wire nut connectors. Refer to page 34 for programming information.
Remote Control Connection — Connects the Intermatic Remote Control (133PE1484A),
which allows you to remotely turn ON or OFF all three available circuits. It also has status
lights that indicate when a load is ON, OFF or delayed. If using the Three-Button Wired
Remote Control (133PE1484A), it connects here as well. Refer to page 38 for additional
information.
1.
2.
•
•
•
Figure 4-2
Wired or Wireless
Remote Control
Connection
Freeze Sensor
Connection
Fireman Switch
Connection
Source Voltage
Selection Jumper
Fuse

Four: Programming the Three-Circult Clock Mechanism 27
Providing a brighter solution.™
Circuit Ratings
CLOCK SOURCE VOLTAGE — 120/240VAC, 50/60 Hz
POWER CONSUMPTION — 6.0 Watts Max
CIRCUIT CONTACT CONFIGURATION — SPST
CIRCUIT SWITCH RATINGS ALL MODES:
20A Resistive, 120/240 VAC, 50/60 Hz
20A FLA@120 VAC, 96A LRA@120 VAC, 50/60 Hz
17A FLA@240 VAC, 80A LRA@240 VAC, 50/60 Hz
5 Amps Tungsten, 120/240 VAC, 50/60 Hz
5 Amps Ballast, 120/240 VAC, 50/60 Hz
EVENTS PER CIRCUIT — 3 On/Off Events Per Circuit
INTERNAL BATTERY POWER:
40-year retention for all programmed settings
Up to 24 hours
Mode Selection/Definition
IMPORTANT NOTE—There are six modes to choose from, depending on your pool
or spa equipment pad configuration. Each mode has specific programming, timing,
and lockout features that are designed to work with specific types of pool or spa
equipment. Mode setting is generally done only once and usually during the initial
installation. It is purposely difficult to enter the mode-changing program and should
only be done by a Qualified Installer. Be sure you fully understand each mode
definitions and installation, prior to selecting the proper mode.
Mode 1 — (Aux1, Aux2, Aux3)
Each of the three single pole circuits are dened
generically, and can control any load within each
of its individual circuit ratings. All three circuits act
independent of each other.
•
•
•
•
•
•
•
Figure 4-3Figure 4-3
NOTE: This drawing illustrates
that only one leg is broken, with
the other leg going directly to
load, whether 120V or 240V.
NOTE: This drawing illustrates
that only one leg is broken, with
the other leg going directly to
load, whether 120V or 240V.

28 I-Wave PE5 Installation Guide
Copyright © 2006 Intermatic, Inc.
Mode 2 — (Pump High, Pump Low, Aux3)
Circuit one and two are dedicated single pole
outputs for a two-speed pump load. Circuits one and
two will never be ON at the same time, consistent
with a two-speed pump application. Circuit
three is single pole circuit for a generic load, and
independent of circuits one and two.
Mode 3 — (Pump, Aux2, Cleaner Pump)
Circuit one and three are dedicated single pole
outputs for a single speed pump working with a
pressure side cleaner pump. Circuit three will never
come on unless circuit one is on for at least one
minute, consistent with a pressure side cleaner
pump. Circuit two is a single pole circuit for a
generic load, independent of circuits one and three.
Figure 4-4Figure 4-4
NOTE: This drawing illustrates
that only one leg is broken, with
the other leg going directly to
load, whether 120V or 240V.
NOTE: This drawing illustrates
that only one leg is broken, with
the other leg going directly to
load, whether 120V or 240V.
Figure 4-5Figure 4-5
NOTE: This drawing illustrates
that only one leg is broken, with
the other leg going directly to
load, whether 120V or 240V.
NOTE: This drawing illustrates
that only one leg is broken, with
the other leg going directly to
load, whether 120V or 240V.

Four: Programming the Three-Circult Clock Mechanism 29
Providing a brighter solution.™
Mode 4 — (Pump High, Pump Low, Cleaner Pump)
Circuit one and two are dedicated single pole
outputs for a two-speed pump load. Circuits one and
two will never be ON at the same time, consistent
with a two-speed pump application. Circuit three
is also a dedicated single pole output for a pressure
side cleaner pump. Circuit three will never come
on unless circuit one is on for at least one minute,
consistent with a pressure side cleaner pump.
Mode 5 — (Pump, Pump, Aux3)
Circuit one and two are now coupled together
making up one circuit capable of switching the
power source to one pump. The On/Off button for
circuit one now controls both circuit one and two
simultaneously. The On/Off button for circuit two is
disabled. Circuit three remains a single pole circuit
for a generic load, and is independent of circuits one
and two.
Figure 4-6Figure 4-6
NOTE: This drawing illustrates
that only one leg is broken, with
the other leg going directly to
load, whether 120V or 240V.
NOTE: This drawing illustrates
that only one leg is broken, with
the other leg going directly to
load, whether 120V or 240V.
Figure 4-7Figure 4-7
NOTE: This drawing illustrates
that only one leg is broken, with
the other leg going directly to
load, whether 120V or 240V.
NOTE: This drawing illustrates
that only one leg is broken, with
the other leg going directly to
load, whether 120V or 240V.

30 I-Wave PE5 Installation Guide
Copyright © 2006 Intermatic, Inc.
Mode 6 — (Aux1, Aux2, Aux3)
Identical to Mode 1, in which each of the three single
pole circuits are dened generically and can control any
load within each of its individual circuit ratings, with all
three circuits act independent of each other.
However, with Mode 6, the reman switch closes only
when Circuit 1 (the lter pump) is manually turned on
— not when the clock turns it on. This mode is useful
when you have Circuit 1 connected to a circulation
pump in the spa. When the spa is not in use, the clock
circulates the water to lter it, but does not turn on the
heater. When the spa is in use, the heat is also turned on
by manually switching Circuit 1.
Setting Mode
Overview
Determine the mode that would be best for your installation, then select it using the instructions
provided below.
Procedure
NOTE: If you don’t press a button within 60 seconds
while setting Mode, the control will save current
settings and return to normal operating mode.
With a small pointed tool (i.e., pen, pencil,
screwdriver, etc.), press and hold the <MODE>
button for about 5 seconds until the display
shows SET MODE and the Mode Number
blinks.
Use the <Arrow> buttons to cycle through all
ve available modes. Each circuit output will
be dened on the display as you cycle through
the available modes.
Once the desired mode number is displayed,
press and release the <ENTER> button. This
saves the mode number to memory and exits
SET MODE programming.
1.
2.
3.
Figure 4-8Figure 4-8
NOTE: This drawing illustrates
that only one leg is broken, with
the other leg going directly to
load, whether 120V or 240V.
NOTE: This drawing illustrates
that only one leg is broken, with
the other leg going directly to
load, whether 120V or 240V.
<Mode> button
<ENTER> button
“SET MODE”
<Arrow>
buttons
Circuit outputs will
be defined
Mode
Number
blinks
<Mode> button
<ENTER> button
“SET MODE”
<Arrow>
buttons
Circuit outputs will
be defined
Mode
Number
blinks

Four: Programming the Three-Circult Clock Mechanism 31
Providing a brighter solution.™
Setting Time of Day
Overview
This procedure makes sure that timer-controlled actions will occur at the right time.
Procedure
NOTE: If you don’t press a button within 60 seconds
while setting Time of Day, the control will save
current settings and return to normal operating mode.
Press and release the <PROGRAM> button. The
displayed time will start to blink, and the program
menu will display Set Clock.
Use the <Arrow> buttons to change the time.
NOTE: Check the AM and PM indicator to make
sure your setting is correct.
When the time is set, you have two choices:
Press and release the <ENTER> button to save and exit programming.
Press and release the <PROGRAM> button to save and go on to the next programming
feature.
Setting the On/Off Times for Each Circuit
Overview
You can set up to three separate ON/OFF times per load or circuit, and you can set specic times
for them to turn on and off, i.e., you want the lter pump to run from noon till 4:00 P.M., or you
want lights on from 7:00 P.M., off at 11:00 P.M., then on again at 6:00 A.M. and off at 8:00 A.M.
Procedure
PROGRAMMING TIP: You can use the <ENTER> button to review all the events for each circuit.
You can use the <PROGRAM> button to advance through each circuit and on to the next
programming feature.
If you pressed and released the program key from
the previous procedure, the screen display should
look like the illustration at the right. [If not, press and
release the <PROGRAM> button twice.]
Note that the display indicates that the rst event of
circuit one has not been dened (NO EVENT1).
1.
2.
3.
•
•
1.
<PROGRAM>
button
Program Menu
Displayed Time
<Arrow>
buttons
AM/PM Indicator
<PROGRAM>
button
Program Menu
Displayed Time
<Arrow>
buttons
AM/PM Indicator
NO EVENT 1 Not definedNO EVENT 1 Not defined

32 I-Wave PE5 Installation Guide
Copyright © 2006 Intermatic, Inc.
Use the <Arrow> buttons to dene the Start time for
the rst event (EVENT1) for circuit one. The screen
displays:
Once you are satised with the start time, press and
release the <ENTER> button, saving the start time. The
display will prompt for the Stop time for the rst event
(EVENT1) for circuit one. The screen displays:
Use the <Arrow> buttons to dene the Stop time
for the rst event (EVENT1) for circuit one. Press
and release the <ENTER> button when complete.
The program will now advance to the second event
(EVENT2) for circuit one, as shown below. Note that
the display indicates that the second event of circuit
one has not been dened (NO EVENT2).
Repeat Steps 2 thru 4 to set a second event for circuit
#1, and for subsequent events you wish to set up.
Notes on Setting ON/OFF Times for Each Mode
General Note
The ON/OFF buttons were provided for service operations, and for circumstances where
instantaneous response is required. If the intent is to turn equipment on and off everyday at
the same time, programming individual events will make sure these functions take place.
All circuits will respond to a programmed off time. Therefore, when a circuit is turned on with
the ON/OFF button, it automatically turns itself off at the end of the next programmed event.
If there are no events programmed, the circuit stays on until the ON/OFF button is pressed
again.
If the ON/OFF button is pressed while the corresponding circuit is on, it turns the circuit
off and supersedes any program in progress. The priority is always given to the last manual
operation.
2.
3.
4.
5.
•
•
•
•
First Event
(EVENT1)
Start Time
First Event
(EVENT1)
Start Time
Stop Time
First Event
(EVENT1) Stop Time
First Event
(EVENT1)
NO EVENT 2NO EVENT 2

Four: Programming the Three-Circult Clock Mechanism 33
Providing a brighter solution.™
Notes on Setting ON/OFF Times for Each Mode (cont’d)
Mode 1 — (Aux1, Aux2, Aux3)
All three of the available circuits act independently, and up to three individual on/off times can
be set for each circuit independently.
Mode 2 — (Pump High, Pump Low, Aux 3)
In this mode circuits 1 & 2 are connect to a two speed pump, and Aux 3 is connected
independent of circuits 1 & 2. In the event that you program high and low speed to be on at the
same time or if their independent ON times overlap, high speed will always take precedence.
Example: Low speed is programmed to come ON at noon and run until 6 PM. High speed is
programmed to come on at 2 PM and turn off at 4 PM. In this case the pump will come ON
at noon in low speed, go to high speed at 2 PM, and back to low speed at 4 PM, and shut off
at 6 PM.
All manual ON operations for circuits 1 & 2 override all programmed ON times. Therefore, any
desired low and high-speed run combinations need to be programmed as separate events and
cannot controlled by combining the manual ON/OFF button with a scheduled event. The last
speed started manually has priority over all prior automatic and manual operations.
Example: You would like to run the pump in high speed for 6 hours and low speed for the
remainder of the time. Program a 6-hour event for high speed, and an 18-hour event for low
speed. Do not turn the low speed on manually, and program a 6-hour event for high speed.
The high speed will not occur.
Mode 3 — (Filter Pump, Aux2, Cleaner Pump)
The cleaner pump cannot turn on unless the lter pump has been on for at least 30 seconds.
Therefore, for any ON/OFF time programmed for the cleaner pump, the lter pump will come on
rst, followed 30 seconds later by the cleaner pump. Both the cleaner and lter pump will turn
off according to the programmed off time. When programming an event for the cleaner pump, it
is not necessary to program a separate event for the lter pump, as it will automatically turn on
when the cleaner pump turns on at its next scheduled on time.
Mode 4 – (Pump High, Pump Low, Cleaner Pump)
Mode 4 is a combination of Modes 2 and 3, so refer above to Modes 2 and 3 for programming
specics. Note that if the cleaner pump is programmed to come ON, the control will turn ON
the lter pump to high speed 30 seconds prior to turning the cleaner pump ON, even if the lter
pump is currently on in low speed.
Mode 5 – (Aux1, Aux3)
Both of the available circuits act independently, similar to Mode 1. Therefore you can set up to
three individual ON/OFF times for each circuit and they will act independently.
Mode 6 — (Aux1, Aux2, Aux3)
All three of the available circuits act independently, and up to three individual on/off times can
be set for each circuit independently. When the clock turns ON Circuit #1 due to a scheduled
ON time, the heater will not come on. The heater will come ON only when Circuit #1 is turned
ON manually.

34 I-Wave PE5 Installation Guide
Copyright © 2006 Intermatic, Inc.
Setting the Heater’s Cool Down Time (optional)
Overview
The heater’s cool down time is a time dened by the programmer. This time is dened as the
additional time the pump will run, over and beyond the desired pump OFF time, to make sure
the heater is cooled down before shutting off.
If the heater were to stay on after the pump had shut off, the water in the pipe could
boil, damaging the system. Refer to heater manufacturer for specific time.
If a cool down time is programmed, the cool down cycle will occur in all cases, even if the user
turns off the pump. To override the cool down time, press and release the ON/OFF key a second
time during the cool down cycle. The cool down feature only applies to Circuit #1, in all modes.
Procedure
Use the <PROGRAM> button to advance to the COOL
DOWN setting, as shown. The default cool down time
is zero.
Use the <ARROW> buttons to modify the cool down
time. The programming range is from zero to fteen
minutes and no seconds.
When you’ve set the cool down time, press the
<ENTER> button to save and exit, or the <PROGRAM>
button to save and advance to the next programming feature.
The display will look like the example shown at the right
when the Heater’s Cool Down Time feature is activated. In
this example, the cool down time was set for 5 minutes,
and is in the process of counting down to zero, showing
minutes and seconds.
The AUX1 indicator is blinking, indicating that the Cool
Down feature is activated for Circuit #1. The Cool Down
feature only affects Circuit #1. When the countdown
display reaches zero, Circuit #1 will open and the time
display will change back to the time of day.
NOTE: You can override the Cool Down feature during countdown by pressing and releasing the
ON/OFF button associated with Circuit #1. This will end the cool down cycle and immediately
power off Circuit #1.
1.
2.
3.
COOL DOWN
<PROGRAM> button
<ARROW> buttons
COOL DOWN
<PROGRAM> button
<ARROW> buttons
Counting Down
Minutes and Seconds
AUX1 Indicator
Blinking
Counting Down
Minutes and Seconds
AUX1 Indicator
Blinking

Four: Programming the Three-Circult Clock Mechanism 35
Providing a brighter solution.™
Setting Freeze Temperature (optional)
Overview
Freeze temperature programming will not appear unless the optional Intermatic Freeze Sensor
(178PA28A) has been installed. This is the only freeze sensor that will work with the P1353ME
Mechanism.
Power must be disconnected when connecting the 178PA28A sensor.
If Intermatic Freeze Sensor (178PA28A) has been installed, use the following procedure to
program freeze temperature.
Procedure
Use the <PROGRAM> button to advance to the
Freeze Temp setting, as shown. The 1st Circuit and
32°F are the factory default settings.
Use the <ARROW> buttons to modify the desired
freeze temperature trip point. The programming range
is 32° through 44°F.
After you have set the desired trip temperature, push
and release the desired ON/OFF button to indicate
which circuits should come ON when the trip temperature is reached.
When programming is complete, , press the <ENTER> button to save and exit, or the
<PROGRAM> button to save and advance to the next programming feature.
The display will look like the example shown at the
right when the Freeze Control feature is activated. In
this example, the freeze sensor was connected, enabling
the Freeze Control feature. Circuits #1 and #3 were
programmed to come on during a Freeze condition.
AUX1 and AUX3 will blink, indicating that the control
has activated these two circuits due to a freeze condition.
NOTE: You can override the circuits during a freeze condition by pressing and releasing the
corresponding ON/OFF buttons. This will turn the devices OFF. The override will only last one
hour, so if the freeze condition still exists after one hour, Circuits #1 and #3 will come back on.
NOTE: Freeze protection stays enabled until the outside air temperature exceeds the
programmed freeze temperature for more than one minute.
1.
2.
3.
4.
32°F
Freeze Temp
1st Circuit
32°F
Freeze Temp
1st Circuit
Aux #1 and #3
Freeze
Aux #1 and #3
Freeze
/