HJC HJ-40 Owner's manual

Category
Bicycle accessories
Type
Owner's manual

HJC HJ-40 motorcycle helmet offers a great combination of safety and comfort features. With its advanced channeling ventilation system and removable, washable interior, it provides a comfortable ride even on long journeys. The HJ-40 comes with an interchangeable cheek pad system, ensuring a snug fit, and a HJ-V12 internal sun shield for protection against the sun's glare. It's DOT approved and provides 99% UV protection. Whether you're a daily commuter or an adventure tourer, the HJC HJ-40 is a reliable and versatile helmet for your riding needs.

HJC HJ-40 motorcycle helmet offers a great combination of safety and comfort features. With its advanced channeling ventilation system and removable, washable interior, it provides a comfortable ride even on long journeys. The HJ-40 comes with an interchangeable cheek pad system, ensuring a snug fit, and a HJ-V12 internal sun shield for protection against the sun's glare. It's DOT approved and provides 99% UV protection. Whether you're a daily commuter or an adventure tourer, the HJC HJ-40 is a reliable and versatile helmet for your riding needs.


21
Please visit www.hjchelmets.com for more information about HJC helmets.
PIM EVO Shell
Advanced Channeling
Ventilation System
Pinlock ready
HJ-40 visor(shield)
Provides 99% UV protection
HJ-V12 Internal sun shield
Removable and
washable interior
Inerchangeable cheek pads
throughout all sizes
Double D-ring
Emergency Kit (Cheek Pads)
Anti-fog sun shield Smart HJC 21B & 50B
Install ready
DOT APPROVED
Specications
1. Outer shell
2. Rear venturi exhausts
3. Impact absorbent liner
4. Comfort liner
5. Rubber edge trim
6. Bluetooth Cover
7. Sun shield lever
8. Chin strap
9. Chin strap snap
10. Double "D" ring
11. Bluetooth UI cover
12. Shield locking system
13. Front chin vent
14. Breath deector
15. Anti-fog lens pins
16. HJ-40 Visor(Shield)
17. HJ-V12 Sun shield
18. Eyeport Gasket
19. Shield Ratchet
20. Top Front Vent
13
12 11
14
17
19
20
1
2
3
4
5
6
8
9
10
7
18
15
16
20
OPEN
OPEN
OPEN
CLOSE
CLOSE
CLOSE
13
OPEN
OPEN
CLOSE
CLOSE
3 4
1. Press the visor(shield) locker, then lift the visor(shield) tab up.
2. Open visor(shield) to the maximum open position.
3. Pull the handle-locker to the open position, then pull out the visor(shield) from ratchet mechanism.
Cheek Pad Removal
1. Ensure that the handle-locker is in the open position.
2. Align and insert the top of the shield guide into the plate-gear guide.
3. With the guides properly aligned, press the lower section of the shield into the plate-gear mechanism.
The locking tab should pop into position, locking the shield into place.
Visor(Shield) Installation
Always check to make sure helmet pads are installed before using the helmet. A helmet with
missing or improperly installed pads may increase your risk of serious injury or death in an accident.
There are 3 snaps holding the cheek pad in place.
1. Gently pry the cheek pad away from the interior, releasing the snaps.
2. Grasp the cheek pad near its center and gently pull it free from the chin strap.
Visor(Shield) Removal
1 2
Visor(shield) locker
Handle-locker
Handle-locker
Handle-locker
Handle-locker
Handle-locker
Handle-locker
Handle-locker
OPEN
OPEN
OPEN
12
1 2
3
OPEN
OPEN
OPEN
3
Visor(shield) tab
Visor(shield) tab
Visor(shield) tab
Warning!
5 6
1. Align and fully slide the cheek pad plastic plate between shell and EPS.
2. Clip the cheek pad’s 3 small male snaps to the 3 female snaps xed on the shell interior.
1. Install the front section rst by aligning the plastic shell base and the crown pad plastic sleeve, ensuring
that the center and side holes are properly aligned. Press the crown pad plastic sleeve (center portion)
into the center of the channel which is built into the plasticshell base, working your way outward to each
side.
2. Align and snap the two rear snaps into place.
Slide tab 'A' from the cheek pad into the holder 'B'.(Repeat same
on opposite side)
Cheek Pad Installation
Crown Pad Removal
Crown Pad Installation
Chin Strap Cover Removal
Chin Strap Cover Installation
1. Grasp the end of the chin strap cover and pull/pry
away from the helmet.
1. Insert the chin strap into the chin strap cover and push the chin strap all the way in.
B
B
A
B
B
AA
A
1a 1b
Position of tap holder
1. Grasp the crown pad fabric as close as possible to its plastic base and pull/pry away from the helmet.
Notice how the crown pad plastic section aligns with the shell plastic sleeve. This will help orient you
with the reinstallation.
2. Repeat same at rear.
12
1 2
12
1
1a 1b
AA
A
7 8
Warning!
Try not to operate the sun shield while riding as this may impair your vision and may lead to an
accident.
DO NOT pull on the sun shield when it is already down. The sun shield may be ejected and this
will increase the risk of serious injury or death in the event of an accident.
Do not attempt to adjust the sun shield itself with your hands.
Always use the sun shield lever.
DO NOT use sun shield at night time. The sun shield is only for day time use.
The sun shield does not
provide eye protection. When you use the sun shield
be sure that the clear visor(shield) is also in closed
position.
Above illustration shows raised sun shield
position.
Above illustration shows lowered sun shield
position.
Sun shield Operation
There are three positions for the sun shield sliding lever.
Stage 3 -
Lowest position
Stage 2 -
Lower position
Stage 1 -
Standard position
Lever
Stopper
Stage 1
Stage 2
Stage 3
번역요청건 -
Sun shield Installation
1. Insert sun shield tab 'A' into 'B' position.(Repeat same on opposite side)
When installing the sun shield, be sure to have it
slided behind the tap ‘B’ holder.
1
Sun shield Removal
1. Place the stopper in Stage 3.
2. Push the sun shield lever in the direction of the arrow to lower the sun shield as much as possible.
3. Gently pull one side of the sun shield as arrow indicates (repeat same for other side).
Stopper
Stage 3
Lever
1
23
9 10
1. To remove the breath deector, pull in the direction of the arrow.
Breath Deector Removal
1a 1b
1. To attach the Breath Deector, insert into the slot and push it in the direction of the arrow.
Breath Deector Installation
1a 1b
Lower Vent Operation
Lower Vents open in two ways, and the amount of intake and exhaust can be adjusted.
1. Press the bottom of the lower vent door once to open the rst stage.
2. The 1st position will allow minimum air ow, while the 2nd position will allow maximum air ow.
OPEN
OPEN
CLOSE
CLOSE
1 2
OPEN
OPEN
CLOSE
CLOSE
Chin Curtain Removal
1. Pull the chin curtain away from the helmet as arrow
indicates.
1
1. Align the center of the chin curtain with the center of the helmet. Push into place as arrows indicate.
(Please assemble in order from 1 to 3.)
Slide tab 'A' from the cheek pad into the holder 'B'.
Chin Curtain Installation
1
1
2
3
A
A
B
B
11
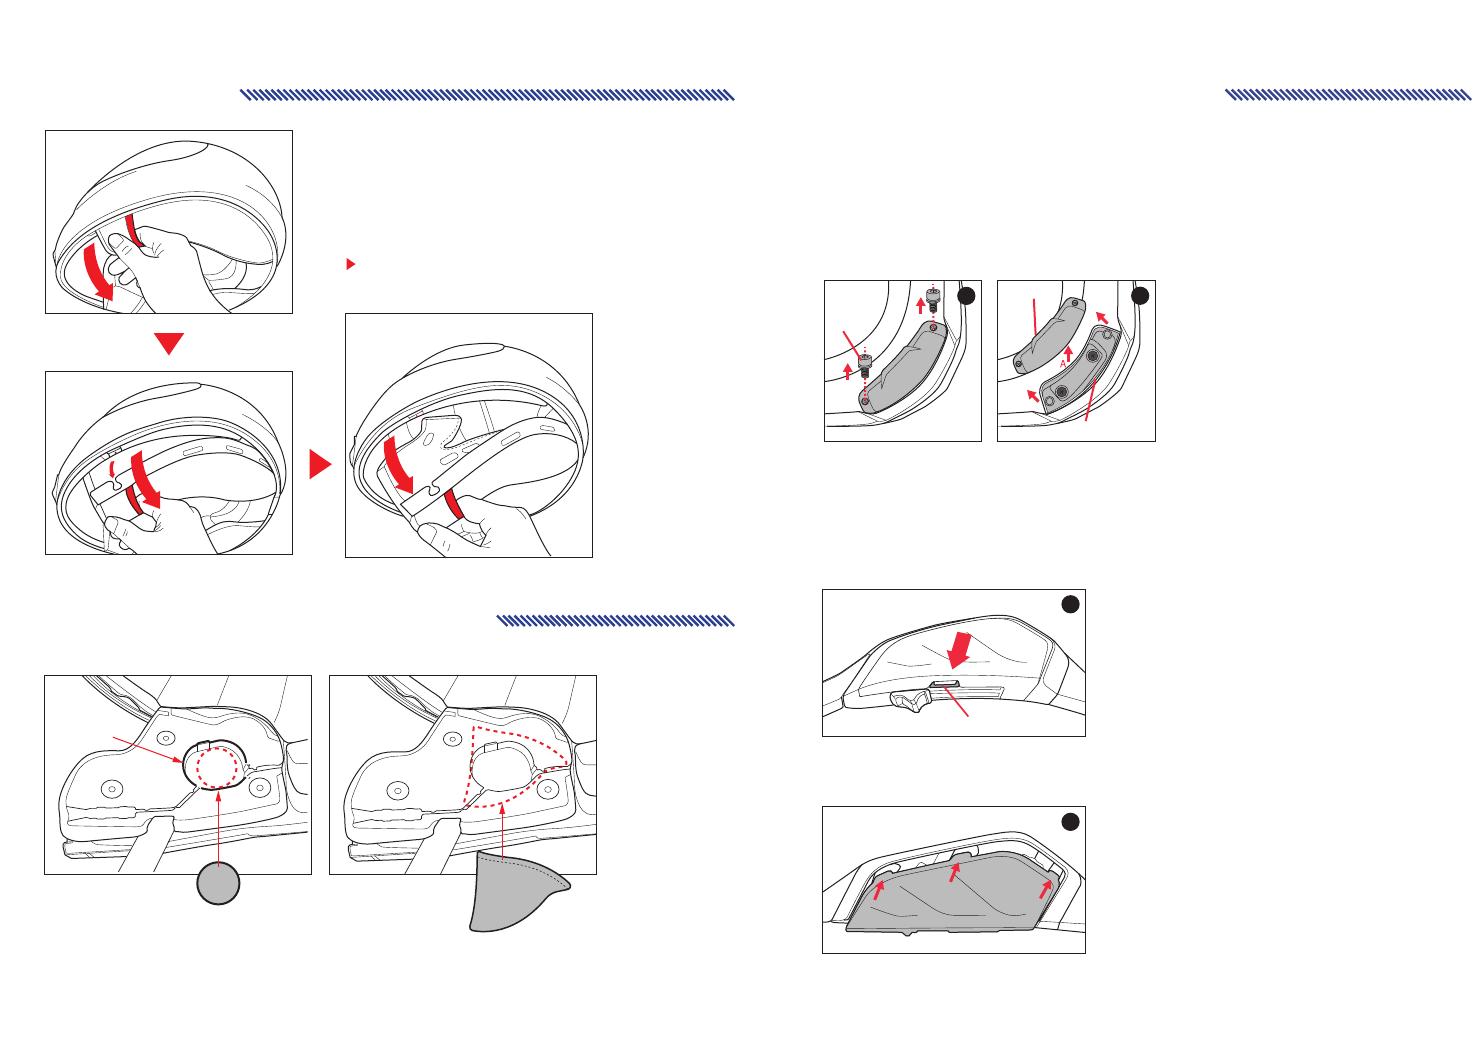
In an emergency, you may remove the cheek pads as
indicated in the illustration. Pull the red line pocket with
your ngers.
Please use Emergency Kit only in emergency
situation.
Emergency Kit
12
If you install communication system speakers, please do not use the speaker pocket cover.
How to install speaker pocket cover
HJC Intercom Placement Guide
12
Mounting the Intercom
Unscrew and remove the base cover at the back of the helmet to begin mounting process
of the intercom. Please refer to the manual of the current intercom you are using for directions
on mounting and unmounting the intercom unit.
Base Cover Detachment
1. Remove the screws from the base cover. (picture1)
2. While lifting the base cover(direction A) detach it by pushing toward direction B. (Picture 2)
Base cover
Base cover
Base cover
Bracket
Bracket
Bracket
Screw
Mounting the Base Cover
Push the base cover underneath the gasket at the bottom of the helmet until the base cover
and the bracket screw holes match. Using the screw, xate the base cover onto the helmet.
1. Push the Bluetooth UI cover in the direction of the arrow while pressing down on A.
A
Bluetooth UI Cover Detachment
1. After aligning the hook of the Bluetooth UI cover with the groove of the body, and push and attach.
Mounting the Bluetooth UI Cover
1
1
Speaker Pocket
Speaker Pocket
Speaker
Speaker Pocket Cover
  • Page 1 1
  • Page 2 2
  • Page 3 3
  • Page 4 4
  • Page 5 5
  • Page 6 6
  • Page 7 7

HJC HJ-40 Owner's manual

Category
Bicycle accessories
Type
Owner's manual

HJC HJ-40 motorcycle helmet offers a great combination of safety and comfort features. With its advanced channeling ventilation system and removable, washable interior, it provides a comfortable ride even on long journeys. The HJ-40 comes with an interchangeable cheek pad system, ensuring a snug fit, and a HJ-V12 internal sun shield for protection against the sun's glare. It's DOT approved and provides 99% UV protection. Whether you're a daily commuter or an adventure tourer, the HJC HJ-40 is a reliable and versatile helmet for your riding needs.

Ask a question and I''ll find the answer in the document

Finding information in a document is now easier with AI