Biolase SureFire YSGG User manual

Type
User manual

Biolase SureFire YSGG, the advanced laser system, offers precise and versatile performance for a wide range of dental procedures. Its unique features include:

  • Efficient tissue interaction: With a wavelength of 1064nm, the YSGG laser effectively targets water molecules, enabling precise cutting and coagulation with minimal thermal damage.

  • Multi-functionality: The system's versatility allows for a variety of applications, including cavity preparations, crown lengthening, gingivectomy, and bone sculpting.

  • Enhanced safety: The built-in safety mechanisms, such as the Protective Window and the purging function, minimize the risk of tissue damage or cross-contamination.

Description
The SureFire™ Fiber Optic Cable is
used with Waterlase iPlus (all versions),
Waterlase MDX, and Waterlase MD Turbo.
PN 5200024 Rev C
Copyright © 2020 BIOLASE, Inc. All rights reserved.
BIOLASE, Inc.
27042 Towne Centre Drive, Suite 270
Foothill Ranch, CA 92610-2811
USA+1 949.361.1200
833.BIOLASE
biolase.com
INSTRUCTIONS FOR USE
2. Gently pull the loosened Protective Window
from the distal end of the Fiber Optic Cable.
3. Insert the replacement Protective Window
by aligning it to the circular opening and
gently screwing the replacement Protective
Window clockwise while gently pressing
downward. (Figure 3)
4. Discard of the burned/damaged Protective
Window in normal disposal bins.
5. Re-attach the Handpiece and prime before
using the laser.
The SureFire Protective Window Rell Kit
(Three Protective Windows) is available for
re-order using PN 7240003.
Note: The Protective Window will
continue to rotate after fully installed.
There should be minimal to no gap
between the end of the Fiber Optic
Cable and the Protective Window.
Fig. 3
biolase.com
Installing the SureFire Fiber Optic Cable
1. Remove the Fiber Optic Cable from its
packaging.
2. Remove the protective silver cap from the
proximal end (which connects to the laser
console) of the Fiber Optic Cable.
3. Remove the protective cover of the Fiber
Optic Cable shaft at the distal end and
hold it against any light source; look into
the proximal end of the Fiber Optic Cable
– it should glow yellow, be at and clean.
Replace the cover.
4. Remove the black plastic outer cover and
the internal red protective cap from the laser
head and laser aperture; save these for
future use (do not misplace them).
5. Carefully look inside the laser aperture
and check that the surface of the aperture
window is clean, free of
water, dirt, or damage.
(Figure 1)
6. If water or dirt is visible, try to remove it by
blowing dry, compressed air in the aperture;
7. If this does not help, contact BIOLASE
Technical Support or your authorized
service provider.
8. Align the blue guide of the connector (proximal
end of the Fiber Optic Cable) to the blue
dot on the laser head interface. Position the
middle of the connector to the laser aperture
and vertically push down, gently, as far as the
connector will go.
9. Secure the retainer ring by turning it clockwise
until it is snug.
10. Align the middle length of the ber to the hook
of the telescopic arm and push it in gently to
secure it.
11. Remove the protective cover from the distal
end of the ber again and verify that it is
clean and not damaged (see Section 11 of
Waterlase iPlus User Manual, Maintenance
and Troubleshooting).
12. Carefully place the ber with its protective
cover or with the handpiece connected in the
handpiece holder.
WARNING: DO NOT APPLY FORCE
when installing the Fiber Optic Cable.
Applying force may damage the laser
head components.
NOTE: Make sure the black retaining
O-ring on the ber cable is on the
front side of the hook to keep the cable
in place.
Fig. 1
Replacing the Protective Window
Protective Windows are used in conjunction with
SureFire Fiber Optic Cable. The Fiber Optic Cable
ships with a pre-installed Protective Window and
one (1) replacement Protective Window.
The Protective Window may become burned or
damaged during use, please follow the steps
outlined below, should your Protective Window
need to be replaced.
PRELIMINARY STEPS:
1. Before replacing the Fiber Optic Cable
Protective Window, purge the Handpiece and
Fiber Optic Cable of any residual water.
2. POWER OFF THE LASER SYSTEM.
3. Remove the Handpiece from the Fiber Optic
Cable. NEVER REMOVE THE HANDPIECE
FROM THE FIBER OPTIC CABLE WITHOUT
PURGING PROPERLY.
4. Locate the distal end of the Fiber Optic Cable.
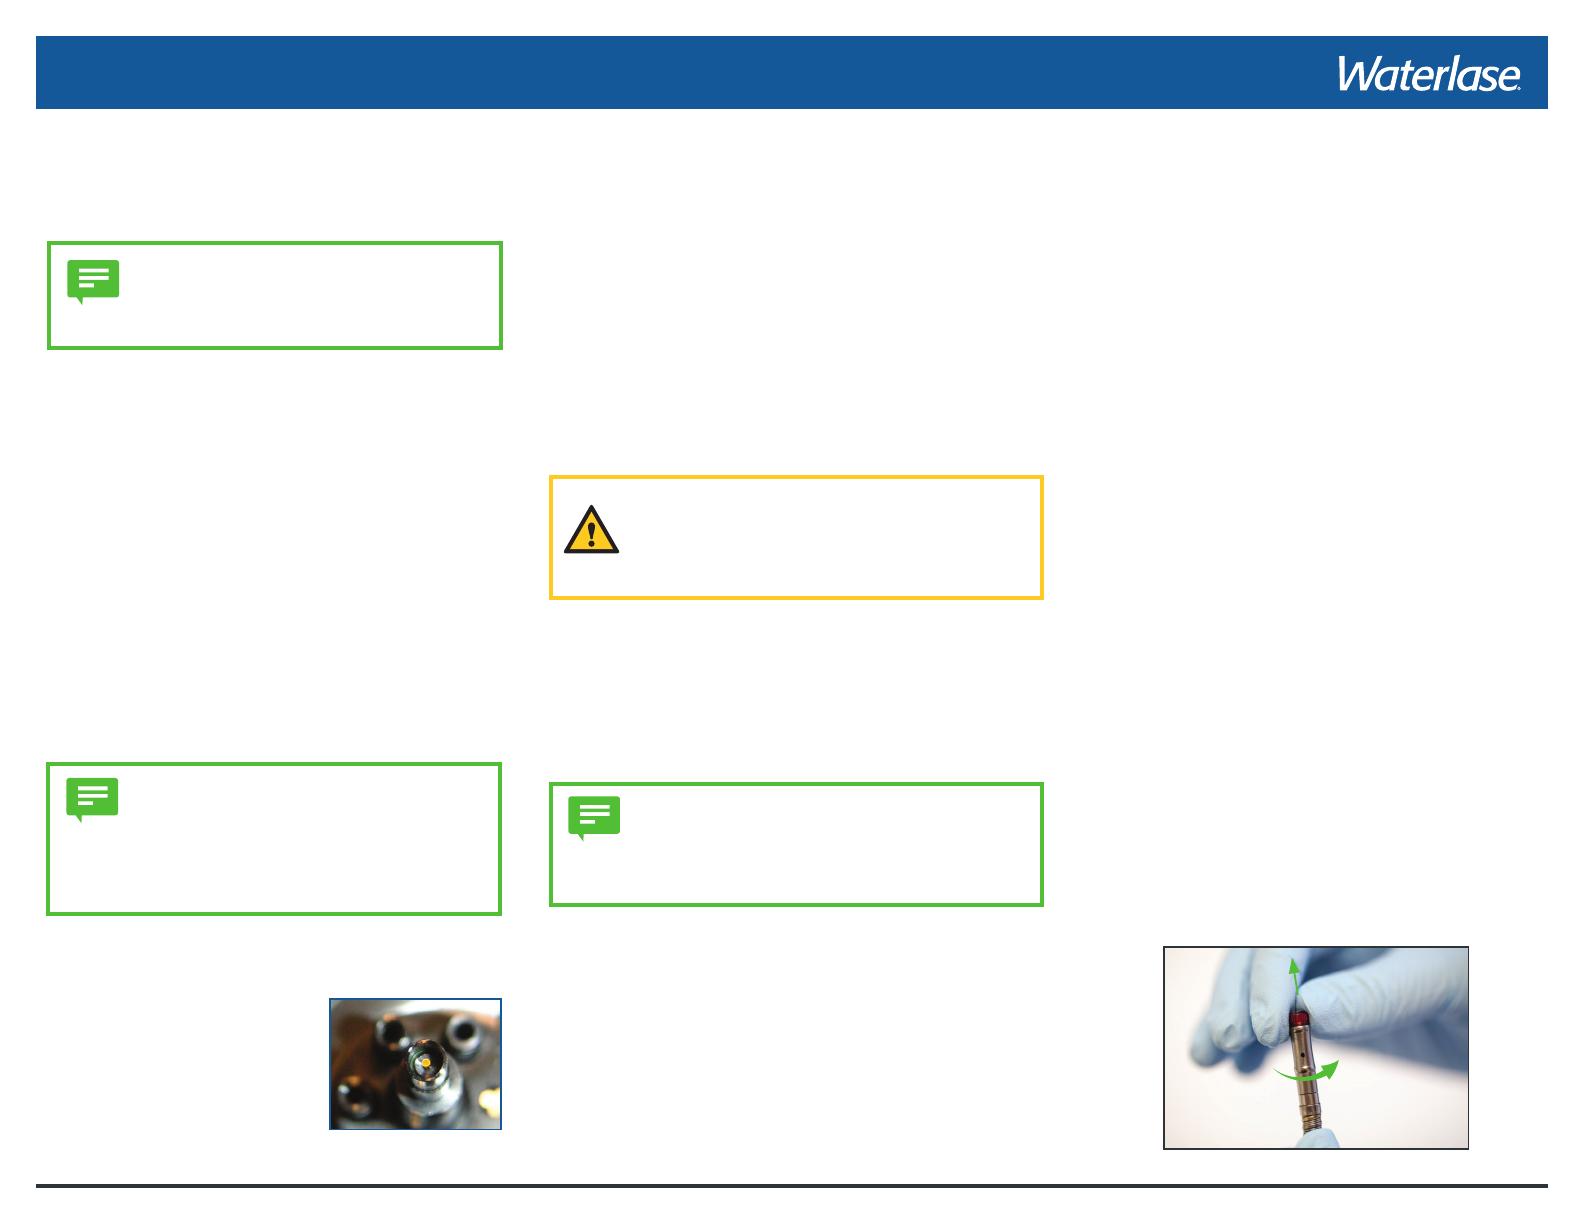
PROTECTIVE WINDOW REPLACEMENT STEPS:
1. To remove the Protective Window from the
Fiber Optic Cable, gently pull the Protective
Window, while unscrewing the Protective
Window counter-clockwise until it is loose.
(Figure 2)
NOTE: To avoid damaging the Fiber
Optic Cable, drape it around your
neck as you prepare it for installation.
Fig. 2
NOTE: In most cases, you will only
encounter the aperture black and red
plastic covers mentioned in step 4
above upon initial installation of the
Fiber Optic Cable.
  • Page 1 1
  • Page 2 2

Biolase SureFire YSGG User manual

Type
User manual

Biolase SureFire YSGG, the advanced laser system, offers precise and versatile performance for a wide range of dental procedures. Its unique features include:

  • Efficient tissue interaction: With a wavelength of 1064nm, the YSGG laser effectively targets water molecules, enabling precise cutting and coagulation with minimal thermal damage.

  • Multi-functionality: The system's versatility allows for a variety of applications, including cavity preparations, crown lengthening, gingivectomy, and bone sculpting.

  • Enhanced safety: The built-in safety mechanisms, such as the Protective Window and the purging function, minimize the risk of tissue damage or cross-contamination.

Ask a question and I''ll find the answer in the document

Finding information in a document is now easier with AI