Page is loading ...

application version 2.0
For Windows
®
User’s Guide
• We recommend that you print on a disc* before you record
anything on it. Printing on a disc that already has data
recorded on it can cause the data to become corrupted.
• Note that TDK Recording Media Europe S.A. shall not be
held liable for any loss or corruption of data on discs arising
through the use of this product.
* CD-R, CD-RW, DVD-R, etc.
Be sure to read the Safety Precautions contained in printer manual
before trying to use the printer and this application for the first
time.
LPCW-100

1
Important!
The copyright of this User’s Guide and all rights related to the software
shall revert to CASIO COMPUTER CO., LTD.
• Microsoft, Windows, Windows Media and Windows NT are registered
trademarks or trademarks of Microsoft Corporation in the United States
and other countries.
• Pentium is a registered trademark of Intel Corporation in the United
States.
• Macintosh, Mac OS and TrueType are registered trademarks of Apple
Computer, Inc. in the United States and other countries.
• Easy CD Creator is a trademark of Roxio, Inc. in the United States.
• Other company and product names used herein may also be company
and product names of others.
© Copyright 2003 CASIO COMPUTER CO., LTD. All rights reserved.
• Be sure to read this manual carefully before attempting to use the
product for the first time.
Read This First!
• TDK Recording Media Europe S.A. shall not be held liable for any loss
or claims by you or any other person or entity that may arise through
the use of this product.
• Reproduction of this manual in any form, either in part or its entirety,
is forbidden without the express permission of CASIO COMPUTER
CO., LTD. You are granted permission to use this software for your
own personal use. Any and all other use of this software without the
express permission of CASIO COMPUTER CO., LTD. is forbidden
under international copyright laws.
• The contents of the manual are subject to change without notice.
• Due to the time required for printing on paper, contents of the
manual may be outdated by the version of software supplied to you.
Because of this, the software and the contents of the displays it
produces may be different from those described in this manual, or
some items described in this manual may no longer be available.
• The CD/DVD LABEL PRINTER application is an application
designed to run under Windows 98, 98SE, Me, 2000
Professional, or XP.
• This CD/DVD LABEL PRINTER application is designed for use with
the TDK LPCW-100 Printer. It does not support printing with the
LPCW-50 printer.
• The application may not be able to run correctly on certain
system hardware and software configurations.
• See the printer User’s Guide for details about its minimum computer
system requirements.

2
Contents
About the Bundled CD-ROM and CD-R ............................. 4
Scope of This Manual ..................................................... 5
Button Operations .......................................................... 5
How to use this Manual ................................................. 7
LPCW-100 Printer Features ........................................... 8
Label Making Overview
Label Creation Basics .................................................. 12
To create a label .......................................................... 12
To print a label ............................................................. 16
To save label data ......................................................... 19
To quit the CD/DVD LABEL PRINTER application ............. 19
Label Making with Preset Templates
Automated Label Layout ............................................... 20
Using the Assistant Feature ......................................... 22
Using the Assistant Screen ........................................... 22
Using the Main Window ............................................... 23
Importing Text Data ..................................................... 26
Importing CD-Text Data for a Music Label ....................... 26
Importing Media Player Data for a Music Label ............... 27
Importing Easy CD Creator Data for a Music Label .......... 29
Importing File and Folder Name
for a Data Label or Digital Image Label ....................... 30
Importing Data Created with a Previous Version ................. 31
Useful Text Input Functions .......................................... 32
Saving Label Data ........................................................ 33
Opening a Label Data File ............................................. 34
Creating a Data Index File ............................................ 35
Configuring Layout Settings .......................................... 36
To configure layout settings ........................................... 36
Configuring Text Layout Settings .................................... 37
Configuring Font Settings ............................................. 39
Inserting an Image into a Label ..................................... 41
To input an image from a file ......................................... 41
Capturing a PC Screen Image ........................................ 41
Controlling the Aspect Ratio of an Image ........................ 43
About color images... ................................................... 44
Original Label Making
Creating an Original Label Layout .................................. 46
Free Text Label Template Main Window .......................... 47
Free Design Label Template Main Window ...................... 47
Free Design and Free Text Template Main Windows ........ 48
Toolbars ...................................................................... 48

3
Configuring Font Settings
(Free Text Template, Free Design Template) ................ 50
Inserting a Label Background Image
(Free Text Layout) ...................................................... 51
Fields (Free Design Template) ....................................... 52
Field Types ................................................................... 52
Common Text Field and Image Field Operations ............... 52
Inputting Text into a Text Field (Free Design Template) ... 53
To input text manually ................................................... 53
To input text imported from a file ................................... 53
To configure font settings for the text in a field ............... 54
To delete a text field ..................................................... 54
Inserting an Image into a Label
(Free Design Template)............................................... 54
To insert an image into a label ....................................... 54
To delete an image field ................................................ 54
Resizing a Field (Free Design Template) ......................... 55
Aligning and Resizing Fields (Free Design Template) ....... 56
To align fields ............................................................... 57
Configuring Field Properties (Free Design Template) ....... 58
To reposition and resize a field ...................................... 58
Useful Text Input Functions
(Free Text Template, Free Design Template) ................. 59
Other Operations
Configuring Advanced Settings ..................................... 61
To configure advanced print settings .............................. 61
Registering and Deleting a Phrase Memory Entry ............ 62
To configure advanced layout settings ............................ 63
Using Help ................................................................... 64
To use Help .................................................................. 64
Phrase Library List ...................................................... 65
Troubleshooting ........................................................... 65
Error Messages ........................................................... 67

4
About the Bundled CD-ROM and CD-R
Handling Precautions
• Handle the disc to avoid finger smudges, dirt, scratches, etc. on either
of its surfaces.
• Should the disc become dirty, use an eyeglass cleaning cloth or some
other soft dry cloth to wipe it lightly from the center of the disc outwards
towards its edge. Never use phonograph record cleaner or any other
cleaning agent.
• Never write on either of the disc’s surfaces with a pen or pencil or
other sharp writing utensils, or affix a sticker to the disc surfaces.
• Use of a disc that is cracked or deformed, or a disc that has adhesive
on it is dangerous. Never use such a disc.
Storage Precautions
• Avoid storing discs in areas subjected to high temperature, high
humidity, or direct sunlight.
• When you are not using a disc, store it in its original case.
• Avoid storing a disc so its label comes in direct contact with the surface
of a vinyl case, bag, etc.
Warning!
Never play a CD-ROM disc on any device that is not specifically designed
to play back CD-ROM discs. Audio output at a high volume setting cre-
ates the risk of damaged hearing and damage to audio speakers.

5
1.
2.
Using the Assistant Feature
The CD/DVD LABEL PRINTER application has an Assistant feature
that guides you step-by-step through certain operations. (See page
22.)
Help
You can access information about procedures and precautions us-
ing the CD/DVD LABEL PRINTER application’s Help feature. (See
page 64.)
Button Operations
All operations in this manual are performed using the mouse.
• Command operations are indicated as shown below.
1
. Click the button.
2
. On the menu that appears, click New.
• Dialog box button operations are indicated as shown below.
3.
Scope of This Manual
This manual does not cover standard Windows operations.
This manual covers operating procedures for the CD/DVD LABEL
PRINTER application only. It does not include any detailed information
about standard Windows operations like the following.
• Clicking, double-clicking, right-clicking, dragging, dropping, and other
mouse operations
• Menu operations
• Text on the keyboard
• Standard window operations
For information about these and other Windows operations, see the
user documentation that came with your Windows operating system.

6
3
.Click Save.
• All of the sample screens in this manual show operation under
the English version of Windows XP. Screens appear differently
when running the application under another operating system.
• Note that the screen images shown in this manual may differ
somewhat from those that actually appear on your computer
screen.

7
How to use this Manual
• This section takes you through the basic label creation and printing process,
using a music CD label as an example.
The sections of this manual are arranged as shown below.
Refer to the indicated pages for details.
Getting Ready
• Installing the CD/DVD LABEL
PRINTER application
• For information about installing the
CD/DVD LABEL PRINTER application
and connecting the printer to your
computer, see the printer User's
Guide.
Label Making
with Preset Templates
Automated Label Layout (page 20)
• This section describes how to create
labels quickly and easily using preset
templates.
• You can select a music label, data
label, or digital image label template.
Creating an Original Label Layout
(page 46)
• This section describes how to layout
text and images to create exactly the
type of look you want.
• A Free Text label template gives you
wide ranging control over text you
input into a label.
• A Free Design label template provides
you with maximum freedom when
creating your label design.
Original Label Making
Printing (page 16)
This section explains how to print a completed label.
• Simply place the disc onto the tray as instructed by the message that appears on the screen.
Other Operations (page 61)
This section provides details about other settings.
Printing and Other Operations
Troubleshooting Guide
(page 65)
• Check this section whenever you run into
problems.
• Here you will find details about online
help and error messages.
Label Making Overview (page 12)

8
After using this CD/DVD LABEL PRINTER application to create the labels you want, you can connect your
printer to your computer and print them.
You can also import track names from
Windows Media
TM
Player, or Easy CD
Creator, or you can import CD-Text
from a CD (page 26).
• Screen shots shown in this manual
are based on Media Player for
Windows XP.
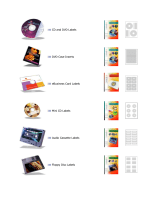
• Music Discs
Labels can include artist names and track titles (page 20).
LPCW-100 Printer Features

9
This printer and its software do not include functions for recording to a CD-R, CD-RW or other types of discs.
• Data Discs
You can import the names of folders and
files you plan to store on a disc and print
them on its label. You can also type in
information manually (pages 20 and 30).
• Digital Image Discs
You can import recording dates and image
descriptions from your PC and print them
on the label. You can also type in
information manually (pages 20 and 30).
Important!
Business report.xls
Holiday work.xls
New employees research data.doc
Weekly meeting summary.doc
New order.xls
Counter error data.doc

10
• Print with TrueType
®
fonts installed on your
PC (page 39).
• Support for both text and images (page 41).
Note that images are printed in monochrome.
• A collection of preset templates lets
you produce great looking labels with
minimum effort.
LPCW-100 Printer Features

11
• A Free Text Template allows more control
over the appearance and layout of text (Free
Text → page 46).
• A Free Design template gives you almost total
freedom for laying out text and images to
create exactly the look you want (Free Design
→ page 46).

12
Label Making Overview
Label Creation Basics
After you install the CD/DVD LABEL PRINTER application, connect the
printer to your computer, and load an ink ribbon cassette into the printer,*
you can perform this operation in this section to actually print a label.
This section takes you through the basics of label making, from layout,
to printing and storage.
* See the printer User's Guide for information about how to load an ink
ribbon cassette.
Example: Music CD label
To create a label
1.
On your Windows desktop, double-click the CD DVD LABEL PRINTER
LPCW-100 short cut icon.
Note
You can also start up the application by clicking the Windows Start
button and then All Programs. Next, point to TDK, and then click CD
DVD LABEL PRINTER LPCW-100. Note that the location of the
application may be different on your computer, depending on what
you specified when you installed it.
This starts up the CD/DVD LABEL PRINTER application and displays a
dialog box for specifying the orientation of the printer.

13
2.
Select the “Vertical” or “Horizontal” option, and then click OK.
• This starts up the CD/DVD LABEL PRINTER application and then
displays a label template selection menu.
• Use the Advanced Settings dialog box (page 61) to control whether
or not the printer orientation dialog box appears each time you
start up the CD/DVD LABEL PRINTER application.
3.
Click .
This displays the main window for the music label template.
Important!
You must select a label template before you can perform operations
on the main window.
Label Preview Image
Label Input Boxes

14
4.
Input the text data you want.
Move the cursor to the label input boxes, and then type in the disc
title, artist names, and track names.
The text you input appears in the preview image on the screen.
Important!
The warning message “Printing string is overflow” appears when the
text data you input does not fit inside the print area.
See “Configuring Text Layout Settings” (page 37) and “Configuring
Font Settings” (page 39) for information about adjustments you can
make to help the text fit.
Warning message
Configuring Template Setting
5.
Click .
This displays a dialog box for selecting the print pattern.
Note
See page 36 for details about print pattern setting.
6.
Click .

15
7.
Click .
This displays a dialog box for selecting the text layout.
Note
See page 37 for details about changing the text layout pattern.
8.
Click .
Selecting a Font
9.
Click .
This displays a dialog box for making font settings.
10.
Confirm that Title tab is selected.
Note
If a different tab is displayed, click Title.
11.
For Font Size, select 2.

16
12
. Click the Artist Name tab.
13
.Select 2 for Font Size, and then click OK.
This completes input of the label data.
Note
See page 39 for details about font settings.
To print a label
Important!
•
See the separate “Quick Start Guide” sheet for important information
about printing conditions.
•
Do not try to use this printer to print on a mini CD-R or a CD-R
business card. Doing so can damage the printer. Use the printer to
print on 12cm discs only.
•
We recommend that you print on a disc before you record anything
on it. Printing on a disc that already has data recorded on it can
cause the data to become corrupted.
1.
Connect the printer to your computer.
• For information about connecting the printer to your computer, see
the printer User’s Guide.
2.
Click .
• This causes the disc tray to open.
Important!
• Make sure there is nothing in front of the printer to interfere with
the movement of the disc tray.
• Note that the disc tray will not open automatically if you have “Manu-
ally open disc tray before printing” selected under Auto Disc Tray
Operation Setting on the Print tab of the Advanced Settings dialog
box (page 61).

17
• The dialog box shown below appears on your computer screen when
the disc tray opens.
1 Shows how the disc should be oriented when placed on the disc tray.
Note
• You can specify the vertical/horizontal configuration of your printer
using the Printer Orientation setting on the Print 2 tab of the Ad-
vanced Settings dialog box (page 61).
2 Click to start printing.
3 Click to skip the upper label area printing and perform lower label area
printing.
4 Click to cancel printing.
5 Click to open or close the disc tray.
6 Click to display a dialog box for configuring printing, phrase memor y, and
other settings (page 61).
3.
Place the disc onto the disc tray.
• Place the disc onto the disc tray with the recording side of the disc
facing the tray. Press down lightly until you hear the disc click into
place. When placing the disc onto the tray, use your hand to hold
the disc tray still.
Important!
• Do not apply excessive pressure against the tray when placing a disc
on it.
• Check to make sure that there is no dirt or other foreign matter on
the disc or tray. Closing the tray while there is foreign matter present
can damage the recording surface of the disc and make recording
on it impossible.
• Make sure that the disc is facing properly. If the recording side of
the disc is facing away from the tray, the printer will print on the
recording side, which will make it impossible to record data onto the
disc.
• Placing a disc onto the tray
when the printer is standing
up vertically
• Placing a disc onto the tray
when the printer is laid down
horizontally
2
1
3456

18
Printing on a disc that already has something
printed on it
This printer will not print properly over a logo or other printing that
is already on a disc. For such a disc, you will need to use the print-
er's built-in printing guide to make sure that printing is performed in
the correct location.
1
Pull the printing guide from the
printer.
Note
You do not need to use the printing
guide if the disc you are printing
on does not have anything printed
on it.
2
Adjust the position of the disc.
Important!
• Pressing in on the disc tray or
pressing the eject button while
adjusting the position of the disc
will cause the disc tray to close.
When adjusting the disc position,
use your other hand to hold the
disc tray still.
• If you want to print only in the lower label area, position the disc
so the upper label area is facing towards you.
• For more information, see the separate “Quick Start Guide”.
Position the disc
so the upper label
area is facing
towards you.
Position the disc so the
printing areas marked on
the printing guide are
parallel with the logo and
other printing.
Printing area
4
. Close the disc tray.
• Press in lightly on the tray, press the Eject button, or click the
button on the CD/DVD LABEL PRINTER application screen.
Important!
• Take care to avoid catching your fingers or hand in the disc tray
when closing it.
5
. Click Start printing.
• This starts the printing operation.
• The disc tray will open automatically after printing is complete. When
this happens, remove the disc from the tray.
Important!
• Never disconnect the printer’s AC adaptor power cord or the USB
cable while printing is in progress. Doing so can cause malfunction
of the printer.
This completes the printing operation.

19
To save label data
1
. Click .
2.
On the menu that appears, click Save.
3.
Check the file name and then click Save.
The label data is saved in your Windows My Documents folder.
Note
See page 33 for details about saving label data.
To quit the CD/DVD LABEL PRINTER application
1
. Click .
2.
On the menu that appears, click Exit.
Note
You can also quit the application by clicking the button in the
upper right corner of a main window.
Important!
You cannot quit the application while a print operation is in progress.
Wait until printing is finished before you quit.
/