Page is loading ...


In this case the 'Home Movies - Insert your own titles.tpl' was chosen. The 'insert your own titles' means that the
theme has merge fields or place holders for text to be dynamically inserted at the time the project is run. The color,
font and placement of the text can be seen or modified by using the disc layout editor or case wrap layout editor.
For this particular menu theme, the first menu is the main menu and has buttons to play the video, jump to the
chapter selection menu(s) or jump to the second menu page which can be an information page. The third menu
page shown is used for bitmaps to represent each chapter. To modify or see how the menu is laid out, use the
accompanying MenuMaker application. If you choose to modify either the disc label, case wrap those changes can
be saved by saving the project from the application using the 'Save Project' button. If you choose to modify the
DVD menu, use the MenuMaker application. It is probably best to save the new template and menu theme under
different filenames because, if you install an upgrade, it will most likely overwrite the project and menu theme
templates. If you change the menu, make sure to change the name of menu in the project theme to points to your
modified menu.
Finally, if you choose the project theme shown, the rest of the quick start guide will match what you actually see on
your own screen.
To continue the Quick Start Guide, proceed to 'Select Live or Pre-Captured Video'.
For additional information on this Wizard Page see also (Theme Selection Page)
Select Live or Pre-Captured Video
Select Live or Pre-Captured Video
There are a couple couple different ways to start a job, but they both end up at the same place with a DVD and
printed assets. Selecting a default here will not prevent you from making DVD's the other way. The two differnt
ways of starting a DVD project are brought out because the way the job is setup and started are completely
different. The wizard page for making this selection is shown below:

If you select the first option, proceed to 'Select Audio/Video Inputs and Settings'.
If you select the second option, proceed to 'Select DVD Writer'.
For additional information on this Wizard Page see also (Select Live or Pre-Captured Video)
Select DVD Writer
On this page, you can specify where your DVD's will typically be written. The choices are either a local DVD writer
robotic DVD duplicator/printers. On this page, simply make your selection from the drop down listbox. As has been
mentioned repeatedly, setting up this preference as a default will not prevent you from changing the writer on each
and every job.

To continue the Quick Start Guide, proceed to 'Select Default Printers'.
For additional information on this Wizard Page see also (Select DVD Writer)
Select Default Printers
On this page, you can specify where your paper assets will normally be printed. The choices are either a local DVD
writer robotic DVD duplicator/printers. On this page, simply make your selection from the drop down listbox. As has
been mentioned repeatedly, setting up this preference as a default will not prevent you from changing the writer on
each and every job.

To continue the Quick Start Guide, please specify which type of source material you selected in the setup wizard.
• From a video source
• From files on your hard drive (DV source not needed for this option)
For additional information on this Wizard Page see also (Select Default Printers)
Creating a DVD From a Video Feed
1. At this stage, the assumption is made that you have completed the Setup Wizard. Since the Quick Start Guide
used the HOME Movie theme as an example, the following example creates a DVD with the HOME Movies
DVD menu theme. If no Menu Theme is selected, the Setup Wizard was probably not correctly started. You
can re-start the Setup Wizard by right-clicking on the application logo (located in the upper left hand corner of
the DVD-300SDI user interface) and then selecting 'Setup Wizard...' from the popup menu.
2. On the setup tab of the display area on the application enter the text as shown below:

If you selected an alternate theme when stepping through the Setup Wizard, a different menu theme may be
shown. That is ok!
3. Next click the record button with the un-lit red LED.
Now the red LED should appear lit and the green encode LED should be blinking.
4. If the video is a live feed such as a TV or camera feed, simply press the play button. If it is a tape deck, queue
the video to the desired starting place and then start it playing. You should click the play button very shortly
after starting the video feed. Once capture has started, the green LED will be on without blinking and the
display should automatically have switched to the 'Encode' tab shown below.

5. After a minute or so, click the stop button (with the square symbol on it shown below) to stop the video capture
before the 1 hr capture limit would have automatically stopped it for you. The display area should switch to the
'Author' tab where it should take a few seconds to author the DVD. Upon completion of the authoring, the
project is complete and your DVD has been created on the Hard Drive.
6. You may now play the DVD on the hard drive using a software DVD player. For help on using PowerDVD to
test your DVD before writing it to disc, go to 'Testing Your DVD using PowerDVD'.
To learn how to print the paper assets and write the DVD, proceed to Printing the Paper Assets and Writing the
DVD
Creating a DVD From Files on Your Hard Drive
Prerequisites
Creating DVD's from files on your hard disc requires that you to have some appropriate files to use. So the first
question is, what kind of files can you create DVD's from?
1. Currently our DVD authoring only supports full D1 size video and we don't resize the frame size so your pre-
capture files will need to be full D1 size which is either 720x480 or 704x480 for NTSC or 720x576 or 704x576
for PAL.
2. Now, as for compression formats, we either support:
a) DVD ready compression which is DVD compliant MPEG-2. This can come in several different formats.
- Elementary streams where the audio and video are stored in seperate files. Video files with the
following extensions *.mpv or *.m2v may but are not guaranteed to contain MPEG-2 video. Audio
files must also have the correct sampling rate for for DVD's which is 48 KHz, 16 bit. The audio can
be compressed as MPEG layer 2 audio which will typically have extension *.mpa or *.m2v. AC3
audio (*.ac3) of the correct sampling rate and size are is also acceptable.
- MPEG-2 program streams are typically MPEG-2 video and MPEG layer 2 audio multiplexed into a
single stream. *.mpg is a common extension for this type of file.
- VOB files are very similar to MPEG-2 program streams in format. They will typically be found in
the VIDEO_TS folders of DVD's. Do NOT try to use VOB files from copyrighted or encrypted
DVD's, it will not work.

b) Any video format of the right dimensions (Frame sizes mentioned above) that you have a DirectShow
decoder for. Another way to look at it is any video file of the right size that can be played by Window
Media Player. Our software uses a software MPEG-2 encoder to convert raw video to DVD compliant
MPEG-2. Some typical file extensions which will contain usable media are *.wmv and *.avi. If you have
specifically installed a QuickTime DirectShow
Before, setting up the project, let's set one of the preferences to suit our needs. Click the preferences button, and
the Preferences tab from the property page dialog that pops up. Uncheck the option to 'Step Through Property
Pages as a Wizard'. Don't worry about the other options for now. If you want to read more about the this options on
this page you can do that in the section titled 'Preferences'.
After making sure that option is unchecked, you can apply your options by clicking OK.
Proceed to 'Setting Up the Project'
Setting Up the Project
You can start out the same way as when doing live capture by entering a Job ID, title, subtitle and date for the
project.

Selecting the Audio and Video Files
At this time, don't worry about the capture limit because it will not be needed. Leave all four checkboxes
unchecked. Now click the button to bring up the project property pages.
The four text fields are the values entered on the setup page of the display. If you changed any of the text here, the
change would be reflected on the setup display page.
• Now check the 'Use Pre-Captured File' option.
• Next click on the 'Pre-Captured Files' tab, and that property page should appear.

What you need to do now will depend on the type of pre-captured files you have. Select the type of files you have
on your hard disc that you will be making a DVD from. Next click the 'Enter/Edit FileList' button and the following
should appear.
Now click cell under the Video File header.
Click again, this time in the area circled in red, to get a browse button.

Now click the browse button to select the video or multiplexed file.
After selecting the file and closing the browser dialog, if needed follow the same steps to select your audio
elementary stream.
If you are using Elementary Streams, Program Stream or VOB Files, the video will not need to be encoded so you
can close the 'Pre-Captured FileList' dialog as well as the project property page dialog. If your hardware supported
Video Preview, the preview will stop when the property page is closed. This is because the application knows that
this project has been setup to author pre-encoded file and will not need the video capture. Proceed to 'Start
Authoring Pre-Encoded Files'.
Setting the Encoder Bitrate
If using 'AVI files or other files that need to be transcoded' the software MPEG-2 encoder will be used. One of the
key settings that needs to be made for MPEG encoding is the video bitrate. The bitrate is the factor that determines
how many minutes of video can be stored on a standard DVD.
• The bitrate can be computed automatically if the length of the video clip is known. The length of the video clip
can be entered in the cell under the heading 'Length (hh:mm:ss)'.
• If the length of the video clip is not known, but you know what to set the bitrate to so that the compressed audio
and video will fit onto the DVD, you may set it manually at this time. To set the bitrate, click on the
'Capture/Encoding' tab on the property page to get the following:
Select the 'Manual' Bitrate Computation as shown. If your video is less than one hour and fifteen minutes long,
you can leave the bitrate where it is. If your video is longer, you will have to compute the bitrate yourself. For
now, ignore the other fields and click OK accept all the project settings. If your hardware supported Video
Preview, the preview will stop when the property page is closed. This is because the application knows that
this project has been setup to do offline encoding and will not need the video capture.

Proceed to 'Start Offline Encoding'.
Start Offline Encoding
To begin the offline encoding, click the 'Encode' button shown below. After encoding starts, the green LED above
the 'Encode' button will be lit.
The application display area should automatically switch to the 'Encode' tab and appear as shown.
When the encoding completes, the project will authomatically switch to the 'Author' display tab and continue with the
DVD authoring. When the DVD authoring is finished, your DVD may be viewed using the PowerDVD application
that was provided with this software. For help on using PowerDVD to test your DVD before writing it to disc, go to
'Testing Your DVD using PowerDVD'.
To learn how to print the paper assets and write the DVD, proceed to Printing the Paper Assets and Writing the
DVD
Start Authoring Pre-Encoded Files
To begin authoring your pre-encoded files, click the 'Author' button shown below. After authoring starts, the green
LED above the 'Author' button will be lit.

The application display area should automatically switch to the 'Chapter' tab and appear as shown. Based on the
default chapter selection algorithm, the application must first select chapter points and then acquire bitmaps of the
first frame of each chapter to use on the chapter selection menu.
After the chapter selction is done, the application display area should automatically switch to the 'Author' tab and
appear as shown.

When the DVD authoring is finished, your DVD may be viewed using the PowerDVD application that was provided
with this software. For help on using PowerDVD to test your DVD before writing it to disc, go to 'Testing Your DVD
using PowerDVD'.
To learn how to print the paper assets and write the DVD, proceed to Printing the Paper Assets and Writing the
DVD
Printing the Paper Assets and Writing The DVD
1. Go back to the 'Setup' tab by clicking on it. Now check the four boxes as shown below:
2. Make sure your printers are turned on and have the correct paper. If using a single printer, the disc label will be
printed first, followed by the case wrap and the chapter insert will be printed last. You must also have a blank
DVD in the selected DVD writer. If not, when you try to start the job, it will prompt you for blank media. If you
did not select default printers when you steped through the Wizard, you should do so now, otherwise you will
get errors if you try to print.
3. Repeat the steps used to create the DVD from a video feed or files on the hard drive.
4. This time however, the job will not stop after the authoring stage but will proceed to the printing and writing
stages.
5. Once the printing and writing are complete, if you printed a paper label, you can apply the label to the DVD.
You can also tear or cut the perforated case wrap and cut out the chapter insert. You should be able to use
your DVD in most DVD players on the market today.
If you were happy with the DVD you had created on the hard drive and you simply want to print and burn the DVD
without having to re-capture or re-author the DVD, your could simply have clicked on the 'Setup' tab as mentioned in
step 1, checked the four boxes and then simply pressed the print button shown below:
Assuming you had not deleted the intermediate files from your work directory, the project would have started at the
print stage and proceeded to the write stage.
If you had closed the application since you had created the DVD and had not reused the 'test' Job ID, you could
simply load test.job by clicking on the 'Load 'Project' button and selecting test.job as the project file to open. From
this point, you could click on the the print button which would perform the print and write stages.

It should be obvious that this is one way to make extra copies of a job provided the intermediate files are not
removed.
For a more detailed walk through and discussion of options, see the tutorial.
Introduction to DVD-300SDI
Important Note
It is important to realize that there are two root level directory names that are reserved on the drive that the
DVD is to be built. See preferences for setting the Drive for VIDEO_TS and AUDIO_TS directories. The
VIDEO_TS and AUDIO_TS folders on the specified DVD directory will be overwritten during the authoring
stage.
What it is
The DVD-300SDI Application is a Windows XP based, full-featured DVD authoring application. It provides a simple
and efficient means of completely setting up a DVD authoring job to be able to run without user intervention once
started. It was designed to increase productivity in commercial DVD authoring jobs by reducing the need for user
intervention without sacrificing flexibility and quality. Using 4x DVD-R writers, a two-hour DVD can be captured and
authored in approximately 2-1/2 hours, and a one-hour DVD can be authored in less than 1-1/2 hours. DVD-300SDI
can also output to robotic CD/DVD duplicating systems
The output of the completed job is:
• A written DVD sitting in the ejected DVD writer tray containing the following features/options:
• Full D1 NTSC or PAL video resolution
• Variable bit rate MPEG-2 video encoding
• Two channel (stereo) Digital Dolby audio encoding
• User defined menus with dynamic (number of chapters and scene selection pages determined by video
content) scene selection menu
• Automatic scene detection, with additional chapters added into long scenes. Natural and forced scene breaks
are distinguished from each other in the DVD scene selection menu as well as the paper assets.
• Printed/paper asset options
• Disc label
• Self-adhesive disc label with title, subtitle, date.
• Direct to disc printing by robotic duplication system.
• DVD case wrap with title, subtitle, date, running time and full color thumbnails of the chapter points.
• Case insert with chapter time indices and chapter durations.

• A job file containing all pertinent data that was input to the job as well as data that was collected as the job
progressed. The job file can be used as a template to run another similar job or re-run the completed job.
What it isn't
DVD-300SDI is not a video editing application.
Using DVD-300SDI
This section discusses how to use the DVD-300SDI application.
Setup Wizard
The Setup Wizard is automatically run the first time the application is launched. It can also be launched manually
from the popup menu obtained by a right click on the application logo. The purpose of this wizard is to setup your
hardware specific settings to simplify making your first DVD. All these settings can also be set through the project
wizard or property pages. If the wizard is cancelled without finishing, it will be run again the next time the
application is launched unless the settings are saved using the save settings button.
Introduction Page
This page merely introduces the Setup Wizard.
Theme Selection Page
This page provides a preview of some of the current theme assets. The first time it is run, no preview will be
showing until a theme is selected.

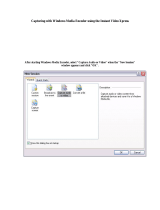
Click on the '...' browse button to select a theme. A Theme will determine how your DVD menu will look as well as
the disc label and the case wrap. Once a theme is selected, you can further customize your DVD if you like by
using the project property pages. This software provides the capability to dynmically insert title and date information
into both your DVD menus and paper assets. The placement of that dynamic text is not show on these previews. If
the menu theme contains more than 3 menus, only the background bitmaps of the first three will be shown. At this
time, thumbnails previews of motion menus are not provided.
The browse button will bring up the following dialog box to select your default look.
Select Live or Pre-Captured Video
The page allows you to specify whether you will primarily be creating DVD's from a live video feed, such as a
camera or VCR or whether you will be making your DVD's from pre-captured files on your hard drive. If you select
from a live video source, each time the application is launched or the 'New Project' button is pressed, the application
will be initially setup to capture video. This default can easily be overridden by the radio buttons in the lower left
hand corner of the Job Property Page. Your default setting can be changed by re-running the wizard or by simply
pressing the save settings button after changing the setting on the Job Property Page.

Select Audio/Video Inputs and Settings
This page is only shown if the live video selection is made on the previous wizard page. This allows default audio
video input settings to be set. On a project by project basis, this default can easily be overridden by the options on
the Encoding Property Page. Your default settings can also be changed by re-running the wizard or by simply
pressing the save settings button after changing the setting on the Encoding Property Page.

Some of these settings will not be applicable depending on the hardware configuration.
• Audio Input Source Connector - may be used to specify analog or digital audio and possible the type
or format of the audio feed.
• Video Input Source Connector - may be used to specify the type of cable that is used to connect the
video source to the capture card.
• Video Signal - specifies whether the video feed will be NTSC or PAL.
• Aspect Ratio - if available will specify whether the default video feed has a 4x3 or 16x9 aspect ratio.
Select DVD Writer
This page allows the DVD writing device to be selected. If no DVD duplicators or towers are attached, a local DVD
writer must be accessible in order to select a writing device. Again as is the case on each other setup wizard page,
on a project by project basis, this default can easily be overridden by the options on the DVD Writing Property Page.
Your default settings can also be changed by re-running the wizard or by simply pressing the save settings button
after changing the setting on the DVD Writing Property Page.

Select your default output device from the drop-down listbox.
Select Default Printers
The printers to be selected here are those used for printing paper label, case wrap stock and case inserts. Again as
is the case on each other setup wizard page, on a project by project basis, these defaults can easily be overridden
by the options on the Disc Label Property Page, Case Wrap Property Page or Case Insert Property Page wizard
pages. Your default settings can also be changed by re-running the wizard or by simply pressing the save settings
button after changing the setting on the project property pages mentioned.
/