
13
CONTENTS GB
BEFORE USING THE APPLIANCE
PAGE
14
SAFEGUARDING THE ENVIRONMENT
PAGE
14
PRECAUTIONS AND GENERAL
RECOMMENDATIONS
PAGE
14
HOW TO USE THE REFRIGERATOR
COMPARTMENT
PAGE
15
HOW TO USE THE FREEZER COMPARTMENT
PAGE
17
HOW TO DEFROST THE FREEZER
COMPARTMENT
PAGE
18
HOW TO CLEAN THE REFRIGERATOR
COMPARTMENT
PAGE
18
CARE AND MAINTENANCE
PAGE
20
TROUBLESHOOTING GUIDE
PAGE
20
AFTER-SALES SERVICE
PAGE
21
INSTALLATION
PAGE
21
ELECTRICAL CONNECTION
PAGE
22
10033051aGB.fm5 Page 13 Friday, February 25, 2005 12:05 PM

14
Your new appliance is a combined fridge freezer
exclusively for domestic use.
The
freezer compartment
can be
used to deep freeze fresh and cooked food,
make ice cubes, and for the storage of frozen
and deep-frozen food;
defrosting the freezer is
a manual procedure
. The
refrigerator
compartment
, which has an
automatic defrost
feature, is used for the storage of fresh food and
beverages.
To get the most out of your new appliance,
read the user handbook thoroughly. The
handbook contains a description of the
appliance and useful tips for storing food.
Keep this handbook for future consultation.
1.
After unpacking the appliance, make sure
that the doors shut properly. Any damage
must be reported to your retailer within 24
hours after delivery of the appliance.
2. Wait at least two hours without moving
the appliance before connecting it to the
power supply.
3.
Appliance installation and electrical
connections must be carried out by a
qualified technician in accordance with the
manufacturer’s instructions and local
regulations.
1. Packing
The packaging material is 100% recyclable
(marked with recycling symbol). Adhere to local
regulations when disposing of packaging
material.
The packaging material (plastic bags,
polystyrene parts, etc.) is potentially dangerous
and must be kept out of reach of children.
2. Product
The appliance is made from recyclable materials
and must be scrapped in accordance with local
waste disposal regulations.
Make the appliance unusable by cutting off the
power cord. The appliance must be consigned to
an authorised collection centre for the recovery
of refrigerant gas.
Information:
This appliance does not contain CFCs (replaced
with R134a) or HFCs (replaced with R600a -
Isobutane). For information, refer to the rating
plate affixed to the appliance.
BEFORE USING THE APPLIANCE
SAFEGUARDING THE ENVIRONMENT
10033051aGB.fm5 Page 14 Friday, February 25, 2005 12:05 PM

15
•
Use the
refrigerator compartment
only for
storing fresh food and beverages and use the
freezer compartment
only for storing frozen
food, freezing fresh food and making ice
cubes.
•
Do not cover or close the air vents.
•
Do not store liquids in glass containers in the
freezer compartment - danger of bursting.
•
Do not eat ice cubes or ice lollies immediately
after taking them out of the freezer
compartment - risk of “cold” burns.
•
Do not allow children to play or hide inside
the appliance - risk of becoming entrapped
and suffocating.
•
Do not ingest the contents (non-toxic) of the
ice packs.
•
Before cleaning or servicing, always unplug
the appliance or switch the power supply off.
Declaration of conformity
•
This appliance is intended to come into
contact with foodstuffs and conforms to D.L.
108 of 25.01.1992 (European Directive
89/109/EEC).
Information
Appliances with isobutane (R600a)
Isobutane is a naturally occurring low
environmental impact gas. Caution is required,
however, because Isobutane is inflammable.
Take care not to damage the pipelines of the
refrigerant circuit.
PRECAUTIONS AND GENERAL RECOMMENDATIONS
10033051aGB.fm5 Page 15 Friday, February 25, 2005 12:05 PM

16
This appliance is a refrigerator with a 4 star
freezer compartment.
Defrosting of the refrigerator compartment is
performed automatically.
The refrigerator can operate in room
temperatures between +10° C and +38° C.
Optimal performance of the appliance depends
on the climatic class, which is indicated on the
rating plate.
Switching on the appliance
Plug in the appliance.
The thermostat knob in the refrigerator
compartment serves to adjust the temperature in
both the refrigerator and freezer compartment if
your appliance is equipped with a single
compressor.
Refrigerator compartment and freezer
compartment temperature adjustment is
independent in the case of appliances with two
compressors (see product description sheet).
Temperature adjustment
1.
To ensure correct operation and the best
possible food storage in both compartments,
set the thermostat in accordance with the
indications on the enclosed product
description sheet.
2.
To alter the temperature in the refrigerator
and freezer compartments set the thermostat
knob to:
• lower numbers 1-2
(MIN)
if you want to
INCREASE
the temperature;
• higher numbers 5-7
(MAX)
if you want to
DECREASE
the temperature.
Thermostat setting z switches off all functions of
the appliance including the interior light.
Note:
The room air temperature, the number of times
the door is opened and the position of the
appliance will affect the temperature in the
refrigerator and freezer compartments. Take
these factors into consideration when you set the
thermostat. For example if the machine is
operated in a room with high temperature you
may need to set the thermostat to a low number.
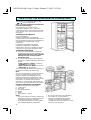
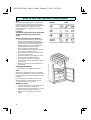
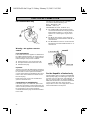
Using the refrigerator compartment
Position the food as shown in the figure.
A Cooked food
BFish, meat
C Fruit and vegetables
D Bottles
E Butter
F Dairy products, cheese
Notes:
•
The space between the shelves and the rear
wall of the refrigerator compartment must be
unobstructed to allow air circulation.
•
Do not place the food in direct contact with the
rear wall of the refrigerator compartment.
•
Do not place hot food in the refrigerator.
•
Store liquids in closed containers.
•
Storage of vegetables with high water
contents can lead to the formation of
condensation: this will not affect the correct
operation of the appliance.
HOW TO USE THE REFRIGERATOR COMPARTMENT
10033051aGB.fm5 Page 16 Friday, February 25, 2005 12:05 PM

17
The appliance has a 4 star freezer
compartment in which food can be stored for
the time indicated on the packaging. The
freezer can also be used to freeze fresh food
by positioning it on the racks; place frozen
food in the lower basket so that there is no
contact with fresh food that has yet to be
frozen.
The quantity of fresh food that can be frozen
in 24 hours is shown on the rating plate.
Freezing fresh food
If your appliance is equipped with a single
compressor:
•
Set the thermostat knob to 2-3.
•
If the appliance is equipped with a freeze
button, press it to activate the function (the
yellow indicator light will switch on). Also the
red indicator light (models with control panel)
may switch on. The red indicator light will
switch off when the freezer compartment has
reached the optimum temperature.
Note:
The freeze function makes it possible to freeze
fresh food while maintaining the temperature in
the refrigerator compartment at the optimum
level.
Rapid freezing function
If your appliance is equipped with two
compressors, activate the rapid freezing function
6 hours before inserting fresh food to obtain the
maximum freezing power as indicated on the
rating plate.
Important:
•
Before freezing, wrap and seal fresh food in:
aluminium foil, cling film, air and water-tight
plastic bags, polythene containers with lids
or special freezer containers.
•
Arrange the fresh food in the upper area of
the freezer compartment, leaving sufficient
space around each pack for the air to
circulate.
•
The food will be completely frozen in 24 hours.
•
Press the rapid freezing button to switch off
the function (yellow indicator light switches
off).
Temperature alarm function
(control panel versions)
When the appliance is running normally or when
food is being frozen, the
red led
may switch on
(in certain models this will be accompanied also
by an
audible signal
) informing you that the
temperature in the freezer compartment is too
high.
This may occur in the following situations:
•
when the appliance is switched on for the first
time;
•
when it is switched on following defrosting
and cleaning;
•
if you load too much food at room
temperature;
•
if the freezer door has been left ajar;
•
if the “freezer thermostat knob” on the control
panel is advanced towards the “
MAX
” setting
(intense cold);
To mute the acoustic alarm press the “Fast
freeze” button.
When temperature in the freezer compartment
has fallen to acceptable levels, the red indicator
LED will switch off automatically. At this point
remember to switch off the “Fast freeze”
function.
HOW TO USE THE FREEZER COMPARTMENT
10033051aGB.fm5 Page 17 Friday, February 25, 2005 12:05 PM

18
Note:
The temperature in the freezer compartment is
maintained at the ideal level for the storage of
frozen food also during power failures of limited
duration, although it is advisable to avoid
opening the freezer compartment door during
such periods.
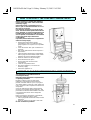
Important:
The table alongside shows the recommended
maximum storage time for frozen fresh
foods.
When purchasing frozen food products:
•
ensure that the packaging is not damaged
(frozen food in damaged packaging may
have deteriorated). Avoid packages that are
swollen or show evidence of damp areas
indicating that the food may have thawed
partially during its period of storage.
•
When shopping, leave frozen food
purchases till last and transport the products
in a thermally insulated cool bag.
•
Place the items in the freezer compartment
as soon as you get home.
•
If food has thawed, even partially, do not re-
freeze it. Consume within 24 hours.
•
Avoid subjecting foods to temperature
variations. Observe the “best before” date on
the package.
•
Always observe the storage information on
the package.
Removing the baskets
•
Pull out fully, raise slightly and remove.
Note:
The freezer compartment can be used without
the two upper baskets to increase storage space
for large products. The lower basket must not be
removed.
Place the food products directly on the racks.
After inserting food, ensure that the freezer
compartment door closes properly.
Making ice cubes
•
Pour water into the ice tray up to 2/3 full and
place it in the freezer compartment.
•
If the ice tray sticks to the shelves, do not use
pointed or sharp objects to detach it.
•
Bend the ice tray slightly to remove the
cubes.
HOW TO USE THE FREEZER COMPARTMENT
MONTHS FOOD
10033051aGB.fm5 Page 18 Friday, February 25, 2005 12:05 PM

19
Before servicing or cleaning the appliance,
unplug it from the mains or disconnect the
electricity supply.
Defrost the freezer compartment once or
twice a year or when the formation of ice on
the racks is excessive.
It is perfectly normal for ice to form on the
racks. The amount and speed at which the ice
forms depends on room air temperature and
humidity and the frequency with which the
door is opened. Ice formation is concentrated
on the racks at the top of the freezer
compartment.
If possible, defrost the freezer compartment
when it is nearly empty.
•
Remove the food from the freezer
compartment, wrap in a newspaper and
group together in a cool place or in a portable
cooler.
•
Leave the freezer door open so that the ice
can thaw.
•
Pull out the defrost water drain and place a
tray below it.
•
Clean the interior of the freezer compartment
with a sponge and warm water and/or neutral
detergent. Do not use abrasive products.
•
Rinse the interior and dry thoroughly.
•
Fit the drain back into place.
•
Put the food back into the freezer
compartment.
•
Close the compartment door.
•
Plug in the appliance / reconnect the
electricity supply.
•
Switch the appliance on.
The refrigerator compartment must be
cleaned periodically.
Defrosting of the refrigerator compartment is
completely automatic.
Droplets of water on the rear wall of the
refrigerator compartment indicate that the
periodic automatic defrost cycle is in progress.
The defrost water is routed to a drain outlet and
into a container on the compressor from which it
evaporates.
Clean the defrost water drain outlet regularly
using the tool supplied with the appliance. This
precaution ensures that defrost water is removed
correctly from the interior of the refrigerator
compartment.
Before cleaning the refrigerator compartment,
unplug the appliance from the mains.
•
Use a sponge with warm water and/or neutral
detergent.
•
Rinse the interior and dry with a soft cloth.
Do not use abrasive products
HOW TO DEFROST THE FREEZER COMPARTMENT
HOW TO CLEAN THE REFRIGERATOR COMPARTMENT
10033051aGB.fm5 Page 19 Friday, February 25, 2005 12:05 PM

20
Prolonged disuse
1.
Empty the refrigerator and freezer
compartments.
2.
Unplug the appliance from the mains.
3.
Defrost and clean the interior of both
compartments.
4.
Leave the doors open to prevent the
formation of mould, odours and oxidation.
1. The appliance is not working.
•
Is there a power failure?
•
Is the plug properly inserted in the socket?
•
Is the mains power switch set to ON?
•
Has the fuse blown?
•
Is the power cord in perfect condition?
•
Is the thermostat knob on
position z (Stop)?
2. Temperature is not low enough.
•
Are the doors closed properly?
•
Is the appliance installed next to a heat
source?
•
Is the thermostat setting correct?
•
Are the air circulation grilles blocked?
3. Temperature is too low.
•
Is the thermostat setting correct?
4. Water collects at bottom of refrigerator
compartment.
•
Is the defrost water drain outlet blocked?
5. The interior light is not working.
Perform the checks for problem 1, and then:
•
Unplug the appliance. To access the bulb,
refer to the instructions and illustration on
the attached product description sheet.
•
Check the bulb and, if necessary, replace it
with an equivalent one (15 W max.).
6. Red LED on freezer control panel remains
lit / acoustic alarm sounds.
(see "How to use the freezer compartment")
•
Have you just loaded a large quantity of
fresh food?
•
Freezer door properly closed?
Notes:
• The front edge of the appliance may be
hot. This prevents the formation of
condensation and is not a defect.
• Gurgling and hissing noises due to
expansion in the refrigerant circuit are
normal.
CARE AND MAINTENANCE
TROUBLESHOOTING GUIDE
10033051aGB.fm5 Page 20 Friday, February 25, 2005 12:05 PM

21
Before calling After-sales Service:
1.
See if you can solve the problem yourself
with the help of the "Troubleshooting Guide".
2.
Switch the appliance on again to see if the
problem persists. If it does, switch off and
wait for about an hour before switching on.
3.
If the problem persists after this action,
contact After-sales Service.
Specify:
•
the nature of the fault,
•
the model,
•
the service number (the number after the
word SERVICE on the rating plate on the
inside of the appliance),
•
your full address,
•
your telephone number and area code.
Note:
The direction of door opening can be
changed. If this operation is performed by
After-sales Service it is not covered by the
warranty.
•
Install the appliance away from heat sources.
Installation in a hot environment, direct
exposure to the sun or installation near heat
sources (heaters, radiators, cookers) will
increase power consumption and should
therefore be avoided.
•
If this is not possible, the following minimum
distances must be respected:
•
30 cm from coal or paraffin stoves;
•
3 cm from electric or gas cookers.
•
Install the appliance in a dry, well-ventilated
place.
•
Clean the interior (see the relative heading in
this handbook).
•
Fit the accessories.
Electrical connection
• Electrical connections must be made in
accordance with local regulations.
•
Voltage and power consumption are
indicated on the rating plate inside the
appliance.
• The appliance must be earthed by law.
The manufacturer declines all liability for
injury to persons or animals and for
damage to property resulting from failure
to observe the above prescriptions.
•
If the plug and socket are not of the same
type, have the socket replaced by a qualified
electrician.
•
Do not use extension leads or adaptors.
Disconnecting the appliance
It must be possible to disconnect the appliance
by unplugging it or by means of a two-pole switch
fitted upline of the socket.
AFTER-SALES SERVICE
INSTALLATION
10033051aGB.fm5 Page 21 Friday, February 25, 2005 12:05 PM

22
For Great Britain only
Warning
- this appliance must be
earthed
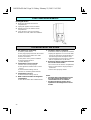
Fuse replacement
If the mains lead of this appliance is fitted with a
BS 1363A 13amp fused plug, to change a fuse in
this type of plug use an A.S.T.A. approved fuse
to BS 1362 type and proceed as follows:
1.
Remove the fuse cover (A) and fuse (B).
2.
Fit replacement 13A fuse into fuse cover.
3.
Refit both into plug.
Important:
The fuse cover must be refitted when changing a
fuse and if the fuse cover is lost the plug must not
be used until a correct replacement is fitted.
Correct replacement are identified by the colour
insert or the colour embossed in words on the
base of the plug.
Replacement fuse covers are available from
your local electrical store.
Connection to a rewirable plug
If the fitted plug is not suitable for your socket
outlet, then it should be cut off and disposed of in
order to avoid a possible shock hazard should it
be inserted into a 13A socket elsewhere.
A suitable alternative plug should then be fitted
to the cable.
The wires in the mains lead are coloured in
accordance with the following code:
BLUE - “NEUTRAL” (“N”)
BROWN - “LIVE” (“L”)
GREEN AND YELLOW - “EARTH” (“E”)
1.
The GREEN AND YELLOW wire must be
connected to the terminal in the plug which is
marked with the letter “E” or by the Earth
symbol 4 or coloured green or green and
yellow.
2.
The BLUE wire must be connected to the
terminal which is marked with the letter “N” or
coloured black.
3.
The BROWN wire must be connected to the
terminal which is marked with the letter “L” or
coloured red.
For the Republic of Ireland only
The information given in respect of Great Britain
will frequently apply, but a third type of plug and
socket is also used, the 2-pin, side earth type. In
this case, the wire which is coloured GREEN
AND YELLOW must be connected to the EARTH
contact, and the two wires to the two pins,
irrespective of colour. The supply to the socket
must be fitted with a 16 amp fuse.
ELECTRICAL CONNECTION
10033051aGB.fm5 Page 22 Friday, February 25, 2005 12:05 PM
-
 1
1
-
 2
2
-
 3
3
-
 4
4
-
 5
5
-
 6
6
-
 7
7
-
 8
8
-
 9
9
-
 10
10


Smeg CR326AP User guide
- Type
- User guide
- This manual is also suitable for
Ask a question and I''ll find the answer in the document
Finding information in a document is now easier with AI
Related papers
Other documents
-
Whirlpool AQUARIUM/H/2 Owner's manual
-
Whirlpool ART 561/H User guide
-
Whirlpool ART 800-2/H User guide
-
Viking UVI 1302/A Owner's manual
-
Whirlpool ART 942/G User guide
-
Whirlpool ART 836-2/G User guide
-
Whirlpool AFB6601 Owner's manual
-
CONT.DOM.A AFB 825/A Owner's manual
-
Whirlpool KVIE 1309/1/A User guide
-
Whirlpool ART 285/G User guide