Page is loading ...

N C
M Y
TABLE OF CONTENTSGB
THE OVEN AND ITS ACCESSORIES Page 81
THE PANEL Page 81
BEFORE USING THE OVEN Page 82
PRECAUTIONS AND GENERAL SUGGESTIONS Page 82
HOW TO USE THE OVEN FUNCTIONS Page 83
HOW TO MAINTAIN THE OVEN AND ITS ACCESSORIES Page 87
TROUBLE-SHOOTING GUIDE Page 88
AFTER-SALES SERVICE Page 88
INSTALLATION Page 89
BUILDING-IN Page 89
OVEN COMPLIANCE WITH REGULATIONS Page 90
80
N C
M Y
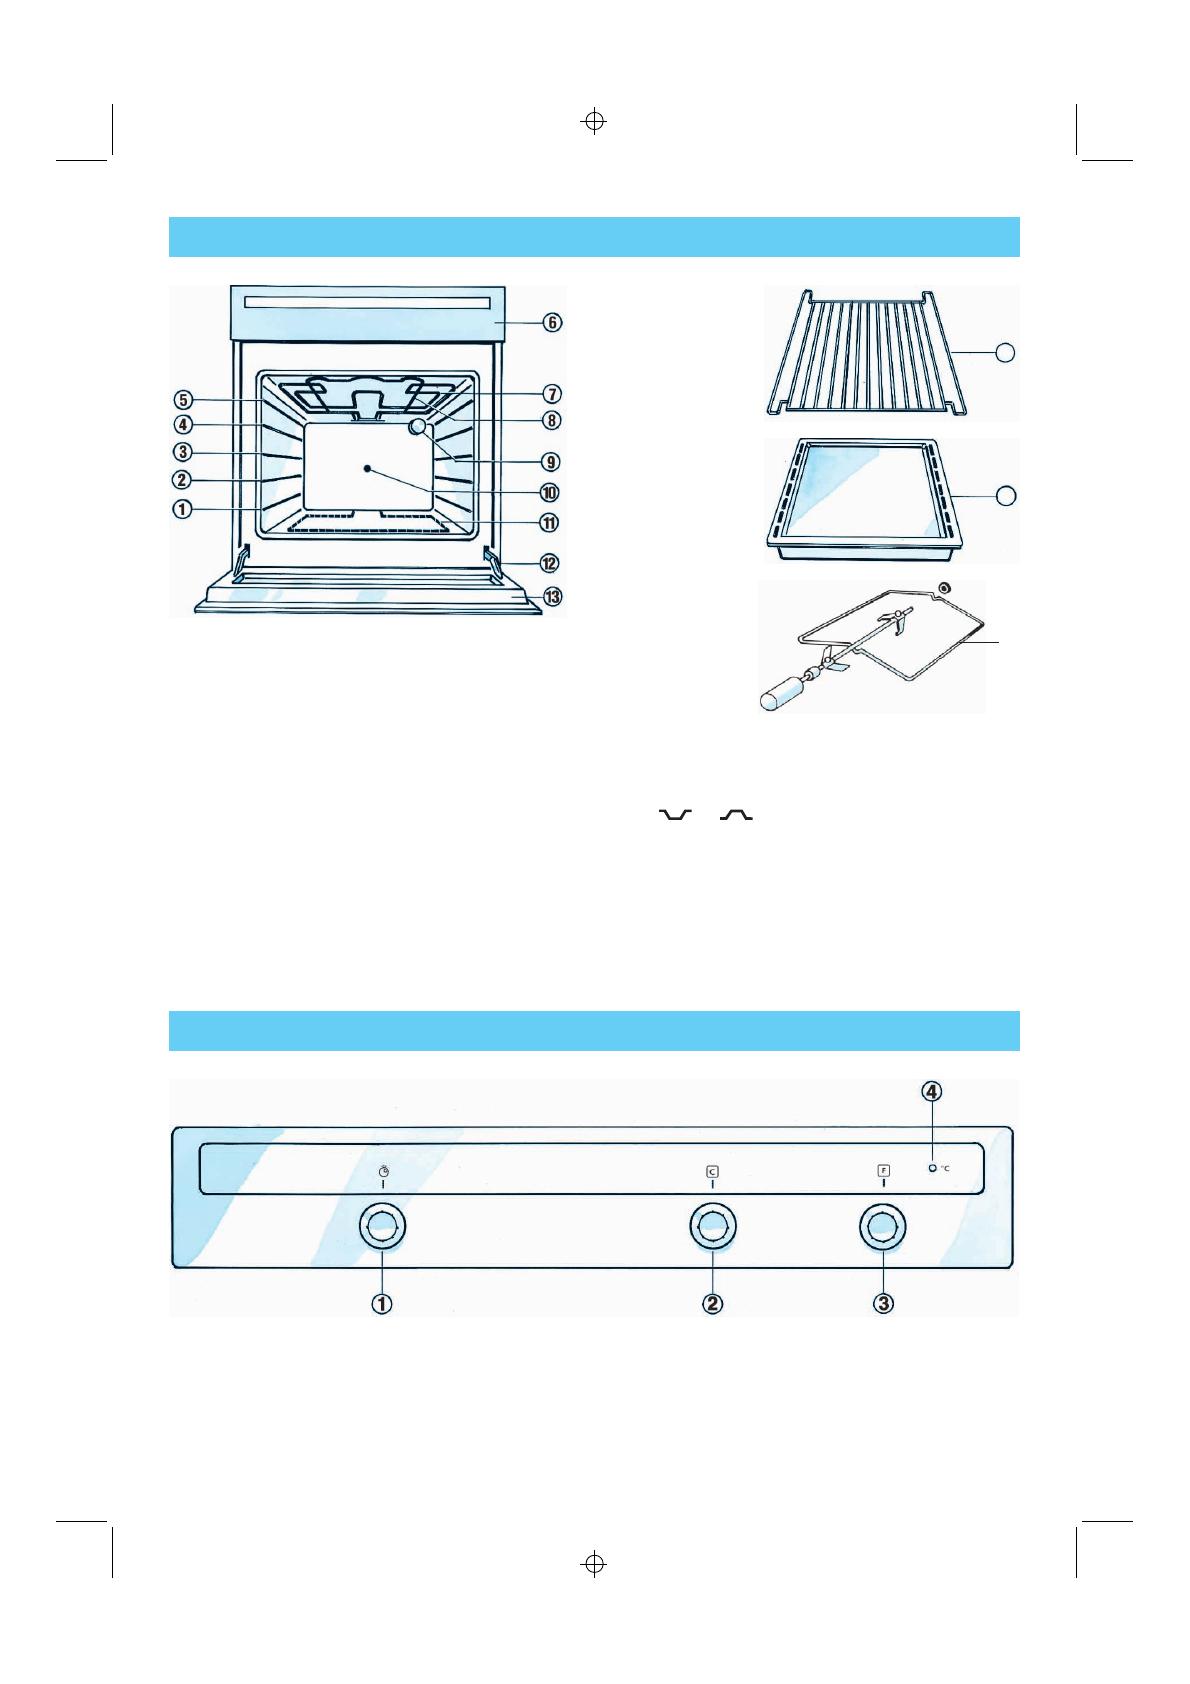
THE OVEN AND ITS ACCESSORIES
4
5
6
X
1-2-3-4-5.
Runner positions
6.
Panel
7.
Grill
8.
Topheatingelement
9.
Oven interior light
10.
Aperture for turnspit
11.
Bottom heating element (not visible)
12.
Oven door hinges
13.
Oven door
14.
Wire shelf: to be used as a support for
casseroles, cake tins, and any other cooking
utensil.
It can be positioned in two different ways
(
or ) and on any available runner.
15.
Fat pan to be used as cooking utensil (i.e.
for meats, chickens, fish with or without
vegetables). It can be positioned under the
wiring shelf when cooking meat to collect
juices. You can pour some water in the fat
pan to reduce smoke and grease spatters.
16.
Turnspit
THE PANEL
1.
Minute minder
2.
Thermostat control knob
3.
Functions selector
4.
Red temperature red lamp
81
N C
M Y
BEFORE USING THE OVEN
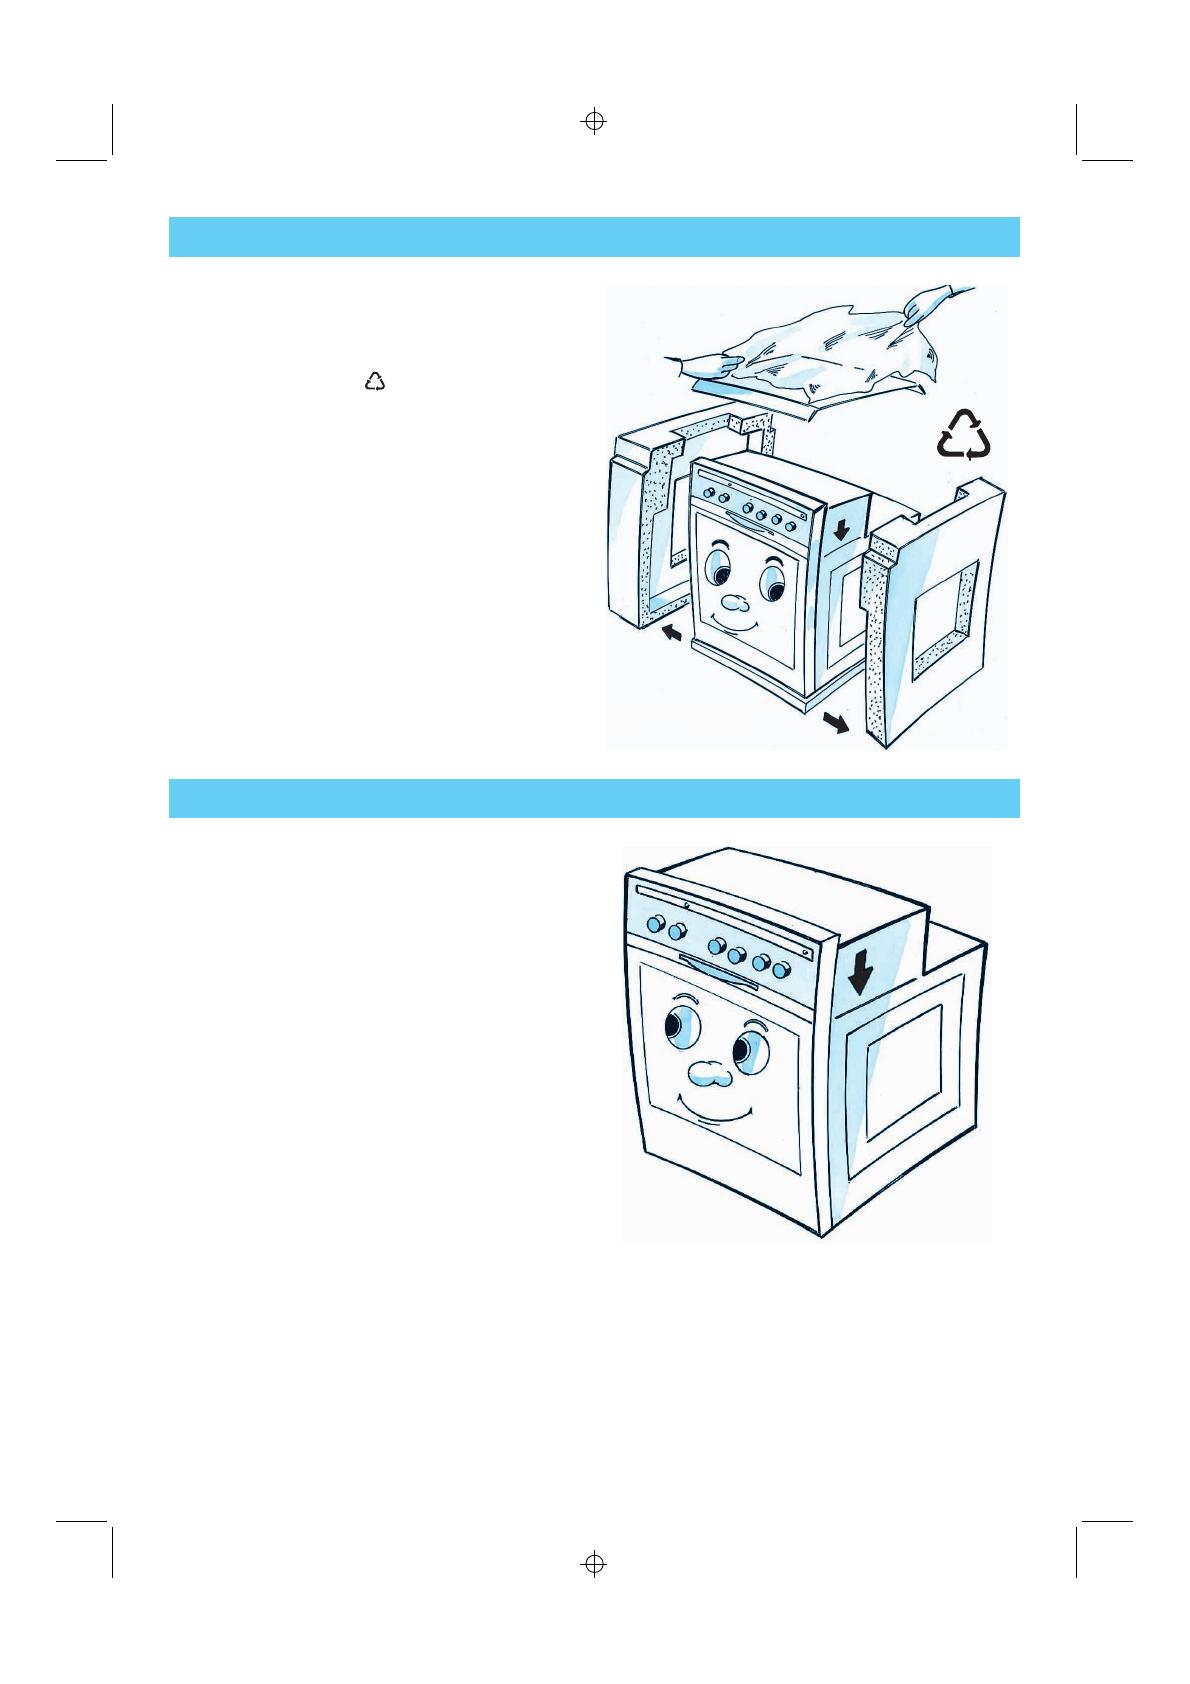
1. Packaging (plastic bags, polystyrene parts,
etc.) must be stored out of the reach of
children as they are potentially dangerous.
2
X
. The package is recyclable and is marked with
the recycling symbol
.
3. Check that the oven is not damaged and
that the door closes tightly.
4. Please ensure that the installation and the
electrical connection have been carried out
by a qualified technician, following the manu-
facturer’s instructions and in compliance with
local safety regulations.
5. Take out all the accessories in your oven, and
startyourapplianceatthetemperatureof
200
o
C for one hour in order to eliminate bad
smell and fumes, caused by the insulation
and coating protection grease of the heating
elements.
We suggest you to open your windows
during this operation.
PRECAUTIONS AND GENERAL SUGGESTIONS
1. Warning: Electrical shock hazard.
Before any maintenance operation,
disconnect the electricity leading to the oven
at the main power supply. Failure to do so
could result in electrical shock or personal
injury.
2
X
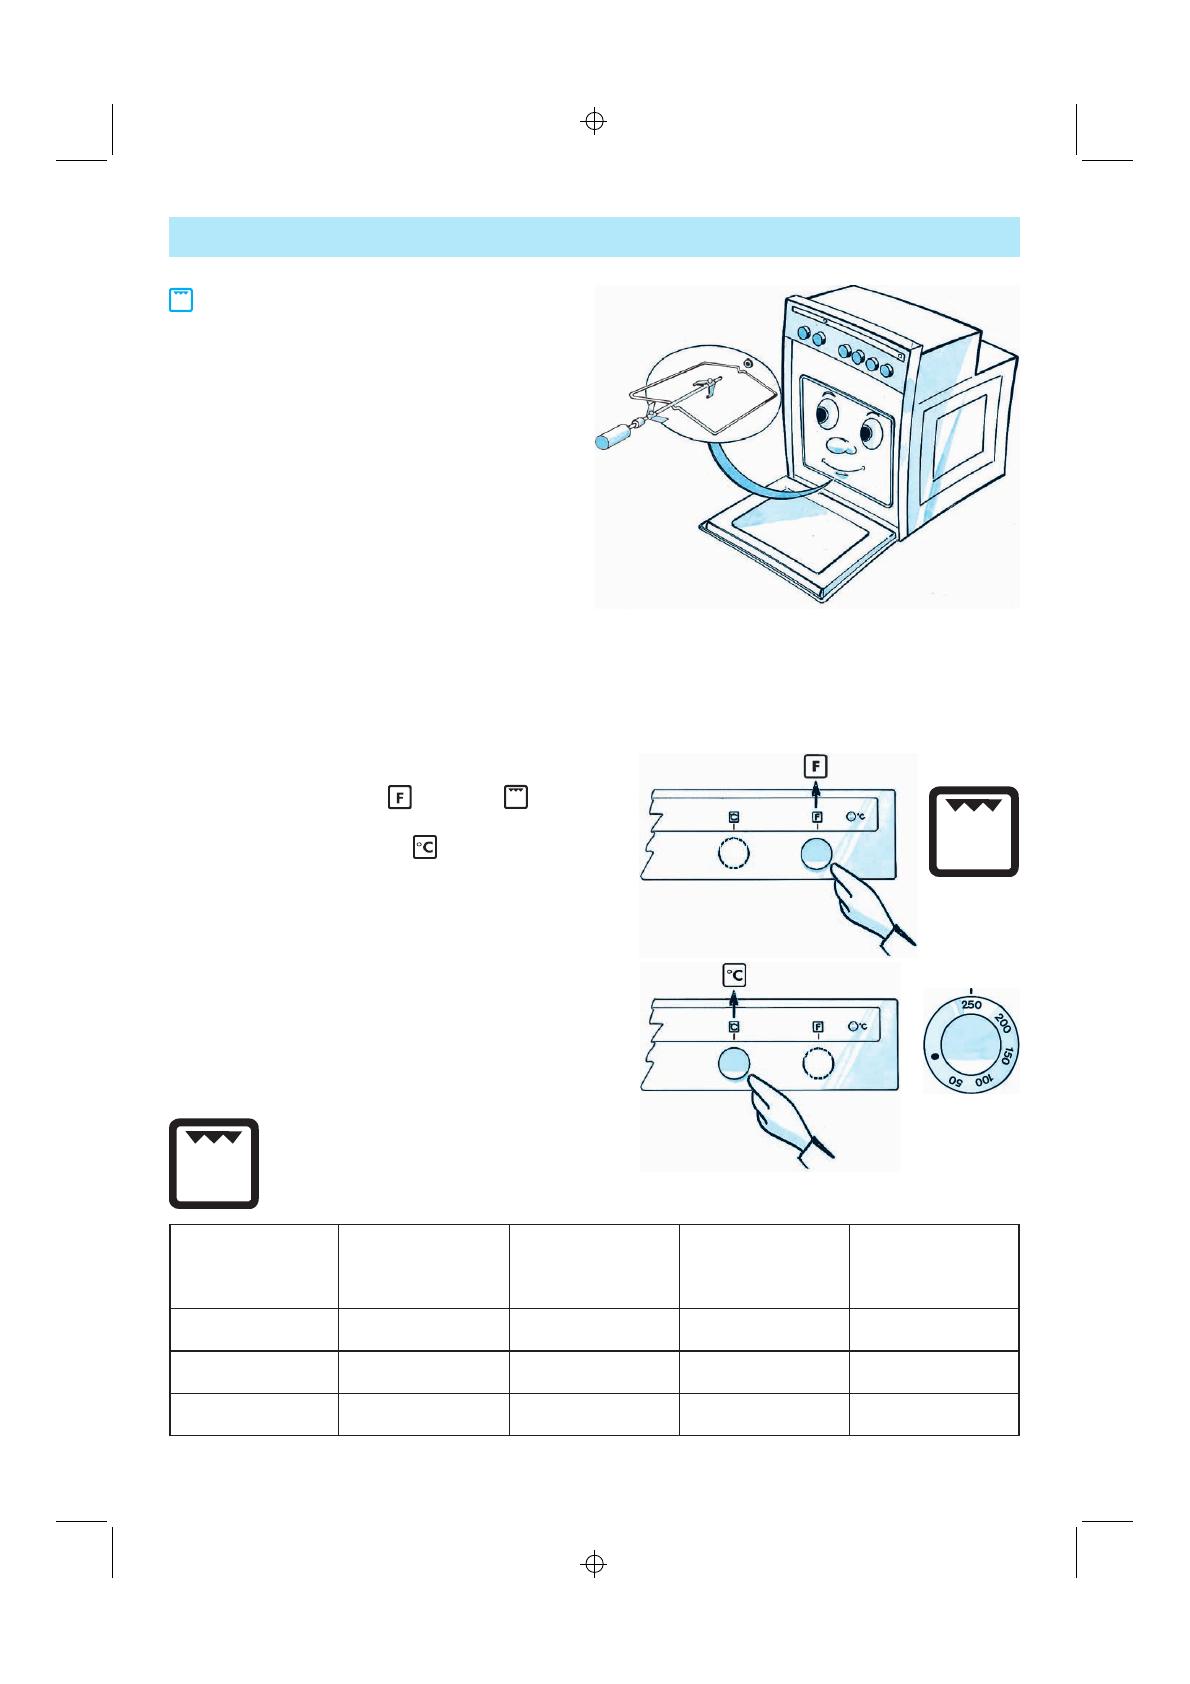
. Do not lift the oven by the door handle, but
lift it at the sides as illustrated (see arrow).
3. During the operation and immediately after
use, some oven parts (i.e. oven door glass)
are hot. Avoid touching them.
4. Attention
Accessible parts may be hot when the grill is
in use. Keep young children away from the
oven.
5. Useprotectiveovenglovestoremovehot
dishes or removing pans/trays.
6. Do not keep any inflammable items in the
oven. If the appliance is inadvertently
switched on, they could catch fire.
7. Make sure that electric cables do not get
trapped in the hot oven door.
8. The Manufacturer cannot be held responsible
for injuries to persons or properties derived
from improper, wrong or unreasonable use
of the oven.
9. The appliance is built with re-usable
material. When scrapping follow the local
environmental-protecting regulations.
Render the oven inoperative. Cut the power
cable off.
10. Do not cover the oven bottom with
aluminium foils.
2
X
2
X
82
N C
M Y
HOW TO USE THE OVEN FUNCTIONS
1
X
2
X
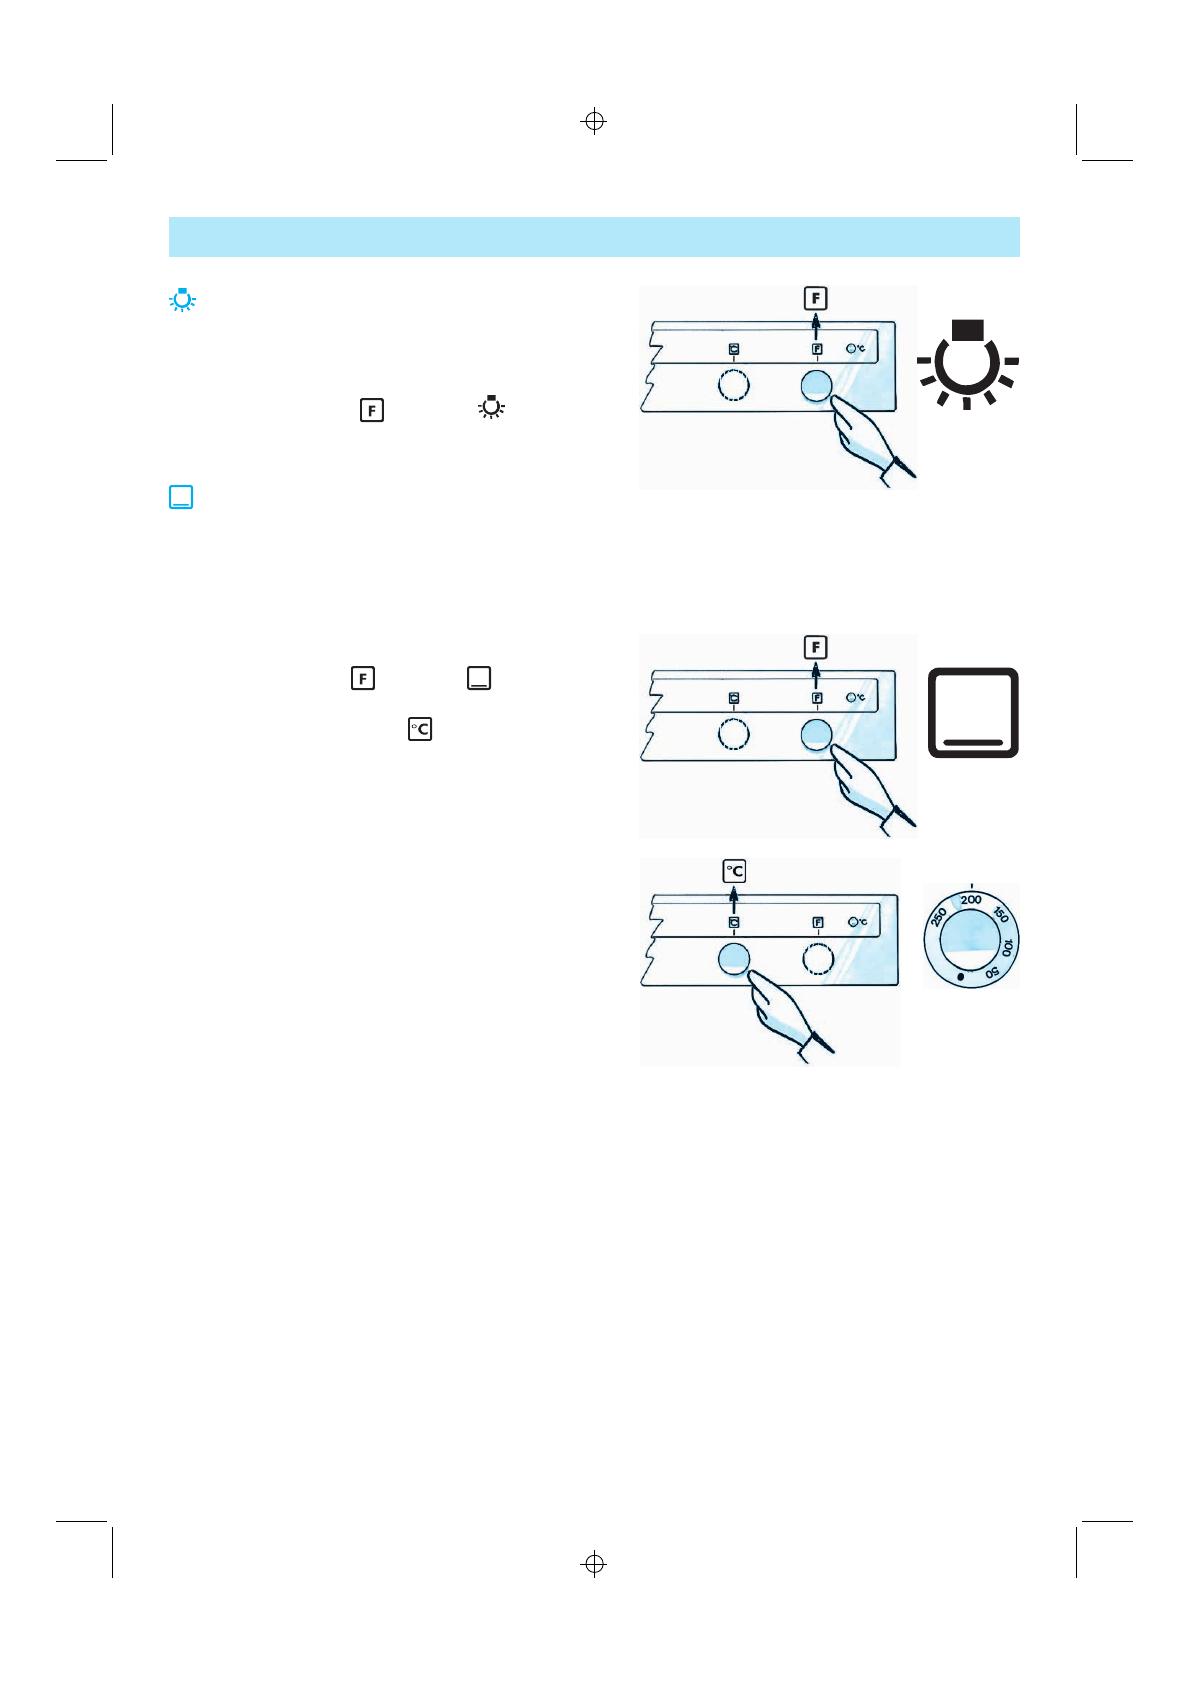
OVEN LIGHT
The oven light can be useful when cleaning the
oven.
HOW TO OPERATE
Turn the selector knob to symbol .
STATIC FUNCTION - BOTTOM
HEAT ONLY
This function is useful to complete cooking of
filled cakes or when is necessary to dry the
lower surface of food. Use it the last 0-5
minutes of cooking.
HOW TO OPERATE
1
X
.
Turn selector knob to symbol . The
oven light switches on.
2
X
.
Turn the thermostat knob clockwise to
the temperature required. The red
thermostat lamp switches on.
Whenever the temperature selected has been
attained, the red lamp will switch off.
At the end of cooking
3.
Turn the selector knob anti-clockwise to
position 0.
4.
Turn the thermostat knob anti-clockwise to
position
x
.
83

N C
M Y
HOW TO USE THE OVEN FUNCTIONS
1
X
2
X
STATIC FUNCTION - TOP AND
BOTTOM HEATING
This function is ideally suited for baking cakes,
meat, roasts, fish, bread, and pizza. Note: only
one runner can be used.
y
We suggest you to pre-heat the oven (heat
radiates from top and bottom elements).
HOW TO OPERATE
1
X
.
Turn the selector knob to symbol .
The oven light switches on.
2
X
.
Turn the thermostat knob clockwise to
the temperature required. The red
thermostat lamp switches on.
Whenever the temperature selected has been
attained, the red lamp will switch off.
At the end of cooking
3.
Turn the selector knob anti-clockwise to
position 0.
4.
Turn the thermostat knob anti-clockwise to
position
x
.
FOOD PREHEATING RUNNER TEMPERATURE COOKING TIME
(starting from
o
C (mins approx.)
bottom)
Chicken yes 2 200 55-65
Steak and kidney pie yes 2 180 110-120
Victoria sandwich
yes 3 180 25-35
cake
Bread yes 2 200 45-55
Rich fruit cake yes 2 140 170-200
N.B.: Cooking times are indicative.
84
N C
M Y
HOW TO USE THE OVEN FUNCTIONS
2
X
3
X
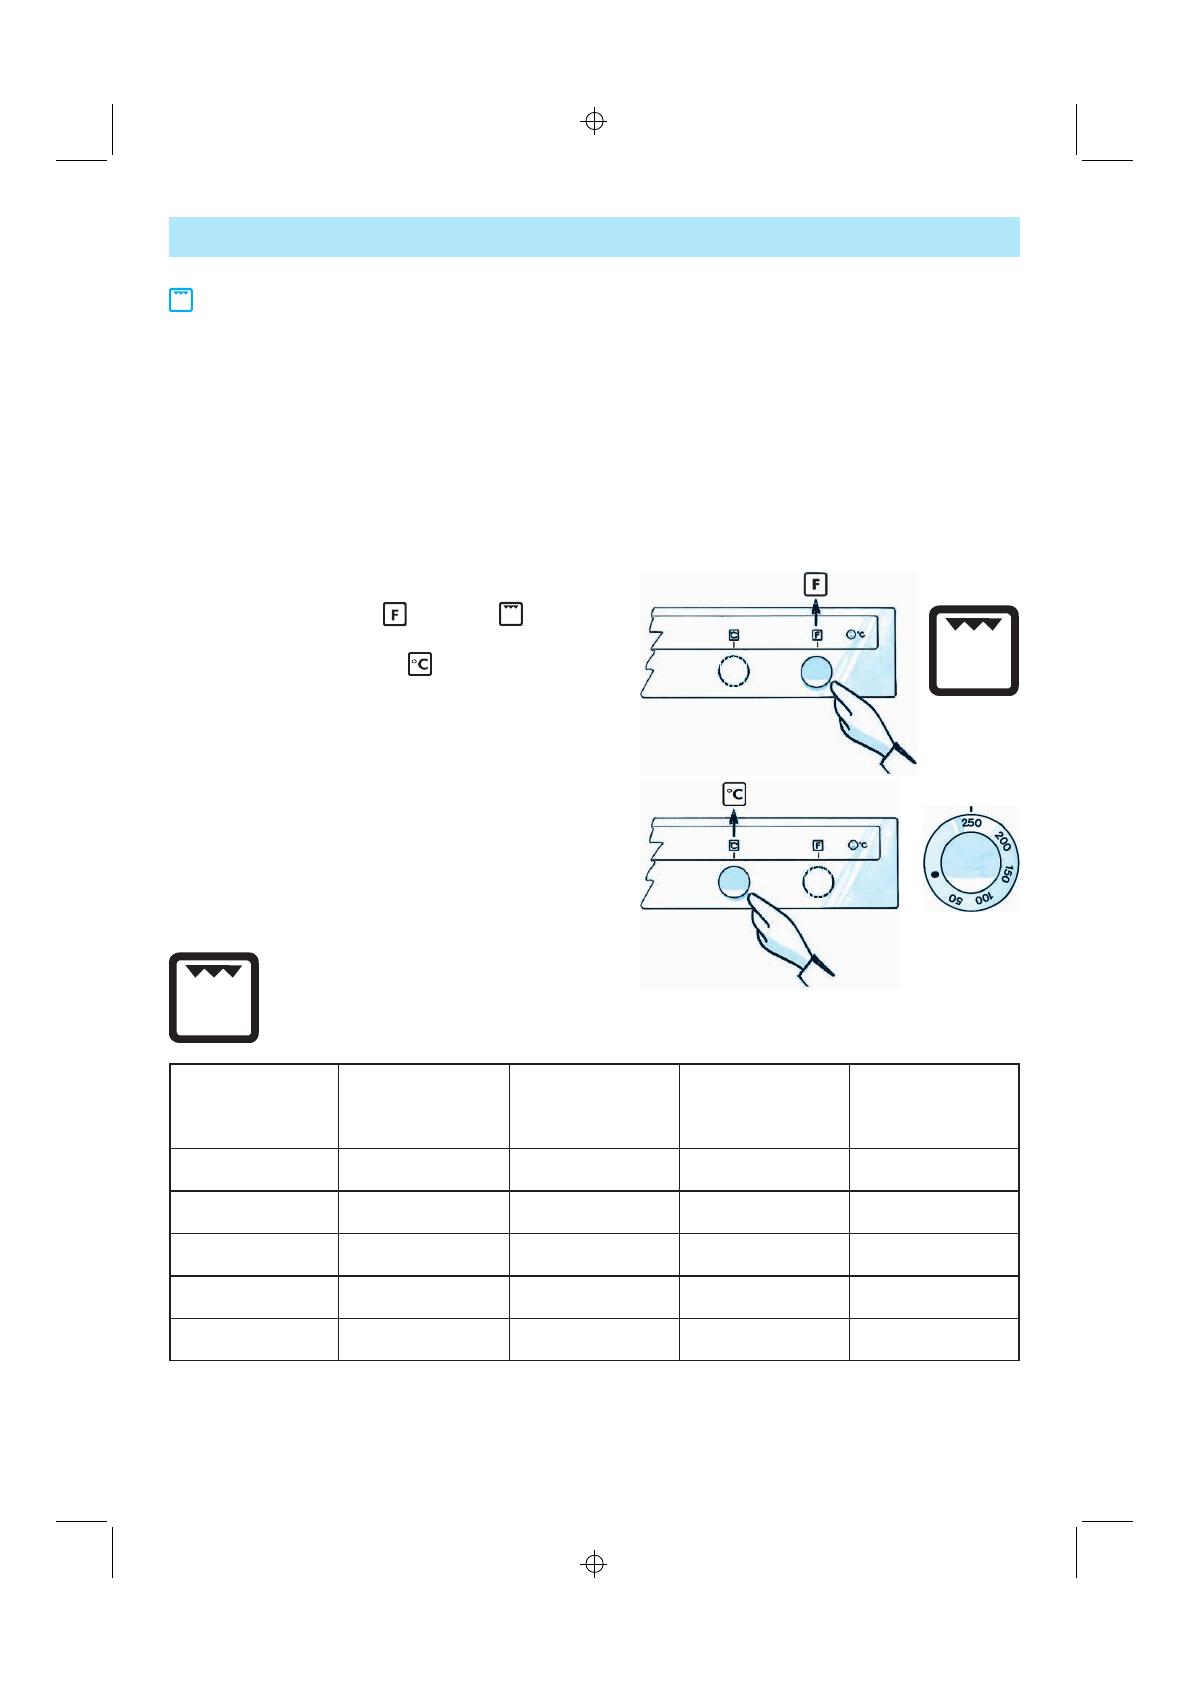
HOW TO USE THE GRILL
FUNCTION
This function is ideally suited to grill small pieces
of meat (steaks, sausages, wurstels) and to
brown bread.
HOW TO OPERATE
Note:
During cooking, the door must remain
closed.
1.
Place meat on the grid and the baking tray
underneath. We suggest you to pour some
water into the baking tray to reduce smoke
and grease spatters.
2
X
.
Turn the selector knob to symbol .
The oven light switches on.
3
X
.
Turn the thermostat knob clockwise to
the temperature required. The red
thermostat pilot lamp switches on.
Whenever the temperature selected has been
attained, the red lamp will switch off.
4.
Turn meat half way through cooking.
At the end of cooking
5.
Turn the selector knob anti-clockwise to
position 0.
6.
Turn the thermostat knob anti-clockwise to
position
x
.
FOOD PREHEATING RUNNER TEMPERATURE COOKING TIME
(starting from
o
C (mins approx.)
bottom)
Toasts yes 4 (grid only) Max 1-3
Pork chops yes 3 pan set Max 30-35
Spits yes 3 pan set Max 35-45
Bacon rasher yes 3 pan set Max 15-20
Sausages yes 3 pan set Max 25-35
* turn halfway through cooking
N.B.: Cooking times are indicative.
85
N C
M Y
HOW TO USE THE OVEN FUNCTIONS
7
X
8
X
GRILL FUNCTION + TURNSPIT
This function is ideally suited to prepare roasts,
chickens, etc.
HOW TO OPERATE
Note:
During cooking, the door must remain
closed.
1.
Slide the food on the turnspit spindle and
secure with the two forks.
2.
Place the support grid inside the oven on the
second runner.
3.
Position the spindle on the support grid and
insert it in the aperture provided in the oven
back panel.
4.
Remove the spindle handle.
5.
Position the baking tray under the grid. We
suggest you pour some water into the
baking tray to reduce smoke and grease
spatters.
6.
Close the oven door.
7
X
.
Turn the selector knob to symbol .
The oven light switches on.
8
X
.
Turn the thermostat knob clockwise to
the temperature required. The red
thermostat pilot lamp switches on.
Whenever the temperature selected has
been attained, the red lamp will switch off.
At the end of cooking
9.
Turn the selector knob anti-clockwise to
position 0.
10.
Turn the thermostat knob anti-clockwise to
position
x
.
FOOD PREHEATING RUNNER TEMPERATURE COOKING TIME
(starting from
o
C (mins approx.)
bottom)
Chicken no − Max 50-60
2 small chickens no − Max 50-60
Roast (500 g) no − Max 50-60
N.B.: Cooking times are indicative.
86

N C
M Y
HOW TO MAINTAIN THE OVEN AND ITS ACCESSORIES
y After each use, let the oven cool down, and
clean it to avoid that any incrustation is
repeatedly heated.
y Do not use abrasives. If food soil is hard to
remove, use oven cleaners following the
instructions on the package.
y Clean the exterior with a sponge dampened
in lukewarm water. Do not use abrasives.
y Clean the oven door glass and the lamp
cover glass with a dishwashing liquid.
y Wash accessories in the dishwasher or
manually using an oven cleaning product.
y When using the oven for a long time, there
might be some condensation on the inside
door and on the gasket. Please wipe it.
HOW TO REMOVE THE OVEN DOOR
(for cleaning purposes)
1. Open oven door.
2. Lift hinge levers (A).
3. Lift and pull out oven door.
4. Remount the oven door reversing the
sequence.
HOW TO REPLACE THE OVEN LAMP
1. Switch off electricity at the mains.
2. Unscrew the lamp cover.
3. Replace the bulb.
4. Remount the lamp cover.
5. Switch on electricity.
Note:
Use only a replacement bulb of 25 Watts
230 V, Type E-4 T 300
o
C, available from our
After-Sales Service.
87

N C
M Y
TROUBLE-SHOOTING GUIDE
1. The oven does not heat:
Check:
y Has the selector knob been set on the
required function?
y Has a temperature been selected?
y Is there a power failure?
2. The interior light does not switch on:
Check:
y Is there is a power failure?
y Is the bulb faulty? If so, replace it.
AFTER-SALES SERVICE
Before calling for Service:
y Check the above trouble-shooting guide
carefully to see if you can correct the fault
yourself.
y Re-start oven to check if it is operating
properly.
y If both attempts fail, please call for After-
Sales Service.
Describe the fault and give the model N
o
indicated on the right side, inside the oven and
Service N
o
of your appliance, your address and
phone N
o
.
An optional kit consisting of an oven door glass
and of relevant mounting components, is
available by the After-Sales Service. The use of
the kit reduces the temperature of the outer
oven surface and is strongly recommended if
there are Kids in the house.
The kit code is: 4819 310 39186.
88
N C
M Y
INSTALLATION
General hints
y This appliance must be installed by a
competent electrican, with all electrical and
installation requirements prescribed by local
regulations and manufacturer instructions.
y The furniture in contact with the oven must
be heat- resistant (80
o
C).
y Remove any packaging material from inside
the oven.
y Leave the oven to stand on its
polystyrene packaging base to avoid
damaging the oven bottom.
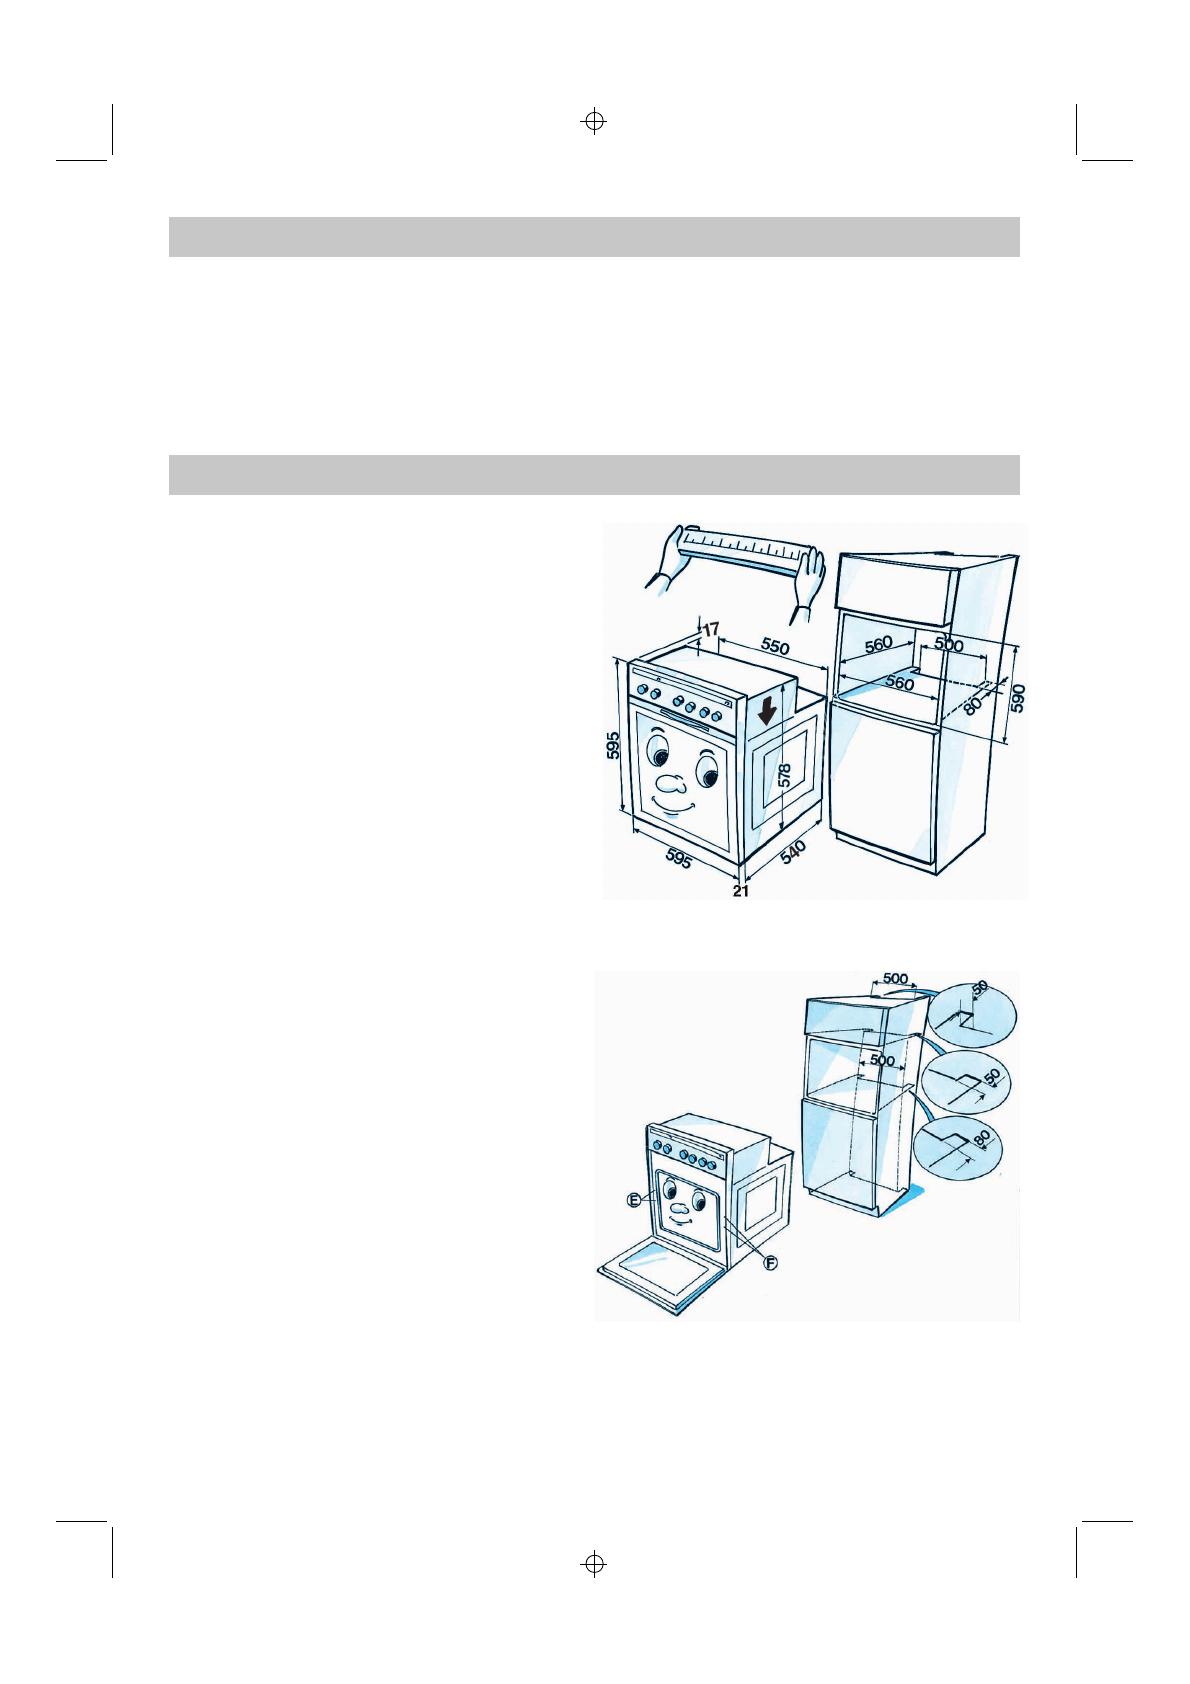
BUILDING-IN
y Do not lift the oven by the door handle,
but lift it at the sides as illustrated (see
arrow).
y The oven has been designed for building-in
in a column.
y The oven and housing dimensions are
illustrated in opposite figure.
y To ensure a correct ventilation, respect the
ventilation gaps shown in opposite figure.
y Install the oven in the housing, lifting it at
the sides, taking care not to trap the wires
of the electrical supply cable.
y Fix the oven to the housing tightening the
screws (E) and (F) as illustrated.
ATTENTION
y Prior to any intervention, disconnect the oven
from the mains supply.
y After installation, electric parts must not be
accessible.
A multiple circuit breaker with a space between
the contacts of 3 mm or more must be fitted.
(LS switches, fuses, relays).
The technician is responsible for the correct
installation of the appliance and of its
compliance with local regulations.
y The earthing of this appliance is
compulsory by law: forthisreasonall
current and earth conductors must be of an
appropriate size.
Note:
To allow for proper ventilation, we recommend
that you left two openings of min. 500x80 mm
and 500x50 mm inside the cabinet (see
drawing).
89
N C
M Y
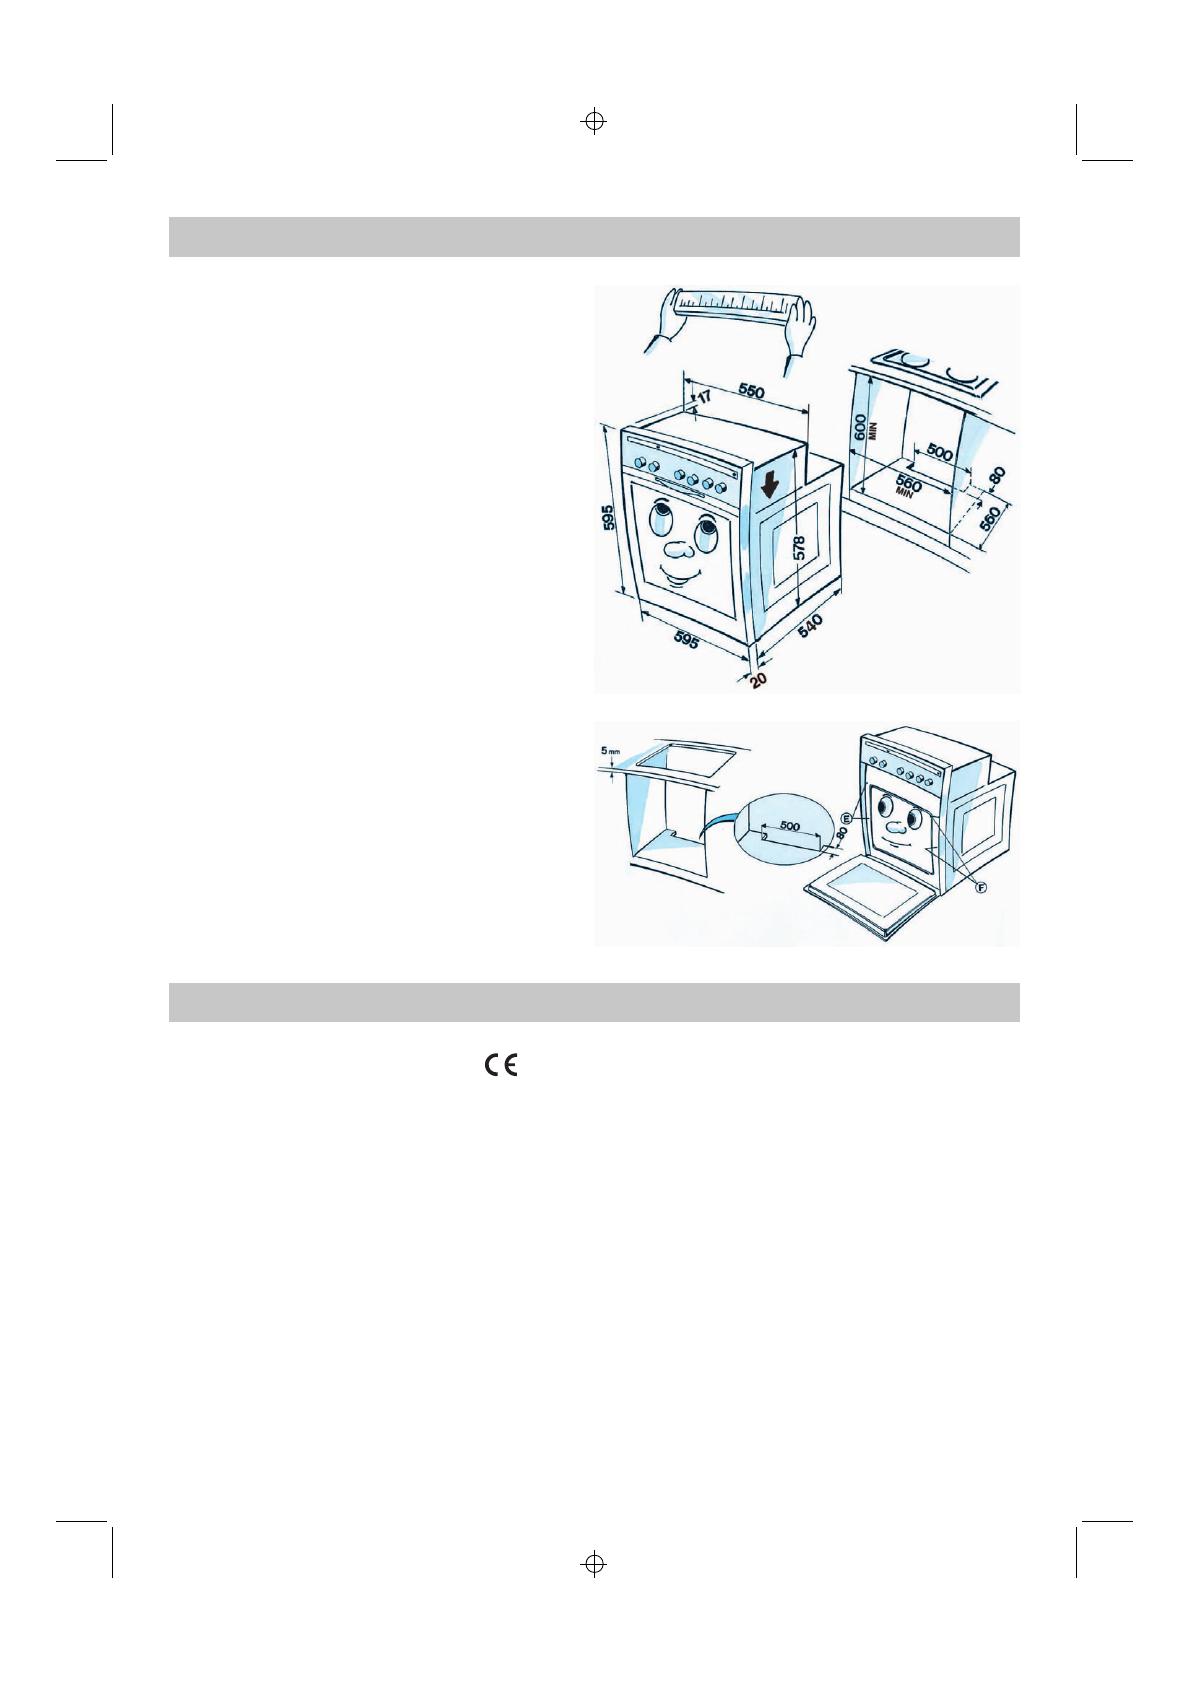
BUILDING-IN
y The oven has also been designed for building-
in under a cooktop.
Note:
To allow for proper ventilation, we recommend
that you left an opening of 500x80 mm in the
lower section of the housing.
An additional opening of 5 mm is required
between the oven top rim and the cooktop
lower rim: this opening must not be closed by
strips or housing crosspieces.
OVEN COMPLIANCE WITH REGULATIONS
Declaration of conformity
x This oven is suitable for contact with
foodstuffs, and complies with EEC Directive
89/109.
x This oven has been designed to be used
only for cooking. Any other use (such as
heating a room) is improper and dangerous.
x This oven has been designed, constructed
and marketed in compliance with:
- safety requirements of EEC Directive “Low
voltage” 73/23;
- protection requirements of EEC Directive
“EMC” 89/336;
- requirements of EEC Directive 93/68.
90
/