Page is loading ...

8251276-03
COPYRIGHT © SIBIR INTERNATIONAL
MO-M 0828
SIBIR KEROSENE/ELECTRIC REFRIGERATOR
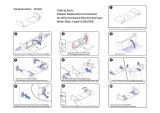
This drawing shows the back of a kerosene model refrigerator. Before using this handbook make sure
that the refrigerator in your care looks like the drawing above (i.e. models V110KE or V170KE).
www.sibir.com
Visit our website for more information
on our products, to download material
and to contact Sibir International.
!
INSTALLATION
&
OPERATING
INSTRUCTIONS

www.sibir.com COPYRIGHT © SIBIR INTERNATIONAL
2
CONTENTS
OPERATIONAL ACTIONS
Review this section to ensure that
your refrigerator is maintained in
best possible working condition.
TROUBLESHOOTING
CHARTS
Review this section when you
are experiencing operational
problems with your refrigerator.
ACTION ON RECEIPT 3
INSTALLATION 3
REFRIGERATOR OVERVIEW 4
BURNER PARTS 5
PREPARATION BEFORE LIGHTING 6
LIGHTING THE BURNER 7
REGULATING THE TEMPERATURE, BURNER 9
STARTING THE REFRIGERATOR USING ELECTRICITY 9
REGULATING THE TEMPERATURE, ELECTRICAL OPERATION 10
DAY/NIGHT REGULATOR 10
DAILY OPERATIONAL ACTIONS 10
WEEKLY OPERATIONAL ACTIONS 11
MONTHLY OPERATIONAL ACTIONS 11
CHECKING THE DOOR SEAL 12
DEFROSTING 12
CLEANING AND TRIMMING THE WICK 13
CLEANING THE CHIMNEY SYSTEM 14
CLEANING THE TANK 14
CLEANING THE REFRIGERATOR 15
CLEANING THE BURNER 15
REPLACING THE WICK 16
CHECKING THE THERMOSTAT AND HEATER 18
REPLACING THE THERMOSTAT 18
REPLACING THE HEATER 19
REPLACING THE COOLING UNIT 19
ORDERING SPARE PARTS 21
KEROSENE OPERATION
REFRIGERATOR NOT COOLING AT ALL 22
REFRIGERATOR TOO COLD 22
REFRIGERATOR NOT COLD ENOUGH 23
BURNER 24
ELECTRICAL OPERATION
REFRIGERATOR NOT COOLING AT ALL [A] 25
REFRIGERATOR NOT COOLING AT ALL [B] 25
REFRIGERATOR NOT COLD ENOUGH 26
REFRIGERATOR TOO COLD 27

www.sibir.com COPYRIGHT © SIBIR INTERNATIONAL
3
ACTION ON RECEIPT
Check the packing case for damages. In case you suspect any refrigerator damages, notify your supplier
before unpacking.
Unpack the refrigerator carefully.
Check the refrigerator. If it is damaged, notify your supplier.
Check that the flue baffle is hanging inside the chimney.
Read the operating instructions in the manual or this manual and follow them exactly.
1
2
3
4
5
Place the refrigerator in the coldest possible place
inside a building. The refrigerator is tested to operate
reliably in temperatures up to 43°C.
The room must be ventilated and free air circulation
around the refrigerator is necessary.
Keep the refrigerator in the shade and away from heat
of any kind.
Avoid draughts, such as door and window openings.
Clearances to wall must be at least 30 mm and to roof
at least 400 mm.
Check that the door seals properly against the cabinet.
If electricity is used, check that the voltage is correct.
30 mm
INSTALLATION
400 mm
1
2
3
4
6
7
5
5

www.sibir.com COPYRIGHT © SIBIR INTERNATIONAL
4
REFRIGERATOR OVERVIEW
Hinge Door gasket
Shelf
Temperature display sensor
Stabilizer tank
Cooling element
Control knob Condensor
Chimney (inside)
Cooling unit
Flue baffle
Burner
Guide pin
Tank lid
Rail
Lever Arm
Day/night regulator
Capillary tube
Electrical parts
Control knob
Thermostat
Heater
Terminal
Electrical cable
Electrical parts

www.sibir.com COPYRIGHT © SIBIR INTERNATIONAL
5
BURNER PARTS
Seal ring1.
Lamp glass2.
Gallery3.
Outer wick tube4.
Flame spreader 5.
Burner base6.
Wick turner 7.
Wick cleaner 8.
Wick carrier9.
Wick 10.
Burner complete 11.
(without lamp glass and seal ring).
AlAddin 23E
A
B
C
D
E
F
G
H
I
J
N
K
L
M
AlAddin 32
Seal ring A.
Lamp glass B.
Gallery C.
Flame spreaderD.
Outer wick tube E.
Locking nut F.
Wick G.
Wick carrierH.
Burner base I.
Tank sleeve J.
Burner complete K.
(without lamp glass and seal ring)
Wick cleanerL.
Adapter M.

www.sibir.com COPYRIGHT © SIBIR INTERNATIONAL
6
5
6
The kerosene tank* is pulled out from the rear.
Release the lever arm.
Pull out the tank.
Check that the tank moves smoothly on the rails.
Remove the tank and flush it with clean kerosene.
PREPARATION BEFORE LIGHTING
3
4
1 2
1
2
*The kerosene tank is available in two variants, one in plastic and one in sheet metal. The illustrations
show the metal tank but the plastic tank is handled in exactly the same way. The instructions in the
manual therefore apply to both tank variants.
Unpack the burner.
Remove the wick cleaner, if any, and put it aside.
Plastic kerosene tank: Remove the protective label.
7
7

www.sibir.com COPYRIGHT © SIBIR INTERNATIONAL
7
Unpack burner glass, sealing ring and fit them to the burner.
Fit the burner into the tank.
Fit the control shaft on the tank to the wick turner.
PREPARATION BEFORE LIGHTING
8
9
10
11
12
Fill the tank with the best quality household kerosene.
The level indicator shows the kerosene level.
Wipe the tank dry from kerosene if any has spilt.
Allow the burner to soak for at least 2 hours before
lighting.
13
13
To speed up the soaking, the burner could be
taken out, the wick turned up and placed up side
down into a bowl of kerosene for 15 minutes.
!
LIGHTING THE BURNER
Gallery
Low flame
51 3
Remove the gallery together with the lamp glass and sealing ring by turning it counter-clockwise.
Adjust the wick to a height you can see, about 2–3 mm (1/8 inch).
Light the wick and allow the flame to travel around the wick.
Replace the gallery together with the lamp glass and sealing ring by turning it clockwise.
Turn the flame down to the smallest possible flame.
2
4
5
3
1

www.sibir.com COPYRIGHT © SIBIR INTERNATIONAL
8
Push the tank into the tank holder underneath the cabinet at the rear of the refrigerator. Slide the tank
carefully forwards against the guide pin.
Carefully lift the tank by means of the lever arm and check that the guide pin enters the hole in the
bracket on the left side of the burner.
Make sure that the sealing ring seals properly against the chimney. There must be no gap between the
chimney and the sealing ring.
Adjust the flame to medium flame and leave the refrigerator running for 3–4 hours. For further adjust-
ment, see ”Regulating the temperature, Burner”.
LIGHTING THE BURNER
9
Sealed
Not sealed
· Never let the flame burn yellow or with yellow streaks. If it does, see ”Kerosene operation, Burner”,
point 3.
· Never turn the flame to maximum until the chimney has been heated for 3–4 hours.
· First time using the refrigerator, smoke will appear due to paint residues in the chimney.
Guide pin
6
7
8
8
Sealing
ring
Sealing
ring
Lever arm
Lever arm
6
7
8
!

www.sibir.com COPYRIGHT © SIBIR INTERNATIONAL
9
For good temperature control, the burner should be lit constantly. The refrigerator temperature depends
on the flame size. It is regulated by the control knob.
High flame gives a colder refrigerator. Low flame gives a warmer refrigerator.
REGULATING THE TEMPERATURE, BURNER
1
2
Low Medium Maximum (high)
Check that the voltage is correct.
If lit, turn off the burner flame.
Plug in the power supply cable.
Turn the control knob to a medium position and leave the refrigerator on for 3–4 hours.
Check the inside temperature and adjust the control knob if necessary, see below.
STARTING THE REFRIGERATOR USING ELECTRICITY
1
2
3
4
5
· The kerosene burner must never be lit when electricity is used.
· First time the refrigerator is used, smoke will appear due to paint residues in the heater tube.
!

www.sibir.com COPYRIGHT © SIBIR INTERNATIONAL
10
In low ambient temperature (for example at
night in some climates) the refrigerator may
be too cold. By moving the lever (at the top
of the refrigerator) to the “moon” position,
the flue baffle inside the chimney will be
lifted up about 320 mm (1 1⁄2 inches), which
reduces the efficiency of the cooling unit.
During day, when it is hot, the lever should
be moved to the “sun” position. The flue
baffle will return to normal and the refrigera-
tor will operate normally.
DAY/NIGHT REGULATOR
To regulate the temperature see ”Regula-
ting the temperature, burner” If necessary,
study the trouble-shooting charts at the
end of this handbook.
Check that the burner flame is normal.
Check kerosene level. Refill if necessary
with kerosene of good quality.
1
2
3
REGULATING THE TEMPERATURE, ELECTRICAL OPERATION
After checking the inside temperature, the con-
trol knob can be turned towards a warmer or
colder position. Any suitable position between
No “1” and “MAX” could be used.
This knob is graduated from 0 (marked by a
spot) to figure 7 and MAX position where the
cabinet is set for continual operation, i.e. the
thermostat is by-passed. Refrigerator tempera-
ture is controlled by the thermostat only when
running on electricity. When running on kero-
sene, the temperature is controlled by means of
the knob on the front of the refrigerator.
ELECTRIC OPERATION
Check the temperature inside the
refrigerator. To regulate the temperature
see ”Regulating the temperature, Electric
operation”. If still necessary, see the trou-
bleshooting charts at the end of this hand-
book.
KEROSENE OPERATION
DAILY OPERATIONAL ACTIONS

www.sibir.com COPYRIGHT © SIBIR INTERNATIONAL
11
1
2
3
4
Wet cloth
5
Check that the kerosene in the tank is clean, see
”Cleaning the tank”.
Check that the wick and its tails are clean. A dirty
wick will give a smoky flame, see ”Cleaning and
trimming the wick”.
Clean the burner, see ”Cleaning the
burner”.
Clean the chimney, see ”Cleaning the chimney
system”.
Clean the flue baffle.
ELECTRIC/KEROSENE OPERATION
Check the frost formation on the cooling element.
If the ice is thicker than 6–10 mm (1/4–3/8 inch)
defrosting should take place.
KEROSENE OPERATION
WEEKLY OPERATIONAL ACTIONS
Frost forming rapidly (in just a few
days) could be result of poor door
sealing.
!
1
Check that the condenser and cooling unit are free from dust.
Check the outer cabinet for paint damage. Repaint if
necessary.
When necessary:
· Clean the refrigerator in and outside with a damp cloth.
Use mild detergent only!
· Clean door gasket.
MONTHLY OPERATIONAL ACTIONS
2
1
!
5

www.sibir.com COPYRIGHT © SIBIR INTERNATIONAL
12
Place a thin paper strip against the cabinet front.
Close the door.
Pull the paper strip, if it moves easily or falls away by itself:
· Find the place where the rubber gasket doesn’t seal tightly, then …
· Place a pad of paper or sticking plaster between the rubber gasket and the inside of the door.
In order to make the gasket seal tightly.
If you can not make the door seal tightly, order a new door, see ”Ordering spare parts”.
CHECKING THE DOOR SEAL
· Check all the way around the door.
· Pay particular attention to the corners.
3
4
Move the vaccine to another refrigerator if available or
store it in a coolbox with ice packs.
Blow out the flame or pull the plug from the wall socket and
leave the door and the freezer compartment shutter open.
Remove ice with your fingers, as soon as it is possible
to do so. Do not use knives or sharp instruments!
Empty the drip tray.
Wipe the freezer compartment and cooling element dry.
Clean the refrigerator inside. Use mild detergent only.
Start the refrigerator on kerosene or electricity.
DEFROSTING
· Defrosting is to be carried out as quickly as possible in order not to damage the vaccine.
· Use the time it will take to defrost to clean the refrigerator etc.
· Wait until the vaccine compartment is cold before replacing the vaccine.
1
2
3
4
5
6
7
It is normal that frost forms on the cooling element. A thin layer of frost does not affect the cooling
performance. A thick layer of frost (6–10 mm or 1/4–3/8 inch or more) must be removed by defrosting.
1 2
1
2
!
!

www.sibir.com COPYRIGHT © SIBIR INTERNATIONAL
13
Remove the tank.
Remove the gallery. Turn it counter clockwise and lift.
Take out the flame spreader.
Insert the wick cleaner (supplied with the burner)
in the burner tube.
Adjust the wick to press gently against the
wick cleaner.
Turn the wick cleaner carefully clockwise.
If the wick cleaner is missing, use a razor
blade or a pair of scissors.
The top surface of a perfectly cleaned wick
should be even and free from carbon and frays.
Blow the wick and burner clean.
Assemble the burner and fit into the tank.
Flame
spreader
CLEANING AND TRIMMING THE WICK
1
2
4
5
7
8
9
10
3
6
3
6
· Do not fray the wick.
· Do not cut away more than necessary.
!

www.sibir.com COPYRIGHT © SIBIR INTERNATIONAL
14
Remove tank and burner.
Place a sheet of paper under the chimney.
Pull out the flue baffle.
Clean the chimney with the brush supplied.
Replace the flue baffle.
Wrap the soot in the paper for disposal.
Light the burner and install the tank.
CLEANING THE CHIMNEY SYSTEM
CLEANING THE TANK
Remove the tank.
Empty the tank
Flush the tank twice with clean kerosene.
Refill the tank with best quality household kerosene.
Check the wick condition. Clean and trim or replace if necessary.
Refit the burner, light it and install the tank.
1
2
5
6
7
1
2
3
4
5
6
3 4
3
4

www.sibir.com COPYRIGHT © SIBIR INTERNATIONAL
15
It is advisable to clean the refrigerator inside when defrosting.
Use warm (not hot) water and mild household detergent.
Never use scouring powder, steel wool or similar.
Do not forget to clean the door gasket.
Before starting the refrigerator again, wipe all parts
completely dry.
Put the vaccine back as quickly as possible.
Clean the external parts with a soft brush or a piece of cloth.
In particular, the cooling unit should be kept clean for best
performance.
CLEANING THE REFRIGERATOR
1
2
3
4
5
6
7
7
Lift the sealing ring.
Lift the lamp glass.
Remove the gallery. Turn it counter clockwise and lift.
Remove the outer wick tube.
Aladdin 23E: Turn it counter clockwise and lift.
Aladdin 32: Unscrew the locking nut on either side and lift.
Lift the flame spreader.
Remove the wick.
Remove the wick carrier.
Burner base with wick turner (not possible to disassemble).
Clean the parts in kerosene. Use a soft brush.
Wipe the parts dry.
Assemble the burner with a new wick if necessary.
CLEANING THE BURNER
1
2
3
4
5
6
7
8
9
10
11
For illustrations, see “Burner parts”

www.sibir.com COPYRIGHT © SIBIR INTERNATIONAL
16
Steps 1 to 8 describe how to remove a wick.
Steps 9 to 19 describe how to install a wick.
Remove the tank.
Remove the control knob from
the burner and lift the burner from
the tank.
Remove the gallery.
Remove the flame spreader.
Remove the outer wick tube.
Aladdin 23E: Turn it counter
clockwise and lift.
Aladdin 32: Unscrew the locking
nut on either side and lift.
Turn the wick up as far as possible.
Pull the wick and the wick carrier
out from the burner.
Pull the wick and wick carrier apart.
REPLACING THE WICK
1
2
6
3 4
5 7
3
4
5
7
8
8

www.sibir.com COPYRIGHT © SIBIR INTERNATIONAL
17
REPLACING THE WICK
12
11
Unpack a new, dry and clean wick. Do not fray the
wick.
New wicks have adhesive papers at the tail ends.
Straighten these out, but do not remove them.
Pull the paper tails through the opening around the
wick tube.
Pull the papers until the wick ends are through the
opening at the bottom of the burner.
9
10
11
12
13
15
16
Fit the wick carrier to the wick. Make sure that
the rack of the wick carrier is on the same side
as the cog wheel of the burner.
Pull the cog wheel handle outwards.
Pull the wick and wick carrier towards the cog wheel.
When the wick carrier touches the wheel, turn
the cog wheel shaft anti-clock-wise.
Press the outer wick tube back into the burner.
Aladdin 23E: Secure by turning it clockwise.
Aladdin 32: Secure by tightening the locking nut
on either side.
Check that the wick can move up and down easily.
Remove paper tails if any.
14
17
18
19
If the wick gets stuck in the burner, do
not force the cog wheel shaft as this may
damage the wick carrier. Repeat the
above procedure instead.
13
15
16
!

www.sibir.com COPYRIGHT © SIBIR INTERNATIONAL
18
Remove the plug from the wall socket.
Remove the capillary tube end at the cooling element and pull it carefully out from the rear of the cabinet
Remove the plastic cover and the wires from the thermostat.
Remove fastening screws or nuts and pull the thermostat out.
Fit the new thermostat.
Connect the wires and replace the plastic cover.
Reattach the capillary tube.
Plug into the wall socket.
REPLACING THE THERMOSTAT
1
2
3
4
5
7
8
· BE CAREFUL NOT TO BREAK THE CAPILLARY TUBE!
· Make sure that the capillary tube makes contact with the cooling element only where it is to be fastened.
6
6
!
Pull out the plug from the wall socket.
Remove the plastic cover on the thermostat.
Remove electrical cables from the thermostat.
By-pass the thermostat by cennecting the cables
using tape or sticking plaster. Make sure to insulate
the metal ends completely.
Push the plug into the wall socket and put the refri-
gerator on test for at least 3–4 hours.
If the refrigerator gets cold the thermostat should
be replaced.
If the cooling unit does not get warm, replace the
heater.
Insulate metal ends completely.
Use tape or sticking plaster.
CHECKING THE THERMOSTAT AND HEATER
1
2
5
6
7
4
3
3
4
Do not attempt this procedure without the
proper knowledge of electrical components.
!
When finished, do not forget to put
the wires back on the thermostat.
!

www.sibir.com COPYRIGHT © SIBIR INTERNATIONAL
19
Remove the plug from the wall socket.
Remove the terminal cover and loosen the
heater cables.
Look for a small cover on the boiler case and
remove it.
Lift the heater and take it out.
Insert the new heater into the heater tube.
Make sure that the glass wool is put back
around the heater and fit the cover again.
Connect the cables and fit the terminal cover
in reverse order.
Put the refrigerator on test.
REPLACING THE HEATER
1
2
3
4
5
6
7
8
Make sure that the replacement cooling unit is correct
for the refrigerator.
Remove the tank and burner.
Remove the capillary tube from the cooling element
and pull it carefully out of the rear of the cabinet.
Look for screws holding cooling elements
inside the refrigerator and remove them.
Remove the door handles and carefully
lay down the refrigerator on the doors.
Remove the electric heater.
Remove the terminal box and other electrical
components fastened to the cooling unit.
REPLACING THE COOLING UNIT
Before condemning a cooling unit:
· Remove kerosene tank and burner, then
turn the empty refrigerator upside down a
few times and see if it works when started.
· Make sure that instructions for installation,
use, maintenance and fault finding have
been followed.
· If the refrigerator works using electricity but
not with kerosene, or the other way around,
the cooling unit is NOT faulty.
BE CAREFUL NOT TO BREAK THE TUBE!
1
2
3
5
6
7
This operation should NOT be attempted by
someone not properly trained to perform
technical service.
4
4
!
!
!
Cover
Heater
Terminal box

www.sibir.com COPYRIGHT © SIBIR INTERNATIONAL
20
Look for screws holding the cooling unit to the cabinet back and remove them.
Look for sealing tape possibly applied between the cooling unit and the cabinet back. Remove if any.
Carefully pull the cooling unit out from the cabinet. If it is hard to get out, apply a lever.
Remove all residual foam on the back of the refrigerator that may be left from the old cooling unit.
REPLACING THE COOLING UNIT
8
9
11
10
Wood block between
lever and topmost
cooling unit pipe
Slide steel
plate under
the pipe coils
as protection
BE CAREFUL NOT TO BREAK ANY COOLING UNIT PIPES!
!
Apply new thermal paste all the way around the pipe.
Fit the new cooling unit into the cabinet and tighten all the
screws at the back.
Seal around the frame of the cooling unit (with tape or similar
material) as damp protection.
Refit the heater, terminal box and the capillary tube in exactly
the same way they were found before.
Transfer the flue baffle from the old cooling unit.
Stand the refrigerator up and replace all screws inside the
freezer and vaccine compartment. Tighten the screws hard.
Reattach the capillary tube end to the cooling element inside
the refrigerator.
Install the kerosene equipment.
Put the refrigerator on test.
Thermal
paste on
pipe
13
14
15
16
17
18
19
20
12
12
For proper function it is very important that good
contact between the cooling element and the cooling
unit itself is obtained.
!
/