
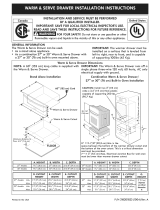
iNSTALLATiON AND SERVICE MUST BE PERFORMED BY A QUALiFiED iNSTALLER.
iMPORTANT: SAVE FOR LOCAL ELECTRICAL iNSPECTOR'S USE.
READ AND SAVE THESE iNSTRUCTiONS FOR FUTURE REFERENCE.
FORYOUR SAFETY: Do not store or use gasoline or other flammable vapors and liquids in the
vicinity of this or any other appliance.
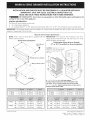
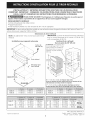
GENERAL INFORMATION
The Warm & Serve Drawer can be used:
• As a stand alone appliance
As a combination 27" or 30" Warm & Serve Drawer with a 27" or 30" (76 cm) built-in oven mounted above
IMPORTANT: The warmer drawer must be installed on a surface that is leveled from left to right, rear to front, and is
capable of supporting 100 Ibs (45 Kg).
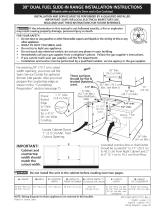
Warm & Serve Drawer Dimensions
NOTE: A 60" (152 cm) long cable is supplied with the
Warm & Serve Drawer.
Stand Alone Installation
60" (152 cm)
Cord
& Serve Drawer
271'Models 11¼"(28.6cm) 27"(68.6cm) 233/8"(59.4cm)
30"Models 11¼"(28.6cm) 30"(76.2cm) 233/8"(59.4cm)
27"Models- Min. 97/8"(25.1cm) 25½"(64.8cm) 235/8"(60cm)
Max. 10_A"(26cm) 253A"(65.4cm) 241'(61cm)
30"Models- Min. 97/8"(25.1cm) 28Y2"(72.4cm) 235/8"(60cm)
Max. 10_A"(26cm) 283A"(73cm) 24"(61cm)
IMPORTANT: The Warm & Serve Drawer runs off a
single phase three-wire 120 volt, 60 hertz, AC only
electrical supply with ground.
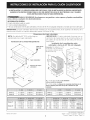
Combination Warm & Serve Drawer/
27" or 30" (76 cm) Built-in Oven Installation
CAUTION: Install two 3" (7.6 cm)
wide x 3.4" (1.9 cm) thick planks
capable of supporting 200 Ibs
(90.7 Kg)
(74_
t
H* = 11-7/8" (30,2 cm) Min. is the space between
the bottom of the warmer drawer cutout and the bottom of the
oven cutout. This is a critical dimension and must be provided.
J** = 3" (7.6 cm) Max. Electrical Junction Box for wall oven must be
lower than warmer drawer cutout.
27"Models 11¼"(28.6cm) 27"(68.6cm) 233/8"(59.4cm)
30"Models 11¼"(28.6cm) 30"(76.2cm) 233/8"(59.4cm)
27"-Min. 97/8"(25.1cm) 25Y2"(64.8cm) 235/8"(60cm) 2I'(5.1cm)
Max. 10¼1.(26cm) 25;A"(65.4cm) 24"(81cm) Do,endsons_itinnl
dimensionH
30"-Min. 97/8"(25.1cm) 28_"(72.4cm) 235/8"(60cm) 2I'(5.1cm)
Max. 10¼"(26cm) 283A"(73cm) 24"(61cm) Dn_ends0ns,itinnl
dimensionH
Printed in the USA
P/N318201813 (0805) Rev.A
English - pages 1-2; EspaAol - p_fginas 3-4
Fran_ais - pages 5-6; Notes - pages 7-8

important Notes to the installer
1. Read all instructions contained in these installation
instructions before installing appliance.
2. Remove all packing material from appliance before
connecting the electrical supply.
3. Observe all governing codes and ordinances.
4. Besure to leave these instructions with the consumer.
important Note to the Consumer
Keep these instructions for future reference.
IMPORTANT SAFETY
INSTRUCTIONS
* Be sure your appliance is installed and plugged
into a 120 Volt grounded outlet.
* This appliance must be electrically grounded in
accordance with the National Electrical Code ANSI/
NFPA No. 70--latest edition in the United States,
or CSA C22.1, Part I in Canada, and local code
requirements.
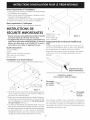
f
s
z Zf
Use screws _,
supplied to attach
drawer to front of
cabinet.
Figure 2
ModeJ and Serial Number Location
The serial plate is located as shown below.
When ordering parts for or making inquiries about your
Warm & Serve Drawer, always be sure to include the
model and serial numbers and a lot number or letter
from the serial plate.
TooJs You Will Need
Phillips@ Screwdriver
Pencil
Ruler or Tape Measure and Straight-edge
Hand Saw or Saber Saw
Spirit Level
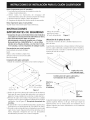
Warm & Serve Drawer Installation
1.Locate the 2 anti-tip brackets supplied asshown in fig. 1.
>k" "
j._" jJ
......24" (64.3 cm) Max.
..-_. %" (60 cm) Min.
12
(32.15 cm).......... '--_ Figure 1
2.Slide drawer into cutout opening until front frame of
drawer is flush against cabinet. Be careful not to pinch
electrical cord.
3.Remove the drawer as instructed in the Use & Care
Guide and secure drawer housing to cabinet using the
3 nickel-plated screws supplied (see Figure 2). Do not
overtighten screws.
4.The 60" (152 cm) appliance power cord can now be
connected into the 120 Volt outlet.
5.Proceed with mounting built-in oven above the drawer
(if applicable). Follow installation instructions provided
with built-in oven. Make sure to use anti-tip brackets
supplied with the built-in oven.
Serial Plate Location
Combination Warm & Serve Drawer
and Cooktop installation
_-</::-- _
Warmer
Drawer
Cutout
You can install the warmer drawer in combination with
an electric or gas cooktop. You must follow the
specifications from the installation instructions of the
cooktop to avoid interference with the gas or electric
installation.
Page is loading ...
Page is loading ...
Page is loading ...
Page is loading ...
Page is loading ...
Page is loading ...
-
 1
1
-
 2
2
-
 3
3
-
 4
4
-
 5
5
-
 6
6
-
 7
7
-
 8
8


Kenmore 79049219800 Installation guide
- Type
- Installation guide
- This manual is also suitable for
Ask a question and I''ll find the answer in the document
Finding information in a document is now easier with AI
in other languages
- français: Kenmore 79049219800 Guide d'installation
- español: Kenmore 79049219800 Guía de instalación
Related papers
-
Kenmore Elite 79048083001 Installation guide
-
Kenmore Elite 79048179001 Installation guide
-
 Kenmore Elite 79046913511 Installation guide
-
Kenmore Elite 30'' Warming Drawer - Stainless Steel Installation guide
-
Kenmore Elite 79074334311 Installation guide
-
Kenmore Elite 79036703500 Installation guide
-
 Kenmore Elite 79041043801 Installation guide


Other documents
-
Electrolux 30'' Built-In Warmer Drawer EW30WD55QS Product information
-
Millenium CP-777 Cajon Pedal Assembly Instructions
-
Whirlpool GBW3050TS00 Installation guide
-
Frigidaire FGWD3065PF Product information
-
KitchenAid KOWT104ESS00 Installation guide
-
-
Frigidaire FGWD3065PF Installation guide
-
-
Roland EC-10 EL Cajon User manual
-