EarthWay M20 Owner's manual

Type
Owner's manual

EarthWay M20 is a versatile 12-volt ATV broadcast spreader designed for precise and efficient spreading of granular materials like fertilizers, seeds, and ice melt. With its durable steel construction, this spreader can handle a variety of materials and is built to withstand the rigors of outdoor use. The M20 features a 5-year limited warranty and is easy to assemble and install on your ATV. Ensure accurate spreading with adjustable rate settings and a solid stop that allows for repeatability without constant monitoring.

EarthWay M20 is a versatile 12-volt ATV broadcast spreader designed for precise and efficient spreading of granular materials like fertilizers, seeds, and ice melt. With its durable steel construction, this spreader can handle a variety of materials and is built to withstand the rigors of outdoor use. The M20 features a 5-year limited warranty and is easy to assemble and install on your ATV. Ensure accurate spreading with adjustable rate settings and a solid stop that allows for repeatability without constant monitoring.

5-YEAR LIMITED WARRANTY
Earthway Products, Inc. warrants this product free of defects in original workmanship and materials for a period
of 5-Years to the end user with the original purchase receipt. If a manufacturing non-conformance is found,
Earthway Products, Inc. at its discretion will repair or replace the part(s) or product at no charge provided the
failure is not the result of incorrect installation, mishandling, misuse, tampering, or normal wear and tear as
determined by Earthway. Earthway at its discretion may require that the part(s) or product be returned along
with the original purchase receipt at owners’ expense for examination and compliance with the terms of this
warranty. Do not return any product without rst receiving authorization from Earthway Products, Inc. To
seek remedy under this warranty, contact Earthway Products, Inc. at 574-848-7491, techsupport@earthway.
com or write to Earthway Products, Inc. P.O. Box 547 Bristol, Indiana 46507 and describe the nature of the
manufacturing defect. SPECIFIC LIMITATIONS: This warranty covers only the part(s) or product; any
labor charges associated with repair or replacement of non-conformances are specically excluded. Due to the
corrosive nature of most fertilizers and ice melt products, Earthway Products, Inc. makes no warranty against
and specically excludes part(s) or product degradation or failure due to corrosion or its eects. Only use
granular materials, the use of Rock Salt or other large size material will void the warranty. Clean and dry your
spreader thoroughly after each use, as a rust preventative measure, coat all metal parts (inside and outside of the
steel tubing) with a light oil, Fluid Film
®
or silicon spray.
Operation and Assembly Manual
for the M20
12-volt ATV Broadcast Spreader
12-2016 Part # 52190
Assembly Instrucons:
STEP 1: Unpack all parts from shipping carton to ensure no parts are missing. Refer to the exploded view.
STEP 2: Install the four (#9) 7/8” Tube plugs onto the ends of the two (#15) Frames with the help of a hammer
or some other tool.
STEP 3: Determine whether to mount on the front or the back luggage rack. Depending on whether the M20
is mounted to the front or rear rack, you will need to install (#4) Control assembly to either the right (#11) or
le (#15) Frame tube to allow for use with the non-throle hand. Wait unl the unit is mounted to the Quad
before installing the Control.
STEP 4: Next install four 1/4-20 x 1-1/2” Carriage bolts (#12) through the Hopper assembly and then through
ONE of either side Frame and secure with 1/4-20 Hex Nut (#8).
STEP 5: Now posion the M20 to the Quad and install the
remaining Frame member as outline above in STEP 4. Now
install the Control assembly (#4) to the Frame and secure
with a 1/4-20 x 1-3/4” Carriage bolt (#13) and 1/4-20 Hex
Nut (#8) and ghten rmly to allow movement, but not
allow the lever to move unassisted.
Now install the M20 on your quad as outlined on the
following page.
STEP 2:
STEP 3: Determine where to mount
STEP 4:
STEP 5:
R
O
T
A
T
I
O
N
Electric Spreaders
Model M20
Always wear protecve clothing, eye wear, and dust mask to prevent contact with chemicals and other
materials being applied with this machine.
Remove any material in the hopper before liing or detaching this machine from the vehicle.
Care must be taken when liing this machine so as not to cause personal injury or equipment damage.
Never aempt to install this machine to the vehicle alone. Recruit the help of someone to assist when
aaching and detaching this machine from the vehicle.
Refer to the material packaging or the Material Safety Data Sheet for precauonary measures required when
handling materials to be applied.
Before aaching this machine, consideraon must be given to the load capacity of the vehicle. Refer to
the owners manual of the vehicle for rated load capacity. Be sure to take into account the weight of this
machine is 20lbs. and the weight of the material to be placed in the hopper when calculang the total load.
WA R N I N G
KEEP HANDS AWAY FROM ANY SPINNING OBJECT, SHUT-OFF PLATE, SHUT-OFF MECHANISM LINKAGE, AND
THE INSIDE OF THE HOPPER, EXTREME INJURY CAN OCCUR.
HOW TO OPERATE SAFELY:
Read, understand, and follow all product label informaon provided on the material being applied.
An adjustable solid stop is provided that allows the operator to adjust to the desired opening posion on
the rate seng control prior to operaon of the vehicle. This allows repeatability to the stop without the
need to look at the control while operang the vehicle.
Establish the correct rate and then lock the stop in that posion using the thumb wing nut on the seng
control. 
OPERATING INSTRUCTIONS:
Before lling hopper, become familiar with the operaon of this spreader. (Pracce the following steps)
Turn the motor switch to the ON POSITION, so that the impeller is turning before going on to the next step.
While driving forward pull the lever back to the stop, this opens the shut o plate on the spreader.
To stop the ow of material, Push the lever to “0” or closed posion, then turn the motor o when nished.
When nished empty any remaining material from hopper.
Thoroughly wash spreader and allow to dry before storing. A light coang of oil will help prevent corrosion
of all metal surfaces.
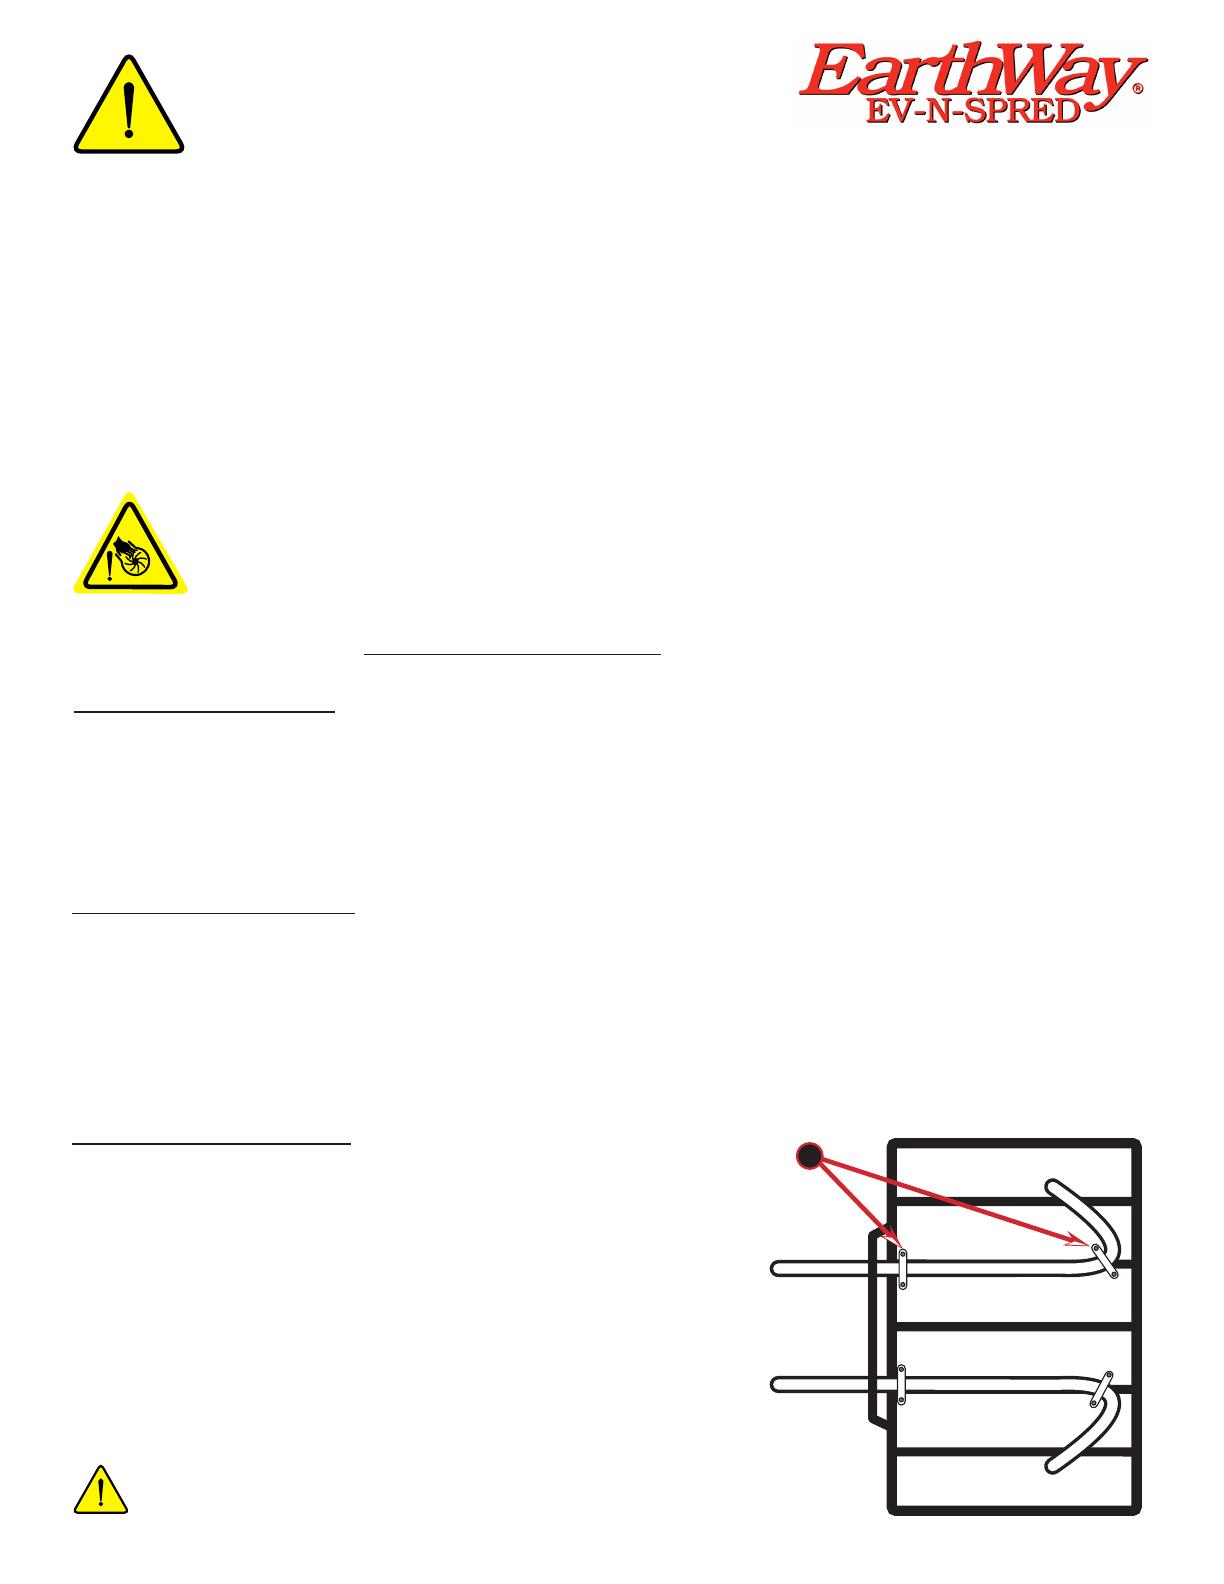
MOUNTING INSTRUCTIONS:
Posion the M20 on the vehicle so that the impeller is posioned
to be able to spin clear of any part of the vehicle, this will allow a
full 180 degree spread paern. Secure the frame to the mounng
locaon with the enclosed J-Bolts at posions that will secure the
spreader so that it will not move when operang the vehicle. For
best results mount the spreader so that the impeller is as close to the
vehicle as possible, but clears any parts on the vehicle and place the
J-Bolts as shown below.
Connect the black wire (ground) to the negave (-) post on the
baery and the fused wire to the posive (+) post on the baery.
If for any reason the impeller rotates counter
clockwise, reverse the battery connection of
the spreader. Correct rotation is clockwise.
M20 & M30 models
SPREADER CALIBRATION INSTRUCTIONS:
Loosen stop on the gauge and set to #30
Open the lever to #30 and make sure that the shut-o is fully open
Loosen the cable clamp on the boom of the hopper and slide the outer cable IN/Out unl the shut-o is
fully OPEN. Tighten the cable clamp and retest.
Calibraon is now complete
TO CALCULATE THE SETTING:
Determine how much material is to be applied per 1,000 sq/.
Measure o a distance of 50 feet, preferably on a paved surface such as a parking lot.
Weigh out enough of the material to be applied to ll the hopper at least half full. Record the weight for
future use.
With the unit mounted on the vehicle and the hopper at least half full of the material to be spread, posi-
on the vehicle far enough before the beginning of the 50 foot test area so that the vehicle will achieve the
desired speed before you reach the starng line.
Set the rate seng stop at a posion that you feel would be an appropriate seng.
Start the vehicle in moon and as you cross the starng line (of the 50 feet) move the rate lever to the open
posion against the stop. Take care to be aware of what is going on around you maintaining control of the
vehicle.
Connue from the starng line with the unit spreading the material. As you cross the nish line move the
rate lever to the closed posion.
Stop the vehicle and note the width of the spread path that was just completed.
Return to the start point and empty the remaining material from the hopper into your weighing container
and re-weigh.
RATE SETTING WORKSHEET
Desired Applicaon Rate (lbs/1,000 sq )
To determine the desired applicaon rate divide the area (sq ) the bag should cover by the weight of the bag,
then mulply by 1,000. (Example: 5,000 sq  / 25 lbs = .005 x 1,000 = 5)
Weight of Material Placed in Hopper
Subtract Weight of Material Le in Hopper
Equals Weight of Material Used
50 Length of Test Area (50 from above)
Mulply Width of Spread Area
Equals Total Spread Area
Divide the Weight of Material Used by the Total Spread Area = lbs\sq 
Mulply the lbs\sq  mes 1,000 = lbs\1,000 sq 
Compare the results of your test to the desired applicaon rate.
Adjust the rate seng stop accordingly and run through the test again.
Repeat this process unl you have achieved the desired applicaon rate.
Earthway Products, Inc.
P.O. Box 547
Bristol, Indiana 46507
USA
EC DECLARATION OF CONFORMITY
(Machinery Direcve & Electromagnec Compability Direcves)
Herewith we declare that the machinery described below is in accordance with the relevant health and safety
requirements of the EC Council Direcves concerned with Machinery and Electromagnec Compability. No
alteraons are to be made to the machine without prior consultaon and approval of Earthway Products, Inc.
otherwise the Declaraon may become invalid. This equipment must be commissioned, used and maintained
strictly in accordance with the operang and maintenance instrucons issued with the machine. Operators
must be trained in accordance with the recommendaons given in the operang and maintenance instrucons
issued with the machine.
Descripon of Machine: EarthWay
®
M20 12-volt Broadcast Spreader
Date of Supply: AS INVOICED DATE
Relevant EC Council Direcves:
Machine Direcves 89/392/EEC and subsequent amendments.
Electromagnec compability Direcve 89/336/EEC and subsequent amendments.
Issued by: Jerey D. Kendall on behalf of Earthway Products, Inc.
Signed by:
Date: December, 2016
Posion of Signatory: Vice President Sales & Markeng
DO NOT RETURN TO DEALER FOR REPAIR
EARTHWAY PRODUCTS, INC.
1009 Maple Street
P.O. Box 547
Bristol, IN 46507
FOR YOUR RECORDS
Date Purchased:
Store Name:
3
2
10
21
19
7
5
15
20
24
23
1
8
6
16
4 Sets included
9
9
9
8
11
4
13
14
18
8
25
22
17
12
25
77122 OPTIONAL
3-Sided Deflector Kit
*
advanced fitting required
8
27
26
28
29
M20 Parts List
Key # Part # Descripon Key # Part # Descripon
1 77003 HEAVY DUTY RAIN COVER 16 43050 U-BOLT STRAP (M20)
2 77101 ELECTRIC MOTOR DRILLED (M20) 17 32103 1/4-20 NYLON INS LOCKNUT ZINC
3 60323 MOTOR SUPPORT ASSEMBLY (M20) 18 12318 LOWER HOUSING CLIP
4 60523 CONTROL ASSEMBLY-M20 REV907 19 12221 SHUT OFF PLATE
5 60322 HOPPER ASSEMBLY (M20) 20 31138 #8 X 3/8" PMT #8 HD COARSE BLACK
6 44287 "J" BOLT (M30/M20) 21 12109 IMPELLER (9" DIA)
7 60511 WIRE HARNESS ASSEMBLY (M20/M30) 22 34108 9/16" OD. X .257 ID. WASHER ZINC
8 32100 1/4-20 HEX NUT ZINC 23 12309 MOTOR BASE (M20/M21)
9 19132 7/8" TUBE PLUG 24 12310 MOTOR CAP (M20)
10 31103 #6 X 1/2" TYPE 25 HWHS ZINC 25 31101 1/4-20 X 3/4" HHMS ZINC
11 25118 FRAME (M20) REV 907 RIGHT 26 32106 10-24 WING NUT ZINC
12 37101 1/4-20 X 1 1/2" CARRIAGE BLT Z 27 12222 INDICATOR-BROADCAST
13 37108 1/4-20 X 1 3/4" CARRIAGE BOLT ZINC 28 60422 MOTOR ASSEMBLY (M20)
14 31124 #10 X 5/8" TYPE A PHPS ZINC 29 77032 STRAIN RELIEF (#1184) HEYCO
15 25119 FRAME (M20) REV 907 LEFT
5 Installaon the 77122 3-Sided Deector Kit requires drilling of the hopper and motor support assembly for
ng.
  • Page 1 1
  • Page 2 2
  • Page 3 3
  • Page 4 4
  • Page 5 5
  • Page 6 6

EarthWay M20 Owner's manual

Type
Owner's manual

EarthWay M20 is a versatile 12-volt ATV broadcast spreader designed for precise and efficient spreading of granular materials like fertilizers, seeds, and ice melt. With its durable steel construction, this spreader can handle a variety of materials and is built to withstand the rigors of outdoor use. The M20 features a 5-year limited warranty and is easy to assemble and install on your ATV. Ensure accurate spreading with adjustable rate settings and a solid stop that allows for repeatability without constant monitoring.

Ask a question and I''ll find the answer in the document

Finding information in a document is now easier with AI