Sony XBR-65X900B Owner's manual
- Category
- LED TVs
- Type
- Owner's manual
This manual is also suitable for
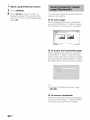
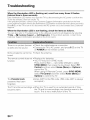
The Sony XBR-65X900B 4K Ultra HD LED TV with High Dynamic Range (HDR) offers a stunning viewing experience with four times the resolution of Full HD. With its X1 Extreme processor, the TV delivers exceptional clarity, color, and contrast, and its TRILUMINOS Display reproduces a wide range of colors for a more realistic picture. The TV also features Motionflow XR technology for smooth and blur-free motion, and its Acoustic Surface Audio+ system delivers immersive sound. With its built-in Wi-Fi and Ethernet connectivity, the TV allows you to stream content from your favorite apps and devices.
The Sony XBR-65X900B 4K Ultra HD LED TV with High Dynamic Range (HDR) offers a stunning viewing experience with four times the resolution of Full HD. With its X1 Extreme processor, the TV delivers exceptional clarity, color, and contrast, and its TRILUMINOS Display reproduces a wide range of colors for a more realistic picture. The TV also features Motionflow XR technology for smooth and blur-free motion, and its Acoustic Surface Audio+ system delivers immersive sound. With its built-in Wi-Fi and Ethernet connectivity, the TV allows you to stream content from your favorite apps and devices.


-
 1
1
-
 2
2
-
 3
3
-
 4
4
-
 5
5
-
 6
6
-
 7
7
-
 8
8
-
 9
9
-
 10
10
-
 11
11
-
 12
12
-
 13
13
-
 14
14
-
 15
15
-
 16
16
-
 17
17
-
 18
18
-
 19
19
-
 20
20
-
 21
21
-
 22
22
-
 23
23
-
 24
24
-
 25
25
-
 26
26
-
 27
27
-
 28
28
-
 29
29
-
 30
30
-
 31
31
-
 32
32
-
 33
33
-
 34
34
-
 35
35
-
 36
36
-
 37
37
-
 38
38
-
 39
39
-
 40
40
-
 41
41
-
 42
42
-
 43
43


Sony XBR-65X900B Owner's manual
- Category
- LED TVs
- Type
- Owner's manual
- This manual is also suitable for
The Sony XBR-65X900B 4K Ultra HD LED TV with High Dynamic Range (HDR) offers a stunning viewing experience with four times the resolution of Full HD. With its X1 Extreme processor, the TV delivers exceptional clarity, color, and contrast, and its TRILUMINOS Display reproduces a wide range of colors for a more realistic picture. The TV also features Motionflow XR technology for smooth and blur-free motion, and its Acoustic Surface Audio+ system delivers immersive sound. With its built-in Wi-Fi and Ethernet connectivity, the TV allows you to stream content from your favorite apps and devices.
Ask a question and I''ll find the answer in the document
Finding information in a document is now easier with AI
Related papers
-
Sony KDL-55W800B Owner's manual
-
Sony Bravia KD-55X9005C Owner's manual
-
Sony HT-XT2 Quick Start Guide and Installation
-
-
-
-
Sony KD-70X8505B User manual
-
Sony KDL-65W950B Owner's manual
-
-
Other documents
-
Welland RS1952ULB User manual
-
Welland RS1949LB User manual
-
Hisense N8700UWG User manual
-
-
Approx APPC10 Datasheet
-
-
-
Kanex MHLHDADP10FT Datasheet
-
Panasonic TYWK15LT1U Operating instructions
-
Legrand XBR-4400 Quick Installation guide