Page is loading ...

ENGLISH
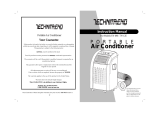
INSTRUCTION MANUAL
AMB12
• PORTABLE AIR CONDITIONER
AMB
12KE410A

2
3
For safety reasons, please read this manual
carefully before operating.
Persons who are not familiar with this manual
must not use this dehumidifier.
We strongly recommend keeping this manual in a
safe place for future reference.
Warning: Never operate this appliance if it has
a damaged cord or plug.
If the supply cord is damaged, it must be replaced
by an approved service representative or a
similar qualified person in order to avoid the risk
of injury.
This appliance is not intended for use by young
children or infirm persons without supervision.
Young children should be supervised to ensure
that they do not play with this appliance.
This appliance should be installed at least 50
centimetres clear of any structure.
The minimum clearance this appliance and any
combustible surface is 50 centimetres.
Do not place anything on top of the appliance,
e.g. clothing.
GENERAL SAFETY
Do not place in front of an open
window.
Do not clamp or bend the cable.
Do not immerse in water.
Do not insert anything.
Do not place near a heat source.
Do not place unevenly.
Do not use a damaged cable.
Do not bring in contact with
chemicals.
Do not use an extension cord.
Do not spill.
Do not repair. Keep out of the reach of children.
Warning: This appliance must be earthed. For
voltage and power input refer to the rating plate.
This appliance is supplied with an electrical cable
and an earthed plug. Should it be necessary
to replace this plug at any time, you must use
an earthed plug and wire as shown on page 3
opposite.
If the attached plug is unsuitable cut it off and
throw it away.
NEVER insert the severed plug into an electrical
socket or outlet. Never use the plug without the
fuse cover fitted in place. The replacement fuse is
13 Amps and should conform to BS1362.
PLUG / FUSE REPLACEMENT

2
3
15
11
13
12
14
16
10
17
7
6
9
5
8
4
2
3
1
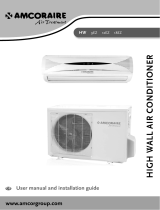
1. Control panel
2. Cooling air outlet
3. Handle
4. Casters
5. Air filter
6. Air inlet
7. Exhaust air outlet
8. Cord hanger
9. Water stopper (rubber plug inside)
Parts
PVC suction cups
PVC tube
Nylon strip
Adjustable
spring stopper
18
10. Hose adapters
11. Exhaust hose
12. Foam strip (hole for connection to the exhaust hose)
13. Round window connector
14. Cap for round window connector
15. Water tray
16. Remote control
17. Water tube
18. Window fitting kit
Plug / fuse replacement (continued from page 2)
13 Amp
13 A fuse
Brown
(Live)
Yellow/Green
(Earth)
Blue
(Neutral)
Cable grip
The wires of the cable are colour-coded in accordance with
the standard electrical code.
• The BLUE (Neutral) wire should be connected to the
terminal in the plug marked N or coloured black.
• The BROWN (Live) wire should be connected to the
terminal in the plug marked L or coloured red.
• The YELLOW/GREEN (Earth) wire should be connected
to the terminal in the plug marked E or coloured green.

4
5
It is important that you read these instructions before using your new portable air
conditioner. We strongly recommend that you keep these instructions in a safe
place for future reference.
Warning: Before using the air conditioner it should be left in an upright
position for at least 2 hours.
Thank you for choosing this air conditioner from AMCOR - a leading name in air
treatment.
For over 50 years, AMCOR has specialised in complete indoor environment
control, manufacturing portable air conditioners, coolers, air purifiers, ionisers,
dehumidifiers and aromatherapy products.
These world class products incorporate the latest technological developments and
are designed to create a quality environment.
The unit is designed for indoor operation.
Rating:
This unit must be connected to a 220-240 V / 50 Hz earthed outlet. The
installation must be in accordance with regulations of the country where the unit is
used.
If you are in any doubt about the electrical installation, have it checked and if
necessary modified by a qualified electrician.
• The air conditioner is safe. However, as with other electrical appliances, use it
with care.
• Do not clean the air conditioner by spraying it or immersing it in water.
• Do not insert any object into the opening of the air conditioner.
• Disconnect from the mains before cleaning the unit or any of its components.
• Never connect to an electrical outlet using an extension cord. If an outlet is not
available, one should be installed by a licensed electrician.
• Any service other than regular cleaning or filter replacement should be
performed by an authorized service representative.
Failure to do so could result in a loss of warranty.
WARNING Never operate this appliance if it has a damaged cord
or plug. Do not lead the cord over sharp edges.
Instruction manual
Thank you!
Safety instructions
Installation

4
5
Instruction manual
This unit is a portable air conditioner. It can be moved from room to room so that
the cooling can follow you anywhere. Fitting the exhaust hose is easy, through a
window or wall. Please refer to either of the following ways:
Important
The supplied flexible exhaust hose can be extended from 300 to 1500 mm for
locating. It is recommended that you use the shortest possible length of the hose.
This length has been designed especially according to the specifications of the air
conditioner. Do not replace or extend it with your own hoses as this could cause
the unit to malfunctioning.
The exhaust air must flow freely, any blockage can lead to overheating of the air
conditioner. Take care to prevent any kink or bend in the middle of the exhaust
hose, as this will trap hot exhaust air, which will radiate into the room.
14
13
11
Safety instructions
Installation
Using the foam strips.
• Open the window.
• Moisten the suction cups from the window
fitting kit (18) and press firmly onto a clean
window to secure.
• Place the connector (13) into the hole in the
foam (12) with the flange outside.
• Screw the end of the hose (11) into the
fitting (13).
• Place the assembled foam strip between the
open window and pull the windows so that
they close onto the foam.
• Depress the button on the toggle and pull
the cord until it is taught.
• Release the button to enable the cord to
hold the foam in place.
• Connect the hose to the back of the unit
with the adapter (10).
• Pass the hose through the opening in the
foam (12)
Using the round window connector.
• Make a hole in the wall/glass large enough
to fit the supplied round connector (13) with
the flange on the inside.
• Fit the hose (11) directly to the round
connector.
• When the hose is not in use, place the cap
(14) to cover the hole.
12
18
11
13

6
7
ON/OFF
Press button the unit will start to work at the last setting. If the wall
socket is switched off, the unit defaults to the factory setting. To turn the unit
off, press the button again.
Timer button
Press the button to set the operating hours (1 to 12 hours, the timer
LED will light up). When the set time has elapsed, the unit will turn off
automatically. The display will show the hour(s) you set as you press the
button. If the button is not pressed, the unit will work continuously.
By pressing the button without turning on the unit, you can PRE-SET the
time for the unit to work. For example, if you press the timer to '2', the unit
will come on automatically after 2 hours.
Mode button
Press the button to select the required working mode: automatic, co or
.
The LED illustrating your selected mode lights up: AUTO, or .
AUTO mode
• higher than 23 °C, the unit will work in cooling mode.
• higher than 20 °C but below or equal to 23 °C, the unit will work in
ventilation mode.
Indicators of the functions in progress come on at the same time, e.g. and
i.e. cooling with low fan speed.
Fan speed button
Press the button to choose the fan speed you require, high or low .
The LED will light up at the same time.
Operation

6
7
If the unit is in AUTO mode, it will select the fan speed automatically
according to the ambient temperature (the related LED will light up), at this
time the fan speed button is inoperative.
Temperature selection
Press the or button to select the temperature you desire (ranging
from 18 °C to 32 °C).
The display will show the temperature you set as you press the
or button. Otherwise, it will always display the ambient
temperature .
The pre-set room temperature of this unit is higher than 23 °C for cooling.
Sleep mode
This mode can only be used when cooling is selected. Press the button.
Every hour the temperature will rise with 1 °C, to a maximum of 2 °C. After
12 hours the unit will switch off automatically. Press the button again to
cancel sleep mode. In the sleep mode the set temperature can not be changed.
Remote control
All the above functions can also be performed with the supplied remote
control. This remote control requires 2 AAA-batteries to operate.
Notice!
• To prolong the unit's life, it will start 3 minutes after the unit was switched on.
After switching off, please wait at least 3 minutes before switching it on again.
• The cooling will switch off when the room temperature is lower than the set one.
The fan, however, keeps working at the set level. If the ambient temperature
rises above the chosen value, the cooling will resume.
Turn the roller on the air vent
to control the air flow direction
from the vertical louvres.
Move the air vent directly to
adjust the air flow direction
from the horizontal louvres.
Regulating the air flow direction.

8
9
During the process of cooling, some water
will be extracted from the air into the unit. If
the water container inside the unit is full, the
unit will stop, the fan will continue to circulate
the air. The POWER-LED will blink to inform you
to empty the internal container. To make the
cooling function work again, please empty the
water by one of the following methods:
By the supplied water tray.
1. Turn OFF the unit.
2. Position the supplied plastic water tray flat
on the floor under the drain hole.
3. Remove the drain knob and the rubber plug
from the drain hole. The condensed water will
drain out automatically.
4. When the water tray is almost full, replace
the rubber plug into the drain hole to stop the
water. Empty the water tray.
5. Repeat steps 2, 3 and 4 until all the
condensed water is emptied.
6. One all the condensed water has been
removed, replace the rubber plug into the
drain hole firmly. The 'Tank Full' indicator
should be off now.
7. Replace the drain knob.
By water tube (continuous drainage)
1. Remove the drain knob and rubber plug
and keep them for future use.
2. Connect the supplied water tube to the
water hole. The condensed water will drain
out automatically.
3. If you want to extend the water tube, you
can connect it with another tube (outside
diameter 18 mm).
Rubber plug Drain knob Water tray
Drainage

8
9
Always unplug the unit from the mains before beginning the cleaning.
Cleaning the housing.
• Use a soft, damp cloth to wipe the body clean.
• Never use aggressive chemicals, petrol, detergents, chemically treated cloths or
other cleaning solutions. These could possibly damage the cabinet.
Maintenance
non washable deodorising
carbon filter
washable foam antibacterial
filter
filter frame
Cleaning the filter.
• Lift out the filter frame and remove
the black carbon filter - this should
NOT be washed. The black foam
antibacterial filter may be washed
along with the frame.
• Use a vacuum cleaner or tap the filter
lightly to remove loose dust and dirt
from the filters and then rinse them
thoroughly under running water (no
hotter than 40 °C).
• Dry thoroughly before replacing the
carbon and antibacterial filters and
then replace the frame into the unit.
Notice! Never operate the unit without the filters.
End of season storage.
• Unplug the unit.
• Drain the condensed water
completely (see page 8).
• Clean or change the filter.
• Turn the unit to fan mode for a
couple of hours in a warm room
so that the inside can dry out
completely.
• It is recommended that the unit be
put back in its original carton for
storage.
• Do not stack heavy objects on top of
the unit.
When the unit is not in use, please tidy
the power cord away as shown.

10
11
Never try to repair or dismantle the air conditioner yourself. Incompetent repairs result in loss of warranty and can endanger the user.
The unit does not function Connect to a functioning outlet and
switch on
Water tank indicator is on Empty water tank
Room temperature outside operating
temperature range
The unit does not seem to perform In direct sunlight Close curtains
Windows or doors open, many people or
heat source in room
Dirty filter Clean or replace filter
Air inlet or air outlet blocked Remove blockage
Room temperature lower than selected value Change temperature selection
The unit is noisy Unit stands uneven Place on even surface (less vibrations)
The compressor does not work Overheat protection probably activated Wait until room temperature lowers
Trouble shooting

11
/