
Application Instructions
Updated: 10/14
Royal Sovereign
®
& Sentinel
®
Shingles
For English Size Shingles
www.gaf.com
Quality You Can Trust…
From North America’s
Largest Roofing
Manufacturer!
™

INSTALLATION INSTRUCTIONS
·
INSTRUCCIONES DE INSTALACIÓN
1.
Quality You Can Trust…From
North America’s Largest Roofing Manufacturer!
™
¡
Calidad En La Que Usted Puede Confiar...Del
Fabricante De Techos Más Grande De Norteamérica!
™
GENERAL INSTRUCTIONS
• SAFETY DATA SHEETS: When using GAF products, e.g., shingles, underlayments, plastic cement, etc., please refer to the applicable SDS.
The most current versions are available at gaf.com. GAF does not provide safety data sheets or installation instructions for
products not manufactured by GAF. Please consult the material manufacturer for their SDS and installation instructions where appropriate.
• ROOF DECKS: Use minimum 3/8" (10mm) plywood or OSB decking as recommended by APA-The Engineered Wood Assn. Wood decks must
be well-seasoned and supported having a maximum 1/8" (3mm) spacing, using minimum nominal 1"(25mm) thick lumber, a maximum 6"
(152mm) width, having adequate nail-holding capacity and a
smooth surface. Do NOT fasten shingles directly to insulation or insulated deck
unless authorized in writing by GAF. Roof decks and existing surfacing material must be dry prior to application of shingles.
• UNDERLAYMENT (LEAK BARRIER): Install GAF leak barrier at the eaves in localities where leaks may be caused by water backing up behind
ice or debris dams.
• UNDERLAYMENT (ROOF DECK PROTECTION): Underlayment beneath shingles has many benefits, including helping to prevent wind-driven
rain from reaching the interior of the building and to prevent sap in some wood decking from reacting with asphalt shingles. When an
underlayment is installed, use a breather-type underlayment, such as GAF Shingle-Mate
®
or Deck-Armor
™
underlayments. GAF Tiger Paw
™
underlayment, with its moisture control design, can also be used. Always have a design professional review ventilation requirements when
using a moisture control design underlayment. Underlayment is also required by many code bodies and is required to maintain the shingles’
UL Class A fire rating. When using FeltBuster™High-Traction Synthetic Roofing Felt asunderlayment,itMUST be installed over one layer of
VersaShield
®
Fire-ResistantRoofDeckProtection in order to maintain a Class A fire rating for GAF asphalt shingles.
• FASTENERS: Use only zinc-coated steel or aluminum, 10-12 gauge, barbed, deformed, or smooth shank roofing nails with heads 3/8" (10mm)
to 7/16" (12mm) in diameter. Fasteners should be long enough to penetrate at least 3/4" (19mm) into wood decks or just through the plywood
decks. Fasteners must be driven flush with the surface of the shingle. Overdriving will damage the shingle. Raised fasteners will interfere with
the sealing of the shingles and can back out.
• ASPHALT PLASTIC CEMENT: Use asphalt plastic cement conforming to ASTM D4586 Type I or II.
• WIND RESISTANCE/HAND SEALING: These shingles have a special thermal sealant that firmly bonds the shingles together a fter applica
tion
when exposed to sun and warm temperatures. Shingles installed in fall or winter may not seal until the following spring. If shingles are damaged
by winds before sealing or are not exposed to adequate surface temperatures, or if the self-sealant gets dirty, the shingles may never seal.
Failure to seal under these circumstances results from the nature of self-sealing shingles, and is not a manufacturing defect. If shingles are
to be applied during PROLONGED COLD periods or in areas where airborne dust or sand can be expected before sealing occurs, the shingles
MUST be hand sealed. See Nailing Instructions / Hand Sealing.
• MANSARD AND STEEP SLOPE APPLICATIONS: For roof slopes grea ter than 21" per foot (1750mm/m), shingle must be hand sea
led. DO NOT
use on vertical side walls.
• RELEASE FILM: Plastic film strips are present either on the back or face of each shingle. The film strips are to prevent shingles from sticking
together while in the bundle. Do not remove the film strip before or during the application.
• THROUGH VENTILATION: For optimal shingle life and to help prevent mold growth, all roof structures must have through ventilation to prevent
entrapment of moisture-laden air behind roof sheathing. Ventilation must be designed to meet or exceed current F.H.A., H.U.D., or local code
minimum requirements. Note: Minimum net free ventilation area of 1 sq. foot per 150 sq. feet (1 sq. meter per 150 sq. meters) of ceiling area
is required. When vents are located at the eaves and near the roof’s peak (balanced) for maximum air flow, ventilation may be reduced to 1 sq.
foot per 300 sq. feet (1 sq. meter per 300 sq. meters).
• EXPOSED METAL: Paint all exposed metal surfaces (flashing, vents, etc.) with m
atching GAF Shingle-Match
™
roof accessory paint for
best appearance.
• NOTE: All drawings not drawn to scale.
INSTRUCCIONES GENERALES
• HOJAS DE DATOS DE SEGURIDAD (SDS): Cuando utilice los productos de GAF, tales como tejas, bases de pisos, cemento plástico, etc.,
consulte las SDS correspondientes. Las versiones más actuales están disponibles en es.gaf.com. GAF no proporciona hojas de datos de
seguridad ni instrucciones de instalación para productos que no sean fabricados por GAF. Consulte al fabricante del material para sus SDS e
instrucciones de instalación según corresponda.
• PLATAFORMAS BASE DE TECHOS: Use una plataforma base de 3/8" (10mm) de madera terciada u madera aglomerada orientada (OSB por
sus siglas en inglés) como mínimo según lo recomendado por la Asociación Americana de Madera Terciada (APA por sus siglas en inglés).
Las cubiertas de madera deben estar bien preparadas y apoyadas, con un espacio máximo de 1/8" (3mm), con un espesor mínimo nominal de
1"(25mm), con un ancho máximo de 6" (152mm), y una capacidad de retención de clavos adecuada y una superficie suave. NO asegure las
tejas directamente al aislante o a la plata
forma base aislada a menos que sea autorizado por escrito por GAF. Las plataformas base de techo y
material de superficie existentes deben estar secas antes de la aplicación de las tejas.
• CAPA BASE (barrera contra goteras): Instale barrera de filtraciones de GAF en los aleros en lugares donde el estancamiento de agua detrás de
hielo o desechos podría causar filtraciones.
• CAPA BASE (PROTECCIÓN PARA CUBIERTAS DE TECHOS): La capa base deb
ajo de las tejas tiene muchos beneficios, incluyendo el ayudar a
evitar que la lluvia arrastrada por el viento alcance el interior del edificio y evitar que la savia de algunas plataformas de madera reaccione con
l as tejas asfálticas. Donde vaya a instalar una capa base, use una de tipo respira ble como las capas base ShingleMate
®
o Deck-Armor
™
de GAF.
También se puede utilizar la capa base Tiger Paw
™
de GAF, con su diseño de control de la humedad. Siempre pida a un profesional en diseño
que revise los requisitos de ventilación cuando utilice una capa base con diseño de control de la humedad. La capa base también es requerida
por muchos códigos de construcción para mantener la calificación Clase A de UL contra incendios. Cuando utilice el Fieltro Sintético De
Alta Tracción FeltBuster™ Para Techos como capa base, DEBE instalarse sobre una capa de Protección de la Cubierta del Techo Ignífuga
VersaShield
®
con el fin de mantener una clasificación Clase A contra incendios para las tejas asfálticas GAF.

2.
• SUJETADORES: Use únicamente clavos de techado de acero o aluminio galvanizados, de calibre 10-12, arponados, deformados o con espiga
suave con cabezas de 3/8" (10mm) a 7/16" (12mm) de diámetro. Los sujetadores deben ser suficientemente largos como para penetrar al
menos 3/4" (19mm) en las plataformas base de techos o apenas a tra vés de las plataformas base de madera terciada . Los sujetadores deben
ser clavados a nivel con la superficie de la teja. Clavar en exceso puede da ñar la teja. Los clavos sobresalientes interferirán con el sellado de las
tejas, y pueden doblarse hacia atrás.
• CEMENTO PLÁSTICO ASFÁLTICO: Use cemento plástico asfáltico conforme a los Tipos I o II de ASTM D4586.
• RESISTENCIA AL VIENTO / SELLADO A MANO: Estas tejas tienen un sellador térmico especial que firmemente une las tejas entre sí después
de la aplicación, cuando queda n expuestas al sol y a temperaturas cálidas. Las tejas instaladas en otoño o invierno pueden no sella r hasta la
primavera siguiente. Si las tejas son dañadas por los vientos antes de sellar o no son expuestas a temperaturas de superficie adecuadas, o si
el auto-sellante se ensucia, las tejas podrían no sella
r jamás. La imposibilidad de sellar bajo esta s circunstancias resulta de la naturaleza de las
tejas auto-sellantes y no es un defecto de fábrica. Si las tejas deben ser aplicadas durante períodos PROLONGADOS DE FRÍO o en áreas donde
se puede esperar la presencia de polvo o arena en el aire antes que el sellado ocurra, las tejas DEBEN ser selladas a mano. Ver instrucciones
de clavado/sellado a mano.
• APLICACIONES EN BUHARDILLAS Y PENDIENTES ESCARPADAS: Para pendientes de techos superiores a las 21" por pie (1750mm/m), la teja
debe ser sellada a mano. NO usar en paredes laterales verticales.
• PELÍCULA SEPARADORA: Las tiras separadoras de plástico están presentes o bien en la parte posterior o en la cara de cada teja.
Las telas separadoras sirven para evitar que la s tejas se peguen entre si estando en el manojo. No retire la banda de película antes o durante
la aplicación.
• VENTILACIÓN PASANTE: Para la vida útil óptima de las tejas y para ayudar a prevenir el crecimiento de moho, todas las estructuras del
techo deben tener ventilación continua para evitar el atrapamiento de aire cargado de humedad detrás del revestimiento del techo.
La ventilación debe estar diseñada para cumplir o exceder los requerimientos mínimos actualizados de la F.H.A., H.U.D. o los requerimientos
de códigos locales. Nota: Se requiere un área mínima de ventilación libre de red de 1 pie cuadrado por cada 150 pies cuadra
dos (1 metro
cuadrado por cada 150 metros cuadrados) de cielorraso. Cuando las ventilaciones estén colocadas en los aleros y cerca del pico del techo
(balanceadas) para un máximo flujo de aire, la ventilación puede reducirse a 1 pie cuadrado por cada 300 pies cuadrados (1 metro cuadrado
por cada 28 metros cuadrados).
• METAL EXPUESTO: Pinte todas las superficies de metal expuesto (vierteaguas, ventilaciones, etc.) con la pintura de accesorio para techos GAF
ShingleMatch
™
para una mejor apariencia.
• NOTA: Las ilustraciones no están hechas a escala.
Page is loading ...
Page is loading ...

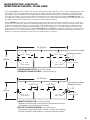
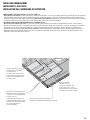
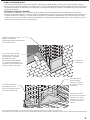
Along rake, put non-corroding
metal drip edge on top of GAF
roof deck protection.
A lo largo del alero, coloque borde
de goteo de metal inoxidable encima
de la protección de plataforma base
del Techo de GAF.
4" (102mm) minimum vertical lap
Solape vertical mínimo de 4" (102mm)
Along eaves, put GAF
leak barrier on top of
non-corrosive metal drip edge.
A lo largo de los aleros, coloque
la barrera de filtraciones de GAF
sobre el borde de goteo de
metal inoxidable.
2" (51mm) minimum horizontal lap
Solape horizontal mínimo de 2" (51mm)
Solape horizontal mínimo de 2" (51mm)
Chevauchement horizontal minimum de 51mm (2po)
GAF Roof Deck Protection
Protección de Plataforma Base
de Techos de GAF
GAF Leak Barrier
Barrera de Filtraciones de GAF
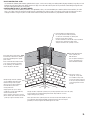
For maximum wind resistance along rakes, install
any GAF starter strip shingles which contain sealant
or cement shingles to underlayment and each other
in a 4" (102mm) width of asphalt plastic cement.
Para máxima resistencia al viento a lo largo de
LAS INCLINACIONES, instale cualquier teja de
hilada inicial de GAF con conteniendo sellador
o cemente las tejas a la capa base y entre sí en
un ancho de 4" (102mm) de cemento
plástico asfáltico.
Place starter strip shingles 1/4" – 3/4" (6 – 19mm) over
eave and rake edges to provide drip edge.
Coloque las tejas de hilada inicial a 1/4" – 3/4" (6 – 19mm)
sobre los bordes de alero e inclinación para proporcion r borde de goteo.
Overlap eave edge starter strip
at least 3" (76mm).
Traslape la hilada inicial del borde
de alero por lo menos 3" (76mm).
Non-corroding metal drip edge
Borde de goteo de metal inoxidable.
GAF Underlayment
Barrera de Filtraciones de GAF
Sheathing
Revestimento
Sheathing
Revestimento
Not more than 1/4" (6mm) roof overhang
No más que 1/4" (6mm) techo sobresale por encima de
Nail approximately 1-1/2"
– 3" (38 – 76mm)
above the butt edge of the shingle
Clave aproximadamente a 1-1/2" – 3" (38 – 76mm)
por encima del borde de empalme de la teja
5.
UNDERLAYMENT: FOR ROOF SLOPES 4:12 OR MORE
Application of eave flashing: At eaves and where ice dams can be expected, use one layer of GAF leak barrier. Eave flashing must extend 24"
(610mm) beyond the inside wall line. Application of underlayment: Cover deck with one layer of GAF roof deck protection installed without
wrinkles. Use only enough nails to hold underlayment in place until covered by shingles.
CAPA BASE: PARA TECHOS CON PENDIENTES DE 4:12 O MÁS
Aplicación de vierteaguas para aleros:
En los aleros y donde se pueda esperar la presencia de estancamientos de hielo, use una capa de
barrera de filtraciones de GAF.
El vierteaguas para aleros extenderse 24" (610mm) más allá de la línea interior de la pared.
Aplicación de capa base: Cubra la plataforma base con una capa de capa base de GAF instalada sin arrugas. Use solamente la cantidad
suficiente de clavos como para sostener la capa base en su lugar hasta que la haya cubierto con las tejas.
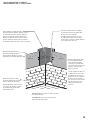
I
NSTALLING STARTER STRIP SHINGLES
INSTALACIÓN DE TEJAS DE HILADA INICIAL
STARTER COURSE
Use GAF starter strip shingles along the eaves and rake. Apply as shown. NOTE: GAF starter strip shingles are recommended at the
rakes for best performance and required for enhanced warranty coverage on certain products (see limited warranties for details).
Refer to
application instructions for the selected starter strip shingles.
HILADA INICIAL
Use tejas de hilera inicial de GAF en los aleros. Aplicar como se muestra
las inclinaciones
.
NOTA:
Se recomienda usar tejas de hilera inicial de GAF en
las inclinaciones para mejor rendimiento y se requiere para cobertura de la garantía contra el viento en ciertos productos (consulte la garantía limitada para
detalles).
Siga las instrucciones de aplicación de tejas de hilada inicial.

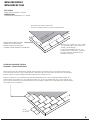
Starter Course
Hilada Inicial
First Cours
e
Primera Hilada
First Course
Primera Hilada
GAF Underlayment
Barrera de Filtraciones de GAF
Place first course of shingles 1/4" – 3/4" (6–19mm)
over eave and rake edges, covering starter course
overhang, to provide drip edge.
Coloque la primera hilada de tejas a 1/4" – 3/4"
(6–19mm) sobre los bordes de alero e inclinación,
cubriendo el traslape de la hilada inicial, para
suministrar borde de goteo.
Start at either rake and lay in either direction
Comience en cualquier inclinación y coloque en cualquier dirección
Empiece y continúe con tejas enteras
colocadas en forma nivelada con la hilada inicial.
Start and continue with full shingles
laid flush over the starter course.
Start the second course with a shingle that has a half tab removed. Continue the subsequent courses by removing tabs as follows: third
course, trim full tab; fourth course, trim 1 1/2 tabs; fifth course, trim 2 tabs; sixth course trim 2 1/2 tabs. This will create a stair step pattern.
Begin the seventh course with a full shingle and repeat the pattern above for subsequent courses.
Comience el segundo curso con una tablilla que tiene media etiqueta quitada. Continúe los cursos subsiguientes quitando etiquetas de la
siguiente manera: en tercer lugar curso, recorte etiqueta llena; cuarto curso, recorta 1 1/2 etiquetas; quinto curso, recorta 2 etiquetas; sexto
curso recorta 2 1/2 etiquetas. Esto creará una pauta de paso de escalera. Empiece el séptimo curso con una tablilla llena y repita la pauta antes
mencionado para cursos subsiguientes.
Sixth Course
Sexto Curso
Sixth Course
Sexto Curs
o
1/2 tab
1/2 etiquetas
FIRST COURSE
Shingle exposure should be 5
"
(127mm)
PRIMERA HILADA
La exposición de la tablilla debe ser 5
"
(127mm)
SECOND AND SUBSEQUENT COURSES
SEGUNDOS Y CURSOS SUBSIGUIENTES
6.
INSTALLING SHINGLES
INSTALACIÓN DE TEJAS

Metal flashing (Nailed to the
deck, NOT to the vertical wall)
extend up wall at least
5" (127mm)
El vierteaguas de metal (Clavado a la
plataforma base, NO a la pared vertical)
se extiende hacia arriba por la pared
5" (127 mm)
Extend GAF leak barrier
at least 5"(127mm) up wall
Extienda la barrera para
goteras de GAF por al menos
5" (127 mm) hasta la pared.
Cover metal flashing with
cut shingle. Do NOT nail
shingle, install with asphaltic
plastic cement.
Cubra el vierteaguas de metal
con tejas cortadas. NO clave
las tejas, instale con cemento
plástico asfáltico.
Siding
Tinglado
Sheathing
Revestimento
Sheathing
Revestimento
Siding/cladding must be at least 2" (51mm) above the
roof surface and covering flashing at least 2" (51mm).
El revestimiento/recubrimiento debe ser de al menos
2" (51mm) por encima de la superficie del techo y
cubrir el vierteaguas por lo menos 2" (51mm).
Step flashing pieces overlap
each other 2" (51mm)
Las piezas de vierteaguas escalonado
se traslapan entre si 2" (51mm)
Bend hip & ridge shingle centered over hip or ridge
Doble la teja de cumbrera y borde centrada sobre
la cumbrera o borde
5"(127mm) minimum
Cut shingle to make three 12"(305mm) x 12"(305mm)
hip & ridge shingles from each strip.
Taper for best appearance
Corte las tejas para hacer tres tejas de cumbrera y borde
de 12" (305mm) x 12" (305mm) para cada hilada.
Afile para un mejor aspecto.
5" (127mm) Mínimo
Nail 5 5/8" (143mm) above butt and 1" (25mm)
from edge. Cover nails with roof cement.
Clave a 5 5/8" (143mm) por encima del empalme y
1" (25mm) del borde. Cubra los clavos como
cementos para techos.
Extend GAF leak barrier at least
5"(127mm) up wall.
Extienda la barrera para goteras
de GAF por al menos
5" (127 mm) hasta la pared.
2 nails per step flashing
2 clavos por vierteaguas escalonado
Coloque tapajuntas metálico de paso
sólo expuso orilla de tablilla
y extiende 5" (127 mm) sobre tablilla
fundamental y 5" (127 mm) arriba
la pared vertical.
GAF Underlayment
Capa base de GAF
Place metal step flashing just upslope
from exposed edge of shingle and extend
5" (127mm) over underlying shingle
and 5" (127mm) up the vertical wall.
WALL FLASHING (Sloped Roof to Wall)
VIERTEAGUAS DE PARED (Techo en Pendiente hacia la Pared)
SOLINS MURAUX (de Toit en Pente à Mur)
7.
VENTILATION
Install GAF ventilation products for optimal shingle life. See General Instructions “Through Ventilation” section. Refer to application instructions for
the selected ventilation products.
VENTILACIÓN
Instale productos de ventilación de GAF para una óptima vida útil de la teja. Vea la sección de Instrucciones Generales “ventilación continua”. Siga las
instrucciones de aplicación de los productos de ventilación seleccionados.
RIDGE CAP SHINGLES
Install GAF ridge cap shingles following the application instructions on the GAF ridge cap shingle wrapper or cut hip & ridge shingles from these full
shingles, and apply as shown. Position laps away from prevailing wind direction.
TEJAS DE TOPES DE BORDE
Instale las tejas de tope de borde de GAF siguiendo las instrucciones de aplicación que figuran en el envoltorio de las tejas de tope de borde de GAF
o corte las tejas de cumbrera y borde de estas tejas completas, y aplique como se muestra. Coloque los solapes lejos de la dirección del
viento predominante.
INSTALLING ROOF ACCESSORIES AND DETAILS
INSTALACIÓN DE ACCESORIOS Y DETALLES DE TECHO

Extend non-corroding metal counter
flashing over base flashing.
Extienda contravierteaguas de metalinoxidable
sobre vierteaguas de base.
Use one piece metal non-corroding
step flashing for each course. Seal
overlying shingles to step flashing
with asphalt plastic cement.
Utilice un metal de pedazo tapajuntas
no-corroendo de paso para cada curso.
Selle tablillas que recubre para dar un paso
destellar con asfalto cemento plástico.
Cricket ridge should be
at least 12" (305mm).
El borde de los desviadores
debe estar a por lo menos
12" (305 mm).
4" (102mm) min.
4" (102mm) mín.
Cricket flange should be at
least 18" (457mm) up roof deck.
La brida de los desviadores
debe estar a por lo menos 18"
(457mm) por la cobertura
del techo.
Selle las tejas a la brida de metal con
cemento del plástico del asfalto.
Seal shingles to metal flange
with asphalt plastic cement.
Crickets should extend at least 6" (152 mm) up the back of the chimney and extend at least 12" (305 mm) up the roof deck.
Los desviadores deben extenderse a por lo menos 6" (152 mm) hasta la parte posterior de la chimenea y extenderse a por lo menos 12" (305 mm) hasta la cubierta del techo.
8.
CHIMNEY FLASHING AND CRICKETS
Cover deck around chimney and over wood crickets with GAF roof deck protection. DO NOT run GAF roof deck protection up sides of chimney. Install leak
barrier over GAF roof deck protection and up sides of chimney at least 5" (127 mm). Install shop fabricated metal cricket flashings (shown) after underlayments
are installed. Seal shingles to the metal flanges (see drawing below). Treat large wooden crickets like a separate roof and install valleys, shingles, hip and ridge
shingles and step flashing.
VIERTEAGUAS DE CHIMENEA Y DESVIADOR
Cubra alrededor de la chimenea y sobre los desviadores en pico de madera con protección de plataforma de techos de GAF. NO coloque protección de
plataforma base de techos de GAF por los laterales de la chimenea. Instale la barrera de filtraciones sobre la protección de plataforma de techos de GAF y a los
costados de la chimenea a un mínimo de 5" (127mm). Instale los vierteaguas de los desviadores de metal fabricados (que se muestran) después de instalar
las capas base. Selle las tejas a
las bridas de metal (ver ilustración debajo). Trate los desviadores grandes de madera como un techo por separado e instale los
valles, tejas, tejas de cumbreras y bordes y vierteaguas de paso.

6"
(152 mm)
6"
(152 mm)
Center valley metal, overlap metal
horizontal laps a minimum 12" (305mm)
and seal by embedding them in asphalt
plastic cement.
Center full width roll of GAF leak barrier.
Do not place fasteners within 6" (152mm)
of center line. Horizontal laps 6" (152mm) min.
Centre un rollo de ancho completo
de barrera de filtraciones de GAF. No coloque sujetadores
dentro de las 6" (152mm) de la línea central.
Traslapes horizontales a 6" (152mm) como mín.
Carry GAF underlayment at
least 6" (152mm) over
GAF leak barrier.
Lleve la capa base de GAF por
lo menos 6"(152mm) sobre
barrera de filtración de GAF.
Overlap shingles at least 4" (102mm).
over 20" (508mm) wide valley metal.
Embed the shingle ends in asphalt
plastic cement to seal the shingles to
the metal and keep water from
running under them.
Superponga las tejas a por lo menos
4" (102 mm), con más de 20" (508 mm)
de ancho del metal del valle.
Unte los extremos de las tejas en cemento
plástico asfáltico para sellar las tejas al metal
y evitar que el agua corra debajo de ellas.
Centre el metal del valle traslape el metal
en los solapes horizontales un mínimo
de 12" (305mm) y selle untándolos en
cemento del plástico del asfalto.
Recorte las esquinas superiores
de las tejas a 45°para mantener
el flujo de agua hacia el centro
del valle.
Clip the top corners of
shingles 45° to keep water
flow toward the valley center.
Shingles should be separated 6" (152mm) at top of valley. Separation must increase 1/8" (3mm)
per foot towards eaves to handle increasing water volume. Snap chalk lines to ensure
shingles diverge properly in valley.
Parte superior del valle 6" (152mm) de ancho entre tejas.Las tejas deben ampliar 1/8" (3mm)
por pie hacia alero para manejar aumentando volumen de agua. Trace líneas de tiza para
garantizar que las tejas tengan la adecuada divergencia en el valle.
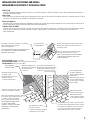
9.
VALLEY CONSTRUCTION – OPEN
Use minimum 20" (508mm) wide aluminum, galvanized steel, copper, or other non-corroding, non-staining metals (24 gauge minimum). Long valleys or local
building codes may require wider metal. Nail the metal on the edges so the nail heads hold it in place. Do not puncture the metal. Nailing through the metal
may cause leaking and buckling due to movement.
CONSTRUCCIÓN DEL VALLE – DE CORTE ABIERTO
Use un ancho mínimo de 20" (508mm) de aluminio, a cero galvaniza do, cobre y otro metal inoxidable que no manche (calibre 24 como mínimo). Los valles
largos o los códigos locales de construcción pueden requerir un metal más ancho. Clave el metal en los bordes de modo tal que las cabezas de los clavos
sostengan el metal en su lugar. No perfore el metal. Clavar a través del metal puede causar filtraciones y ampollamiento debidos al movimiento.

Extend end of shingle at least 12" (305mm)
beyond valley center line. Nail, putting extra
fastener in top corner of shingle.
Extienda la teja del extremo por los menos
12” (305mm) más allá de la línea del centro
del valle. Clavo, poniendo un sujetador adicional
en la esquina superior de la teja.
Overlying shingles must be cut so
they are 2" (52mm) away from
valley center line. Clip shingle
corners 45° to keep water flow
in the valley center. Seal the valley
shingles to each other using
plastic roof cement.
Las tejas superpuestas deben ser
cortadas para tener 2" (52 mm)
de distancia de la línea central
del valle. Recorte las esquinas de
las tejas a 45° para mantener el
flujo de agua en el centro del valle.
Selle las tejas de valle entre sí
utilizando cemento plástico
para techo.
Extend starter strip across valley
at least 12" (305mm) and weave with
opposite side starter strip shingle.
Extienda principio tira a través del valle
por lo menos 12" (305mm) y entrelace
con la hilada inicial y teja de hilada
inicial del lado opuesto.
6"
(152 mm)
6"
(152 mm)
Carry GAF underlayment at least
6" (152mm) over GAF leak barrier.
Lleve la capa base de GAF por lo menos
6"(152mm) sobre barrera de filtración de GAF.
Center full width roll of GAF leak barrier.
Do not place fasteners within 6" (152mm) of center
line. Horizontal laps must be at least 6" (152mm).
Centre un rollo de ancho completo de barrera de
filtraciones de GAF. No coloque sujetadores dentro
de las 6" (152mm) de la línea central. Las juntas de
los desviadores deben estar a por lo menos 6" (152 mm).
CAUTION: Do NOT place nails closer than 6" (152 mm)
to the valley center line.
El CUIDADO: NO coloque clavos más cerca que 6"
(152mm) al valle la línea central.
10.
VALLEY CONSTRUCTION – C LOSED CUT
CONSTRUCCIÓN DEL VALLE – CORTE C ERRADO
Page is loading ...

12.
PRECAUTIONARY NOTES
1. These shingles are fiberglass, self-sealing asphalt shingles. Because of the natural characteristics of the high-quality waterproofing material used, these shingles
will be stiff in cold weather and flexible in hot weather.
2. These shingles are particularly tough and may require additional effort to trim to fit on the roof. Curved blade utility knives are more effective than straight
blade utility knives in cutting these shingles. Using a circular saw equipped with carbide-tipped blades is also effective.
3. When using FeltBuster™High-Traction Synthetic Roofing Felt asunderlayment,itMUST be installed over one layer of VersaShield
®
Fire-Resistant Roof Deck
Protection in order to maintain a Class A fire rating for GAF asphalt shingles.
4. Regardless of the tool used, always wear proper protective gear such as gloves, eye protection, etc. In situations where dust or fumes are generated, e.g., cutting
shingles with a power saw, appropriate respiratory protection is recommended. Please refer to the SDS for further information and follow all safety procedures.
Use tools carefully to prevent personal injury when working with these products.
5. Handle carefully. Shingles can easily be broken in cold weather or their edges damaged in hot weather. Do not drop bundles on edge or on other bundles to
separate shingles. Do not load bundles across a hip or ridge. Do not bend bundles over shoulder for carrying. Premium shingles with heavier weight may cause
cra
cks at sharp bend points.
6. Store on flat surface in a covered, ventilated area-maximum temperature 110°F (43°C). Do not store near steam pipes, radiators, etc., or in sunlight.
7. Do not store double stacked pallets on a long – term basis. If double stacking is required for short periods, use slip sheets of 1/2" (13mm) plywood cut to the pallet
size to minimize damage. Long-term double stacked storage, especially in hot weather, can result in possible sticking, staining, and distortion of the shingles.
IMPORTANT: Repair leaks promptly to avoid adverse effects, including mold growth.
RE-ROOFING
If old asphalt shingles are to remain in place, nail down or cut away all loose, curled or lifted shingles and replace with new, and just before applying the new
roofing, sweep the surface clean of all loose debris. Since any irregula
rities may show through the new shingles, be sure the underlying shingles provide a smooth
surface. Fasteners must be long enough to penetrate the wood deck at least 3/4" (19mm) or just through plywood. Follow above instructions for application.
NOTE: Shingles can be applied over wood shingles if the surface can be made smooth enough. This may include cutting back old shingles at eaves and rakes,
installing new wood edging strips as needed, and the use of beveled wood strips. Install #30 underlayment to maintain Class A rating.
For technical support, call 1-800-766-3411 or visit our website at gaf.com.
NOTAS DE PRECAUCIÓN
1. Estas tejas son tejas asfálticas autosellantes de fibra de vidrio. Debido a las características naturales del material impermeable de alta calidad utilizado, estas tejas
serán duras en climas fríos y flexibles en climas cálidos.
2. Estas tejas son particularmente duras y pueden requerir un esfuerzo adicional en el recorte para encajarlas al techo. Los cuchillos utilitarios de hoja curva son más
efectivos que los cuchillos utilitarios de hoja recta para
cortar estas tejas. También es efectivo usar una sierra circular equipada con hojas con puntas de carburo.
3. Cuando utilice el Fieltro Sintético De Alta Tracción FeltBuster™ Para Techos como capa base, DEBE instalarse sobre una capa de Protección de la Cubierta del Techo
Ignífuga VersaShield
®
con el fin de mantener una clasificación Clase A contra incendios para las tejas asfálticas GAF.
4. Independientemente de la herramienta utilizada, siempre use la vestimenta apropiada, por ejemplo, guantes, protección para los ojos, etc. En situaciones donde
se genere polvo o humo, por ejemplo, al cortar las tejas con una sierra eléctrica, se recomienda utilizar la protección respiratoria apropiada. Consulte las SDS para
obtener más información y siga todos los procedimientos de seguridad.Utilice las herra
mientas cuidadosamente para prevenir las lesiones personales cuando
trabaje con estos productos.
5. Manipule con cuidado. Las tejas pueden romperse fácilmente en climas fríos o sus bordes pueden dañarse en climas cálidos. No arroje los manojos sobre el borde
o encima de otros manojos para separar las tejas. No cargue los manojos sobre un caballete o borde. No doble los manojos sobre los hombros para transportarlos.
El peso superior puede causar grietas en los puntos de pliegue afilados.
6. Almacene en un área cubierta y ventilada
– temperatura máxima 110°F (43°C). No almacene cerca de tuberías de vapor, radiadores, etc., o a la luz del sol.
7. No almacene pálets de apilado doble en períodos largos de tiempo. Si se requiere apilado doble durante períodos breves, es preciso utilizar láminas deslizantes de
1/2" (13mm) de madera terciada cortadas al tamaño del pálet para minimizar los daños. El almacenamiento de apilado doble a largo plazo, especialmente en climas
cálidos, puede resultar en posible pegado, ma
nchado y distorsión de las tejas.
IMPORTANTE: Repare las filtraciones rápidamente para evitar efectos adversos, incluyendo el crecimiento de moho.
RE-TECHADO
Si es preciso que las viejas tejas asfálticas permanezcan en su lugar, clave o corte cualquier teja suelta, curvada o levantada y reemplácela con una nueva, y justo
antes de aplicar el nuevo techo, barra la superficie hasta dejarla libre de cualesquiera residuos sueltos. Dado que cualquier irregularidad podría notarse a través de
las nuevas tejas, a
segúrese que las tejas subyacentes tengan una superficie lisa. Los sujetadores deben tener el largo suficiente como para penetrar la plataforma
base de madera por lo menos 3/4" (19mm) o a través de la madera terciada. Siga el resto de las instrucciones detalladas arriba para la aplicación.
NOTA: Las tejas pueden ser aplicadas sobre tejas de madera si la superficie puede ser suficientemente alisad
a. Esto puede incluir cortar las tejas viejas en los
aleros e inclinaciones e instalar nuevos bordes de madera según sea necesario y el uso de hiladas de madera biseladas. Instale capa base #30 para mantener la
calificación de Clase A.
Para soporte técnico, llame al 1-800-766-3411 o visite nuestro sitio Web en es.gaf.com.
©2014 GAF 9/14
-
 1
1
-
 2
2
-
 3
3
-
 4
4
-
 5
5
-
 6
6
-
 7
7
-
 8
8
-
 9
9
-
 10
10
-
 11
11
-
 12
12
-
 13
13


Ask a question and I''ll find the answer in the document
Finding information in a document is now easier with AI
in other languages
Related papers
-
GAF 0202010 Installation guide
-
GAF 0489395 Installation guide
-
-
-
-
-
-
GAF 0483395 Operating instructions
-
-
Other documents
-
Dot Metal Products RE15B Operating instructions
-
Gibraltar Building Products RE33WH Operating instructions
-
Construction Metals RE15B Operating instructions
-
Rust-Oleum 347428 User manual
-
Construction Metals 3W4BR Installation guide
-
Construction Metals 11398 Operating instructions
-
Gibraltar Building Products 3W4BR Operating instructions
-
-
-
Gibraltar Building Products 12020 Operating instructions