Page is loading ...

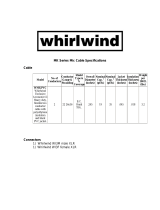
WHIRLWIND TESTER
POWER ON/OFF SWITCH: This switch turns the unit on or off and the red LED above the switch
indicates on/off status. As the battery’s power diminishes, the brightness of the LED will decrease.
XLR JACKS: There is one female and one male XLR jack located on the side of the unit. To check the
condition of an XLR-F/XLR-M cable, plug each end into the corresponding jacks.
¼” JACKS: These can be used for testing either mono or stereo ¼” cables. To test this type of cable,
connect the cable between the two jacks.
RCA (PHONO) JACKS: At the end of the unit are two RCA jacks. Connect this type of cable between the
two jacks.
LEDs: The 4 LEDs positioned directly in a row indicate the condition of the cable being tested. Below are
some examples of which LEDs will illuminate when checking various types of cables:
XLR to XLR and ¼” to ¼” STEREO or TRS
Designations for XLR and ¼” cables are located to the left of each LED (ignore the designations on the
right). When testing these cables, all three green LEDs will light when the cable is good.
1. If the pins 2 and 3 are reversed on one XLR connector, the red LED labeled PHASE REVERSE will
light.
2. If there is an open ground (pin 1), no LEDs will light.
3. If there is a short to ground from pin 3, the LEDs labeled PIN 1 and PIN 2 will remain lit while the
LED labeled PIN 3 will not light.
4. If there is a short to ground from pin 2, only pin 1 LED will light.
5. If there is an open on either pin 2 or pin 3 and the ground is intact, both LEDs labeled PIN 2 and PIN
3 will not light.
¼” to ¼” MONO
When testing this type of cable, the LED labeled PIN 3 RING will not light. A good cable will light the PIN
1 SHIELD and PIN 2 TIP LEDs. If either connection is open, the corresponding LED will not light. If the
connections are shorted, only the PIN 1 SHIELD LED will light.
RCA to RCA
Designations for RCA PHONO cables are located to the right of the 2 LEDs closest to the top of the box
(ignore the designations on the left). The top LED corresponds to the shield and the bottom LED
corresponds to the tip. A good cable will light both LEDs. An open or shorted tip will light only the shield
LED. No LEDS will light with an open shield connection.
SPECIAL CABLES
Refer to the following for testing mixed connector cables such as adapter cables.
Female or Male XLR to ¼” TS (Mono)
On the box is the designation XLR-1/4” located above and between a male XLR jack and a ¼” jack.
These two jacks must be used for testing these cables. To test male XLR to ¼” cables, you must use a
Switchcraft 389 or equivalent female/female XLR adapter in the male XLR jack. To get an accurate
reading from a cable of this type, it is essential that the unused pin be tied to ground. When testing the
cable, the LED labeled PIN 1 SHIELD should always light and either the LED labeled PIN 2 HOT or PIN
3 HOT will light depending upon which is wired to the tip of the TS plug. Any other reading indicates a
problem.
Female or Male XLR to ¼” TRS (Stereo)
Use the same jacks as when testing XLR and ¼” TRS cables. When testing the cable, the LED labeled

PIN 1 SHIELD and the LED labeled PIN 3 RING should always light and either the LED labeled PIN 2
HOT or PIN 3 HOT will light depending upon which is wired to the tip of the TRS plug. Any other
reading indicates a problem.
¼” to RCA PHONO
Connect the ¼” connector to the bottom ¼” jack located above the label ¼ PHONO and the left hand
RCA jack. The LED labeled PIN 1 SHIELD will light for the ground connection and the LED labeled PIN
2 TIP will light for the hot connection. The PIN 2 TIP LED will not light if the hot connection is either
open or shorted.
RCA to XLR
Follow the conventions used for female XLR to ¼” TS above, using a Switchcraft 345 female RCA to
male ¼” adapter or equivalent in the ¼” jack. Be sure to always use the male XLR jack. Use a female-
female XLR adapter for testing cables with male XLR plugs.
NOTE! IN THE CASE OF INTERMITTENT PROBLEMS, WIGGLING THE WIRES AT THE
CONNECTORS MAY HELP YOU TO LOCATE THE PROBLEM. THIS IS EASILY ACCOMPLISHED DUE
TO THE HANDS FREE DESIGN OF THE TESTER.
BATTERY REPLACEMENT
Remove the 4 screws from the bottom cover, remove the cover and replace the battery with a new 9V
alkaline type. Be sure that the foam padding remains in place underneath the new battery before
replacing the cover.
Should you have any questions regarding the use of this product, contact Whirlwind customer service at
888 733-4396 or [email protected]. Office hours are 9:00 AM to 5:00 PM EST.
WARRANTY
This product is warranted to be free of defects in materials or workmanship to the original
purchaser for a period of 2 years from the date of purchase. Should warranty service be
required, return the unit postage paid along with the original sales receipt to:
Whirlwind Music Dist., Inc.
99 Ling Road
Rochester NY 14612
Whirlwind will, at its option, repair or replace the unit. This warranty does not cover damage
resulting from abuse, unauthorized modifications or use of the product in unintended
applications.
/