
LFP/3D Customer Assurance 1 HP Public
HP Scitex FB5X0/FB7X0 Printers
TECHNICAL NEWSLETTERS FROM CUSTOMER ASSURANCE
Date: May 2018 Impact/Severity: High
Region/Audience: WW Public Category/Area: Using Product
Instructions for printing with Roll-to-Roll supply and takeup assemblies
Background: FlatBed is world famous for rigid substrates solutions but can be used for flexible substrates
printing as well. The Roll-to-Roll kit (L6E80A for FB5X0 / L6E81A for FB7X0) is an upgrade kit that can be
activated and installed on demand by your HP Service Representative.
There is a lack of information in the User Guide and this public newsletter aims to provide tips and tricks for
experienced operators to save time loading and printing efficiently using the Roll-to-Roll feature.
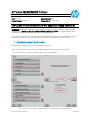
1. Activate and select a roll media:
Roll media do not appear in the list of available media by default.
Follow this path in order to check if the roll media are activated and can be selected for loading:
Tools > Service Printer > Proceed > Support Rollfed > Cut Sheet and Rollfed
Fig. 1. Path to follow in order to activate R2R (Roll-to-Roll) media in the media load list.

LFP/3D Customer Assurance 2 HP Public
- If the “Cut sheet and Rollfed” option is activated it will enable new roll media to be displayed and
selected in the media load list: Frontlit & Backlit Banner, Textile, UV Photobase, Self-Adhesive Vinyl
(SAV), Canvas and Clear Film.
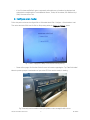
2. Configure a roll media:
Follow this path to select and configure Roll-to-Roll media: Media Tab > Configure > Select Media to Load.
Then select the kind of Roll Load: for Roll-to-Roll printing select the “Supply and Takeup” option.
Fig. 2. Select “Supply and Takeup” for R2R (Roll-to-Roll) printing.
- Please refer to page 19 of the User Guide for more information regarding the “Top Table Roll Holder”.
When the printer prompts “Load media now” just select YES if the media is ready for loading.
Fig. 3. Manually load the media on the input spindle or use a carriage/forklift to do so.

LFP/3D Customer Assurance 3 HP Public
If the media is ready for loading select the load procedure (there are two options: “Restore Loaded State” or
“New Load”):
- If the media has already been properly attached to the take-up spool just select “Restore Loaded
State”, indicate the thickness (in cm or in inches using a caliper) and the length (in cm or in inches).
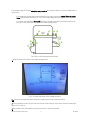
- If it is a new roll load select “New Load” and follow the steps indicated by the media wizard. It will
provide you with visual aids throughout the media loading process:
Fig. 4. Roll-to-Roll loading procedure sketch.
1. Move the Foam Press Roller to the upper resting position:
Fig. 5. First step and sketch of the loading procedure.
Tip: Save time turning the UV lamps ON before completing the whole loading procedure.
2. Pull the media from the roll, pull it over the foam lift roller and lay it on the belt to the input media roller
(points 2 & 3 in Fig. 4.).
3. Use the belt to pull the media through the printer until it reaches the takeup.

LFP/3D Customer Assurance 4 HP Public
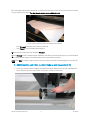
After the media is advanced to the takeup, run the belt with the vacuum fans off for a few seconds to smooth
out any wrinkles in the media. You may have to smooth some wrinkles by hand.
Fig. 6. Pull the media by hand until it reaches the takeup.
- Press Proceed when there are no more wrinkles left.
- Press Cancel to exit the media load procedure.
4. Move back the foam press roller and press Proceed.
5. Press Proceed once the media has been attached to the takeup, and start printing once you have indicated
the thickness and the length of the media (width will be measured by the printer).
Note: Press Help for step-by-step instructions on how to attach the media to the takeup (points 4 to 8 Fig. 4.).
3. Additional tips and tricks to attach takeup and ensure best IQ:
1. Use a ruler to ensure that the edge of the media is the same distance from the user-end edge of the
belt on both the input and output sides of the printer: it helps to avoid skew.

LFP/3D Customer Assurance 5 HP Public
2. Pull the media under the first dancer bar, over the second dancer bar, and down to the printer side of
the takeup roller:
3. Looking down the length of the takeup roller from the user end, the roller rotates clockwise. Ensure
that the media is wrapped as shown in the image above.
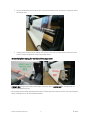
Be careful when taping the media to the output core!
CORRECT WAY of taping the media to the output core (on the left) vs WRONG WAY (on the right) that can
result in damaging the printer.
All the steps, tips and tricks described previously are the best operator practices for Roll-to-Roll printing after
the kit installation by an HP Service Representative.
-
 1
1
-
 2
2
-
 3
3
-
 4
4
-
 5
5


HP Scitex FB500 Industrial Printer Operating instructions
- Type
- Operating instructions
- This manual is also suitable for
Ask a question and I''ll find the answer in the document
Finding information in a document is now easier with AI
Related papers
-
HP Scitex FB910 Printer series User manual
-
-
-
-
-
-
-
HP Latex 820 Printer (HP Scitex LX820 Industrial Printer) User guide
-
-
Other documents
-
Intermec PX4I User manual
-
Intermec EasyCoder PX4i User manual
-
-
-
Zebra P640I User manual
-
Kodak 4000 SERIES Quick start guide
-
-
Intermec EasyCoder 501 E User manual
-
Intermec EasyCoder 501XP User manual
-
Intermec EasyCoder PF4i User manual