Kohler K-158-3-CP Installation guide

Category
Faucets
Type
Installation guide

This manual is also suitable for

Tools and Materials
Thank You For Choosing Kohler Company
We appreciate your commitment to Kohler quality. Please take a few
minutes to review this manual before you start installation. If you
encounter any installation or performance problems, please don’t
hesitate to contact us. Our phone numbers and website are listed on
the back cover. Thanks again for choosing Kohler Company.
Before You Begin
Observe all local plumbing and building codes.
Shut off the water supplies.
Before installation, unpack the new faucet and inspect it for
damage. Return the faucet to the carton until you are ready to
install it.
Carefully inspect waste and supply tubing for any sign of
damage and replace if necessary.
For new installations, assemble the faucet to the sink before
installing the sink.
If supply tubes must be cut, allow for required penetration into
shut-off valve.
Kohler Co. reserves the right to make revisions in the design of
faucets without notice, as specified in the Price Book.
Adjustable
Wrench
Plumbers
Putty
Tube
Cutter
Assorted
Screwdrivers
Thread
Sealant
1015072-2-D 2 Kohler Co.
1. Install the Spout and Handspray
NOTE: Before applying plumbers putty or other sealant to the
escutcheon, make sure the O-ring is in place in the groove on the
interior surface.
Apply a bead of plumbers putty or other sealant to the underside
of the escutcheon according to the manufacturer’s instructions.
Thread the shank nut and washer to the bottom of the shank.
Insert the shank from the bottom of the sink.
Slide the escutcheon over the shank.
Thread the spout to the bottom of the shank, then loosen the
spout 1/8 of a turn.
Loosen the shank 1/8 of a turn.
IMPORTANT! Do not loosen the shank more than 1/2 turn. The
spout may not seal, resulting in a leak.
Tighten the nut and washer to secure the spray holder to the sink.
Slide the gasket (provided) onto the spray holder.
Slide the spray holder through the mounting hole from above.
Securely hand tighten the nut to the spray holder from under the
sink.
Insert the handspray hose through the spray holder.
Attach the handspray hose to the shank tee using thread sealant.
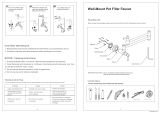
Handspray
Nut
Sink
Shank Nut
Washer
Spout
Shank
Escutcheon
O-Ring
Handspray
Hose
Shank Tee
Spray Holder
Apply
plumbers
putty.
Kohler Co. 3 1015072-2-D
2. Install the Valve Body
Apply thread sealant to the coupling nut threads of the flexible
hoses.
Thread the flexible hoses to the valve body outlets and wrench
tighten. Do not overtighten.
Apply a bead of plumbers putty or other sealant to the underside
of the escutcheons according to the manufacturer’s instructions.
Insert the valve bodies into the mounting holes from the top of
the sink. Make sure the hot valve body is installed in the
left-hand hole and the cold valve body is installed in the
right-hand hole.
Install a washer and then a nut to the bottom of the valve bodies.
Align the valve bodies so the copper tubing faces the outside.
Wrench tighten the nuts.
Remove any excess plumbers putty.
Connect and wrench tighten the hoses to the shank tee. Do not
overtighten.
Escutcheon
Hose
Nut
Washer
Shank
Tee
Valve Body
Apply
plumbers
putty.
Coupling Nut
Threads
Valve
Body
Outlet
1015072-2-D 4 Kohler Co.
3. Install the Handles
Set the valve stem to the closed position by rotating the stem
counterclockwise until it stops.
Thread the bonnet onto the escutcheon.
Insert the stem extension into the bonnet and press it onto the
valve stem.
Lever Handles
Properly align the lever handle.
Press the lever handle onto the stem extension.
Secure the lever handle with the screw.
Six-Prong Handles
Secure the stem extension with the screw.
Press the handle onto the stem extension with the text on the
ceramic button properly aligned.
Secure the handle with the setscrew.
Setscrew
Screw
Bonnet
Escutcheon
Screw
Six-Prong
Handle
Lever
Handle
Stem
Extension
Stem
Extension
Valve Stem
Kohler Co. 5 1015072-2-D
4. Install the Supplies
NOTE: If the sink is not installed, install it at this time. Be sure to
follow all instructions packed with the sink.
Slide the coupling nuts and ferrules onto the supply tubes.
Secure the supply tubes and valve body inlets with coupling nuts.
Carefully insert the supply tubes into the valve body inlets and
shut-off valve outlets (if used).
Position the round end of the supply tube squarely to the valve
body inlet and supply stop.
Tighten all coupling nuts.
Supply
Tube
Coupling Nut
Valve Body
Inlet
Supply Stop
Valve Body
Inlet
Ferrule
Ferrule
1015072-2-D 6 Kohler Co.
5. Installation Checkout
Ensure that both faucet handles are turned off. Hot is clockwise
close and cold is counterclockwise close.
Turn on the hot and cold water supplies.
Check for leaks.
Remove the aerator by turning it counterclockwise.
Turn on the hot and cold faucet handles for one minute to flush
debris from the faucet.
Close the hot and cold faucet handles.
Reattach the aerator by turning it clockwise until hand tight.
Aerator
Kohler Co. 7 1015072-2-D
1 / 1

Kohler K-158-3-CP Installation guide

Category
Faucets
Type
Installation guide
This manual is also suitable for

Ask a question and I''ll find the answer in the document

Finding information in a document is now easier with AI

Ask the document