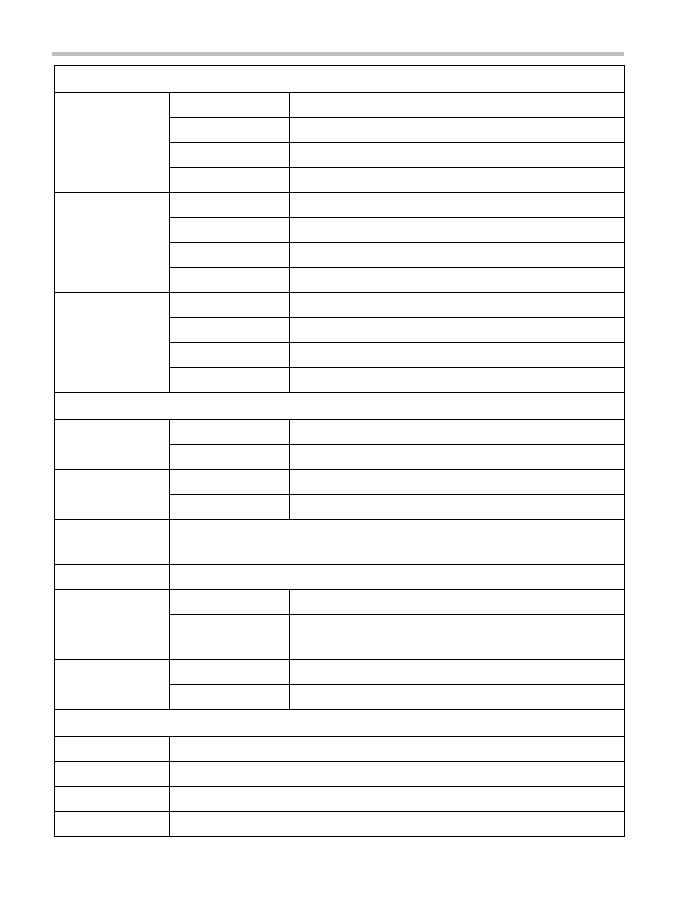
Toshiba Camileo B10 Quick start guide

Category
Camcorders
Type
Quick start guide

Toshiba Camileo B10: Capture life's moments with stunning Full HD video and high-resolution photos, easily share your memories with friends and family. Its compact design and user-friendly features make it perfect for everyday use, from family gatherings to outdoor adventures.

Toshiba Camileo B10: Capture life's moments with stunning Full HD video and high-resolution photos, easily share your memories with friends and family. Its compact design and user-friendly features make it perfect for everyday use, from family gatherings to outdoor adventures.

Introduction
2
Introduction
For more detailed information please refer to the User's Manual on the
included CD.
Safety instructions
1 Do not drop, puncture or disassemble the camcorder; otherwise the
warranty will be voided.
2 Avoid all contact with water, and dry hands before using.
3 Do not expose the camcorder to high temperature or leave it in direct
sunlight. Doing so may damage the camcorder.
4 Use the camcorder with care. Avoid pressing hard on the camcorder
body.
5 For your own safety, avoid using the camcorder when there is a storm
or lightning.
6 Do not use batteries of different specifications. Doing so may lead to
the potential for serious damage.
7 Remove the battery during long periods between usages, as a
deteriorated battery may affect the functionality of the camcorder.
8 Remove the battery if it shows signs of leaking or distortion.
9 Use only the accessories supplied by the manufacturer.
10 Keep the camcorder out of the reach of infants.
11 There is risk of explosion if battery is replaced by an incorrect type.
12 Dispose of used batteries according to the instructions.
About the battery
Use only batteries recommended by TOSHIBA as replacements. The
battery is a lithium ion battery, which can explode if not replaced,
used, handled or disposed of properly. Dispose of the battery as
required by local ordinances or regulations.
Charge the battery only in an ambient temperature between 41 and 95
degrees Fahrenheit (5 and 35 degrees Celsius). Otherwise, the
electrolyte solution might leak, battery performance might
deteriorate and the battery life might be shortened.
Safety instructions
3
Never install or remove the battery without first turning off the power
and disconnecting the USB cable or AC adaptor (AC adaptor sold
separately).
Only use the USB cable or AC adaptor (AC adaptor sold separately)
to charge the battery. Never attempt to charge the battery with any
other charger.
Handling the cord on this product will expose you to lead, a chemical
known to the State of California to cause birth defects or other
reproductive harm. Wash hands after handling.
Regulatory Information
TOSHIBA declares that this product conforms to the following Standards:
Following information is only valid for EU-member States:
Contact
FCC Conditions
This equipment has been tested and found to comply with Part
15 of the FCC Rules.
Operation is subject to the following two conditions:
(1) This device may not cause harmful interference.
(2) This device must accept any interference received.
Including interference that may cause undesired operation.
Disposal of products
This symbol indicates that this product must not be disposed of
with normal household waste. The product must be disposed
of separately.
Address: TOSHIBA America Information Systems, Inc.
9740 Irvine Boulevard
Irvine, California 92618-1697
Telephone: (949) 583-3000
Safety instructions
4
Additional Information
© Copyright 2011 TOSHIBA CORPORATION. All rights reserved.
TOSHIBA reserves the right to make technical changes. TOSHIBA
assumes no liability for damages incurred directly or indirectly from
errors, omissions or discrepancies between this product and the
documentation.
Trademarks
CAMILEO is a registered trademark of Toshiba America Information
Systems, Inc. and/or Toshiba Corporation.
Adobe and Photoshop are either registered trademarks or trademarks of
Adobe Systems Incorporated in the United States and/or other countries.
ArcSoft, MediaImpression, and MediaConverter are registered trademarks
of ArcSoft, Inc.
HDMI, the HDMI Logo and High-Definition Multimedia Interface are
trademarks or registered trademarks of HDMI Licensing, LLC.
Secure Digital and SD are trademarks of SD Card Association.
All other brand and product names are trademarks or registered
trademarks of their respective companies.
Getting Started
5
Getting Started
The battery comes pre-installed in the camcorder, however you must
remove the protective film on the battery before use.
To properly connect the battery:
1 Slide the battery cover up and remove.
2 Remove the battery.
3 Pull the film off.
4 Reinsert the battery, making sure it is lined-up with the correct
polarity marks.
5 Close the battery cover.
REMOVE
Li-ion battery
Getting Started
6
To insert the SD™ Card (optional):
1 Flip open the SD™ Card cover.
2 Insert the SD™ Card into the slot until it locks in place.
3 Once inserted, close the SD™ Card cover.
Charging the battery
You must use the supplied USB cable or AC adaptor (AC adaptor sold
separately) to charge your camcorder before use. Turn off the camcorder.
A blinking light indicates active charging and a solid light indicates that
charging is complete. In AC charging mode, the light turns off
automatically after 5 minutes. It may take up to 8 hours to charge the
battery via USB and up to 4.5 hours via AC adaptor (AC adaptor sold
separately).
To remove the
SD™ Card, press
inward to release
it. When the card
pops out, grasp
it and pull it
straight out.
Quick Tour
7
Quick Tour
1 To power on
Press and hold the Power (......) button
for one second.
To conserve battery power, the
camcorder will turn off automatically
after 3 minutes of non-operation.
2 To start or stop recording
Press the Video (.......) button.
3 To take a photo
Press the Photo (......) button.
4 To zoom in and out
Press the Up/Down arrow (....) buttons.
5 To review videos/photos
Press the Playback (....) button.
6 For menu options
Press the MENU/OK (.......) button to access
the options menu.
For more detailed operational instructions,
please refer to the User’s Manual, chapters
3 & 4 on the supplied CD.
6
32
4
5
1
MENU
OK
Quick Tour
8
Menu/OK button
Menu ON.
Validate the setting.
Front View
Press to take a photo.
Press to begin recording.
Photo button
LCD screen
Left button
Playback button
Video button
To stop recording, press
it again.
Zoom out (Down) button
Delete button
In Record mode: Zoom out.
In Playback mode: Go to the delete
screen. When playing a video,
press to decrease volume.
Move between option items.
During playback: Go to
previous video/photo.
In Record mode: Zoom in.
Zoom in (Up)/Thumbnail
In Playback mode: Go to the
video/photo thumbnail
button
screen. When playing a video,
press to increase volume.
Move between option items.
Right button
In Playback mode: Go to the
next video/photo.
Return/Exit button
Return to the previous screen.
Exit.
Switch to Playback mode.
Quick Tour
9
Power button
Light button
Press to toggle ON/OFF/
Internet upload button
In Playback mode, press to
Rear/Underside Views
Light
Microphone
Multi-indicator light
Battery cover
Strap hook
Speaker
SD™ Card cover
select the current file to tag
Tripod socket
Lens
for upload.
Mini HDMI™ port
Mini USB 2.0 port
When the camera is
connected to your computer,
press to launch the
CAMILEO
®
Uploader (for
Digital light.
Windows
®
based systems
only).
Quick Tour
10
Menu options
Video Settings
Light
ON
The light turns ON, providing illumination when
recording.
OFF The light turns OFF.
Digital light
Extends the dynamic range for backlight and high
contrast, so that objects are brighter and clearer.
Resolution
Full HD 1080/30 1920 x 1080p (30fps)
HD 720/60 1280 x 720p (60fps)
HD 720/30 1280 x 720p (30fps)
VGA 480/30 640 x 480 (30fps)
Stabilization
ON
Enables digital image stabilization, providing
smooth and stable recording.
OFF Disables digital image stabilization.
Motion Detect
ON Initiates video recording when motion is detected.
OFF Disables Motion Detection.
Slow Motion
ON
Records videos with slow motion effect. When the
video is played, the playback time will be longer than
the actual recording time.
NOTE:
While using the Slow Motion setting, audio is not
recorded and zoom is disabled.
OFF Disables Slow Motion.
Pre-Record
ON
Enables pre-recording. The camcorder records one
second before the Record button is pressed.
OFF Disables pre-recording.
Time Lapse
OFF Disables time lapse.
1 Sec Records one frame per second.
3 Sec Records one frame every three seconds.
5 Sec Records one frame every five seconds.
Continuous Play
ON Playback a video file continuously.
OFF Disables continuous play.
Quick Tour
11
Photo Settings
Light
ON
The light turns ON, providing illumination when
recording.
OFF The light turns OFF.
Digital light
Extends the dynamic range for backlight and high
contrast, so that objects are brighter and clearer.
Resolution
High-16MP 4608 x 3456 (16MP)
Standard-5MP 2592 x 1944 (5MP)
Low-3MP 2048 x 1536 (3MP)
Self-Timer
ON Activates 10-second delayed self-timer.
OFF Disables self-timer.
Face Tracking
ON
Detects and focuses on human face(s) automatically.
This function is available in Photo mode to capture
portraits in backlit scenes.
OFF Disables face tracking.
Date Printing
ON Imprints the date and time on each photo.
OFF Disables date printing.
ISO
Auto
The camcorder adjusts the ISO sensitivity of the
image automatically.
800 The larger the number, the higher the ISO sensitivity.
Select a lower number to shoot a smoother image.
Select a higher number to shoot an image in the dark
or a subject moving at high speed.
NOTE: The image may appear grainy, while using a
higher number.
1600
Slideshow
2 sec Display one photo every 2 seconds.
5 sec Display one photo every 5 seconds.
10 sec Display one photo every 10 seconds.
OFF Disables Slideshow.
Quick Tour
12
Effects
Scene
Auto Automatically adjusts to the current conditions.
Skin Adjusts skin tones to appear more natural.
Night Use in low light conditions or at night.
Backlight Use when the subject is brightly lit from behind.
Filter
Auto Automatically adjusts to the current conditions.
Black & White The image is converted to black and white.
Classic The image is converted to sepia.
Negative The image is converted to a negative of the original image.
White Balance
Auto Automatically adjusts to the current conditions.
Daylight Use while taking photos outside.
Fluorescent Use in fluorescent lighting.
Tungsten Use in tungsten lighting.
Setup
Menu Sound
ON Enables camcorder operation sounds.
OFF Disables camcorder operation sounds.
TV
NTSC (60Hz) TV output setting is NTSC standard.
PAL (50Hz) TV output setting is PAL standard.
Language
Czech, Danish, Dutch, English, Finnish, French, German, Greek, Italian,
Norwegian, Polish, Portuguese, Russian, Swedish, Spanish, Turkish.
Time Setting Set up Date and Time.
Format
YES Formats the internal memory or the media card.
NO
Does not format the internal memory or the media
card.
Default Setting
YES Restores to the default factory settings.
NO Does not restore the default factory settings.
Delete
Delete Video Selects video files to be deleted.
Delete Photo Selects photo files to be deleted.
Select & Delete Selects video and photo files to be deleted.
Delete All Deletes all video and photo files.
Plug and share
13
Plug and share
Install the bundled software application, ArcSoft MediaImpression
®
, for
optimal video playback on your computer.
Connect the computer and camcorder with the supplied mini USB 2.0
cable as shown.
Videos and photos recorded on your SD™ Card can be found on your
computer at My Computer\SD\DCIM\100MEDIA (path will vary
depending on name of SD™ Card). In this folder, you can view, delete,
move, or copy the desired recorded movies and pictures.
Uploading files to a Web site
You can also share recorded movies on the Internet via the built-in
CAMILEO
®
Uploader application (for Windows
®
based systems only),
which offers you an easy way to upload your video clips and photos to a
Web site instantly. For more detailed instructions, refer to the User’s
Manual, on the supplied CD.
The social Web site must first be configured with your user profile in
the CAMILEO
®
Uploader application before file transfer can begin.
Webcam mode
14
Webcam mode
Connect the camcorder to your computer with the supplied mini USB 2.0
cable. Press the Playback button to switch to Webcam mode. The
Multi-indicator light glows blue. You can also implement live video
conference meetings and multimedia communications.
For additional information, refer to the User’s Manual.
Toshiba Support
If you require help or are having problems operating your product, you
may need to contact Toshiba for additional technical assistance.
Before you call
Since some problems may be related to software, it is important that you
investigate other sources of assistance first. Try the following before
contacting Toshiba:
Review the User’s Manual supplied with your product.
If a problem occurs when you are running software applications,
consult the software documentation for troubleshooting suggestions.
Contact the software company’s technical support department for
assistance.
Consult the reseller or dealer from whom you purchased your
product. They are your best resource for current information and
support.
Contacting Toshiba
Toshiba’s technical support Web site
For technical support, or to stay current on the most recent software
options for your CAMILEO
®
product and for other product information,
be sure to regularly check the Toshiba Web site at
www.support.toshiba.com.
Toshiba voice contact
For technical support, call the Toshiba Customer Support Center:
Within the United States at (888) 592-0944
Outside the United States at (949) 583-3305
Toshiba Support
15
Toshiba Phone Service Center for Latin America Specialized technical
service in Spanish.
Hours:
Monday through Friday from 8:00 a.m. to 9:00 p.m. EST
Argentina: 0-800-666-3701
Bolivia: 800-100-684
Chile: 800-64-6526
Colombia: 01-800-912-0539
Costa Rica: 0-800-011-1123
Ecuador: 949-587-6834*
El Salvador: 800-6601
Guatemala: 949-587-6835*
Honduras: 949-587-6836*
Nicaragua: 949-587-6843
Panama: 00-8000-44-7813
Paraguay: 009-800-441-0059
Peru: 0-800-5-3817
Dominican Republic: 1-888-862-3225
Uruguay: 000-411-002-2297
Venezuela: 0-800-100-8819
*Phone charges apply
This product comes with a One (1) Year Standard Limited Warranty.
The One (1) Year Standard Limited Warranty for Toshiba Computer
Accessories can be found online at
http://pcsupport.toshiba.com/accessories1yr.
  • Page 1 1
  • Page 2 2
  • Page 3 3
  • Page 4 4
  • Page 5 5
  • Page 6 6
  • Page 7 7
  • Page 8 8
  • Page 9 9
  • Page 10 10
  • Page 11 11
  • Page 12 12
  • Page 13 13
  • Page 14 14
  • Page 15 15
  • Page 16 16
  • Page 17 17
  • Page 18 18
  • Page 19 19
  • Page 20 20
  • Page 21 21
  • Page 22 22
  • Page 23 23
  • Page 24 24
  • Page 25 25
  • Page 26 26
  • Page 27 27
  • Page 28 28
  • Page 29 29
  • Page 30 30
  • Page 31 31
  • Page 32 32

Toshiba Camileo B10 Quick start guide

Category
Camcorders
Type
Quick start guide

Toshiba Camileo B10: Capture life's moments with stunning Full HD video and high-resolution photos, easily share your memories with friends and family. Its compact design and user-friendly features make it perfect for everyday use, from family gatherings to outdoor adventures.

Ask a question and I''ll find the answer in the document

Finding information in a document is now easier with AI

in other languages