
Microwave Oven
49-40699 06-13 GE
PEM31
Owner’s Manual
GEAppliances.com
Safety Instructions ........2–8
Operating Instructions
Convenience Features .......19-22
Microwave Terms ..............24
Oven Features ..............11-13
Other Features .................23
Power Levels ...................13
Time Features ...............16-18
Care and Cleaning .........25
Troubleshooting Tips ......26
Things that are Normal .........26
Consumer Support
Consumer Support ......Back Cover
Warranty ......................27
Write the model and serial
numbers here:
Model # __________________
Serial # ___________________
You can find them on a label inside the
oven.
Español
For a Spanish version of this manual, visit
our Website at GEAppliances.com.
Para consultar una version en español de
este manual de instrucciones, visite nuestro
sitio de internet GEAppliances.com.

IMPORTANT SAFETY INSTRUCTIONS.
READ ALL INSTRUCTIONS BEFORE USING.
IMPORTANT SAFETY INSTRUCTIONS.
Use this appliance only for its intended purpose as described in this Owner’s Manual.
When using electrical appliances basic safety precautions should be followed, including the following:
Read and follow the specific precautions in the
PRECAUTIONS TO AVOID POSSIBLE EXPOSURE TO EXCESSIVE
MICROWAVE ENERGY section above.
This appliance must be grounded. Connect only to a properly
grounded outlet. See the GROUNDING INSTRUCTIONS section
on page 5.
Install or locate this appliance only in accordance with the
provided installation instructions.
Be certain to place the front surface of the door 3" or more
back from the countertop edge to avoid accidental tipping of
the appliance in normal usage.
This microwave oven is not approved or tested for marine use.
Do not mount this appliance over a sink.
Do not mount the microwave oven over or near any portion
of a heating or cooking appliance.
Do not store anything directly on top of the microwave oven
surface when the microwave oven is in operation.
Do not operate this appliance if it has a damaged power
cord or plug, if it is not working properly, or if it has been
damaged or dropped.
Do not cover or block any openings on the appliance.
Use this appliance only for its intended use as described in
this manual. Do not use corrosive chemicals or vapors in this
appliance. This microwave oven is specifically designed to
heat, dry or cook food, and is not intended for laboratory or
industrial use.
Do not store this appliance outdoors. Do not use this
SURGXFWQHDUZDWHU³IRUH[DPSOHLQDZHWEDVHPHQWQHDUD
swimming pool, near a sink or in similar locations.
Keep power cord away from heated surfaces.
Do not immerse power cord or plug in water.
Do not let power cord hang over edge of table or counter.
To reduce the risk of fire in the oven cavity:
³ 'RQRWRYHUFRRNIRRG&DUHIXOO\DWWHQGDSSOLDQFHZKHQ
paper, plastic or other combustible materials are placed
inside the oven while cooking.
³ 5HPRYHZLUHWZLVWWLHVDQGPHWDOKDQGOHVIURPSDSHURU
plastic containers before placing them in the oven.
³ 'RQRWXVHWKHRYHQIRUVWRUDJHSXUSRVHV'RQRWOHDYH
paper products, cooking utensils or food in the oven when
not in use.
³ ,IPDWHULDOVLQVLGHWKHRYHQLJQLWHNHHSWKHRYHQGRRUFORVHG
turn the oven off and disconnect the power cord, or shut
off power at the fuse or circuit breaker panel. If the door is
opened, the fire may spread.
See door surface cleaning instructions in the Care and
cleaning of the microwave oven section of this manual.
GE does not support any servicing of this microwave oven,
H[FHSWDVGHVFULEHGE\WKH&RQVXPHU6XSSRUWVHFWLRQVRI
this manual. Do not attempt to service the microwave oven
yourself. If service is desired, this appliance should be serviced
only by qualified service personnel. Contact the nearest
DXWKRUL]HGVHUYLFHIDFLOLW\IRUH[DPLQDWLRQUHSDLURUDGMXVWPHQW
This appliance must only be serviced by qualified service
personnel. Contact the nearest authorized service facility for
H[DPLQDWLRQUHSDLURUDGMXVWPHQW
As with any appliance, close supervision is necessary when
used by children.
WARNING!
For your safety, the information in this manual must be followed to minimize the risk of fire or explosion, electric shock, or
to prevent property damage, personal injury, or loss of life.
PRECAUTIONS TO AVOID POSSIBLE EXPOSURE
TO EXCESSIVE MICROWAVE ENERGY
2
(a) Do Not Attempt to operate this oven with the door
open since open-door operation can result in harmful
H[SRVXUHWRPLFURZDYHHQHUJ\,WLVLPSRUWDQWQRWWR
defeat or tamper with the safety interlocks.
(b) Do Not Place DQ\REMHFWEHWZHHQWKHRYHQIURQW
face and the door or allow soil or cleaner residue to
accumulate on sealing surfaces.
(c) Do Not Operate the oven if it is damaged. It is
particularly important that the oven door close properly
and that there is no damage to the:
(1) door (bent),
(2) hinges and latches (broken or loosened),
(3) door seals and sealing surfaces.
(d) The Oven Should Not EHDGMXVWHGRUUHSDLUHGE\
DQ\RQHH[FHSWSURSHUO\TXDOLILHGVHUYLFHSHUVRQQHO
SAVE THESE INSTRUCTIONS
Page is loading ...

IMPORTANT SAFETY INSTRUCTIONS.
READ ALL INSTRUCTIONS BEFORE USING.
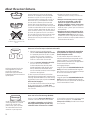
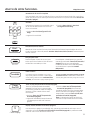
ARCING
If you see arcing, press the Cancel/Off pad and correct the problem.
Arcing is the microwave term for sparks in the oven.
Arcing is caused by:
Metal or foil touching the side of the oven.
Foil not molded to food (upturned edges act
like antennas).
Metal, such as twist-ties, poultry pins or gold-rimmed
dishes, in the microwave.
Recycled paper towels containing small metal pieces
being used in the microwave.
FOODS
Do not pop popcorn in your microwave oven unless
in a special microwave popcorn accessory or unless
you use popcorn labeled for use in microwave ovens.
Some products such as whole eggs and sealed
FRQWDLQHUV³IRUH[DPSOHFORVHGMDUV³DUHDEOHWR
H[SORGHDQGVKRXOGQRWEHKHDWHGLQWKLVPLFURZDYH
oven. Such use of the microwave oven could result in
LQMXU\
Do not boil eggs in a microwave oven. Pressure will
build up inside egg yolk and will cause it to burst,
SRVVLEO\UHVXOWLQJLQLQMXU\
Operating the microwave with no food inside for
more than a minute or two may cause damage to
the oven and could start a fire. It increases the heat
around the magnetron and can shorten the life of the
oven.
Foods with unbroken outer “skin” such as potatoes,
hot dogs, sausages, tomatoes, apples, chicken livers
and other giblets and egg yolks should be pierced to
allow steam to escape during cooking.
$YRLGKHDWLQJEDE\IRRGLQJODVVMDUVHYHQZLWKWKH
lid off. Make sure all infant food is thoroughly cooked.
Stir food to distribute the heat evenly. Be careful
to prevent scalding when warming formula. The
container may feel cooler than the formula really is.
Always test the formula before feeding the baby.
Don’t defrost frozen beverages in narrow-necked
bottles (especially carbonated beverages). Even if the
container is opened, pressure can build up. This can
cause the container to burst, possibly resulting in
LQMXU\
SUPERHEATED WATER
Liquids, such as water, coffee or tea are able to
be overheated beyond the boiling point without
appearing to be boiling. Visible bubbling or boiling
when the container is removed from the microwave
oven is not always present. THIS COULD RESULT IN
VERY HOT LIQUIDS SUDDENLY BOILING OVER WHEN
THE CONTAINER IS DISTURBED OR A SPOON OR
OTHER UTENSIL IS INSERTED INTO THE LIQUID.
7RUHGXFHWKHULVNRILQMXU\WRSHUVRQV
³ 'RQRWRYHUKHDWWKHOLTXLG
³ 6WLUWKHOLTXLGERWKEHIRUHDQGKDOIZD\WKURXJK
heating it.
³ 'RQRWXVHVWUDLJKWVLGHGFRQWDLQHUZLWKQDUURZ
necks.
³ $IWHUKHDWLQJDOORZWKHFRQWDLQHUWRVWDQGLQWKH
microwave oven for a short time before removing
the container.
³ 8VHH[WUHPHFDUHZKHQLQVHUWLQJDVSRRQRURWKHU
utensil into the container.
Hot foods and steam can cause burns. Be careful
when opening any containers of hot food, including
SRSFRUQEDJVFRRNLQJSRXFKHVDQGER[HV7R
SUHYHQWSRVVLEOHLQMXU\GLUHFWVWHDPDZD\IURP
hands and face.
Do not overcook potatoes. They could dehydrate and
catch fire, causing damage to your oven.
&RRNPHDWDQGSRXOWU\WKRURXJKO\³PHDWWRDWOHDVW
an INTERNAL temperature of 160°F and poultry to
at least an INTERNAL temperature of 180°F. Cooking
to these temperatures usually protects against
foodborne illness.
WARNING!
4
SAVE THESE INSTRUCTIONS
Page is loading ...

6
IMPORTANT SAFETY INFORMATION.
READ ALL INSTRUCTIONS BEFORE USING.
Make sure all cookware used in your microwave oven is
suitable for microwaving. Most glass casseroles, cooking
dishes, measuring cups, custard cups, pottery or china
dinnerware which does not have metallic trim or glaze
with a metallic sheen can be used. Some cookware is
labeled “suitable for microwaving.”
If you are not sure if a dish is microwave-safe, use this
test: Place in the oven both the dish you are testing
DQGDJODVVPHDVXULQJFXSILOOHGZLWKFXSRIZDWHU³
VHWWKHPHDVXULQJFXSHLWKHULQRUQH[WWRWKHGLVK
Microwave 30–45 seconds at high. If the dish heats, it
should not be used for microwaving.
If the dish remains cool and only the water in the cup
heats, then the dish is microwave-safe.
If you use a meat thermometer while cooking, make
sure it is safe for use in microwave ovens.
Do not use recycled paper products. Recycled paper
WRZHOVQDSNLQVDQGZD[HGSDSHUFDQFRQWDLQPHWDO
flecks which may cause arcing or ignite. Paper
products containing nylon or nylon filaments should be
avoided, as they may also ignite.
Some foam trays (like those that meat is packaged on)
have a thin strip of metal embedded in the bottom.
When microwaved, the metal can burn the floor of the
oven or ignite a paper towel.
Do not use the microwave to dry newspapers.
Not all plastic wrap is suitable for use in microwave
ovens. Check the package for proper use.
3DSHUWRZHOVZD[HGSDSHUDQGSODVWLFZUDSFDQEH
used to cover dishes in order to retain moisture and
prevent spattering. Be sure to vent plastic wrap so
steam can escape.
Cookware may become hot because of heat
transferred from the heated food. Pot holders may be
needed to handle the cookware.
“Boilable” cooking pouches and tightly closed plastic
bags should be slit, pierced or vented as directed by
package. If they are not, plastic could burst during or
LPPHGLDWHO\DIWHUFRRNLQJSRVVLEO\UHVXOWLQJLQLQMXU\
Also, plastic storage containers should be at least
partially uncovered because they form a tight seal.
When cooking with containers tightly covered with
plastic wrap, remove covering carefully and direct
steam away from hands and face.
Use foil only as directed in this guide. TV dinners may
be microwaved in foil trays less than 3/4"high; remove
WKHWRSIRLOFRYHUDQGUHWXUQWKHWUD\WRWKHER[:KHQ
using foil in the microwave oven, keep the foil at least
1" away from the sides of the oven.
3ODVWLFFRRNZDUH³3ODVWLFFRRNZDUHGHVLJQHGIRU
microwave cooking is very useful, but should be used
carefully. Even microwave-safe plastic may not be
as tolerant of overcooking conditions as are glass or
FHUDPLFPDWHULDOVDQGPD\VRIWHQRUFKDULIVXEMHFWHG
WRVKRUWSHULRGVRIRYHUFRRNLQJ,QORQJHUH[SRVXUHVWR
overcooking, the food and cookware could ignite.
Follow these guidelines:
1. Use microwave-safe plastics only and use
them in strict compliance with the cookware
manufacturer’s recommendations.
2. Do not microwave empty containers.
3. Do not permit children to use plastic cookware
without complete supervision.
WARNING!
SAVE THESE INSTRUCTIONS
Page is loading ...

Usage situations where appliance’s power cord will be disconnected infrequently.
Because of potential safety hazards under certain conditions,
we strongly recommend against the use of an adapter plug. However, if
you still elect to use an adapter, where local codes permit, a TEMPORARY
CONNECTION may be made to a properly grounded wall receptacle by the
use of a UL listed adapter which is available at most local hardware stores.
The larger slot in the adapter must be aligned with the larger slot in the wall
receptacle to provide proper polarity in the connection of the power cord.
CAUTION: Attaching the adapter ground terminal to the wall receptacle
cover screw does not ground the appliance unless the cover screw is
metal, and not insulated, and the wall receptacle is grounded through the house wiring.
You should have the circuit checked by a qualified electrician to make sure the receptacle is properly grounded.
When disconnecting the power cord from the adapter, always hold the adapter with one hand. If this is not done, the
adapter ground terminal is very likely to break with repeated use. Should this happen, DO NOT USE the appliance until
a proper ground has again been established.
Usage situations where appliance’s power cord will be disconnected frequently.
Do not use an adapter plug in these situations because frequent disconnection of the power cord places undue
strain on the adapter and leads to eventual failure of the adapter ground terminal. You should have the 2-prong wall
receptacle replaced with a 3-prong (grounding) receptacle by a qualified electrician before using the appliance.
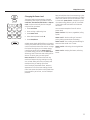
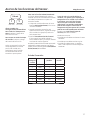
ADAPTER PLUGS
GROUNDING INSTRUCTIONS
This appliance must be grounded. In the event of an
electrical short circuit, grounding reduces the risk of
electric shock by providing an escape wire for the electric
current.
This appliance is equipped with a power cord having a
grounding wire with a grounding plug. The plug must
be plugged into an outlet that is properly installed and
grounded.
Consult a qualified electrician or service technician if
the GROUNDING INSTRUCTIONS are not completely
XQGHUVWRRGRULIGRXEWH[LVWVDVWRZKHWKHUWKHDSSOLDQFH
is properly grounded.
If the outlet is a standard 2-prong wall outlet, it is your
personal responsibility and obligation to have it replaced
with a properly grounded 3-prong wall outlet.
Do not under any circumstances cut or remove the third
(ground) prong from the power cord.
:HGRQRWUHFRPPHQGXVLQJDQH[WHQVLRQFRUGZLWKWKLV
appliance. If the power cord is too short, have a qualified
electrician or service technician install an outlet near the
appliance. (See EXTENSION CORDS section.)
For best operation, plug this appliance into its own
electrical outlet to prevent flickering of lights, blowing of
fuse or tripping of circuit breaker.
WARNING
³,PSURSHUXVHRIWKHJURXQGLQJSOXJFDQUHVXOWLQDULVNRIHOHFWULFVKRFN
Ensure proper
ground and firm
connection before
use.
TEMPORARY
METHOD
Align large
prongs/slots
(Adapter plugs not
permitted in Canada)
IMPORTANT SAFETY INFORMATION.
READ ALL INSTRUCTIONS BEFORE USING.
8
SAVE THESE INSTRUCTIONS
Page is loading ...

10
EXTENSION CORDS
A short power supply cord is provided to reduce the risks resulting from becoming entangled in or tripping over a longer cord.
([WHQVLRQFRUGVPD\EHXVHGLI\RXDUHFDUHIXOLQXVLQJWKHP
,IDQH[WHQVLRQFRUGLVXVHG³
7KHPDUNHGHOHFWULFDOUDWLQJRIWKHH[WHQVLRQFRUGVKRXOGEHDWOHDVWDVJUHDWDVWKHHOHFWULFDOUDWLQJRIWKHDSSOLDQFH
7KHH[WHQVLRQFRUGPXVWEHDJURXQGLQJW\SHZLUHFRUGDQGLWPXVWEHSOXJJHGLQWRDVORWRXWOHW
7KHH[WHQVLRQFRUGVKRXOGEHDUUDQJHGVRWKDWLWZLOOQRWGUDSHRYHUWKHFRXQWHUWRSRUWDEOHWRSZKHUHLWFDQEHSXOOHGRQE\
children or tripped over unintentionally.
,I\RXXVHDQH[WHQVLRQFRUGWKHLQWHULRUOLJKWPD\IOLFNHUDQGWKHEORZHUVRXQGPD\YDU\ZKHQWKHPLFURZDYHRYHQLVRQ&RRNLQJ
times may be longer, too.
READ AND FOLLOW THIS SAFETY INFORMATION CAREFULLY.
SAVE THESE INSTRUCTIONS
WARNING!
¡ADVERTENCIA!
FAVOR DE LEER Y SEGUIR CUIDADOSAMENTE ESTA INFORMACIÓN DE SEGURIDAD.
GUARDE ESTAS INSTRUCCIONES
IMPORTANT SAFETY INFORMATION.
READ ALL INSTRUCTIONS BEFORE USING.
PROLONGADORES
Se brinda un cable de corriente corto a fin de reducir riesgos de enredo o tropiezos con un cable más largo.
Se podrán usar prolongadores siempre que se tenga el debido cuidado.
6LVHXVDXQSURORQJDGRU³
1. La graduación eléctrica del prolongador debería ser por lo menos tan amplia como la graduación eléctrica del electrodoméstico;
2. (OSURORQJDGRUGHEHUiFRQWDUFRQFDEOHVFRQFRQH[LyQDWLHUUD\HVWDUHQFKXIDGRDXQWRPDFRUULHQWHFRQUDQXUDV
3. (OSURORQJDGRUQRVHGHEHUiFRORFDUDORODUJRGHODPHVDGDRPHVDGHPRGRTXHSXHGDVHUHPSXMDGRSRUQLxRVRTXHVHSXHGD
tropezar con éste de forma no intencional.
Si usa un prolongador, la luz interna podrá parpadear y el sonido del calefactor podrá variar cuando el horno microondas esté
encendido. Los tiempos de cocción podrán ser más largos también.

11
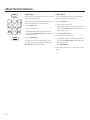
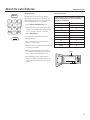
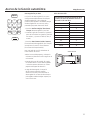
Throughout this manual, features and appearance may vary from your model.
800 Watts
1 2 3
4 5 6
7 8 9
Power
0
Level
Set
Clock
Turntable
Cook
Time
Timer
On/Off
Add
30 Sec
Express Cook
Sensor Cooking
Defrost
Reheat
Vegetable
PotatoBeverage
Popcorn
Weight/Time
Cancel
Off
Start
Pause
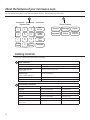
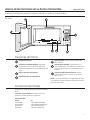
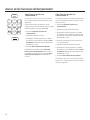
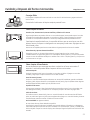
Features of the Oven
Door Latches.
Window with Metal Shield. Screen allows cooking
to be viewed while keeping microwaves confined
in the oven.
Convenience Guide.
Touch Control Panel Display.
Door Latch Release. Press latch release to open
door.
Removable Turntable. Turntable and support
must be in place when using the oven. The
turntable may be removed for cleaning.
Removable Turntable Support. The turntable
support must be in place when using the oven.
NOTE: Rating plate is located on the front of the
microwave oven. Oven vent(s) and oven light is located on
the inside walls of the microwave oven.
About the features of your microwave oven. GEAppliances.com
Optional Accessories
$YDLODEOHDWH[WUDFRVWIURP\RXU*(VXSSOLHU
04-A019 Hanging Kit allows this oven to be mounted
under a cabinet.
Built-in Kits:
Model Kit
PEM31DFBB JX827DFBB/JX830DFBB
PEM31DFWW JX827DFWW/JX830DFWW
PEM31SFSS JX827SFSS/JX830SFSS
PEM31RFSS JX827SFSS/JX830SFSS

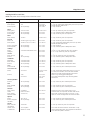
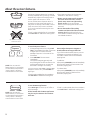
You can microwave by time or with the convenience features. Not all features on all models.
Cooking Controls
Check the Convenience Guide before you begin.
12
About the features of your microwave oven.
1 2 3
4 5 6
7 8 9
Power
0
Level
Set
Clock
Turntable
Cook
Time
Timer
On/Off
Add
30 Sec
Clock Display
Express Cook
Sensor Cooking
Defrost
Reheat
Vegetable
PotatoBeverage
Popcorn
Weight/Time
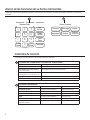
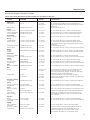
Time Features
Press Enter
Cook Time Amount of cooking time
Defrost Weight/Time
Press twice
Amount of defrosting time
Express Cook
Press number pads (1-6)
Starts Immediately!
Add 30 Sec Starts Immediately!
Power Level Power level 1 to 10
Convenience Features
Press Enter Options
Popcorn Starts immediately! more/less time
Beverage Starts immediately!
Reheat Food 1-8 more/less time
Potato Starts Immediately! more/less time
Vegetables Food 1-3 more/less time
Defrost Weight/Time
Press once
Enter food weight

GEAppliances.com
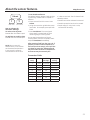
Changing the Power Level
The power level may be entered or changed
immediately after entering the feature time for
Cook Time, Time Defrost, Add 30 Sec or Express
Cook. the power level may also be changed
uring the time countdown.
1. Press Cook Time.
2. Enter cooking or defrosting time
3. Press Power Level.
4. Select desired power level 1-10.
3. Press Start/Pause.
9DULDEOHSRZHUOHYHOVDGGIOH[LELOLW\WRPLFURZDYH
cooking. The power levels on the microwave oven
can be compared to the surface units on a range.
Each power level gives you microwave energy
a certain percent of the time. Power level 7 is
microwave energy 70% of the time. Power level
3 is energy 30% of the time. Most cooking will be
done on HI which gives you 100% power.
Power Level 10 will cook faster but food may
need more frequent stirring, rotating or turning
over. A lower setting will cook more evenly and
need less stirring or rotating of the food.
6RPHIRRGVPD\KDYHEHWWHUIODYRUWH[WXUHRU
appearance if one of the lower settings is used.
Use a lower power level when cooking foods that
have a tendency to boil over, such as scalloped
potatoes.
Rest periods (when the microwave energy cycles
off) give time for the food to “equalize” or transfer
KHDWWRWKHLQVLGHRIWKHIRRG$QH[DPSOHRIWKLV
is shown with power level 3³WKHGHIURVWF\FOH,I
microwave energy did not cycle off, the outside
of the food would cook before the inside was
defrosted.
Here are some examples of uses for various
power levels:
Power Level 10: Fish, bacon, vegetables, boiling
liquids.
Power Level 7: Gentle cooking of meat and
poultry; baking casseroles and reheating.
Power Level 5: Slow cooking and tenderizing for
stews and less tender cuts of meat.
Power Level 3: Defrosting; simmering; delicate
sauces.
Power Level 1: Keeping food warm; softening
butter.
Cook
Time
Start
Pause
1 2 3
4 5 6
7 8 9
Power
0
Level
Set
Clock
Clock Display
Power
Level
13

14
About the time features.
Cook Time I
Allows you to microwave for any time up to 99
minutes and 99 seconds.
Power level 10 (high) is automatically set, but
\RXPD\FKDQJHLWIRUPRUHIOH[LELOLW\
1. Press Cook Time.
2. Enter cooking time.
3. Change power level if you don’t want full
power. (Press Power Level. Select a desired
power level 1–10.)
4. Press Start/Pause.
You may open the door during Cook Time
to check the food. Close the door and press
Start/Pause to resume cooking.
Cook Time II
Lets you change power levels automatically
during cooking. Here’s how to do it:
1. Press Cook Time.
2. Enter the first cook time.
3. Change the power level if you don’t want full
power. (Press Power Level. Select a desired
power level 1–10.)
4. Press Cook Time again.
5. Enter the second cook time.
6. Change the power level if you don’t want full
power. (Press Power Level. Select a desired
power level 1–10.)
7. Press Start/Pause.
At the end of Cook Time I, Cook Time II counts
down.
Cook
Time
Start
Pause
1 2 3
4 5 6
7 8 9
Power
0
Level
Set
Clock
Clock Display

15
GEAppliances.com
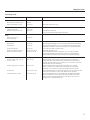
Cooking Guide for Cook Time
NOTE: Use power level 10 (High) unless otherwise noted.
Vegetable Amount Time Comments
Asparagus
(fresh spears) 1 lb. 5 to 8 min., In 1
1
¼2-qt. oblong glass baking dish, place 1/4 cup water.
Med-High (7) Rotate dish after half of time.
(frozen spears) 10-oz. package 4 to 7 min. In 1-qt. casserole.
Beans
(fresh green) 1 lb. cut in half 10 to 14 min. In 1
1
¼2-qt. casserole, place 1/2 cup water.
(frozen green) 10-oz. package 4 to 8 min.
In 1-qt. casserole, place 2 tablespoons water.
(frozen lima) 10-oz. package 4 to 8 min. In 1-qt. casserole, place 1/4 cup water.
Beets
(fresh, whole) 1 bunch 16 to 21 min. In 2-qt. casserole, place 1/2 cup water.
Broccoli
(fresh cut) 1 bunch (1
1
¼4 to 1
1
¼2 lbs.) 5 to 9 min. In 2-qt. casserole, place 1/2 cup water.
(fresh spears) 1 bunch (1
1
¼4 to 1
1
¼2 lbs.) 7 to 10 min. In 2-qt. oblong glass baking dish, place 1/4 cup water.
Rotate dish after half of time.
(frozen, chopped) 10-oz. package 4 to 7 min. In 1-qt. casserole.
(frozen spears) 10-oz. package 4 to 7 min.
In 1-qt. casserole, place 3 tablespoons water.
Cabbage
(fresh) 1 medium head (about 2 lbs.) 6 to 9 min. In 1
1
¼2- or 2-qt. casserole, place 1/4 cup water.
(wedges) 5 to 9 min. In 2- or 3-qt. casserole, place 1/4 cup water.
Carrots
(fresh, sliced) 1 lb. 4 to 8 min. In 1
1
¼2-qt. casserole, place 1/4 cup water.
(frozen) 10-oz. package 3 to 7 min.
In 1-qt. casserole, place 2 tablespoons water.
Cauliflower
(flowerets) 1 medium head 7 to 10 min. In 2-qt. casserole, place 1/2 cup water.
(fresh, whole) 1 medium head 7 to 14 min. In 2-qt. casserole, place 1/2 cup water.
(frozen) 10-oz. package 3 to 7 min.
In 1-qt. casserole, place 2 tablespoons water.
Corn
(frozen kernel) 10-oz. package 2 to 6 min.
In 1-qt. casserole, place 2 tablespoons water.
Corn on the cob
(fresh) 1 to 5 ears 2-1/4 to 4 min. In 2-qt. oblong glass baking dish, place corn. If corn
per ear is in husk, use no water; if corn has been husked,
add 1/4 cup water. Rearrange after half of time.
(frozen) 1 ear 3 to 6 min. Place in 2-qt. oblong glass baking dish.
2 to 6 ears 2 to 3 min. Cover with vented plastic wrap. Rearrange after
per ear half of time.
Mixed vegetables
(frozen) 10-oz. package 2 to 6 min.
In 1-qt. casserole, place 3 tablespoons water.
Peas
(fresh, shelled) 2 lbs. unshelled 7 to 9 min. In 1-qt. casserole, place 1/4 cup water.
(frozen) 10-oz. package 2 to 6 min.
In 1-qt. casserole, place 2 tablespoons water.
Potatoes
(fresh, cubed,
4 potatoes 9 to 11 min. Peel and cut into 1 inch cubes. Place in 2-qt.
white) (6 to 8 oz. each) casserole with 1/2 cup water. Stir after half of time.
(fresh, whole, 1 (6 to 8 oz.) 2 to 4 min. Pierce with cooking fork. Place in the oven, 1 inch
sweet or white) apart, in circular arrangement. Let stand 5 minutes.
Spinach
(fresh) 10 to 16 oz. 3 to 6 min. In 2-qt. casserole, place washed spinach.
(frozen, chopped 10-oz. package 3 to 6 min.
In 1-qt. casserole, place 3 tablespoons water.
and leaf)
Squash
(fresh, summer 1 lb. sliced 3 to 5 min. In 1
1
¼2-qt. casserole, place 1/4 cup water.
and yellow)
(winter, acorn 1 to 2 squash 5 to 9 min. Cut in half and remove fibrous membranes. In 2-qt.
or butternut) (about 1 lb. each) oblong glass baking dish, place squash cut-side-down.
Turn cut-side-up after 4 minutes.

About the time features.
16
Time Defrost allows you to defrost for a
selected length of time. See the Defrosting
Guide for suggested times. (Weight Defrost is
H[SODLQHGLQWKH$XWR)HDWXUHVHFWLRQ
1. Press Defrost Weight/Time twice.
2. Enter defrosting time.
3. Press Start/Pause.
4. Turn food over when the oven signal.
5. Press Start/Pause.
When the oven signals, turn food over and
break apart or rearrange pieces for more even
defrosting. Shield any warm areas with small
pieces of foil. The oven will continue to defrost
if you don’t open the door and turn the food.
Power level is automatically set at 3, but
can be changed. You can defrost small
items quickly by raising the power level after
entering the time. Power level 7 cuts the
total defrosting time in about half; power
OHYHOFXWVWKHWRWDOWLPHWRDSSUR[LPDWHO\
1/3. However, food will need more frequent
attention than usual.
A dull thumping noise may be heard during
defrosting. This is normal when oven is not
operating at High power.
Defrosting Tips
)RRGVIUR]HQLQSDSHURUSODVWLFFDQEH
defrosted in the package. Closed packages
should be slit, pierced or vented AFTER
food has partially defrosted. Plastic storage
containers should be partially uncovered.
)DPLO\VL]HSUHSDFNDJHGIUR]HQGLQQHUVFDQ
be defrosted and microwaved. If the food is
in a foil container, transfer it to a microwave-
safe dish.
)RUPRUHHYHQGHIURVWLQJRIODUJHUIRRGV
such as roasts, use Defrost Weight. Be sure
large meats are completely defrosted before
cooking.
)RRGVWKDWVSRLOHDVLO\VKRXOGQRWEHDOORZHG
to sit out for more than one hour after
defrosting. Room temperature promotes the
growth of harmful bacteria.
:KHQGHIURVWHGIRRGVKRXOGEHFRROEXW
softened in all areas. If still slightly icy, return
to the microwave very briefly, or let it stand
a few minutes.counts down.
Start
Pause
1 2 3
4 5 6
7 8 9
Power
0
Level
Set
Clock
Clock Display
Defrost
Weight/Time

17
GEAppliances.com
Defrosting Guide
Food Time Comments
Breads, Cakes
Bread, buns or rolls (1 piece) 1/4 min.
6ZHHWUROOVDSSUR[R] WRPLQ 5HDUUDQJHDIWHUKDOIRIWLPH
Fish and Seafood
Fillets, frozen (1 lb.) 6 to 9 min.
Shellfish, small pieces (1 lb.) 3 to 7 min. Place block in casserole.
Turn over and break up after first half of time.
Fruit
3ODVWLFSRXFK³RU WRPLQ
(10-oz. package)
Meat
Bacon (1 lb.) 2 to 5 min.
Place unopened package in oven. Let stand 5 minutes after defrosting.
)UDQNVOE WRPLQ 3ODFHXQRSHQHGSDFNDJHLQRYHQ0LFURZDYHMXVWXQWLOIUDQNVFDQEH
separated. Let stand 5 minutes, if necessary, to complete defrosting.
Ground meat (1 lb.) 4 to 6 min. Turn meat over after first half of time.
Roast: beef, lamb, veal, pork 9 to 12 min. per lb. Use power level Warm (1).
Steaks, chops and cutlets 4 to 8 min. per lb. Place unwrapped meat in cooking dish. Turn over after first half
of time and shield warm areas with foil. After second half of time,
separate pieces with table knife. Let stand to complete defrosting.
Poultry
Chicken, broiler-fryer, cut up 14 to 19 min. Place wrapped chicken in dish. Unwrap and turn over after first
(2
1
¼2 to 3 lbs.) half of time. After second half of time, separate pieces and place in
cooking dish. Microwave 2 to 4 minutes more, if necessary. Let stand
a few minutes to finish defrosting.
Chicken, whole (2
1
¼2 to 3 lbs.) 20 to 24 min. Place wrapped chicken in dish. After first half of time, unwrap
and turn chicken over. Shield warm areas with foil. To complete
defrosting, run cool water in cavity until giblets can be removed.
Cornish hen 7 to 12 min. per lb. Place unwrapped hen in oven breast-side-up. Turn over after first half
of time. Run cool water in cavity until giblets can be removed.
Turkey breast (4 to 6 lbs.) 3 to 8 min. per lb. Place unwrapped breast in microwave-safe dish breast-side-down.
After first half of time, turn breast-side-up and shield warm areas
with foil. Defrost for second half of time. Let stand 1 to 2 hours in
refrigerator to complete defrosting.

About the time features.
18
Add 30 Sec
You can use this feature two ways:
It will add 30 seconds to the time counting down each time the pad is pressed.
It can be used as a quick way to set 30 seconds of cooking time.
Express Cook
This is a quick way to set cooking time for 1 –6 minutes.
Press one of the Express Cook pads (from 1 to 6) for 1 to 6 minutes of cooking at power level 10. For
H[DPSOHSUHVVWKH2 pad for 2 minutes of cooking time.
The power level can be changed as time is counting down. Press POWER LEVEL and enter 1–10.
1 2 3
4 5 6
Add
30 Sec

19
About the auto features. GEAppliances.com
Weight Defrost
Weight defrost automatically sets the
defrosting tmes and power levels to give
even defrosting results for meats, poultry
DQGILVKZHLJKLQJXSWRVL[SRXQGV
1. Press Defrost Weight/Time once.
2. Using the conversion guide, enter food
ZHLJKW)RUH[DPSOHSUHVVSDGVDQG
for 1.2 pounds (1 pound, 3 ounces).
3. Press Start/Pause.
7LPH'HIURVWLVH[SODLQHGLQWKH7LPH
Features section.)
There is a handy guide located on the
inside front of the oven.
5HPRYHPHDWIURPSDFNDJHDQGSODFHRQ
microwave-safe dish.
:KHQWKHRYHQVLJQDOVWXUQWKHIRRG
over. Remove defrosted meat or shield
warm areas with small pieces of foil.
$IWHUGHIURVWLQJPRVWPHDWVQHHGWR
stand 5 minutes to complete defrosting.
Large roasts should stand for about 30
minutes.
Start
Pause
1 2 3
4 5 6
7 8 9
Power
0
Level
Set
Clock
Clock Display
Defrost
Weight/Time
If the weight of food is stated in pounds and
ounces, the ounces must be converted to
tenths (.1) of a pound.
Ounces Pounds
1–2 .1
3 .2
4–5 .3
6–7 .4
8 .5
9–10 .6
11 .7
12–13 .8
14–15 .9
1 2 3
4 5 6
7 8 9
Power
0
Level
Set
Clock
Turntable
Cook
Time
Timer
On/Off
Add
30 Sec
Express Cook
Sensor Cooking
Defrost
Reheat
Vegetable
PotatoBeverage
Popcorn
Weight/Time
Cancel
Off
Start
Pause
Guide
Conversion Guide

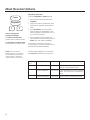
About the sensor features.
20
The Sensor Features detect the increasing
humidity released during cooking. The oven
DXWRPDWLFDOO\DGMXVWVWKHFRRNLQJWLPHWR
various types and amounts of food.
Do not use the Sensor Features twice in
VXFFHVVLRQRQWKHVDPHIRRGSRUWLRQ³LW
may result in severely overcooked or burnt
food. Be sure to let the oven cool down
IRUPLQXWHVEHIRUHVWDUWLQJWKHQH[W
sensor cook.
If food is undercooked after the countdown,
use Cook Time for additional cooking time.
7KHSURSHUFRQWDLQHUVDQGFRYHUVDUH
essential for best sensor cooking.
Always use microwave-safe containers
and cover them with lids or vented
plastic wrap. Never use tight-sealing
SODVWLFFRYHUV³they can prevent
steam from escaping and cause food to
overcook.
Be sure the outside of the cooking
container and the inside of the microwave
oven are dry before placing food in the
oven. Beads of moisture turning into steam
can mislead the sensor.
Covered
Vented
Dry off dishes so they don’t
mislead the sensor.
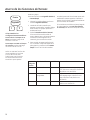
To use the Popcorn feature:
1. Follow package instructions, using Cook
Time if the package is less than 3.0 ounces
or larger than 3.5 ounces. Place the
package of popcorn in the center of the
microwave.
2. Press POPCORN. The oven starts
immediately.
Your popcorn bag may get stuck and
stop rotating, but this will not effect to the
cooking performance. Do not open the
door even if the bag is not rotating.
If you open the door while “Pop” is displayed, “Err”
will appear. Close the door, press CancelOff and
begin again.
If food is undercooked after the countdown
use Cook Time for additional cooking time.
How to Adjust the Popcorn Program to
Provide a Shorter or Longer Cook Time
If you find that the brand of popcorn you use
underpops or overcooks consistently, you
can add or subtract 10% to the automatic
popping time.
To add time:
After pressing POPCORN, press 9 immediately
DIWHUWKHRYHQVWDUWVIRUDQH[WUDRIWKH
automatic popping time.
To subtract time:
After pressing POPCORN, press 1 immediately
after the oven starts for 10% less of the
automatic popping time.
Popcorn
1 9
(less time) (more time)
NOTE: Do not use this
feature twice in succession
RQWKHVDPHIRRGSRUWLRQ³
it may result in severely
overcooked or burnt food.
Beverage
NOTE: Do not use this
feature twice in succession
RQWKHVDPHIRRGSRUWLRQ³
it may result in severely
overcooked or burnt food.
To use the Beverage feature:
Press Beverage to heat a cup of coffee or
other beverage.
Drinks heated with the Beverage feature
may be very hot. Remove the container
with care.
If food is undercooked after the countdown,
use Cook Time for additional cooking time.

21
About the sensor features. GEAppliances.com
To use the Reheat feature:
The Reheat feature reheats single servings
of previously cooked foods or a plate of
leftovers.
1. Place covered food in the oven. Press
Reheat.
2. Using the conversion guide below, enter
IRRGFRGH)RUH[DPSOHSUHVVSDG 1 for
Pizza.
3. Press Start/Pause. The oven signals
when steam is sensed and the time
remaining begins counting down.
Do not open the oven door until time is
counting down. If the door is opened, close it
and press Start/Pause immediately.
After removing food from the oven, stir, if
possible, to even out the temperature. If
the food is not hot enough, use Cook Time
to reheat for more time. Reheated foods
may have wide variations in temperature.
Some areas may be extremely hot.
It is best to use Cook Time for these foods:
%UHDGSURGXFWV
)RRGVWKDWPXVWEHUHKHDWHGXQFRYHUHG
)RRGVWKDWQHHGWREHVWLUUHGRUURWDWHG
)RRGVFDOOLQJIRUDGU\ORRNRUFULVS
surface after reheating.
Reheat
1 9
(less time) (more time)
NOTE: Do not use this
feature twice in succession
RQWKHVDPHIRRGSRUWLRQ³
it may result in severely
overcooked or burnt food.
Food Code
Entry
Food Available
Servings
Ounces per
serving
1 Pizza 1-4 Slices 2 ounces
2 Plate 1
3 Soup 1-4 4 ounces
4 Pasta 1-4 4 ounces
5 Beef 1-4 4 ounces
6 Poutry 1-4 4 ounces
7 Pork 1-4 4 ounces
8 Fish 1-4 4 ounces
Conversion Guide
How to Change the
Automatic Settings
To reduce time by 10%:
Press 1 after the feature pad.
To add 10% to cooking time:
Press 9 after the feature pad.

22
About the sensor features.
Vegetables and Potato
To use the Vegetable or Potato features:
1. Place covered food in the oven. Press
Vegetable.
2. Using the Conversion Guide below, enter
IRRGFRGH)RUH[DPSOHSUHVVSDG1 for
Fresh.
3. Press Start/Pause . The oven signals
when the steam is sensed and the time
remaining begins counting down. Turn or
stir the food if necessary.
3. For the potatoes, pierce skin with fork.
Place potatoes on the turntable, press the
Potato. The oven starts immediately.
Do not open the oven door until time is
counting down. If the door is opened, close it
and press Start/Pause immediately.
If food is undercooked after the countdown,
use Cook Time for additional cooking time.
Vegetable
Potato
1 9
(less time) (more time)
NOTE: Do not use this
feature twice in succession
RQWKHVDPHIRRGSRUWLRQ³
it may result in severely
overcooked or burnt food.
How to Change the
Automatic Settings
To reduce time by 10%:
Press 1 after the feature pad.
To add 10% to cooking time:
Press 9 after the feature pad.
Food Code
Entry
Food Type Amount Comment
1 Fresh Vegetables 4-16 Ounces Add 1/4 cup water per serving. Cover
with lid or vented plastic wrap.
2 Frozen Vegatables 4-16 Ounces Follow package instructions for adding
water. Ocver with lid or vented plastic
wrap.
3 Canned Vegatables 4-16 Ounces Cover with lid or vented plastic wrap.

About other features.
GEAppliances.com
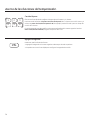
Cooking Complete Reminder
To remind you that you have food in the oven, the oven will display “End” and beep once a
minute until you either open the oven door or press Cancel/Off.
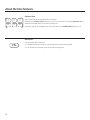
Timer
On/Off
Set Clock
Press to enter the time of day or to check the
time of day while microwaving.
1. Press Set Clock.
2. Enter time of day.
3. Press Start or Set Clock.
Start/Pause
In addition to starting many functions, Start/Pause allows you to stop cooking without opening
the door or clearing the display. Press Start/Pause again to restart the oven.
Timer On/Off
Timer On/Off operates as a minute timer and
can be used at any time, even when the oven is
operating.
1. Press TIMER ON/OFF.
2. Enter time you want to count down.
3. Press TIMER ON/OFF to start.
When time is up, the oven will signal. To turn off
the timer signal, press TIMER ON/OFF.
NOTE: The timer indicator will be lit while the
timer is operating.
Start
Pause
1 2 3
4 5 6
7 8 9
0
Set
Clock
Clock Display
Start
Pause
23
Child Lock-Out
You may lock the control panel to prevent the
microwave from being accidentally started or
used by children.
To lock or unlock the controls, press and hold
Cancel/Off for about three seconds. When
the control panel is locked, LOCKED will
appear in the display.
Turntable
For best cooking results, leave the turntable
on. It can be turned off for large dishes. Press
TURNTABLE to turn the turntable on or off.
Sometimes the turntable can become too hot
to touch. Be careful touching the turntable
during and after cooking.
Display On/Off
To turn the clock display on or off, press and hold 0 for about 3 seconds. The Display On/Off
feature cannot be used while a cooking feature is in use.
0
Clock Display
Cancel
Off
Hold 3 Sec
Lock Controls
Turntable

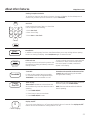
Microwave terms.
Arcing
Arcing is the microwave term for sparks in the
oven. Arcing is caused by:
0HWDORUIRLOWRXFKLQJWKHVLGHRIWKHRYHQ
)RLOWKDWLVQRWPROGHGWRIRRGXSWXUQHG
edges act like antennas).
0HWDOVXFKDVWZLVWWLHVSRXOWU\SLQVJROG
rimmed dishes.
5HF\FOHGSDSHUWRZHOVFRQWDLQLQJVPDOO
metal pieces.
Covering
Covers hold in moisture, allow for more even
heating and reduce cooking time.
Venting plastic wrap or covering with wax
paper allows excess steam to escape.
Shielding
In a regular oven, you shield chicken breasts
or baked foods to prevent over-browning.
When microwaving, you use small strips of foil
to shield thin parts, such as the tips of wings
and legs on poultry, which would cook before
larger parts.
Standing
Time
When you cook with regular ovens, foods such
as roasts or cakes are allowed to stand to
finish cooking or to set.
Standing time is especially important in
microwave cooking. Note that a microwaved
cake is not placed on a cooling rack.
Venting
After covering a dish with plastic wrap, you
vent the plastic wrap by turning back one
corner so excess steam can escape.
24
Page is loading ...
Page is loading ...
Page is loading ...
Page is loading ...
Page is loading ...
Page is loading ...
Page is loading ...
Page is loading ...
Page is loading ...
Page is loading ...
Page is loading ...
Page is loading ...
Page is loading ...
Page is loading ...
Page is loading ...
Page is loading ...
Page is loading ...
Page is loading ...
Page is loading ...
Page is loading ...
Page is loading ...
Page is loading ...
Page is loading ...
Page is loading ...
Page is loading ...
Page is loading ...
Page is loading ...
Page is loading ...
-
 1
1
-
 2
2
-
 3
3
-
 4
4
-
 5
5
-
 6
6
-
 7
7
-
 8
8
-
 9
9
-
 10
10
-
 11
11
-
 12
12
-
 13
13
-
 14
14
-
 15
15
-
 16
16
-
 17
17
-
 18
18
-
 19
19
-
 20
20
-
 21
21
-
 22
22
-
 23
23
-
 24
24
-
 25
25
-
 26
26
-
 27
27
-
 28
28
-
 29
29
-
 30
30
-
 31
31
-
 32
32
-
 33
33
-
 34
34
-
 35
35
-
 36
36
-
 37
37
-
 38
38
-
 39
39
-
 40
40
-
 41
41
-
 42
42
-
 43
43
-
 44
44
-
 45
45
-
 46
46
-
 47
47
-
 48
48
-
 49
49
-
 50
50
-
 51
51
-
 52
52


Ask a question and I''ll find the answer in the document
Finding information in a document is now easier with AI
in other languages
Related papers
Other documents
-
Hotpoint RVM5160DHBB Owner's manual
-
 GE Monogram ZEM115SJSS GE Use and Care Manual
-
Hotpoint RVM5160RHSS Owner's manual
-
-
Sears 91147699100 Owner's manual
-
GE Appliances JNM7196DKWW Owner's manual
-
GE Profile PVM9179DKBB Owner's manual
-
Yes CVM521P2MS1 User manual
-
Danby DOM161KBLSDD User manual
-
Danby DOM16A1SDB Installation guide
