RVS 360-MO inView 360 Degree HD Around Vehicle Monitoring System User manual

Category
Security cameras
Type
User manual

RVS 360-MO inView 360 Degree HD Around Vehicle Monitoring System offers you a comprehensive view of your vehicle's surroundings, enhancing safety and convenience during driving. With its 4 high-resolution fish-eye cameras, you can eliminate blind spots and see everything around your vehicle in real-time. Seamlessly switch between different camera views using the user-friendly remote control or the intuitive touchscreen interface of the 10-inch or 7-inch monitor.

RVS 360-MO inView 360 Degree HD Around Vehicle Monitoring System offers you a comprehensive view of your vehicle's surroundings, enhancing safety and convenience during driving. With its 4 high-resolution fish-eye cameras, you can eliminate blind spots and see everything around your vehicle in real-time. Seamlessly switch between different camera views using the user-friendly remote control or the intuitive touchscreen interface of the 10-inch or 7-inch monitor.

inView 360° HD Quick-Install System
Instruction Manual
© Rear View Safety 2023
RVS-360-MO
2
Rear View Safety, 1797 Atlantic Ave., Brooklyn NY 11233
800.764.1028 [email protected]
www.rearviewsafety.com
Introduction ...................................................................................................3
In The Box ......................................................................................................3
Safety Information ......................................................................................4
Precautions ....................................................................................................5
Maintenance .................................................................................................8
2. Connection Diagram .............................................................................9
3. Technical Specifications .......................................................................10
4. Operation Instruction .............................................................................11
4.1 Remote Controller .................................................................................11
4.2 User Interface .......................................................................................12
Warranty ......................................................................................................30
Disclaimer ....................................................................................................31
TABLE OF CONTENTS
Rear View Safety, 1797 Atlantic Ave., Brooklyn NY 11233
800.764.1028 [email protected]
www.rearviewsafety.com 3
IN THE BOX
Congratulations on purchasing the inView 360° HD Quick-Install System with
5-minute calibration!
With this manual you will be able to properly install and operate the unit.
The system should not be used as a substitute for the standard rear view mirror
or for any other mirror that exists in your vehicle.
In some jurisdictions, it is unlawful for a person to drive a motor vehicle equipped
with a TV viewer or screen located in front of the driver’s seat or in any location
that is visible, directly or indirectly, to the driver while operating the vehicle.
Please read all of the installation instructions
carefully before installing the product. Improper
installation will void manufacturer’s warranty.
1 x monitor w/ built-in harness
4 x 190° sh-eye cameras
1 x 34-button remote control
1 x U-bracket for the monitor
4 x screws for U-bracket mount
1 x center mount bracket for monitor
1 x sun shield
1 x monitor power and camera harness
1 x 360 monitor operation manual
4 x camera extension cable
8 x cross countersunk self-tapping
self-drilling screw
8 x camera screw covers
4 x camera enclosures
4 x camera installation template
INTRODUCTION
4
Rear View Safety, 1797 Atlantic Ave., Brooklyn NY 11233
800.764.1028 [email protected]
www.rearviewsafety.com
SAFETY INFORMATION
USAGE : The Rear View Camera System is designed to help the driver safely
detect people and/or objects helping to avoid damage or injury. However, you
the driver, must use it properly. Use of this system is not a substitute for safe,
proper or legal driving.
Never back up while looking at the monitor alone. You should always check
behind and around the vehicle when backing up, in the same way as you would
if the vehicle did not have the Rear View Camera System. If you back up while
looking only at the monitor, you may cause damage or injury. Always back up
slowly.
The Rear View Camera System is not intended for use during extensive back-
up maneuvers or backing into cross trac or pedestrian walkways.
Please, always remember, the area displayed by the Rear View Camera System
is limited. It does not display the entire panorama that is behind you.
PLEASE READ THE ENTIRE MANUAL AND FOLLOW THE INSTRUCTIONS
AND WARNINGS CAREFULLY. FAILURE TO DO SO CAN CAUSE SERIOUS
DAMAGE AND/OR INJURY, INCLUDING LOSS OF LIFE. BE SURE TO OBEY ALL
APPLICABLE LOCAL TRAFFIC AND MOTOR VEHICLE REGULATIONS AS IT
PERTAINS TO THIS PRODUCT. IMPROPER INSTALLATION WILL VOID
MANUFACTURER’S WARRANTY.
Rear View Safety, 1797 Atlantic Ave., Brooklyn NY 11233
800.764.1028 [email protected]
www.rearviewsafety.com 5
PRECAUTIONS
INSTALLATION
Electric shock or product malfunction may occur if this product
is installed incorrectly.
Use this product within the voltage range specified. Failure to do so can
cause electronic shock or product malfunction.
Take special care when cleaning the monitor.
Make sure to firmly ax the product before use.
If smoke or a burning smell is detected, disconnect the system immediately.
Where the power cable may touch a metal case, cover the cable with a
friction tape. A short circuit or disconnected wire may cause a fire.
While installing the RVS System be careful with the wire positioning in
order to avoid wire damage.
The RVS System should only be used when the vehicle is in reverse.
Do not watch movies or operate the monitor while driving; as it may cause
an accident.
Do not install the monitor where it may obstruct drivers view or obstruct an
air bag device.
Dropping the unit may cause possible mechanical failure.
When in reverse, monitor buttons are not functional
6
Rear View Safety, 1797 Atlantic Ave., Brooklyn NY 11233
800.764.1028 [email protected]
www.rearviewsafety.com
IN NO EVENT SHALL SELLER OR MANUFACTURER BE
LIABLE FOR ANY DIRECT OR CONSEQUENTIAL DAMAGES OF
ANY NATURE, OR LOSSES OR EXPENSES RESULTING FROM
ANY DEFECTIVE PRODUCT OR THE USE OF ANY PRODUCT.
If you have questions about this product,
please contact us at:
800.764.1028 sales@rearviewsafety.com
www.rearviewsafety.com
New York
1797 Atlantic Ave
Brooklyn, NY 11233
Indiana
319 Roske Dr.
Elkhart, Indiana 46516
Canada
68 Trafalgar Square
Thornhill, ON, L4J 7M5, Canada
Rear View Safety, 1797 Atlantic Ave., Brooklyn NY 11233
800.764.1028 [email protected]
www.rearviewsafety.com 7
PRECAUTIONS
Storage and Keeping
Operating Precautions
1. Do not expose the System to excessive heat or cold. The storage temperature of this
device is -30~+80°C, and the operating temperature is -20~+70°C. The humidity is RH90%.
2. Never use this device near a bathtub, wash basin, kitchen, damp basement, swimming
pool or similar places.
3. Never use this device in environments with excessive moisture, dust or smoke.
4. Avoid dropping or striking this device.
5. Avoid using this device in enclosed spaces, areas with excessive vibration or subject to
severe impacts.
6. Never puncture, scratch or use abrasive cleaning materials on this device.
7. Do not place cables where they may be pinched or stepped on.
8. The Monitor is not designed to be waterproof.
1. The device may be powered by a 12 or 24 volt automotive battery or vehicle
electrical system.
2. Make sure all cables are connected properly. Observe polarity. Improper cable
connections may damage the system. Remove the power cable connections when
you do not intend to use the unit.
1. The opening of the case should be by professionals.
2. Do not watch the video while driving unless you are monitoring
the rear view camera display.
8
Rear View Safety, 1797 Atlantic Ave., Brooklyn NY 11233
800.764.1028 [email protected]
www.rearviewsafety.com
1. Remove all the cable connections from the control box before cleaning the device.
2. Use a mild household detergent and clean the unit with a slightly damp, soft cloth.
3. Never use strong solvents such as thinner or benzine, as they might damage the finish
of the device.
This symbol is intended to alert the user to the presence of uninsulated
"dangerous voltage" within the product's enclosure that may be of sucient
magnitude to constitute risk of electric shock to persons.
This symbol is intended to alert the user to the presence of important
operating and maintenance (servicing) instructions in the literature
accompanying the appliance.
This symbol is intended to alert the user not to dispose
of electrical and electronic equipment.
CAUTION
Any changes or modifications not expressly approved in this manual could void your
warranty and necessitate expensive repairs.
MAINTENANCE
Rear View Safety, 1797 Atlantic Ave., Brooklyn NY 11233
800.764.1028 [email protected]
www.rearviewsafety.com 9
2. CONNECTION DIAGRAM
1. White 4P male - Left Camera and trigger
2. Blue 4P male - Right Camera and trigger
3. Green 4P male - Front Camera, Trigger is Full Screen
4. Brown 4P male - Rear Camera and Trigger (Grid Lines)
5. Single red wire to power wire of DC: 10-32V.
6. Single black wire to GND.
7. Single white wire to positive power wire of Left Camera.
8. Single blue wire to positive power wire of Right Camera.
9. Single green wire to positive power wire of Front Camera.
10. Single brown wire to positive power wire of Rear Camera.
11. Single yellow wire for reservation.
12. USB Female for USB mouse.
10
Rear View Safety, 1797 Atlantic Ave., Brooklyn NY 11233
800.764.1028 [email protected]
www.rearviewsafety.com
3. TECHNICAL SPECIFICATIONS
Monitor
Input video Max.4CH×720P@25/720P@30
Display style 2D and 3D
High definition output 720P
Refresh Rate 50/60
Working Voltage 8-32V
Working voltage range for external
trigger signals 8-32V
Working electric current <2A/12V
Working temperature range -20°C-70°C
Storage Temperature -40°C ~85°C
Working Humidity 10%-95%
10" Monitor Dimensions 10.5"x6.2"
7" Monitor Dimensions 7.5"x4.375"
Camera
Enclosure Die-cast aluminum ADC12 with a 304 stainless steel
bracket; IP69K-rated
Dimensions 52 x 42 x 40 mm; 2.0 x 1.7 x 1.6 in (approximate)
Sensor 2.9 mega-pixel CMOS
Voltage 12VDC @65 mA
Focal Length 2.8mm
Field of View (FOV) 130º (V) x 190º (H) - 170º Diagonal
SNR >80dB
Rear View Safety, 1797 Atlantic Ave., Brooklyn NY 11233
800.764.1028 [email protected]
www.rearviewsafety.com 11
4. OPERATION INSTRUCTION
4.1 REMOTE CONTROLLER
ENTER: Enter main menu or confirm menu
selection.
ESC: Exit main menu interface/return to main
menu interface.
LEFT, RIGHT: Left,Right /Minus, Plus button.
Shift image channel to left/right view, or
operate plus/minus in main menu interface.
UP, DOWN: Front/Back button. Shift image
channel to front/back view.
SHIFT: Same function as Tab button to shift
to quad display or exit from quad display. It's
used for switching menu selection in main
menu interface.
POWER: Turn on/o video output.
Number buttons 0-9: (0-9)Input numbers.
CLEAR: Back space button: Delete a character.
MULTI: Full screen function
12
Rear View Safety, 1797 Atlantic Ave., Brooklyn NY 11233
800.764.1028 [email protected]
www.rearviewsafety.com
4.2 USER INTERFACE
4.2.1. Log in Interface
5.2.2. Password reset
Password (factory default is 88888888)
confirm to log in
reset password
exit
current password
save setting
new password
confirm password
Rear View Safety, 1797 Atlantic Ave., Brooklyn NY 11233
800.764.1028 [email protected]
www.rearviewsafety.com 13
4.2.3. User main interface
User Setup: user settings, to set up: Basic Setup, Display, Trigger, ADAS Setup (N/A),
Radar, Screen Setup.
Storage: storage management, can check the SD storage and log file management
(Currently there is no video recording function, this interface is only used for customers to
format the SD card through USB)
AVM: Calibration File, Vehicle Type, Surround View and Outrigger
Information: Software version information and upgrading
14
Rear View Safety, 1797 Atlantic Ave., Brooklyn NY 11233
800.764.1028 [email protected]
www.rearviewsafety.com
4.2.3.1 User Setup Interface
Description: All user setting functions
Basic Setup: Basic settings
Display: Display mode settings
Trigger: Trigger line setting interface
Adas Setup: Intelligence assistance setting (N/A)
Radar: Radar setting interface
Screen Setup: Screen setting
Rear View Safety, 1797 Atlantic Ave., Brooklyn NY 11233
800.764.1028 [email protected]
www.rearviewsafety.com 15
Display Icon: hide display icons on main interface except direction arrows).
Language: Temporarily only English is available.
1) Basic Setup: basic settings interface, as shown below
16
Rear View Safety, 1797 Atlantic Ave., Brooklyn NY 11233
800.764.1028 [email protected]
www.rearviewsafety.com
Blending Region: blending overlapping ON/OFF.
Instant Rear View: Toggle On/O, the default is ON. When set to OFF, the boot mode is
to display the boot logo and then display the panorama screen. When it is set to ON, the
single view will appear after booting for 3 seconds, and then the panoramic image will be
displayed, requiring the back single view to be a mirror image.
Display Direction: Unavailable
Grid Lines: The back single view cursor switch configuration, the default is OFF. When
set to ON, the back single view displays the cursor; when set to OFF, the back single view
does not display the cursor.
Default View: the default display mode can be Dual + Left, Dual + Right, Dual + Front,
Dual +Back, and Quad.
2) Display: select display mode, as shown below
3D option available
Rear View Safety, 1797 Atlantic Ave., Brooklyn NY 11233
800.764.1028 [email protected]
www.rearviewsafety.com 17
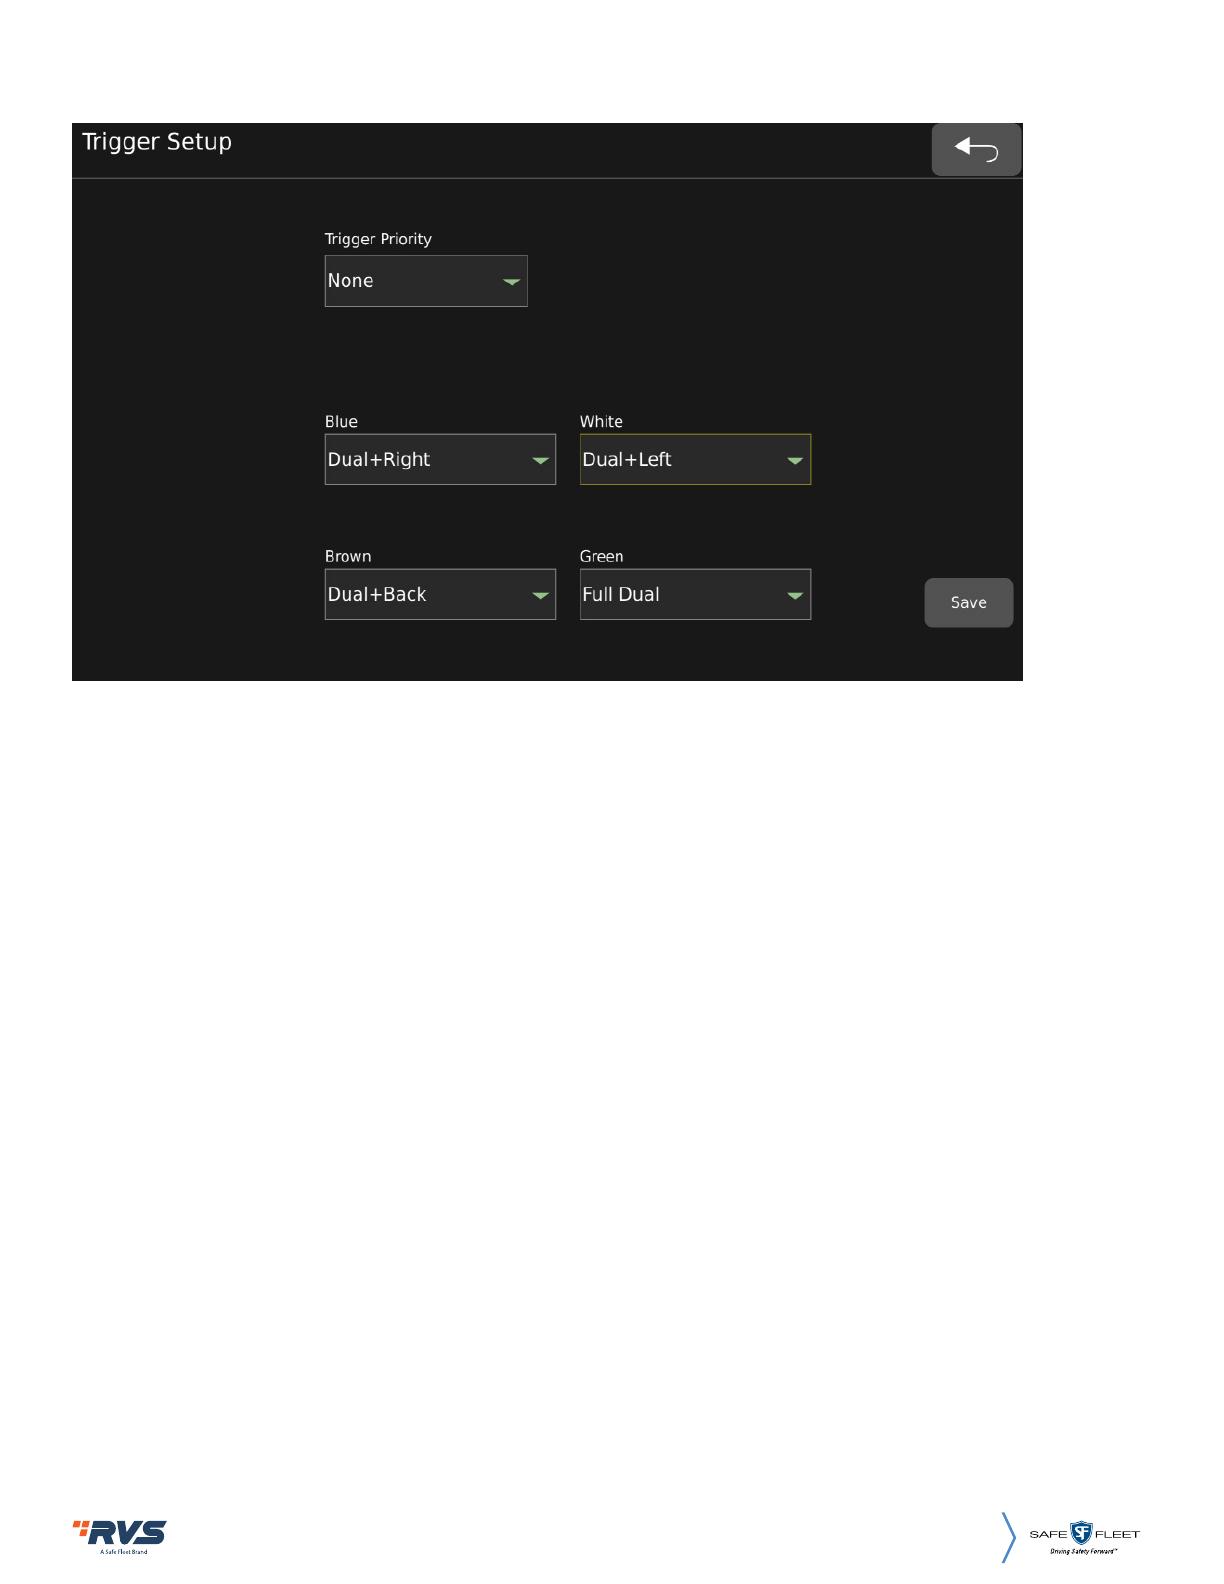
Trigger Priority: Trigger priority, default value is None. When set to None: Panorama will
display the first triggered view. For example, when the rear line (Brown line) is triggered,
the rear view camera is displayed in a panoramic view. At this time, if the left road (White
line) is also triggered, the back road camera is still displayed in the panorama. The left
side camera will not be displayed until the back road trigger is completed. When set to
Brown: When the rear trigger line is triggered, the panorama will always display the rear
camera view. If the current other road is triggered, and the rear camera is triggered at the
same time, and the panorama will give priority to displaying the rear camera picture. Set
to White/Blue/Green in the same way.
Blue: After the Blue line is triggered, the configuration of the screen display eect is
Dual+Right by default. Configurable: Dual+Left, Dual +Right, Dual +Front, Dual +Back,
Single Left, Single Right, Single Front, Single Back, Quad, Full Dual.
White: After the white line is triggered, the configuration of the screen display eect, the
default is Dual+Left. Configurable: Same as above.
Brown: After the brown line is triggered, the configuration of the screen display eect,
the default is Dual+Back. Configurable: Same as above.
Green: After the green line is triggered, the configuration of the screen display eect, the
default is Full Dual. Configurable: Same as above.
3) Trigger: The trigger line setting interface
18
Rear View Safety, 1797 Atlantic Ave., Brooklyn NY 11233
800.764.1028 [email protected]
www.rearviewsafety.com
Detect Switch: On and O setup
4) ADAS Setup: ADAS assistance Setup (N/A)
5) Radar setup interface (Radar/Sensors sold separately)
Category: Radar configuration. When set to OFF, the radar is not available;when set to
Ultrasonic, it can work with Ultronix sensor. (Note: 77GHz 2T4R are currently unavailable)
Unit: Default value of unit parameter setting is Meter. Meter / Inch selectable.
NOTE: The trigger delay is 3s. When a trigger is disconnected, wait for 3s before returning to the default interface.
Exit button
Enter radar sensor
setup interface
Rear View Safety, 1797 Atlantic Ave., Brooklyn NY 11233
800.764.1028 [email protected]
www.rearviewsafety.com 19
Trigger Control: Trigger control setting, the default is ON. When it is set to ON, the sensor
will respond when back line is been triggered;
When the trigger control is o, the radar response is not controlled by the trigger line.
Speed Control: Speed control setting, the default is OFF. When set to ON, if the current
vehicle speed is lower than the configured speed value, the radar responds; if the current
vehicle speed is higher than the configured speed value, the radar does not respond.
When set to OFF, the radar function is not controlled by vehicle speed.
Location: the installation position configuration of radar sensor, user can select sensors S1-S6.
Sensor ID: Sensor ID setting, OFF / S1-S6 selectable.
Danger: Dangerous distance setting.
Warning: Warning distance setting.
Setup: Save the setting parameters (Notice: Click setup button to save the update each time
after finished parameters of each sensor).
Reset: Reset radar parameters.
1. When an object within 0.5m is detected, the display keeps beeping.
2 The sound on the display is dierent when the radar icon is red or yellow
20
Rear View Safety, 1797 Atlantic Ave., Brooklyn NY 11233
800.764.1028 [email protected]
www.rearviewsafety.com
Volume: set screen volume (Notice: not available now).
Dimmer setup: set screen brightness, user can select Low, Mid (Middle) , High and Auto.
When set to Auto, monitor will turn on auto back-light function, which is, screen will turn
bright in bright environments (Day mode) and turn dark in dim circumstances (Night mode).
6) Screen Setup: screen parameters setup
5.2.3.2 Storage management, as shown below:
Storage management, only support 1 USB drives now, support log files exporting.
SD Card Usage: SD storage management
format USB drive
  • Page 1 1
  • Page 2 2
  • Page 3 3
  • Page 4 4
  • Page 5 5
  • Page 6 6
  • Page 7 7
  • Page 8 8
  • Page 9 9
  • Page 10 10
  • Page 11 11
  • Page 12 12
  • Page 13 13
  • Page 14 14
  • Page 15 15
  • Page 16 16
  • Page 17 17
  • Page 18 18
  • Page 19 19
  • Page 20 20
  • Page 21 21
  • Page 22 22
  • Page 23 23
  • Page 24 24
  • Page 25 25
  • Page 26 26
  • Page 27 27
  • Page 28 28
  • Page 29 29
  • Page 30 30

RVS 360-MO inView 360 Degree HD Around Vehicle Monitoring System User manual

Category
Security cameras
Type
User manual

RVS 360-MO inView 360 Degree HD Around Vehicle Monitoring System offers you a comprehensive view of your vehicle's surroundings, enhancing safety and convenience during driving. With its 4 high-resolution fish-eye cameras, you can eliminate blind spots and see everything around your vehicle in real-time. Seamlessly switch between different camera views using the user-friendly remote control or the intuitive touchscreen interface of the 10-inch or 7-inch monitor.

Ask a question and I''ll find the answer in the document

Finding information in a document is now easier with AI