2
SUSSEX
INFO & INSTALL GUIDES
CONCEPTS
sussextaps.com.au
5.0 litres per
minute
Licence No. 0124
In accordance with AS/NZS 6400
Sussex Taps Pty Ltd
WATER RATING
www.waterrating.gov.au
The more
stars the more
water efcient
AS/NZS 3718:2005
LIC. 20081
Calibre
INFORMATION SHEET
Calibre Basin Mixer
Product code: CBM
160
80
100
40
35
48
sussextaps.com.au
5.0 litres per
minute
Licence No. 0124
In accordance with AS/NZS 6400
Sussex Taps Pty Ltd
WATER RATING
www.waterrating.gov.au
The more
stars the more
water efcient
AS/NZS 3718:2005
LIC. 20081
Calibre
Calibre Basin Mixer
Product code: Available options:
CBM Basin Mixer
CEBM Extended Basin Mixer
INSTALLATION GUIDE
PLUMBER NOTE
- On-site testing using higher water pressures must be
conducted with the Mixer in the closed position.
(STATIC TEST )
- Under no circumstances is the Mixer to be opened
when exceeding the maximum stated water pressure.
- At the completion of testing, do not relieve any high
water pressure by operating the Mixer.
- Exposing the internals of the Mixer Cartridge to higher
than specified water pressures will void the
manufacturers warranty.
INSTALLATION GUIDELINES
- The Mixer is supplied assembled, only the Fixing nut
and the Clamp need to be removed.
- After removing the mentioned parts, lower the Mixer
on to the mounting surface and fit the Flexible Hoses.
- In some cases the Flexible Hoses may need to be fed
through from under the mounting surface and then
attached. (Tighten using appropriate spanner)
- After securing the Flexible Hoses, fit Clamp and attach
the Fixing Nut from underneath.
- Before fully securing the Mixer ensure that the Base O
Ring is intact and the Mixer is properly centered over
the mounting surface hole.
- The Mixer mounting surface must be completely sealed
and water-tight.
- The 1/2” Fittings of the Flexible Hoses have a conical
seal, ensure that the matching threads are cut square
and burr free.
- Prior to connecting the Flexible Hoses, ensure all
pipework is thoroughly flushed and ensure pipework is
free of any dirt or debri.
- Isolating Stop Valves are recommended with all
installations. (not supplied)
- Connect the Flexible Hoses to Hot and Cold pipework
fittings, ensure the Hoses do not kink or become
twisted when tightening.
- Check all fittings and connections are secure and
water-tight.
BASE
O-RING
CLAMP
Hole Size
32-35mm
50mm Max.
Bench thickness
1/2" BSP Fittings
with conical Seals
FLEXIBLE HOSES
FIXING
NUT
Product code
Calibre
CWBMS150RH Wall basin mixer outlet system 150mm RH
CWBMS200RH Wall basin mixer outlet system 200mm RH
Wall basin mixer outlet system RH Rough-in
Plumber note
Pipe connections
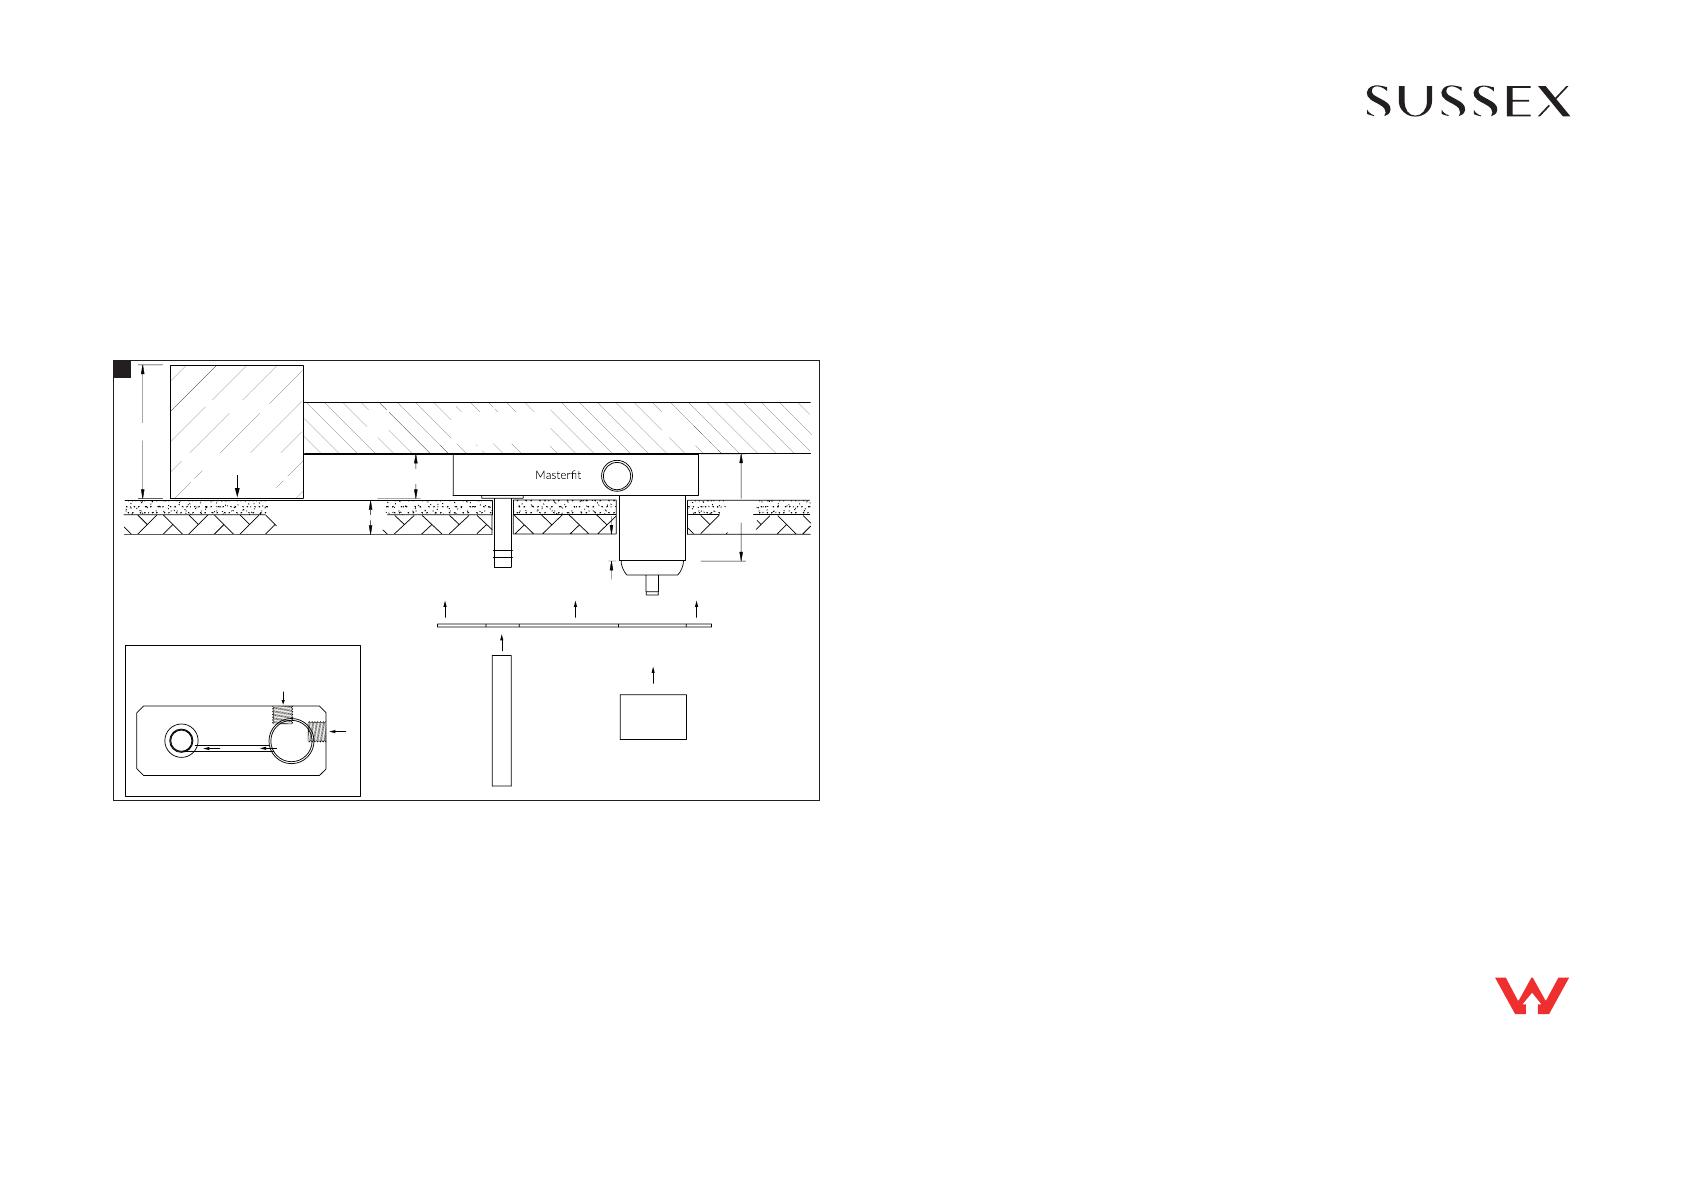
Rough in plumbing
- Prior to installing, calculate the finished wall thickness, maximum is 30mm thick, contact manufacturer for
further options.
- If Wall thickness is greater than 30mm, contact manufacturer for further options.
- Prepare a Nogging to be fixed parallel between the Wall Studs.
- The Nogging must be fitted to enable the base of the Masterfit to be 30-32mm back from the Stud Face.
- The Masterfit will be marked “This side Up” to indicate orientation.
- Using the screws (x4) provided, mount the Masterfit to the Nogging. Ensure the Masterfit is level and square.
- On-site high pressure line testing must be conducted with the Mixer in the closed position. (STATIC TEST ONLY)
- Under no circumstances is the Mixer to be opened when exceeding the maximum stated water pressure.
- At the completion of the testing, do not relieve any high pressure by opening the Mixer.
- Exposing the internals of the Mixer Cartridge to higher than specified water pressures, will void the
manufacturer’s warranty.
- The Hot and Cold ports are marked on the Masterfit. (Mixers have individual Hot/Cold inlet ports).
- Flush all water feed lines. All lines must be free from any dirt and debris before connecting to the Masterfit.
- Connect Hot and Cold lines to the corresponding 1/2” BSP ports of the Masterfit. (see Drawing)
- Do not remove any factory fitted pressure plugs or Fixings.
- Once all water connections are made, check Hot/Cold water flow by operating the Mixer Cartridge.
- Check all fittings and fixtures for leaks.
- Leave the Mixer(s) in the closed position and replace the Mixer protective cover.
- Store the Dress Kit in a safe place until required (see Dress Finishing Guide)
1
Vi ew f ro m ab ov e
NOGGING
Back Plate
Handle
Body
30-32mm
Wall Covering
Max. 30mm
90
70
Mixer
Stud face
Min.
8mm
This
side
UP
Outlet
Hot
Cold
Mixer Outlet
Pipe Connections
Outlet
Fitting
Tapware is to be installed by a Licensed Plumber in accordance with AS/NZS 3500:2003
Recommended working water pressure 300-500 kpa. Maximum water temperature is 65 deg.c
Copyright © Sussex Taps.sussextaps.com.au


